MongoDB
Add Prisma ORM to an existing TypeScript project with MongoDB and learn database introspection and querying.
MongoDB is a popular document-based NoSQL database known for its flexibility, scalability, and developer-friendly features. In this guide, you will learn how to add Prisma ORM to an existing TypeScript project, connect it to MongoDB, introspect your existing database schema, and start querying with type-safe Prisma Client.
MongoDB support for Prisma ORM v7 is coming in the near future. In the meantime, please use Prisma ORM v6.19 (the latest v6 release) when working with MongoDB.
This guide uses Prisma ORM v6.19 to ensure full compatibility with MongoDB.
If you're migrating to Prisma ORM from Mongoose, see our Migrate from Mongoose guide.
Prerequisites
In order to successfully complete this guide, you need:
- Node.js installed on your machine (see system requirements for officially supported versions)
- An existing TypeScript project with a
package.jsonfile - Access to a MongoDB 4.2+ server with a replica set deployment. We recommend using MongoDB Atlas.
The MongoDB database connector uses transactions to support nested writes. Transactions requires a replica set deployment. The easiest way to deploy a replica set is with Atlas. It's free to get started.
Make sure you have your database connection URL (that includes your authentication credentials) at hand!
If your project contains multiple directories with package.json files (e.g., frontend, backend, etc.), note that Prisma ORM is specifically designed for use in the API/backend layer. To set up Prisma, navigate to the appropriate backend directory containing the relevant package.json file and configure Prisma there.
1. Set up Prisma ORM
Navigate to your existing project directory and install the required dependencies:
npm install prisma@6.19 @types/node --save-devnpm install @prisma/client@6.19 dotenvHere's what each package does:
prisma- The Prisma CLI for running commands likeprisma init,prisma db pull, andprisma generate@prisma/client- The Prisma Client library for querying your databasedotenv- Loads environment variables from your.envfile
This is the latest stable version of Prisma ORM v6 that fully supports MongoDB. MongoDB support for Prisma ORM v7 is coming soon.
You can also install prisma@6 and @prisma/client@6 to automatically get the latest v6 release.
2. Initialize Prisma ORM
Set up your Prisma ORM project by creating your Prisma Schema file with the following command:
npx prisma init --datasource-provider mongodb --output ../generated/prismaThis command does a few things:
- Creates a
prisma/directory with aschema.prismafile containing your database connection configuration - Creates a
.envfile in the root directory for environment variables - Creates a
prisma.config.tsfile for Prisma configuration
The generated prisma.config.ts file looks like this:
import { defineConfig, env } from "prisma/config";

export default defineConfig({
  schema: "prisma/schema.prisma",
  migrations: {
    path: "prisma/migrations",
  },
  engine: "classic",
  datasource: {
    url: env("DATABASE_URL"),
  },
});
Add dotenv to prisma.config.ts so that Prisma can load environment variables from your .env file:
import "dotenv/config";
import { defineConfig, env } from "prisma/config";

export default defineConfig({
  schema: "prisma/schema.prisma",
  migrations: {
    path: "prisma/migrations",
  },
  engine: "classic",
  datasource: {
    url: env("DATABASE_URL"),
  },
});
The generated schema uses the ESM-first prisma-client generator with a custom output path:
generator client {
  provider = "prisma-client"
  output   = "../generated/prisma"
}

datasource db {
  provider = "mongodb"
  url = env("DATABASE_URL")
}
3. Connect your database
Update the .env file with your MongoDB connection URL:
DATABASE_URL="mongodb+srv://username:password@cluster.mongodb.net/mydb"For MongoDB Atlas, the connection URL format is:
mongodb+srv://USERNAME:PASSWORD@CLUSTER.mongodb.net/DATABASESelf-hosted MongoDB connection URL format:
mongodb://USERNAME:PASSWORD@HOST:PORT/DATABASEConnection URL components:
USERNAME: Your database user namePASSWORD: Your database user passwordHOST: The host wheremongodormongosis runningPORT: The port where your database server is running (typically27017)DATABASE: The name of your database
For MongoDB Atlas, you can manually append the database name to the connection URL, as Atlas doesn't include it by default.
Troubleshooting connection issues
Error in connector: SCRAM failure: Authentication failed.
If you see the Error in connector: SCRAM failure: Authentication failed. error message, you can specify the source database for the authentication by adding ?authSource=admin to the end of the connection string.
Raw query failed. Error code 8000 (AtlasError): empty database name not allowed.
If you see the Raw query failed. Code: unknown. Message: Kind: Command failed: Error code 8000 (AtlasError): empty database name not allowed. error message, be sure to append the database name to the database URL. You can find more info in this GitHub issue.
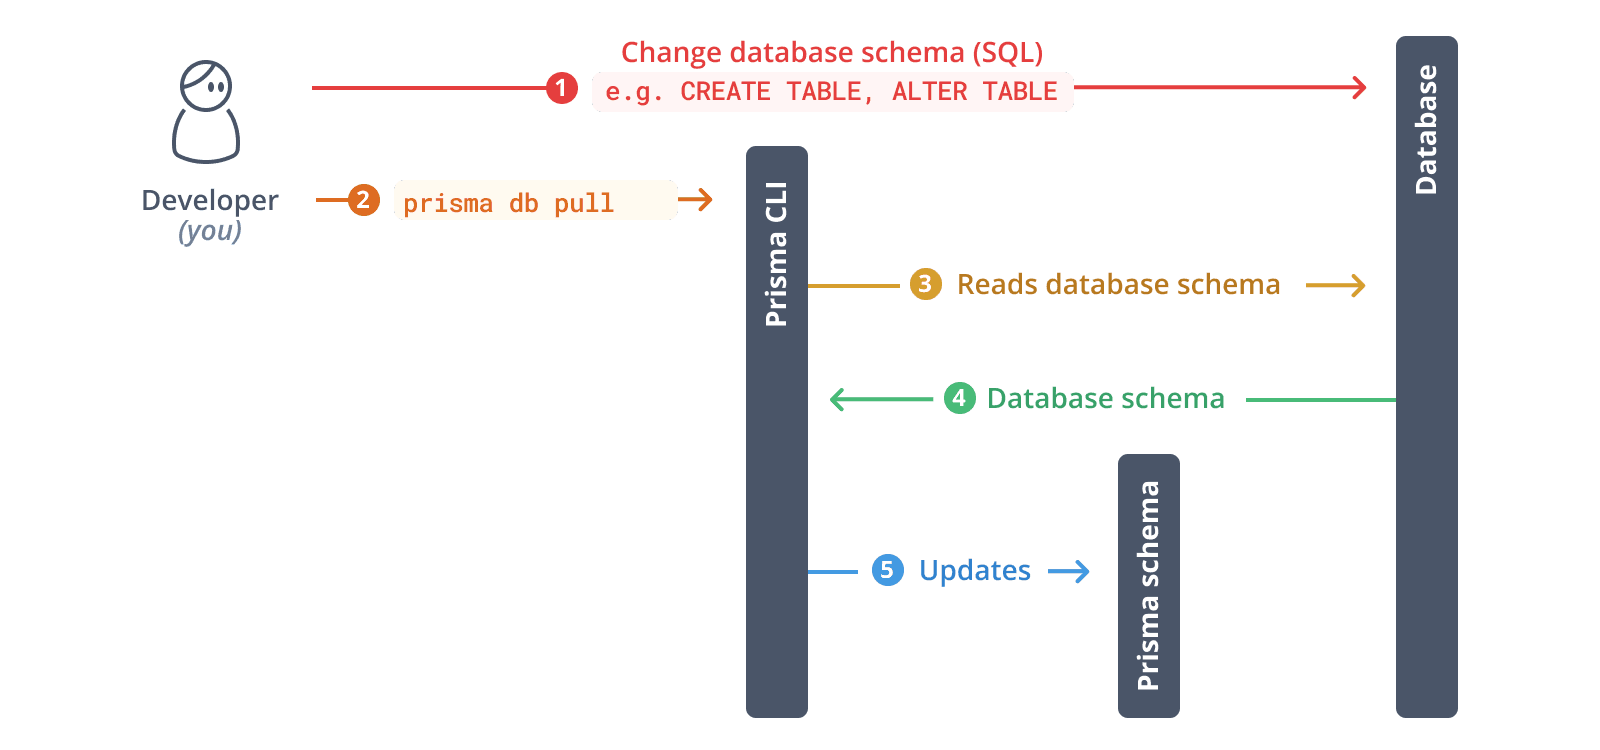
4. Introspect your database
Run the following command to introspect your existing database:
npx prisma db pullThis command:
- Reads the
DATABASE_URLfrom your.envfile - Connects to your MongoDB database
- Samples documents in your collections to infer the schema
- Generates Prisma models in your
schema.prismafile
MongoDB introspection limitations: Prisma introspects MongoDB by sampling documents. You may need to manually:
- Add relation fields using the
@relationattribute - Adjust field types if the sampling didn't capture all variations
- Add indexes and constraints not detected during introspection
5. Generate Prisma ORM types
Generate Prisma Client based on your introspected schema:
npx prisma generateThis creates a type-safe Prisma Client tailored to your database schema in the generated/prisma directory.
6. Instantiate Prisma Client
Create a utility file to instantiate Prisma Client:
import "dotenv/config";
import { PrismaClient } from "../generated/prisma/client";

const prisma = new PrismaClient();

export { prisma };
7. Query your database
Now you can use Prisma Client to query your database. Create a script.ts file:
import { prisma } from "./lib/prisma";

async function main() {
  // Example: Fetch all records from a collection
  // Replace 'user' with your actual model name
  const allUsers = await prisma.user.findMany();
  console.log("All users:", JSON.stringify(allUsers, null, 2));
}

main()
  .then(async () => {
    await prisma.$disconnect();
  })
  .catch(async (e) => {
    console.error(e);
    await prisma.$disconnect();
    process.exit(1);
  });
Run the script:
npx tsx script.ts8. Evolve your schema
MongoDB doesn't support migrations like relational databases. Instead, use db push to sync schema changes:
8.1. Update your Prisma schema file
Modify your Prisma schema file with the changes you want. For example, add a new model:
model Post {
  id        String   @id @default(auto()) @map("_id") @db.ObjectId
  title     String
  content   String?
  published Boolean  @default(false)
  authorId  String   @db.ObjectId
  author    User     @relation(fields: [authorId], references: [id])
}

model User {
  id    String @id @default(auto()) @map("_id") @db.ObjectId
  email String @unique
  name  String?
  posts Post[]
}
In MongoDB, the id field is mapped to _id and uses @db.ObjectId type. Relations use String type with @db.ObjectId annotation.
8.2. Push the changes to your database
npx prisma db pushThis command:
- Applies schema changes to your MongoDB database
- Automatically regenerates Prisma Client
db push instead of migrations?MongoDB uses a flexible schema model. Prisma Migrate (which creates migration files) is not supported for MongoDB. Always use prisma db push to sync your schema changes.
9. Explore your data
You can use MongoDB Atlas, the MongoDB shell, or MongoDB Compass to view and manage your data.
Prisma Studio does not currently support MongoDB. Support may be added in a future release. See Databases supported by Prisma Studio for more information.