PlanetScale
Add Prisma ORM to an existing TypeScript project with PlanetScale MySQL and learn database introspection and querying.
PlanetScale is a serverless database platform. This guide covers PlanetScale MySQL, which is built on Vitess and offers database branching, non-blocking schema changes, and automatic backups. In this guide, you will learn how to add Prisma ORM to an existing TypeScript project, connect it to PlanetScale MySQL, introspect your existing database schema, and start querying with type-safe Prisma Client.
PlanetScale also offers PostgreSQL databases. If you're using PlanetScale PostgreSQL, follow the Add to existing PostgreSQL project guide instead.
Prerequisites
1. Set up Prisma ORM
Navigate to your existing project directory and install the required dependencies:
npm install prisma @types/node --save-devnpm install @prisma/client @prisma/adapter-planetscale undici dotenvHere's what each package does:
prisma- The Prisma CLI for running commands likeprisma init,prisma db pull, andprisma generate@prisma/client- The Prisma Client library for querying your database@prisma/adapter-planetscale- The PlanetScale driver adapter that connects Prisma Client to your databaseundici- A fast HTTP/1.1 client required by the PlanetScale adapterdotenv- Loads environment variables from your.envfile
2. Initialize Prisma ORM
Set up your Prisma ORM project by creating your Prisma Schema file with the following command:
npx prisma init --datasource-provider mysql --output ../generated/prismaThis command does a few things:
- Creates a
prisma/directory with aschema.prismafile containing your database connection configuration - Creates a
.envfile in the root directory for environment variables - Creates a
prisma.config.tsfile for Prisma configuration
The generated prisma.config.ts file looks like this:
import "dotenv/config";
import { defineConfig, env } from "prisma/config";

export default defineConfig({
  schema: "prisma/schema.prisma",
  migrations: {
    path: "prisma/migrations",
  },
  datasource: {
    url: env("DATABASE_URL"),
  },
});
The generated schema uses the ESM-first prisma-client generator with a custom output path:
generator client {
  provider = "prisma-client"
  output   = "../generated/prisma"
}

datasource db {
  provider     = "mysql"
  relationMode = "prisma"
}
PlanetScale requires relationMode = "prisma" because it doesn't support foreign key constraints.
3. Connect your database
Update the .env file with your PlanetScale connection URL:
DATABASE_URL="mysql://username:password@host.connect.psdb.cloud/mydb?sslaccept=strict"You can find your connection string in the PlanetScale dashboard.
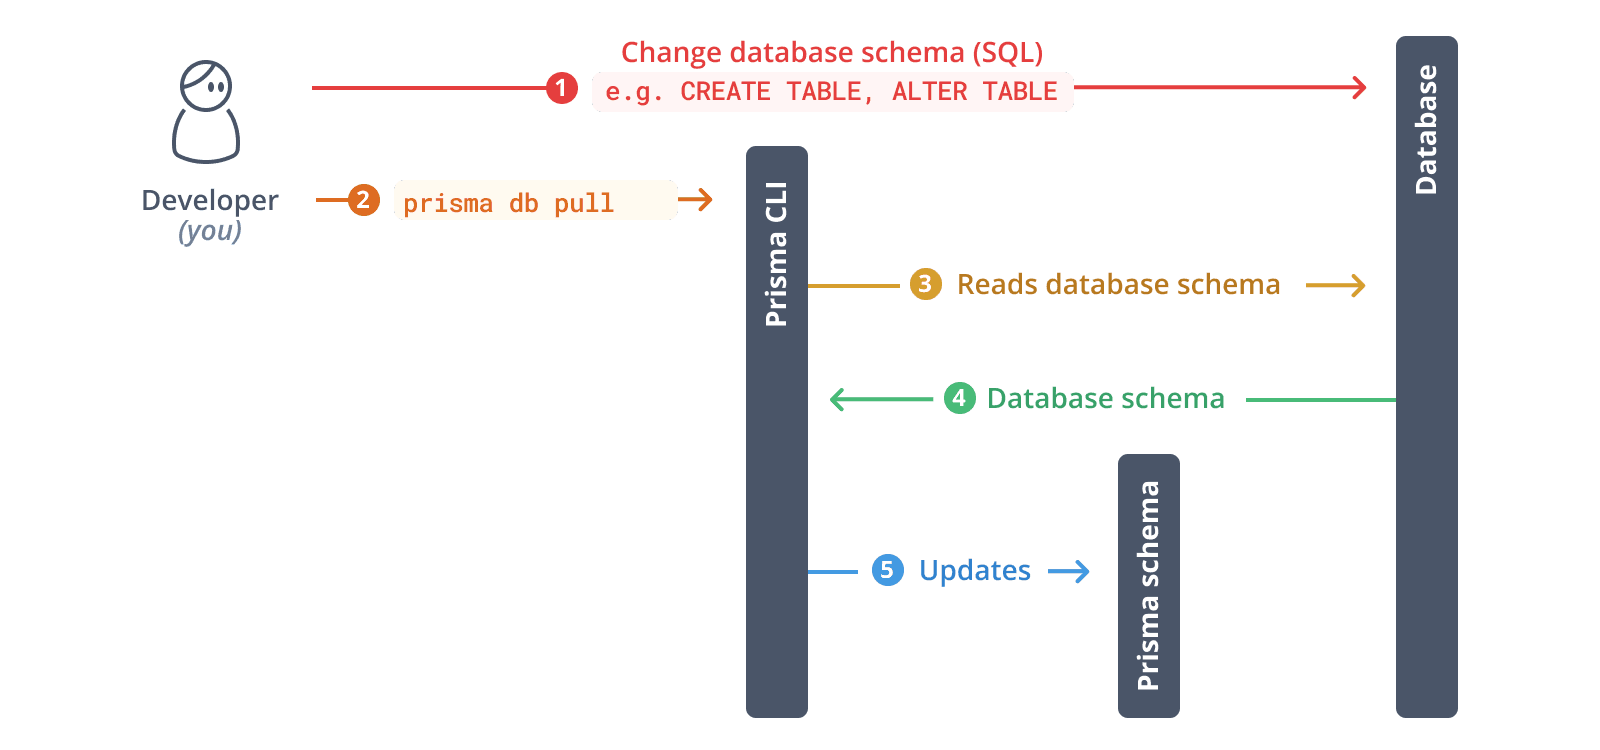
4. Introspect your database
Run the following command to introspect your existing database:
npx prisma db pullThis command reads the DATABASE_URL environment variable, connects to your database, and introspects the database schema. It then translates the database schema from SQL into a data model in your Prisma schema.
After introspection, your Prisma schema will contain models that represent your existing database tables.
5. Generate Prisma ORM types
Generate Prisma Client based on your introspected schema:
npx prisma generateThis creates a type-safe Prisma Client tailored to your database schema in the generated/prisma directory.
6. Instantiate Prisma Client
Create a utility file to instantiate Prisma Client. You need to pass an instance of Prisma ORM's driver adapter to the PrismaClient constructor:
import "dotenv/config";
import { PrismaPlanetScale } from "@prisma/adapter-planetscale";
import { PrismaClient } from "../generated/prisma/client";
import { fetch as undiciFetch } from "undici";

const adapter = new PrismaPlanetScale({ url: process.env.DATABASE_URL, fetch: undiciFetch });
const prisma = new PrismaClient({ adapter });

export { prisma };
7. Query your database
Now you can use Prisma Client to query your database. Create a script.ts file:
import { prisma } from "./lib/prisma";

async function main() {
  // Example: Fetch all records from a table
  // Replace 'user' with your actual model name
  const allUsers = await prisma.user.findMany();
  console.log("All users:", JSON.stringify(allUsers, null, 2));
}

main()
  .then(async () => {
    await prisma.$disconnect();
  })
  .catch(async (e) => {
    console.error(e);
    await prisma.$disconnect();
    process.exit(1);
  });
Run the script:
npx tsx script.ts8. Evolve your schema
PlanetScale uses a branching workflow instead of traditional migrations. To make changes to your database schema:
8.1. Update your Prisma schema file
Update your Prisma schema file to reflect the changes you want to make to your database schema. For example, add a new model:
model Post {
  id        Int      @id @default(autoincrement())
  title     String
  content   String?
  published Boolean  @default(false)
  authorId  Int
  author    User     @relation(fields: [authorId], references: [id])
}

model User {
  id    Int    @id @default(autoincrement())
  email String @unique
  name  String?
  posts Post[]
}
8.2. Push the changes to your development branch:
npx prisma db pushThis command will:
- Apply the schema changes to your PlanetScale database
- Regenerate Prisma Client
For production deployments, use PlanetScale's branching workflow to create deploy requests.