Full Stack Type Safety with Angular, Nest, Nx, and Prisma

TypeScript really shines when we can extend type safety to all parts of our stack. In this article, we'll look at how to apply type safety to every part of a full stack Angular and NestJS app, including database access. We'll see how to share types across the stack by using an Nx monorepo.
2020 was a great year for TypeScript. Usage surged, developers came to love the benefits of type safety, and the language saw adoption in many different settings.
While TypeScript might be fairly new to developers who mainly work with React, Vue, Svelte, and others, it has been around for quite some time for Angular developers. Angular (version 2+) was initially authored in 2015 and was done so using TypeScript. The Angular team made an early bet on type safety, encouraging developers to write their Angular apps in TypeScript as well, even though writing them in JavaScript was an option.
Many Angular developers were initially resistant. TypeScript wasn't very mature in 2015 and there was a steep learning curve. It was common to be slowed down by environment incompatabilities and bugs. All around, there was often a great deal of frustration.
Fast-forward to 2021 and Angular developers have been enormously successful using TypeScript. Teams have benefited greatly from type safety over the years.
While type safety for Angular applications is nothing new, it's less common for Angular developers who work across the full stack. Frameworks like NestJS have made it easy to use TypeScript in a Node environment, but one spot that has continued to lack is at the database. Several tools now exist for acheiving type-safe database access, Prisma being one of them.
In this article, we'll look at how we can use the types generated by Prisma to apply type safety to all parts of an Angular and Nest ecommerce application. We'll work in an Nx monorepo so that we can easily import type across the whole stack. Let's get started!
Check out the code for the project on GitHub.
Create an Nx Workspace
One of the easiest ways to share types between a front end and backend project is to house everything under a monorepo. Nx Dev Tools (created by Nrwl) makes working with monorepos simple. Nx stipulates a set of conventions that, when followed, allow for simplicity when maintaining multiple applications under a single repository.
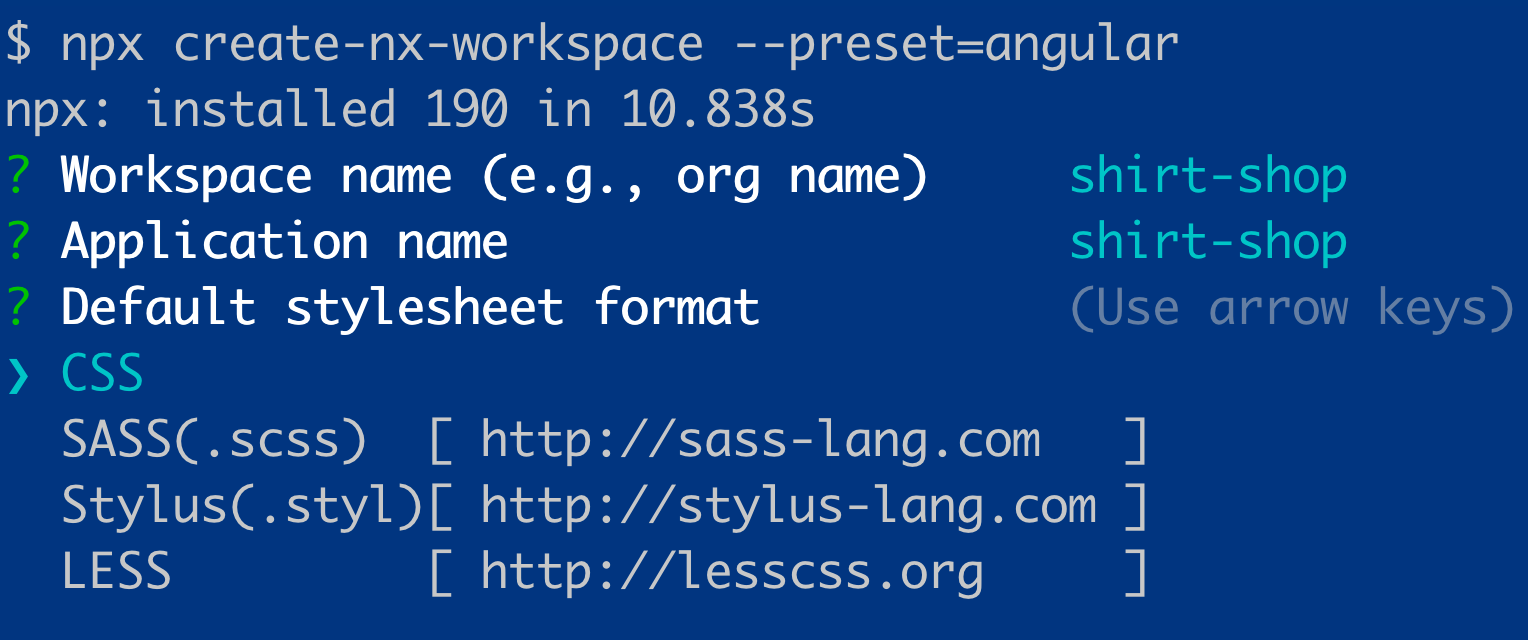
Let's start by creating an Nx workspace for our project. We'll use the create-nx-workspace command to do so.
In a terminal window, create a workspace with a preset of angular.
npx create-nx-workspace --preset=angularAn interactive prompt takes us through the setup process. Select a name for the workspace and application and then continue through the prompts.
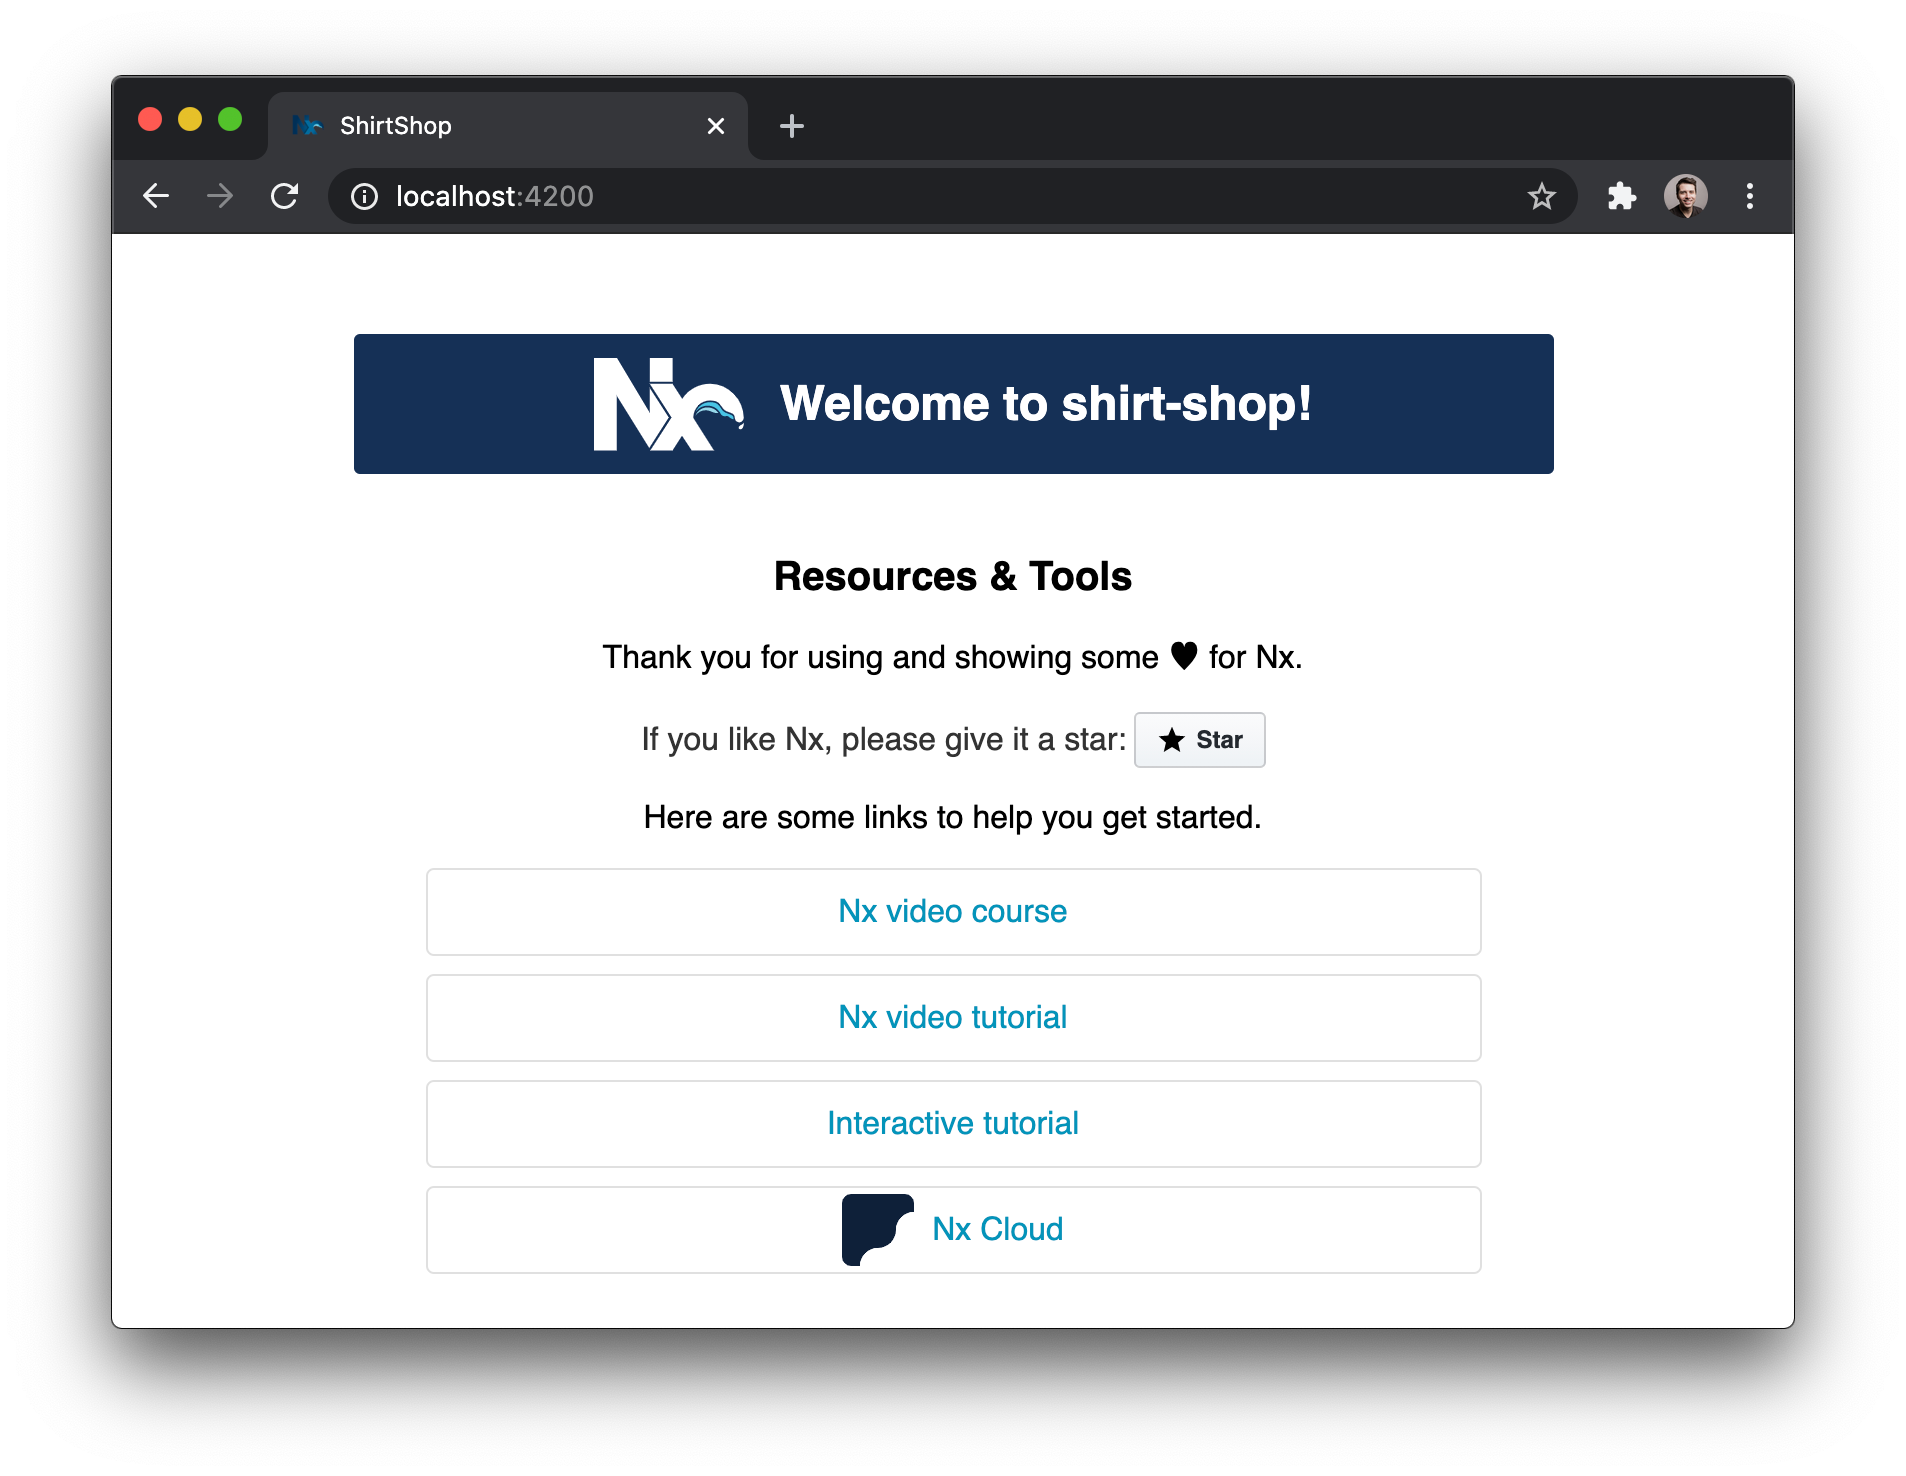
Once Nx finishes wiring up the workspace, open it up and try running the Angular application.
npm startThis command will tell Nx to serve the Angular application that was created as the workspace initialized. After it compiles, open up localhost:4200 to make sure everything is working.
Add a NestJS Application
Our front end is ready to go but we haven't yet included a project for the backend. Let's add a NestJS project to the workspace.
To add our NestJS project, we first need to install the official NestJS plugin for Nx. In a new terminal window, grab the @nrwl/nx package from npm.
npm install -D @nrwl/nestAfter installation, use the plugin to generate a NestJS project within the workspace. Since we'll only have one backend project for this example, let's just name it "api".
nx generate @nrwl/nest:application apiOnce the generator finishes, we can see a new folder called api under the apps directory. This is where our NestJS app lives.
The default NestJS installation comes with a single endpoint which returns a "hello world" message. Let's start the API and make sure we can access the endpoint. To start the API, target the nx serve command directly at the NestJS app.
nx serve apiOnce the API is up and running, go to http://localhost:3333/api in the browser and make sure you can see the "hello world" message.
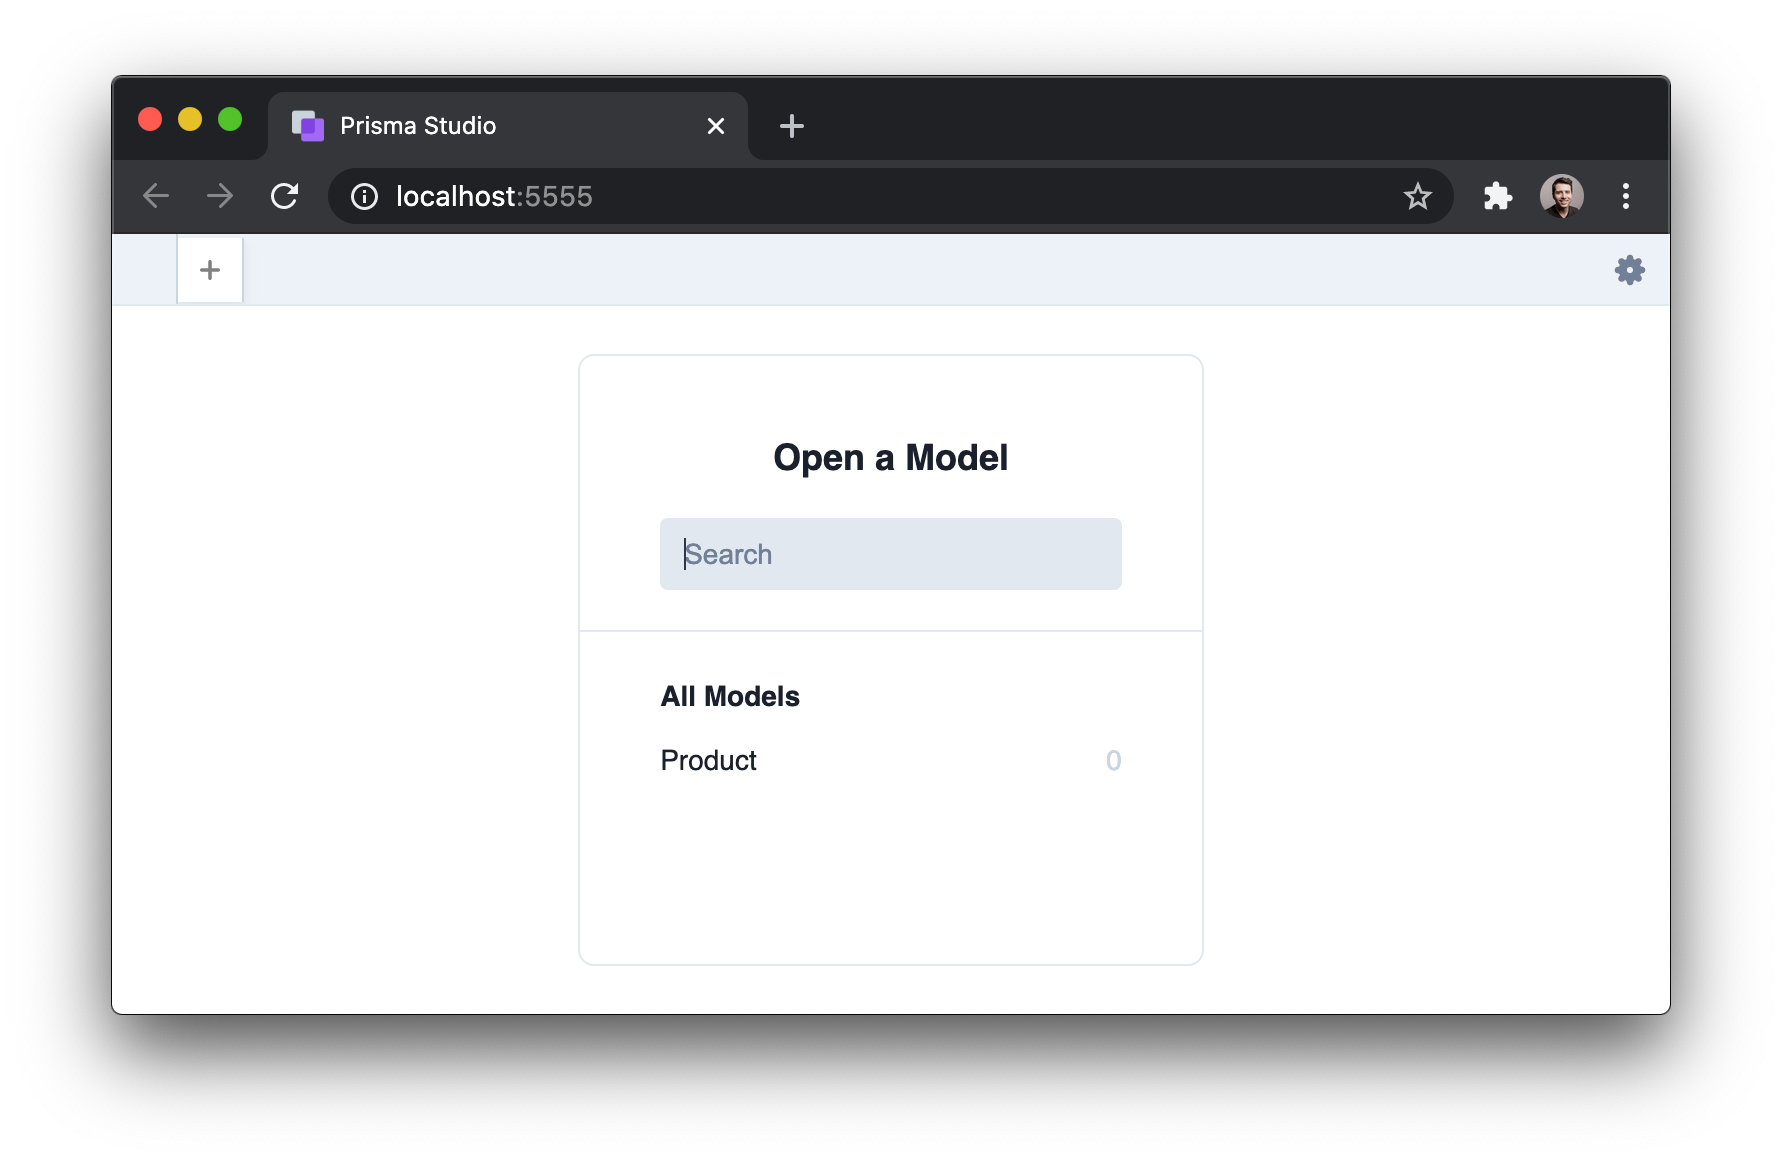
We can use Prisma Studio to add data to the database manually. This isn't a great approach if we have a lot of data to seed, but it's useful if we want to add a few records to test with.
Add as many rows as you like and input data for them. If you would like to work with the data seen in this article, you can grab it in this gist.
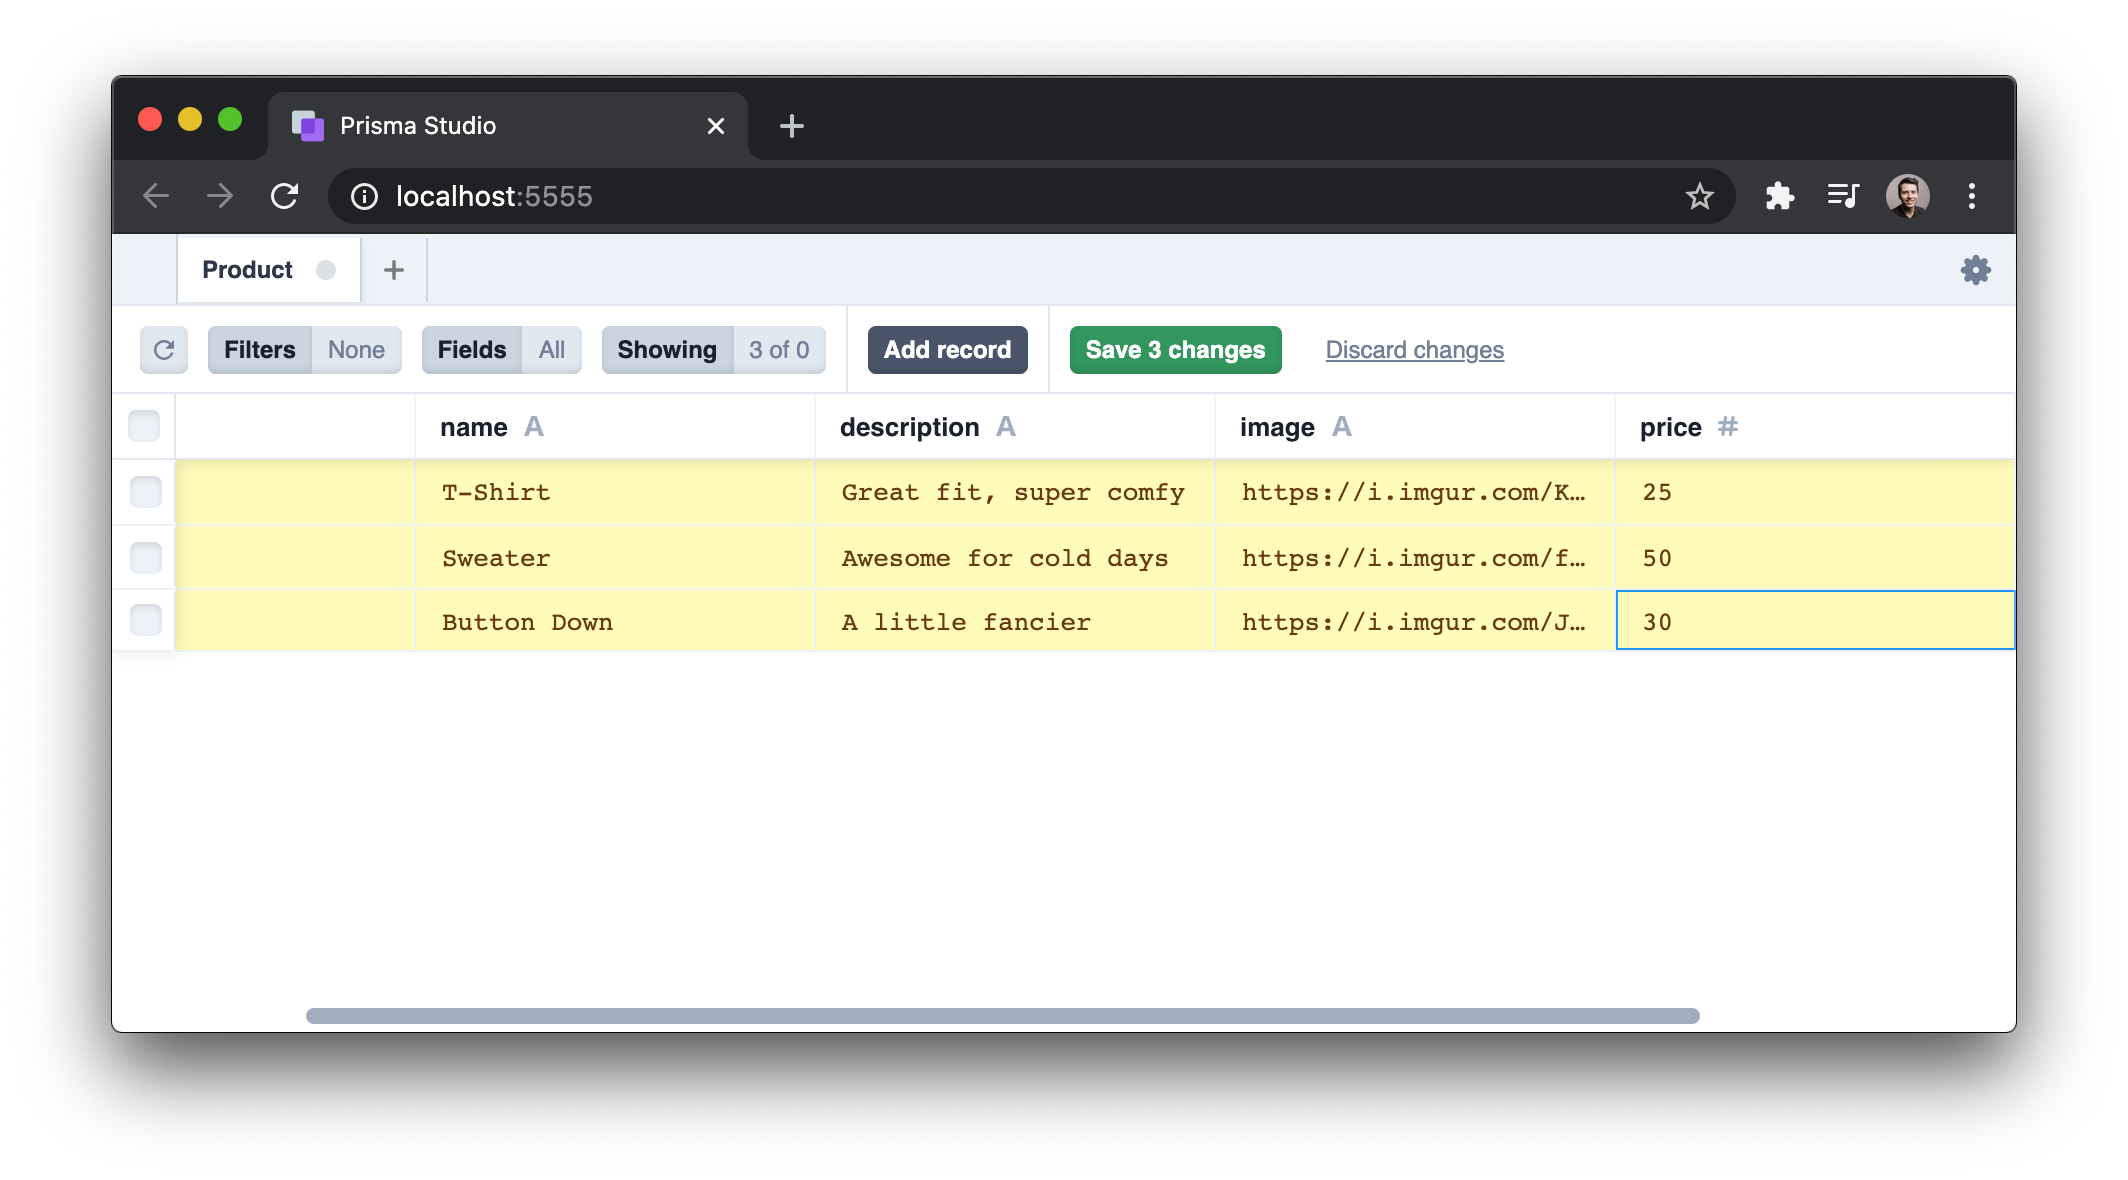
Next, save the changes. IDs for each row will automatically be generated.
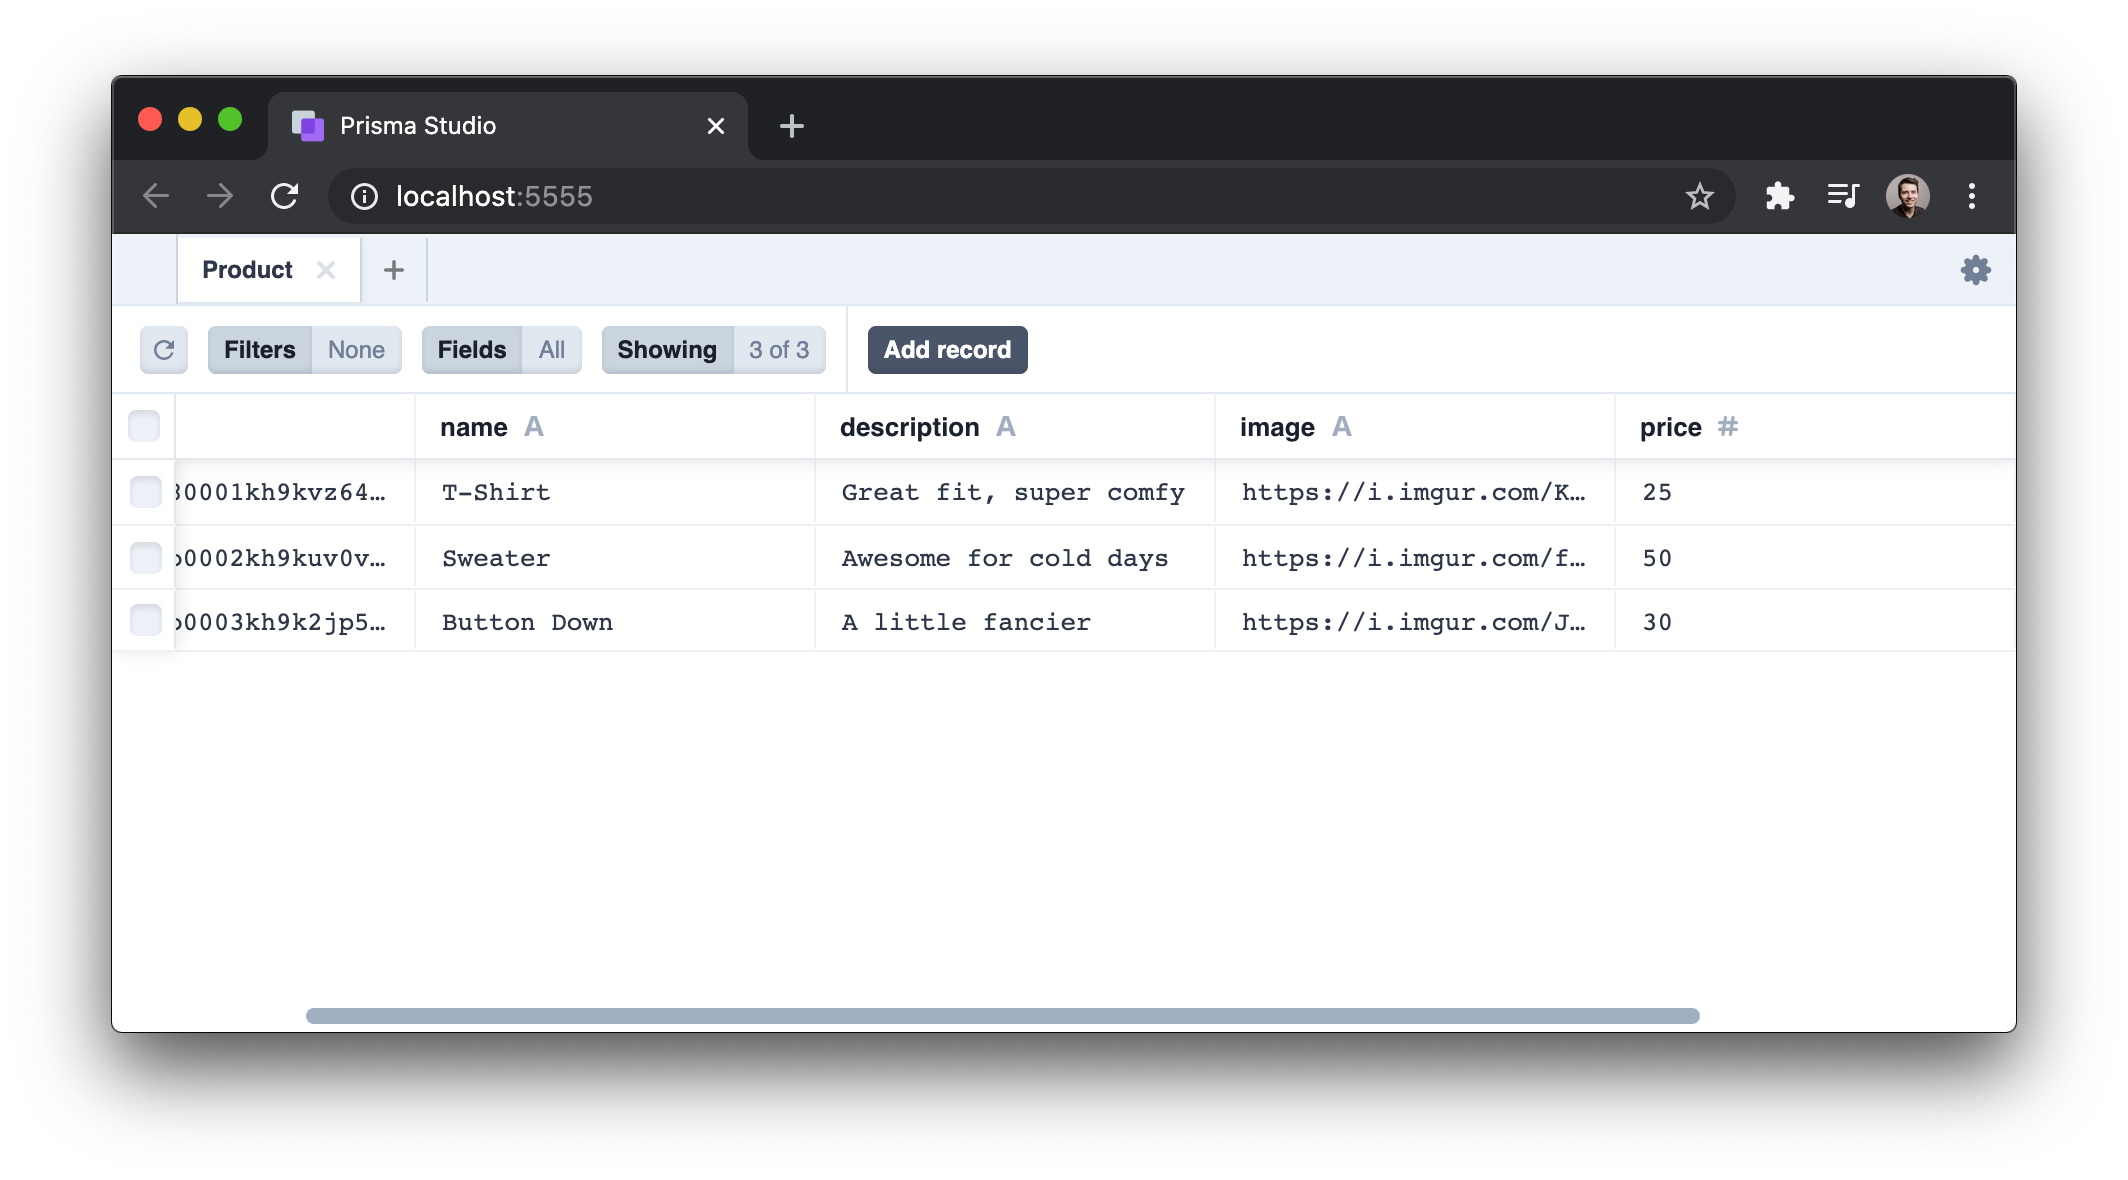
We now have all the pieces of our stack in place! We're ready to start writing some code to surface the data from the API and call for it from the Angular app.
Create a Products Controller for the API
The data in our database is ready to go. What we need now is an endpoint we can call to retreive it. To make this happen, we'll create a library for our NestJS controller and a service that we can reach into to expose an endpoint that responds to GET requests.
Use the NestJS Nx plugin to generate a new library called products. Include a controller and a service within.
nx generate @nrwl/nest:library products --controller --serviceWe'll create a method in the service to reach into our database to get the data. Then, in the controller, we'll expose a GET endpoint which uses the service to get that data and return it to the client.
Let's start by building out the database query within the service. This is the first spot we'll see Prisma's types really shine!
Within products.service.ts, import PrismaClient, create an instance of it, and expose a public method to query for the data.
// libs/products/src/lib/products.service.ts

import { Injectable } from '@nestjs/common'
import { PrismaClient, Product } from '@prisma/client'

const prisma = new PrismaClient()

@Injectable()
export class ProductService {
  public getProducts(): Promise<Product[]> {
    return prisma.product.findMany()
  }
}
We're importing two things from @prisma/client here: PrismaClient and Product.
PrismaClient is what we use to create an instance of our database client and it exposes methods and properties that are useful for querying the database.
The Product import is the TypeScript type that was generated for us by Prisma when we ran our database migrations. This type has the shape of our Product table and is useful for informing consumers of the getProducts method about what it can expect the returned data to look like.
Note: We're instantiating PrismaClient directly within our ProductsService file here. In a real world application, we should instead create a dedicated file for this instance. That way, we wouldn't need to instantiate it multiple times.
Let's now work within the controller to make a call to getProducts to fetch the data. Open up products.controller.ts and add a method which responds to GET requests.
// libs/products/src/lib/products.controller.ts

import { Controller, Get } from '@nestjs/common'
import { ProductsService } from './products.service'

@Controller('products')
export class ProductController {
  constructor(private productService: ProductsService) {}

  @Get()
  public getProducts() {
    return this.productService.getProducts()
  }
}
We've applied the getProducts method with the @Get decorator which means when we make a GET request to /products, the method will be run. The method itself reaches into the service to get the data.
Before we can test out this endpoint, we need to add ProductsController and ProductsService in the main module for the api.
Open up app.module.ts found within apps/api/src/app and import ProductsController and ProductsService. Then include them in the controllers and providers arrays respectively.
// apps/api/src/app/app.module.ts

import { Module } from '@nestjs/common'

import { AppController } from './app.controller'
import { AppService } from './app.service'
import { ProductsController, ProductsService } from '@shirt-shop/products'

@Module({
  imports: [],
  controllers: [AppController, ProductsController],
  providers: [AppService, ProductsService],
})
export class AppModule {}
Now head over to the browser and test it out by going to http://localhost:3333/api/products.
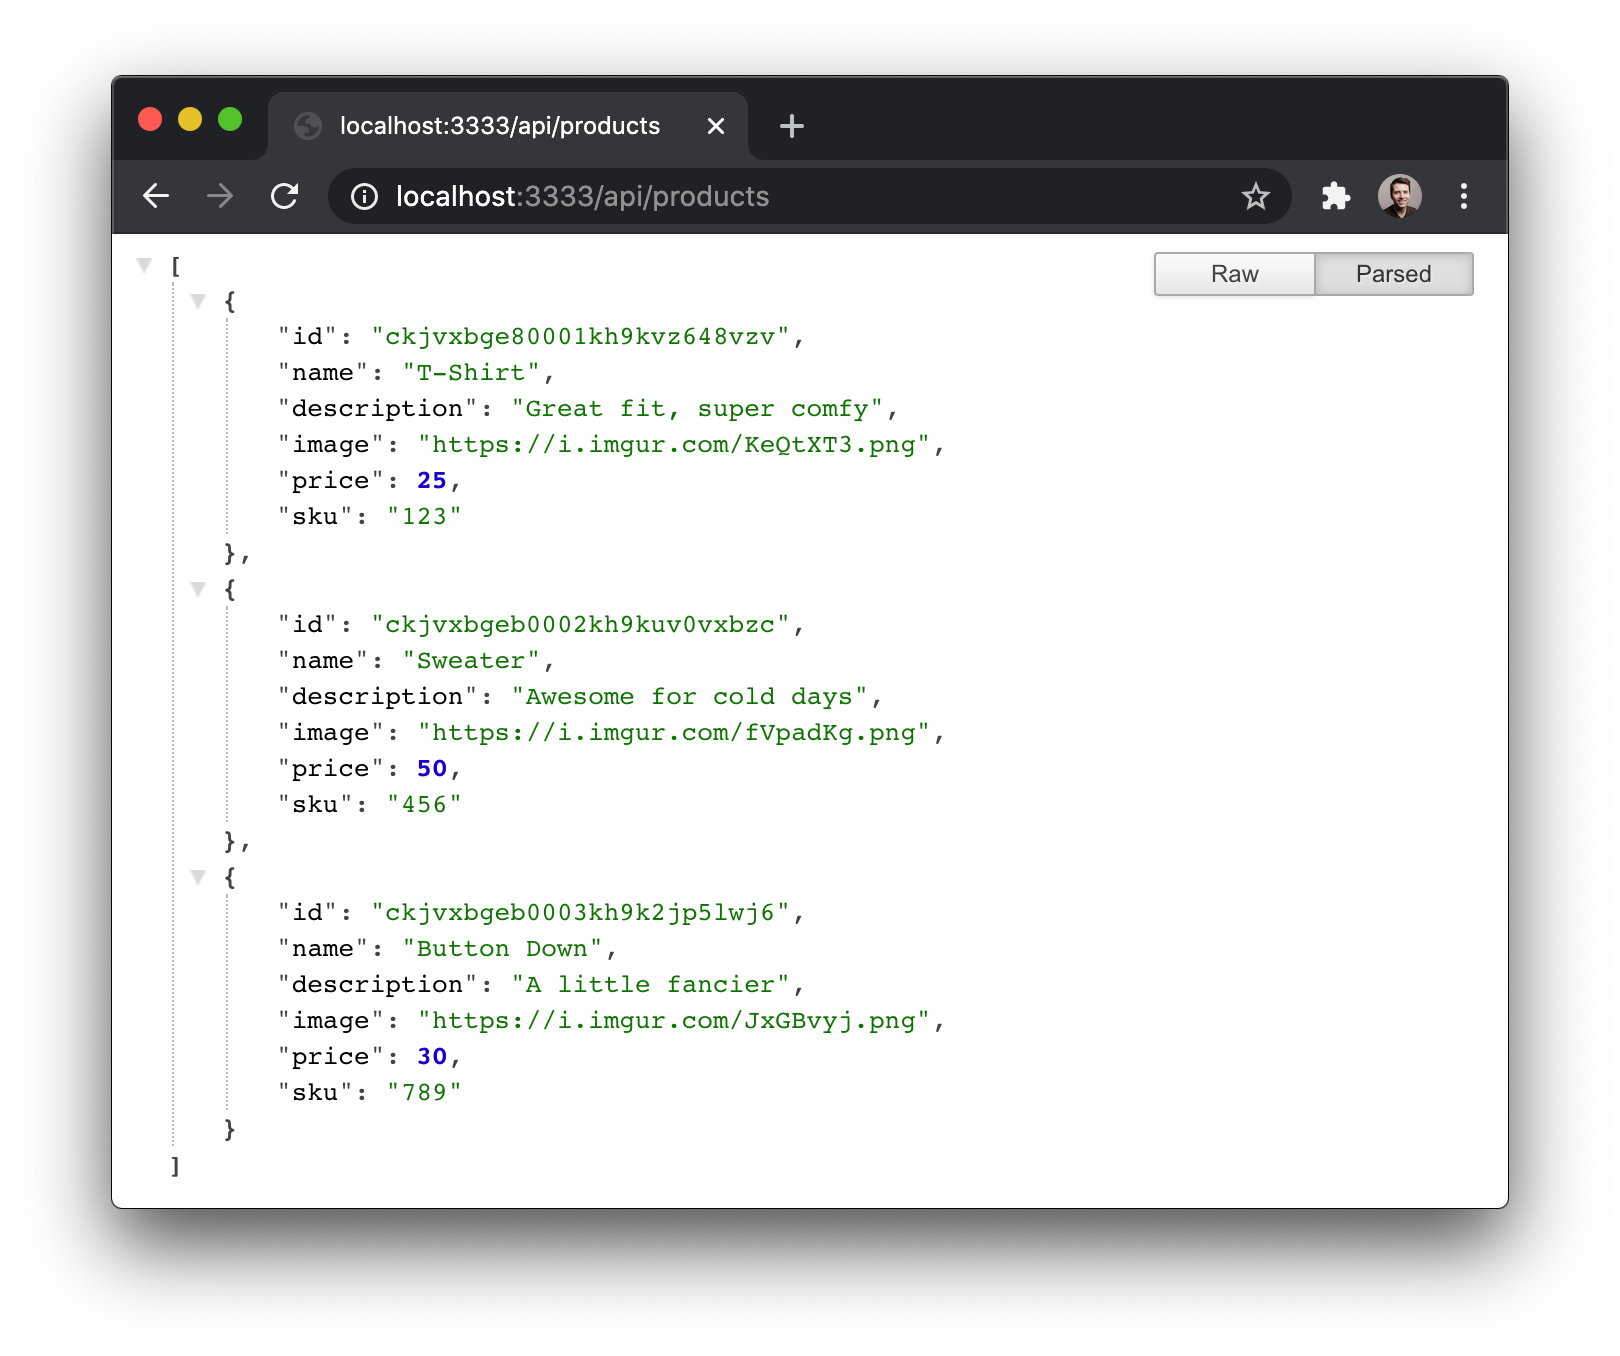
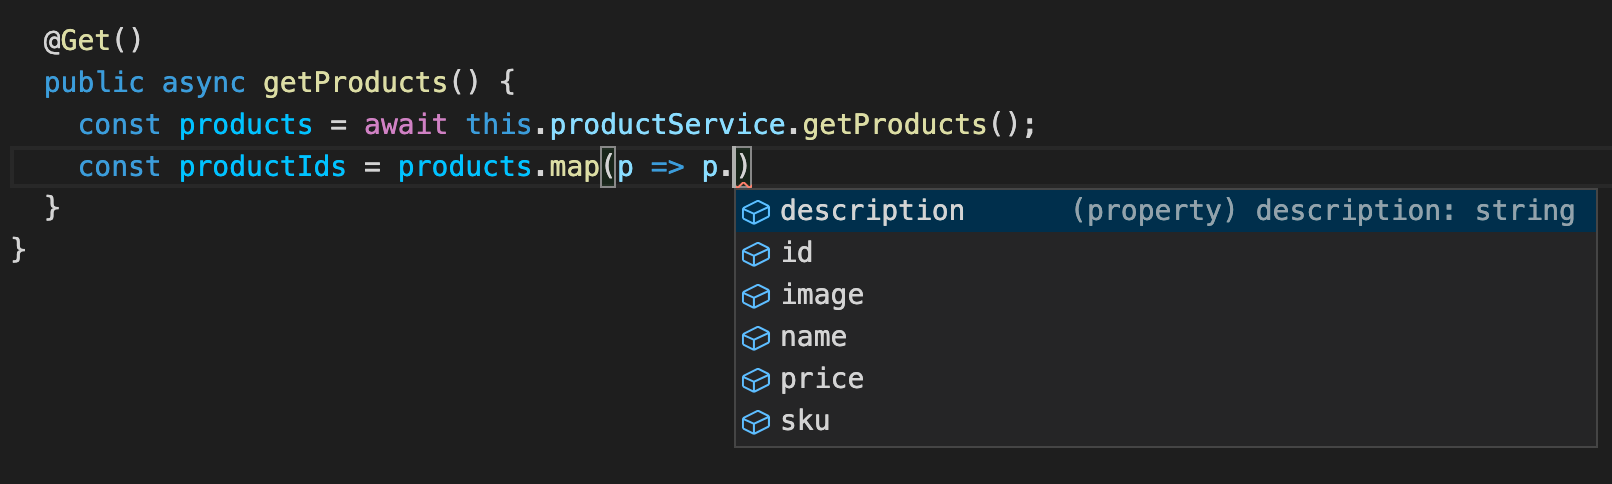
It may not be very apparent at this point, but our endpoint has a layer of type safety applied to it that can help us out if we need to manipulate and/or modify data before it is returned to the client. For example, if we need to map over our data and get access to its properties, we now have full autocompletion enabled when we do so. This occurs because we told the getProducts method in the ProductsService that the return type is a Promise that resolves with an array of type Product.
Now that we have the API working, let's wire up the Angular application to make a call for this data and display it!
Enable CORS
When we create our NestJS API, we have the option of setting up a proxy for our frontend applications such that both the front end and backend get served over the same port. This is useful for situations where we don't want to have separate domains for the two sides of the app.
Instead of setting up a proxy for this demo, we can instead enable CORS on the backend so that our front end can make calls to it. We won't need this until later, but let's get it set up and out of the way now.
Open up apps/api/src/main.ts and add a call to `app.enableCors();
// apps/api/src/main.ts

import { Logger } from '@nestjs/common'
import { NestFactory } from '@nestjs/core'

import { AppModule } from './app/app.module'

async function bootstrap() {
  const app = await NestFactory.create(AppModule)
  const globalPrefix = 'api'
  app.setGlobalPrefix(globalPrefix)
  app.enableCors()
  const port = process.env.PORT || 3333
  await app.listen(port, () => {
    Logger.log('Listening at http://localhost:' + port + '/' + globalPrefix)
  })
}

bootstrap()
Create a UI Module for the Angular App
We could just start building components directly within the shirt-shop app in our Nx workspace, but that would be against the advice that Nx gives about how to manage code in our monorepos. Instead, let's create a new module that will be dedicated to components that make up our UI.
Head over to the command line and create a new module. Follow the prompts to select the desired CSS variety.
nx generate @nrwl/angular:lib uiOnce the module is in place, we can create a component to list our products as well as a service to make the API call to get the data.
Let's start by generating a component.
nx g component products --project=ui --exportUsing the --project=ui flag tells Nx that we want to put this component in our newly-created ui module. We can see the result under /libs/ui/src/lib/products.
Let's now create a service.
nx g service product --project=ui --exportWith the new UiModule in place, we now need to add it to the imports array in our app.module.ts file for the frontend.
// apps/shirt-shop/src/app/app.module.ts

import { BrowserModule } from '@angular/platform-browser'
import { NgModule } from '@angular/core'

import { AppComponent } from './app.component'
import { UiModule } from '@shirt-shop/ui'

@NgModule({
  declarations: [AppComponent],
  imports: [BrowserModule, UiModule],
  providers: [],
  bootstrap: [AppComponent],
})
export class AppModule {}
Note: If you get any errors saying that @shirt-shop/ui cannot be found, try restarting the front end by stopping that process and running nx serve again.
Add an API Call to the Service
We'll use Angular's built-in HttpClientModule to get access to an HTTP client for making requests to the API. To get started, let's import the appropriate module. The place to do this is within the ui.module.ts file in our new UiModule.
// libs/ui/src/lib/ui.module.ts

import { NgModule } from '@angular/core'
import { CommonModule } from '@angular/common'
import { ProductsComponent } from './products/products.component'
import { HttpClientModule } from '@angular/common/http'

@NgModule({
  imports: [CommonModule, HttpClientModule],
  declarations: [ProductsComponent],
  exports: [ProductsComponent],
})
export class UiModule {}
We can now import Angular's HttpClient within our ProductService and make calls with it.
// libs/ui/src/lib/product.service.ts

import { HttpClient } from '@angular/common/http'
import { Injectable } from '@angular/core'
import { Product } from '@prisma/client'
import { Observable } from 'rxjs'

@Injectable({
  providedIn: 'root',
})
export class ProductService {
  private API_URL: string = 'http://localhost:3333/api'

  constructor(private readonly http: HttpClient) {}

  public getProducts(): Observable<Product[]> {
    {
      return this.http.get<Product[]>(`${this.API_URL}/products`)
    }
  }
}
Notice that we're using the same Product type that gets exported from @prisma/client here within our ProductService that was used on the backend in the ProductsController. This is a great illustration of how we can benefit from using the same types across our whole stack. When we use the getProducts method from this service, we'll now have type safety applied.
Build Out the Products Component
We're now ready to add some structure and style to our ProductsComponent so we can display the products to our users.
Let's start by adding some CSS that will style our component.
Open up libs/ui/src/lib/products/product.component.css and add the following styles:
/* libs/ui/src/lib/products/product.component.css */

:host {
  display: grid;
  gap: 40px;
  grid-template-columns: repeat(3, 33% [col-start]);
}

.product-card {
  box-shadow: 0 10px 15px -3px rgba(0, 0, 0, 0.1), 0 4px 6px -2px rgba(0, 0, 0, 0.05);
  background-color: #fff;
  border-radius: 15px;
  padding: 15px;
}

.product-card img {
  border-radius: 15px;
  max-width: 100%;
  height: 200px;
  display: block;
  margin: 0 auto;
}

.product-name {
  font-weight: bold;
  font-size: 22px;
}

.product-description {
  color: rgb(122, 122, 122);
}

.product-price {
  font-weight: bold;
  font-size: 24px;
}

.add-to-cart-button {
  background: rgb(49, 175, 255);
  background: linear-gradient(90deg, rgba(49, 175, 255, 1) 0%, rgba(0, 123, 252, 1) 100%);
  padding: 10px 20px;
  border-radius: 30px;
  border: none;
  color: rgb(219, 233, 248);
  cursor: pointer;
  box-shadow: 0 10px 15px -3px rgba(0, 0, 0, 0.1), 0 4px 6px -2px rgba(0, 0, 0, 0.05);
}
Next, open up libs/ui/src/lib/products/product.component.html and add the structure for products to be displayed..
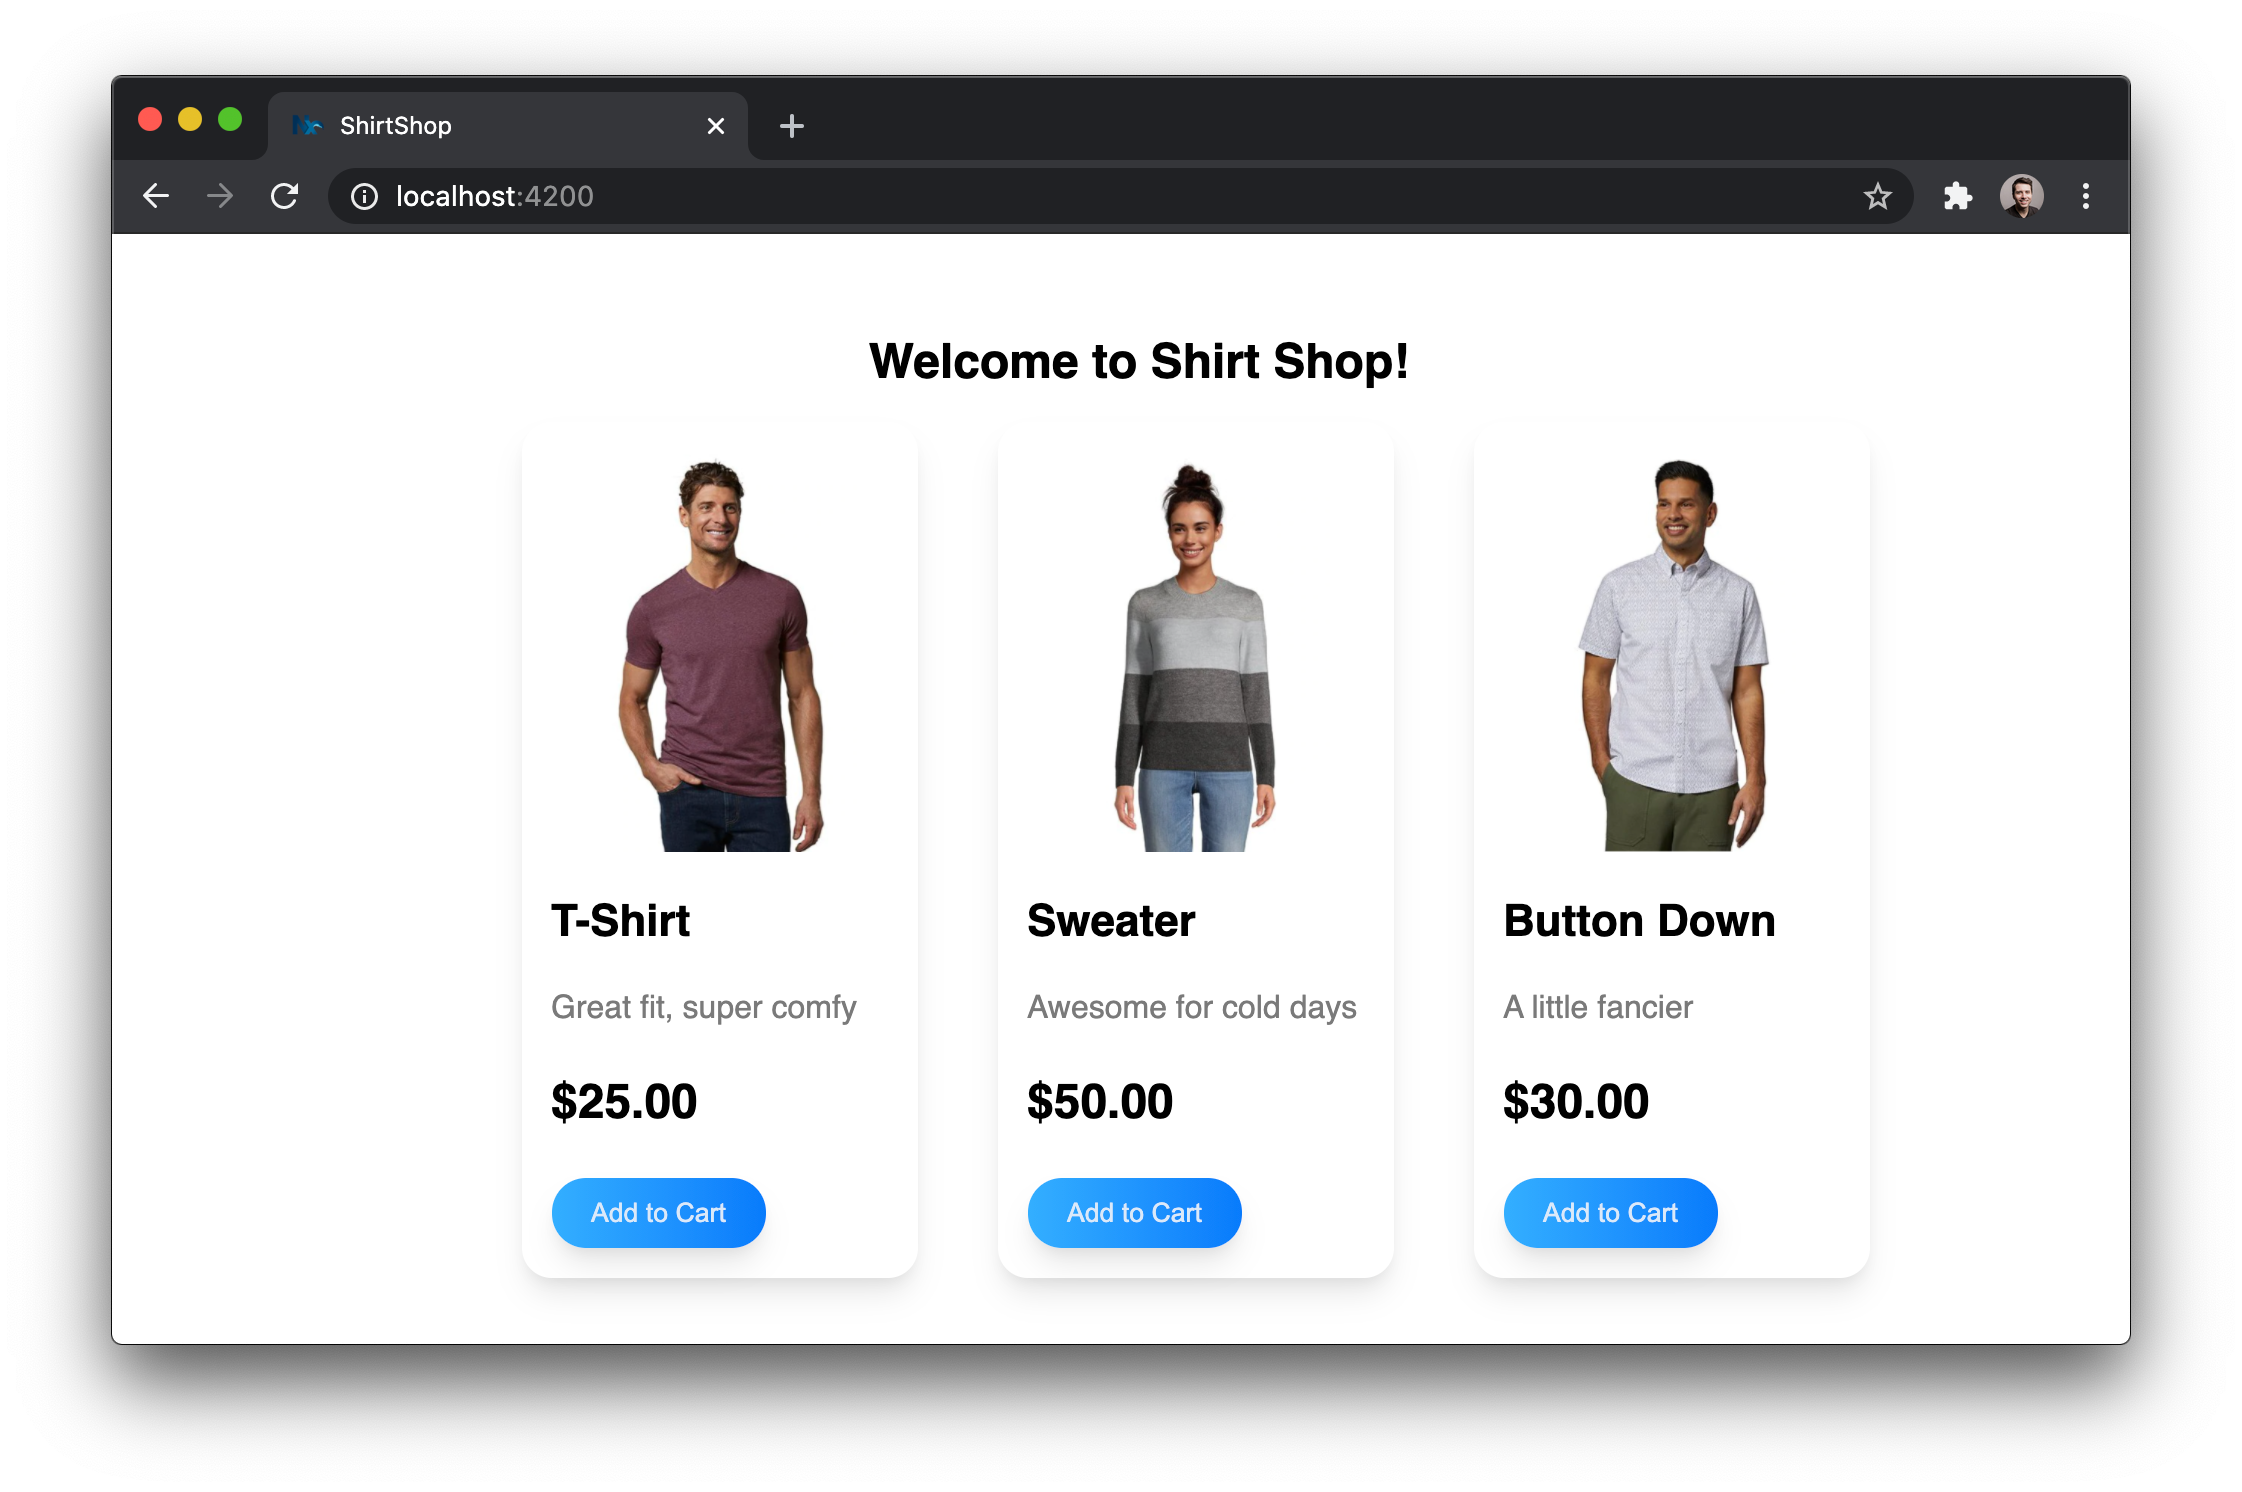
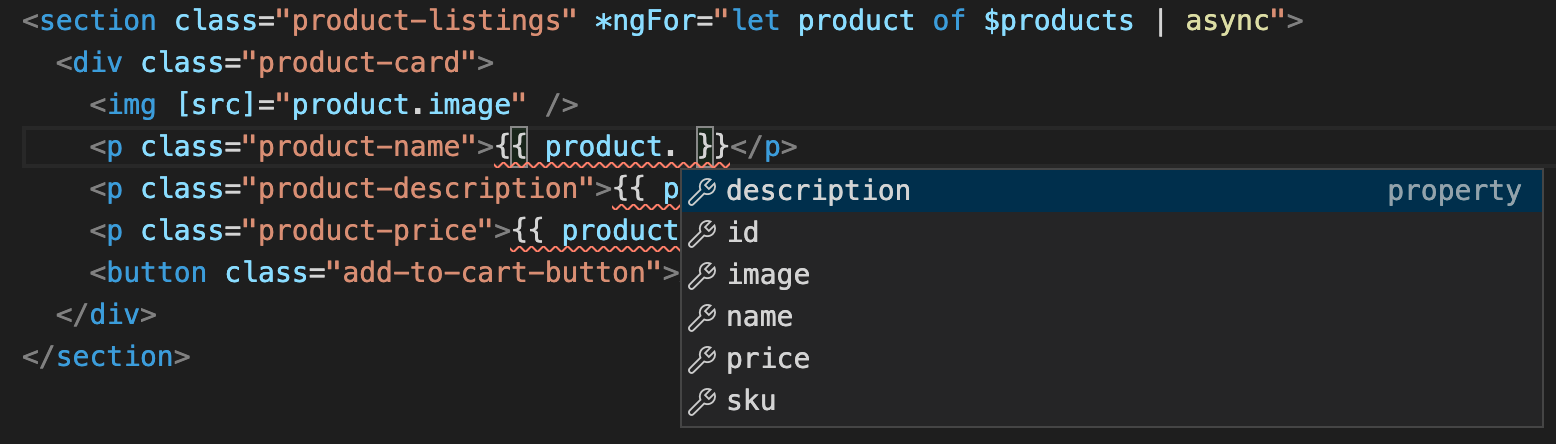
<section class="product-listings" *ngFor="let product of $products | async">
  <div class="product-card">
    <img [src]="product.image" />
    <p class="product-name">{{ product.name }}</p>
    <p class="product-description">{{ product.description }}</p>
    <p class="product-price">{{ product.price | currency }}</p>
    <button class="add-to-cart-button">Add to Cart</button>
  </div>
</section>
Finally, we need to add a method to the component class which uses the ProductService to get the data. We'll then put the result on the $products observable that we've already stubbed out in our template above.
// libs/ui/src/lib/products/products.component.ts

import { Component, OnInit } from '@angular/core'
import { ProductService } from '../product.service'
import { Observable } from 'rxjs'
import { Product } from '@prisma/client'

@Component({
  selector: 'shirt-shop-products',
  templateUrl: './products.component.html',
  styleUrls: ['./products.component.css'],
})
export class ProductsComponent implements OnInit {
  public $products: Observable<Product[]>

  constructor(public productService: ProductService) {}

  ngOnInit(): void {
    this.$products = this.productService.getProducts()
  }
}
This is another spot where we're using our Product type from @prisma/client to give ourselves type safety. Applying this type directly to the $products observable means that we can get autocompletion in our Angular templates.
With our component in place, we're now ready to call it from the shirt-shop app and display the results!
Open up apps/shirt-shop/src/app/app.component.html and include the Products component.
<h1>Welcome to Shirt Shop!</h1>
<shirt-shop-products></shirt-shop-products>
Going Beyond Displaying Data
For any real-world applicaton, we no doubt need a way to take user input and create records in the database.
We won't build out a full CRUD experience for this demonstration, but we can take a quick look at some of the features from the PrismaClient that would help us store new data.
Let's say we have a section in our app which allows admins to add new products in. We'd likely want to start by creating an endpoint to receive this data and store it. In this case, we could use the create method on PrismaClient along with the ProductCreateInput type that is exposed on a top-level export called Prisma.
import { Injectable } from '@nestjs/common'
import { PrismaClient, Product, Prisma } from '@prisma/client'

const prisma = new PrismaClient()

@Injectable()
export class ProductService {
  // ...

  public createProduct(data: Prisma.ProductCreateInput): Promise<Product> {
    return prisma.product.create({
      data,
    })
  }
}
The createProduct method takes in some data which is type-hinted to abide by the Product model from our Prisma schema. The returned result is a single Product that gets resolved from a Promise.
It should be noted that just type-hinting our data parameter here doesn't do anything to add real validation to this endpoint. For data validation at the endpoint, we need to use Validation Pipes from NestJS.
Wrapping Up
TypeScript has come a long way since its early days and early adoption in the Angular community. Using TypeScript on both the frontend and backend bodes well for developer experience and confidence. Applying type safety to database access goes one step further in providing teams large and small with a slew of benefits. Wrapping the whole application up in a monorepo like those provided by Nx gives us an easy way of reusing code (including type definitions) across the whole stack.
If you'd like to go even further with Prisma, check out the docs, follow us on X/Twitter, and join our Slack community!
Keep reading

Prisma Next Is ~90% As Fast as Raw PG
Prisma Next performance benchmarks achieves ~90% of the raw pg driver's peak throughput, holds latency low under load, and ships as a 148.5 KB gzipped bundle for serverless and edge workloads.

Bloom Filters in Postgres: The Index Type Most Developers Overlook
One bloom index can replace a stack of B-trees on wide tables with many filter combinations. A tour of the concept, the Postgres extension, and a benchmark you can run yourself.

Build your next app with Prisma
Start free. Scale when you’re ready.