Build an App With Svelte and TypeScript

TypeScript is all the rage across the whole stack and, increasingly, in every frontend framework. Svelte now comes with TypeScript support. Learn how to build a Svelte app using TypeScript and find out how you can get greater confidence and better developer ergonimics as you do.
What is TypeScript?
TypeScript is a language created by Microsoft that offers developers a way to write JavaScript with type information. It's a superset of JavaScript, meaning that it has all of JavaScript's features but also brings its own.
TypeScript Support in Svelte
Svelte began officially supporting TypeScript in mid-2020. It was the biggest feature request for a long time and the Svelte team responded by providing a way for developers to opt-into TypeScript in their Svelte apps.
Read the announcement post about Svelte's official TypeScript support. We'll use the steps provided in that post to set up a TypeScript environment for ourselves.
Create a Svelte Project with TypeScript
Let's get started by creating a new Svelte project. This will be a simple app that displays a list of Github user data and allows us to dig into the user details.
After installation, we'll enable TypeScript in the app using the setup script that Svelte provides.
Use degit to create a new project.
npx degit sveltejs/template github-users-appOnce the template downloads, open up the project in your editor and have a look in src/App.svelte. The template gives us a standard .svelte file with a script block. If we tried to use TypeScript here right away, we'd get an error.
<script>
  export let name: string; // unexpected token
</script>
To use TypeScript in this block, we need to opt-into it by setting lang="ts" in the script tag.
In App.svelte, set the lang attribute to ts.
<script lang="ts">
  export let name: string;
</script>
Our last step is to run the setupTypeScript.js file that Svelte provides so that we can enable TypeScript properly throughout the app.
node scripts/setupTypeScript.jsThis script creates a tsconfig.json file at the root of the project and converts all the .js files to .ts. It also adds some new dependencies to the package.json file which support TypeScript.
Reinstall the dependencies to get the new ones we need.
npm installWith these steps complete, we should be able to run the app and see everything working.
npm run devOpen the app up at http://localhost:5000.
Next, let's add a template to the Users component to render the data. We'll use an Await block, as well as an Each block to iterate over the users.
Note: The examples here use Tailwind v2 for styling. There's a bit of a setup process to get Tailwind in the project. Have a look at this article by @swyx to find out how to set up Tailwind in a Svelte project.
<script lang="ts">
async function getUsers() {
const res = await fetch('https://api.github.com/users');
const users = await res.json();
if (res.ok) {
return users;
} else {
throw new Error(users);
}
}
$: allUsersPromise = getUsers();
</script>
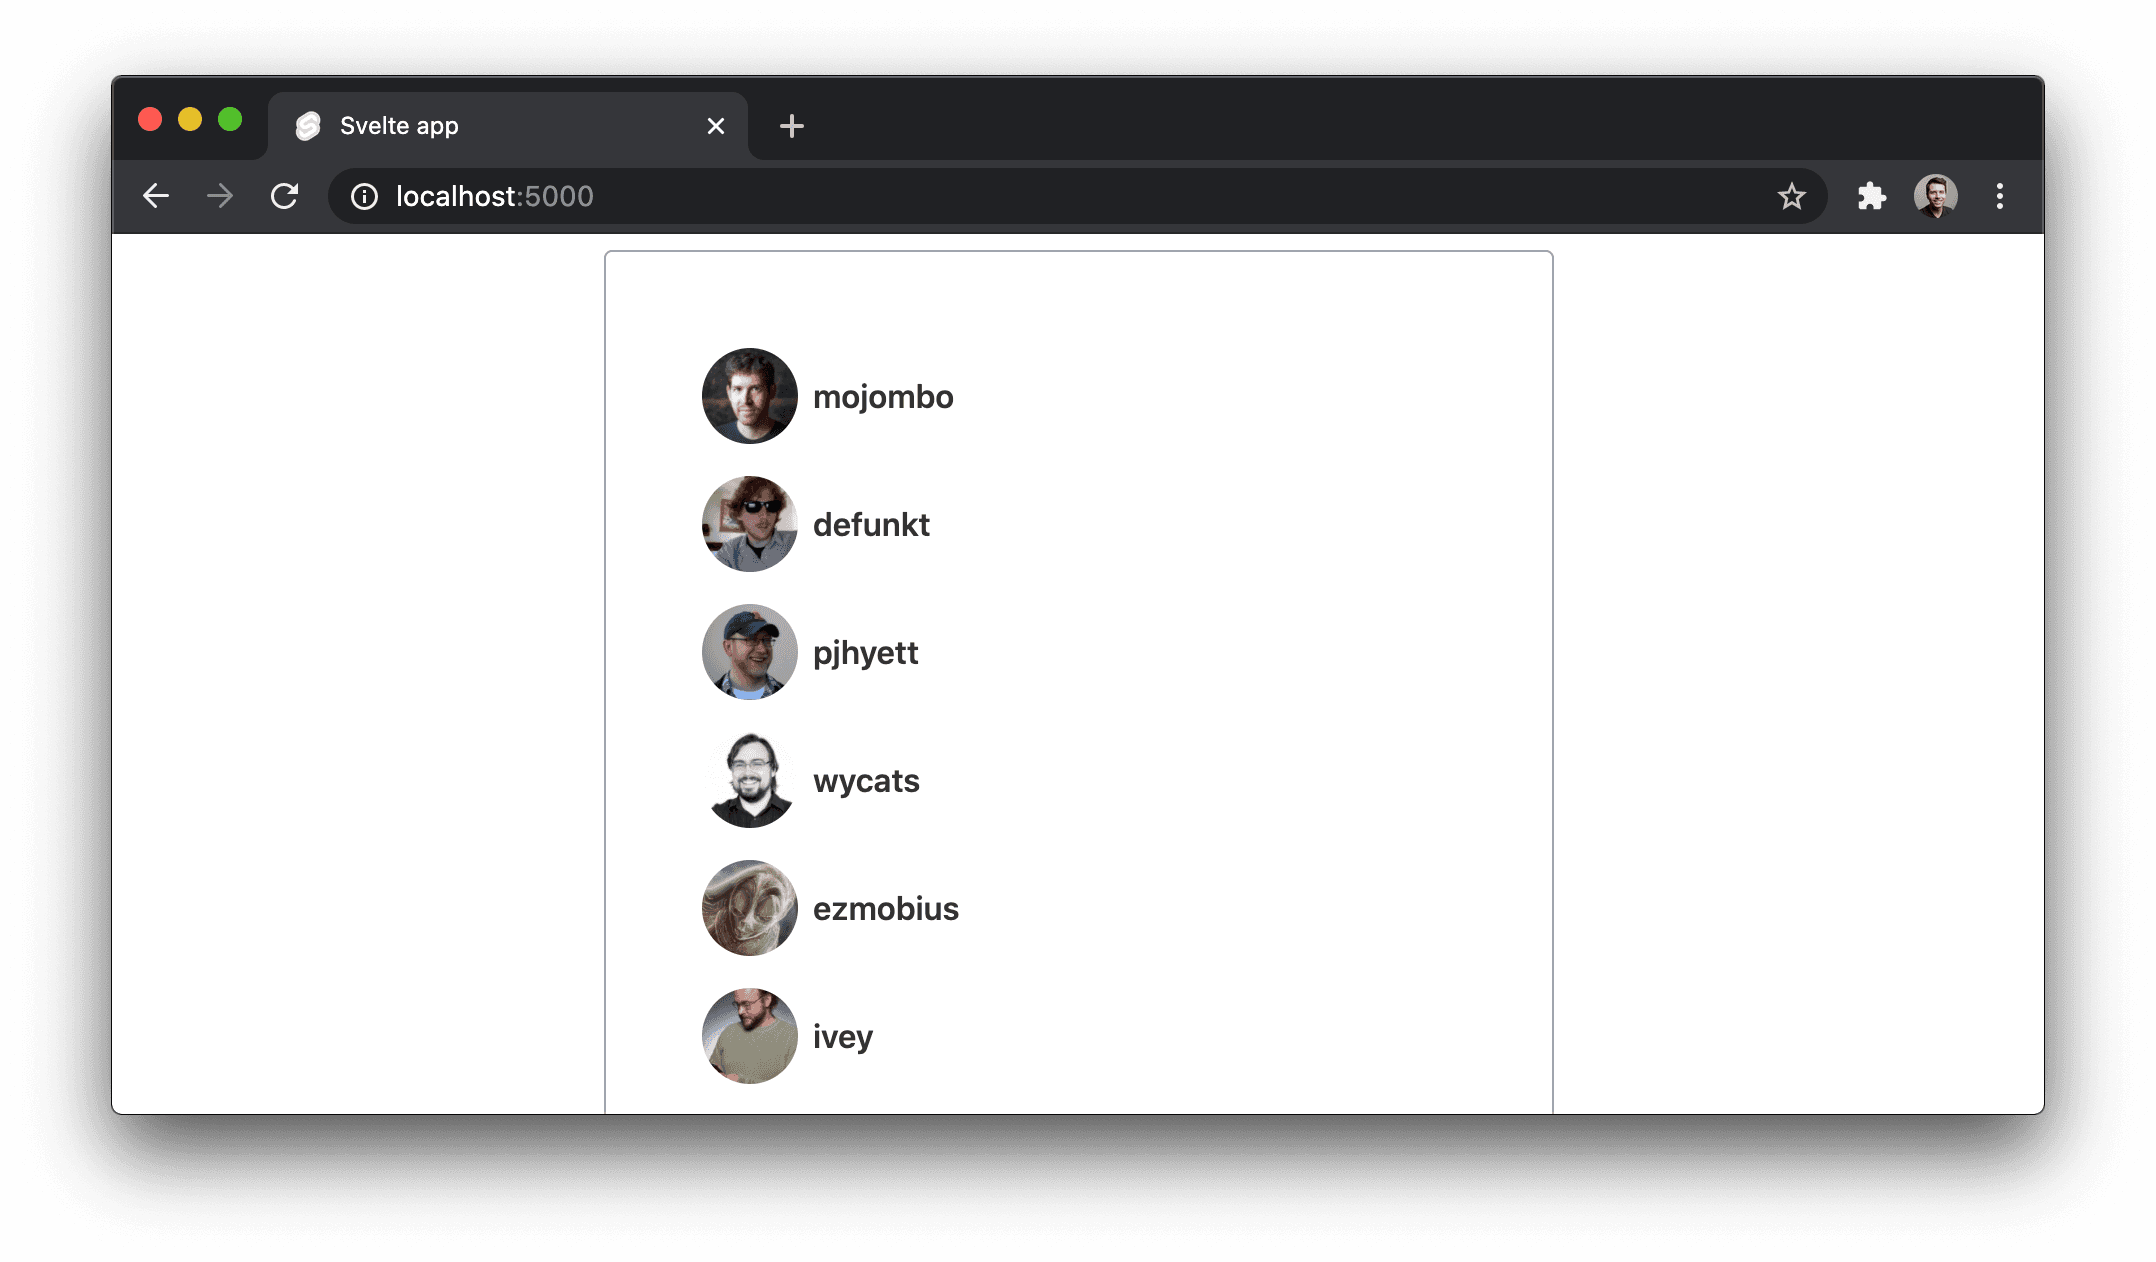
<section class="w-1/2 m-auto border border-gray-400 p-8 rounded">
{#await allUsersPromise then users}
{#each users as user}
<div class="m-4 cursor-pointer">
<div class="flex">
<img class="rounded-full w-12" src={user.avatar_url} alt="avatar" />
<p class="my-auto font-semibold ml-2">{user.login}</p>
</div>
</div>
{/each}
{/await}
</section>We've adjusted the getUsers call to create a reactive declaration. This allows Svelte to automatically update our view when data from this call resolves.
We're awaiting this promise using an Await block in the template and then using an Each block to loop over and display each entry.
If you are using an editor that has TypeScript support such as VS Code, you should now see issues when trying to access the avatar_url and login properties.
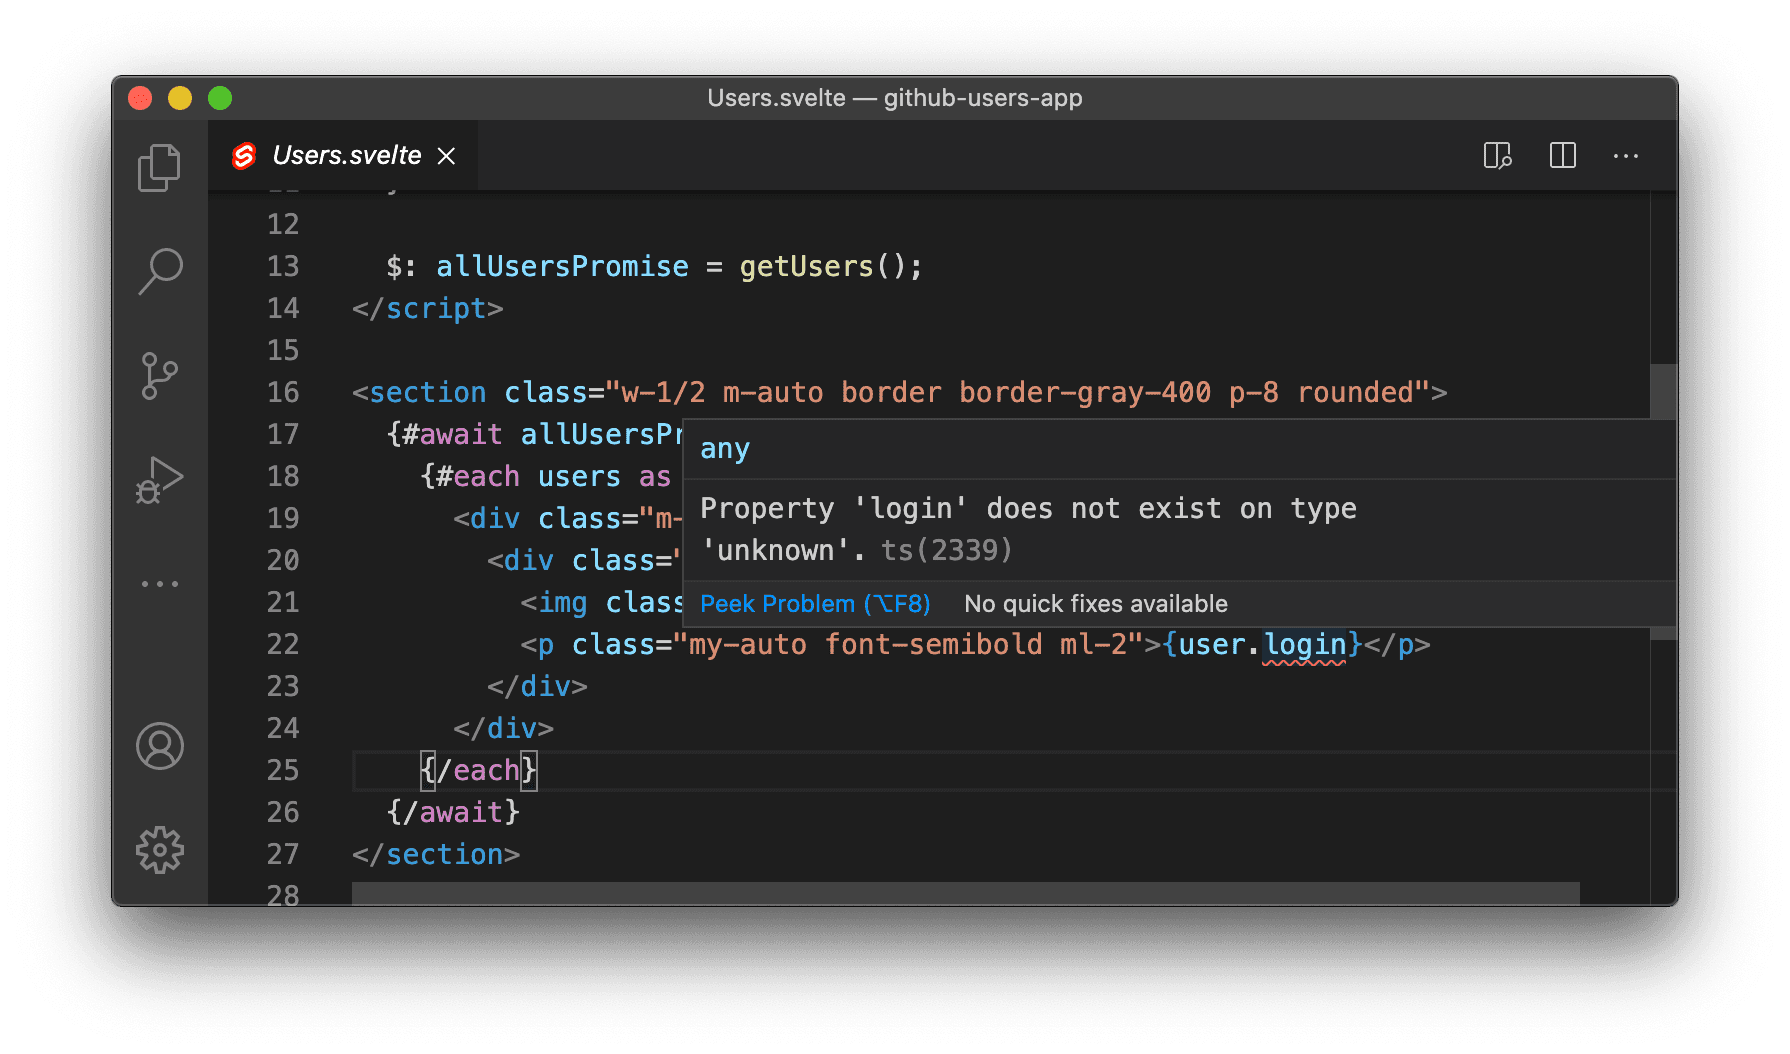
To fix this, we need to make our component aware of the type information for this data.
Apply Type-Hints to the Users Data
Add a type called User to the Users component and give it some of the properties that we know to exist on the GitHub users data. Then apply the User type to the return of the getUsers function.
<script lang="ts">
  type User = {
    login: string;
    avatar_url: string;
    showDetails: boolean;
  };

  async function getUsers(): Promise<User[]> {
    const res = await fetch('https://api.github.com/users');
    const users = await res.json();

    if (res.ok) {
      return users;
    } else {
      throw new Error(users);
    }
  }

  $: allUsersPromise = getUsers();
</script>
The return type of the getUsers function is now type-hinted as a Promise that resolves with an array of objects that are of type User.
You may be wondering why we're relying on this spot to type-hint our data. It's because we can't apply a type hint to the other spots we might think to. We can't type-hint the $: allUsersPromise declaration, nor can we apply types in our template. Type-hinting the return of the function gives us some type safety in a way that is workable with Svelte.
Note that we haven't described the shape of the GitHub data entirely. Instead, we've just taken a limited number of fields. That's fine for this use case but you may want to furnish the type beyond what's here.
Now when we access properties when looping over the User data in the template, we get access to the properties we expect and are prevented from accessing anything that's not on the User type.
Apply Type-Hints to Component Props
One benefit of pairing TypeScript with libraries that use props to pass data down to components is that we can tell the receiving component what types it should expect as input. This is a strength of using TypeScript with libraries like React and the same benefit exists in Svelte projects.
Let's create a UserDetail component so we can see some more information about the user and also demonstrate how to type-hint the props to be passed in.
Create a new file called UserDetail.svelte in the /src directory. In the component, we'll want an event dispatcher so that the parent component can listen for when we want to close this part of the UI. We'll also want a local function which calls the GitHub API for detailed user information. Finally, we'll want a template to display the info.
<script lang="ts">
import { createEventDispatcher } from "svelte";
const dispatch = createEventDispatcher();
function closeDetails() {
dispatch("closeDetails");
}
export let userLogin: string;
async function getUserDetails(userLogin: string): Promise<any> {
const res = await fetch(`https://api.github.com/users/${userLogin}`);
const userDetail = await res.json();`
if (res.ok) {
return userDetail;
} else {
throw new Error(userDetail);
}
}
let details = getUserDetails(userLogin);
</script>
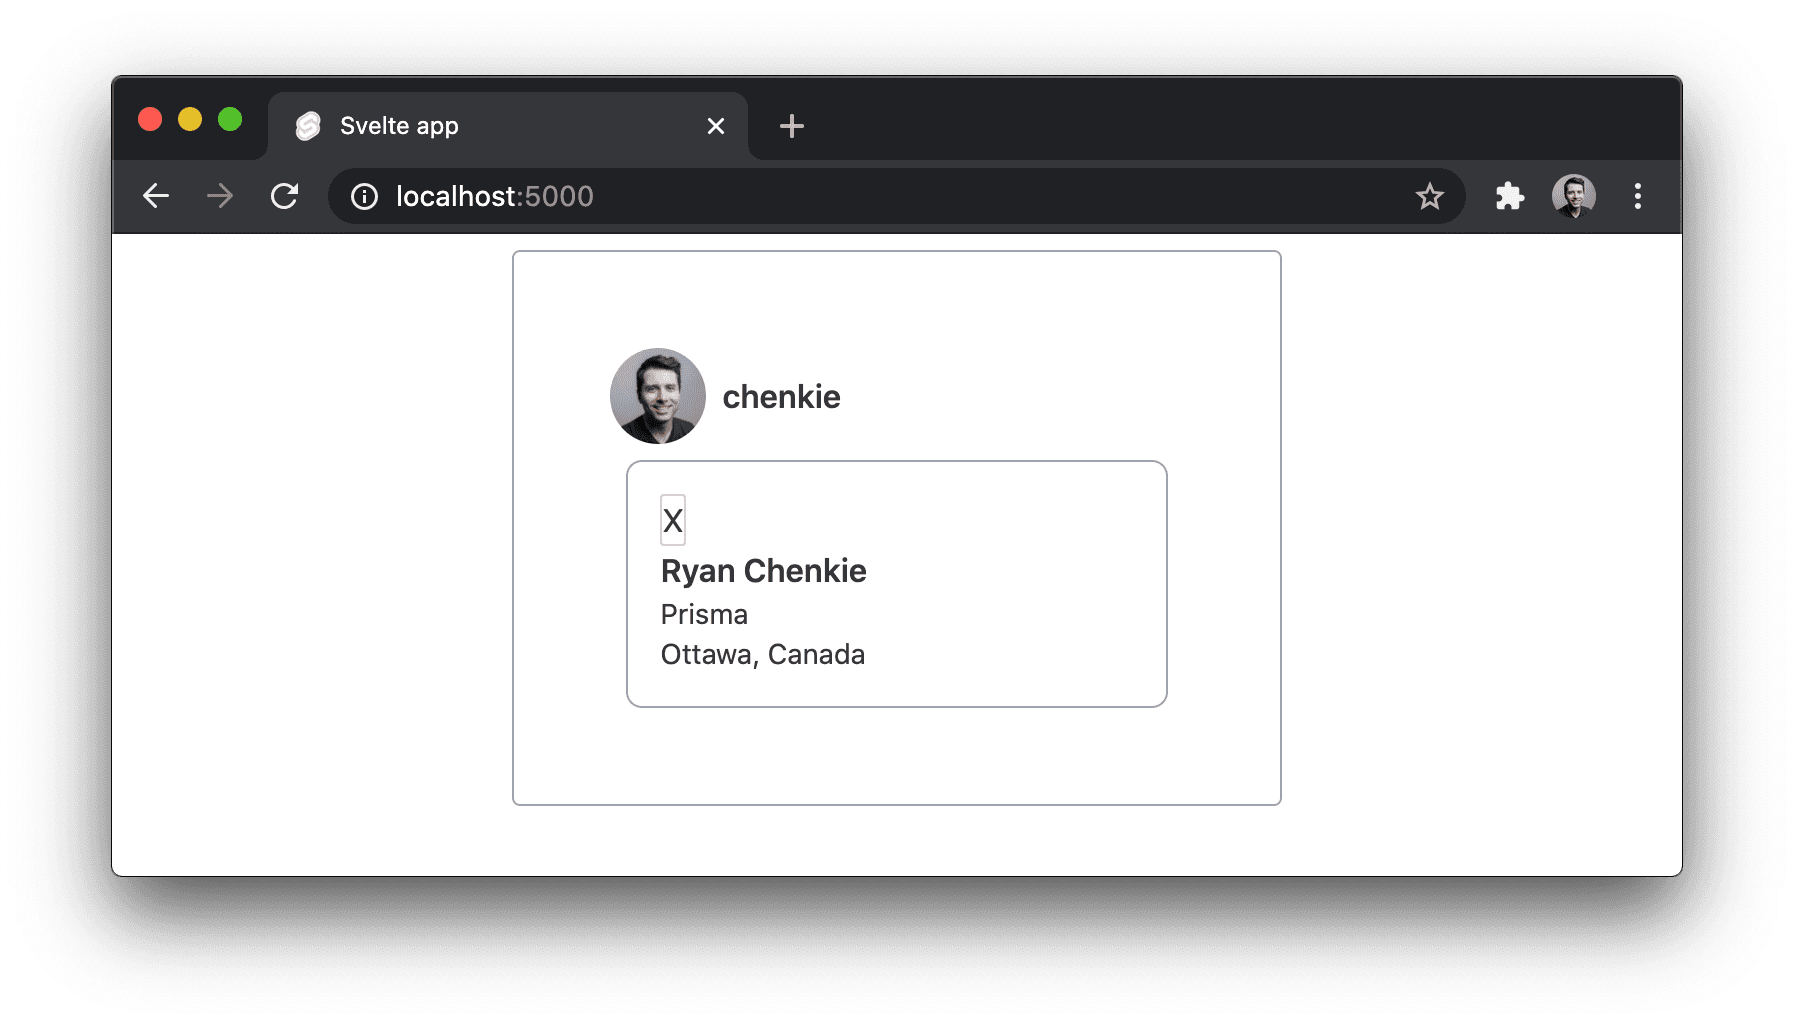
<div class="m-2 border border-gray-400 rounded-lg p-4">
{#await details then detail}
<button on:click={closeDetails}>X</button>
<p class="font-semibold">{detail.name}</p>
<p class="text-sm">{detail.company}</p>
<p class="text-sm">{detail.location}</p>
{/await}
</div>The component should accept a prop for the GitHub handle of the user we want more detail on. This is where we can type-hint the prop for this component. If we type-hint userLogin as a string, we won't be able to pass anything but a string as input from the parent component.
Let's now import and call the UserDetails component in our Users component. We'll need to make some adjustments to toggle it open and closed from the parent.
<script lang="ts">
  import UserDetails from "./UserDetails.svelte";

  type User = {
    login: string;
    avatar_url: string;
    showDetails: boolean;
  };

  async function getUsers(): Promise<User[]> {
    const res = await fetch("https://api.github.com/users");
    const users = await res.json();

    if (res.ok) {
      return users;
    } else {
      throw new Error(users);
    }
  }

  $: allUsersPromise = getUsers();
</script>

<section class="w-1/2 m-auto border border-gray-400 p-8 rounded">
  {#await allUsersPromise then users}
    {#each users as user}
      <div
        class="m-4 cursor-pointer"
        on:click={() => (user.showDetails = true)}>
        <div class="flex">
          <img class="rounded-full w-12" src={user.avatar_url} alt="avatar" />
          <p class="my-auto font-semibold ml-2">{user.login}</p>
        </div>
        {#if user.showDetails}
          <UserDetails
            userLogin={user.login}
            on:closeDetails={() => {
              setTimeout(() => (user.showDetails = false));
            }}
          />
        {/if}
      </div>
    {/each}
  {/await}
</section>
We're now listening for click events on the user's name so we can open the details component. When the user clicks the X at the top of the UserDetails component, the panel is closed.
Sidenote: I know the setTimeout in the on:closeDetails event is pretty hacky. There's probably a better way. If you know it, help me out!
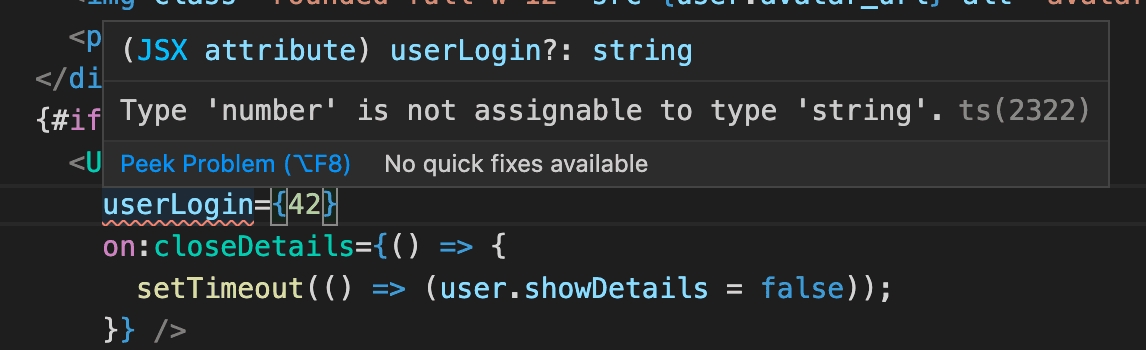
The key thing to point out in this setup is that we have type safety for the inputs to our UserDetails component. If we tried to pass something other than a string, we'd get a type error.
//...

<UserDetails
  userLogin={42}
/>
Right now we have any applied as the return type to the getUserDetails function in UserDetails.svelte. Let's apply type-safety here by defining a type and using it.
<script lang="ts">
  type UserDetails = {
    name: string;
    company: string;
    location: string;
  };

  // ...

  async function getUserDetails(userLogin: string): Promise<UserDetails> {
    const res = await fetch(`https://api.github.com/users/${userLogin}`);
    const userDetail = await res.json();

    if (res.ok) {
      return userDetail;
    } else {
      throw new Error(userDetail);
    }
  }
  let details = getUserDetails(userLogin);
</script>
With the UserDetails type applied, we're now protected in the template.
Current TypeScript Limitations in Svelte
We've added type information to a few spots that will give us a lot of convenience and confidence when developing it out more in the future. It's tempting to want to apply type information in other spots. One candidate is in our event dispatchers and consumers.
At the time of this writing, adding type information to events isn't yet supported in a way that makes it totally type safe. What we'd want to have is something where the TypeScript compiler knows what events we can consume in our components.
In our code above, we have a closeDetails event fired from the child UserDetails event. When we access the event in our consuming component, it would be nice if we were told by the compiler whether or not it is valid. Something like this:
<UserDetails
  userLogin={user.login}
  on:closeTheDetails={() => console.log('this event is not valid')}
/>
// type error: closeTheDetails
This discussion provides some insight on the topic and points to what we may see in the future for being able to type event handlers.
Aside: Add Type-Safe Database Access with Prisma
Type safety for the Svelte app is a great start but it doesn't need to stop there. What if we also wanted to get type safety for our backend? We've been using the GitHub API for this demo but we will no doubt need to access our own backend and database for our real-world apps.
Prisma offers an ORM and set of tools for working with databases in Node.
One of the biggest benefits of using Prisma is that it gives us type safety for our database access. Just like we get guarantees about which properties exist on our data when accessing it in our Svelte templates, we can also get guarantees about the types for our data that go into and come out of our databases with Prisma.
Let's wire up a quick Node API that uses Prisma to see how it all works.
Create a Node API
Let's start by creating a simple Node API. We'll build it with TypeScript.
Start by creating a new folder and initiallizing npm.
mkdir svelte-users-api
cd svelte-users-api
npm init -y
Next, let's install the dev dependencies we'll need.
npm install -D @prisma/cli typescript @types/node @types/express @types/cors ts-node-devMost of the dependencies here are related to TypeScript but the first one in the list is @prismac/cli. This package will give us all the tooling we need for running prisma commands in our workspace to create our database models, run migrations, and more.
Next, let's install our regular dependenceis.
npm install @prisma/client express corsThe first in the list for our regular dependencies is @prisma/client. The Prisma Client is what will give us type-safe access to our database.
Initialize Prisma
The Prisma CLI gives us an init command which takes care of creating a /prisma directory in our project and putting in a default model for us. Let's run that command and see what's inside.
npx prisma initInside the /prisma directory is a file called schema.prisma. This file uses the Prisma Schema Language (PSL) and is the place we describe all of our database tables and the relationships between them.
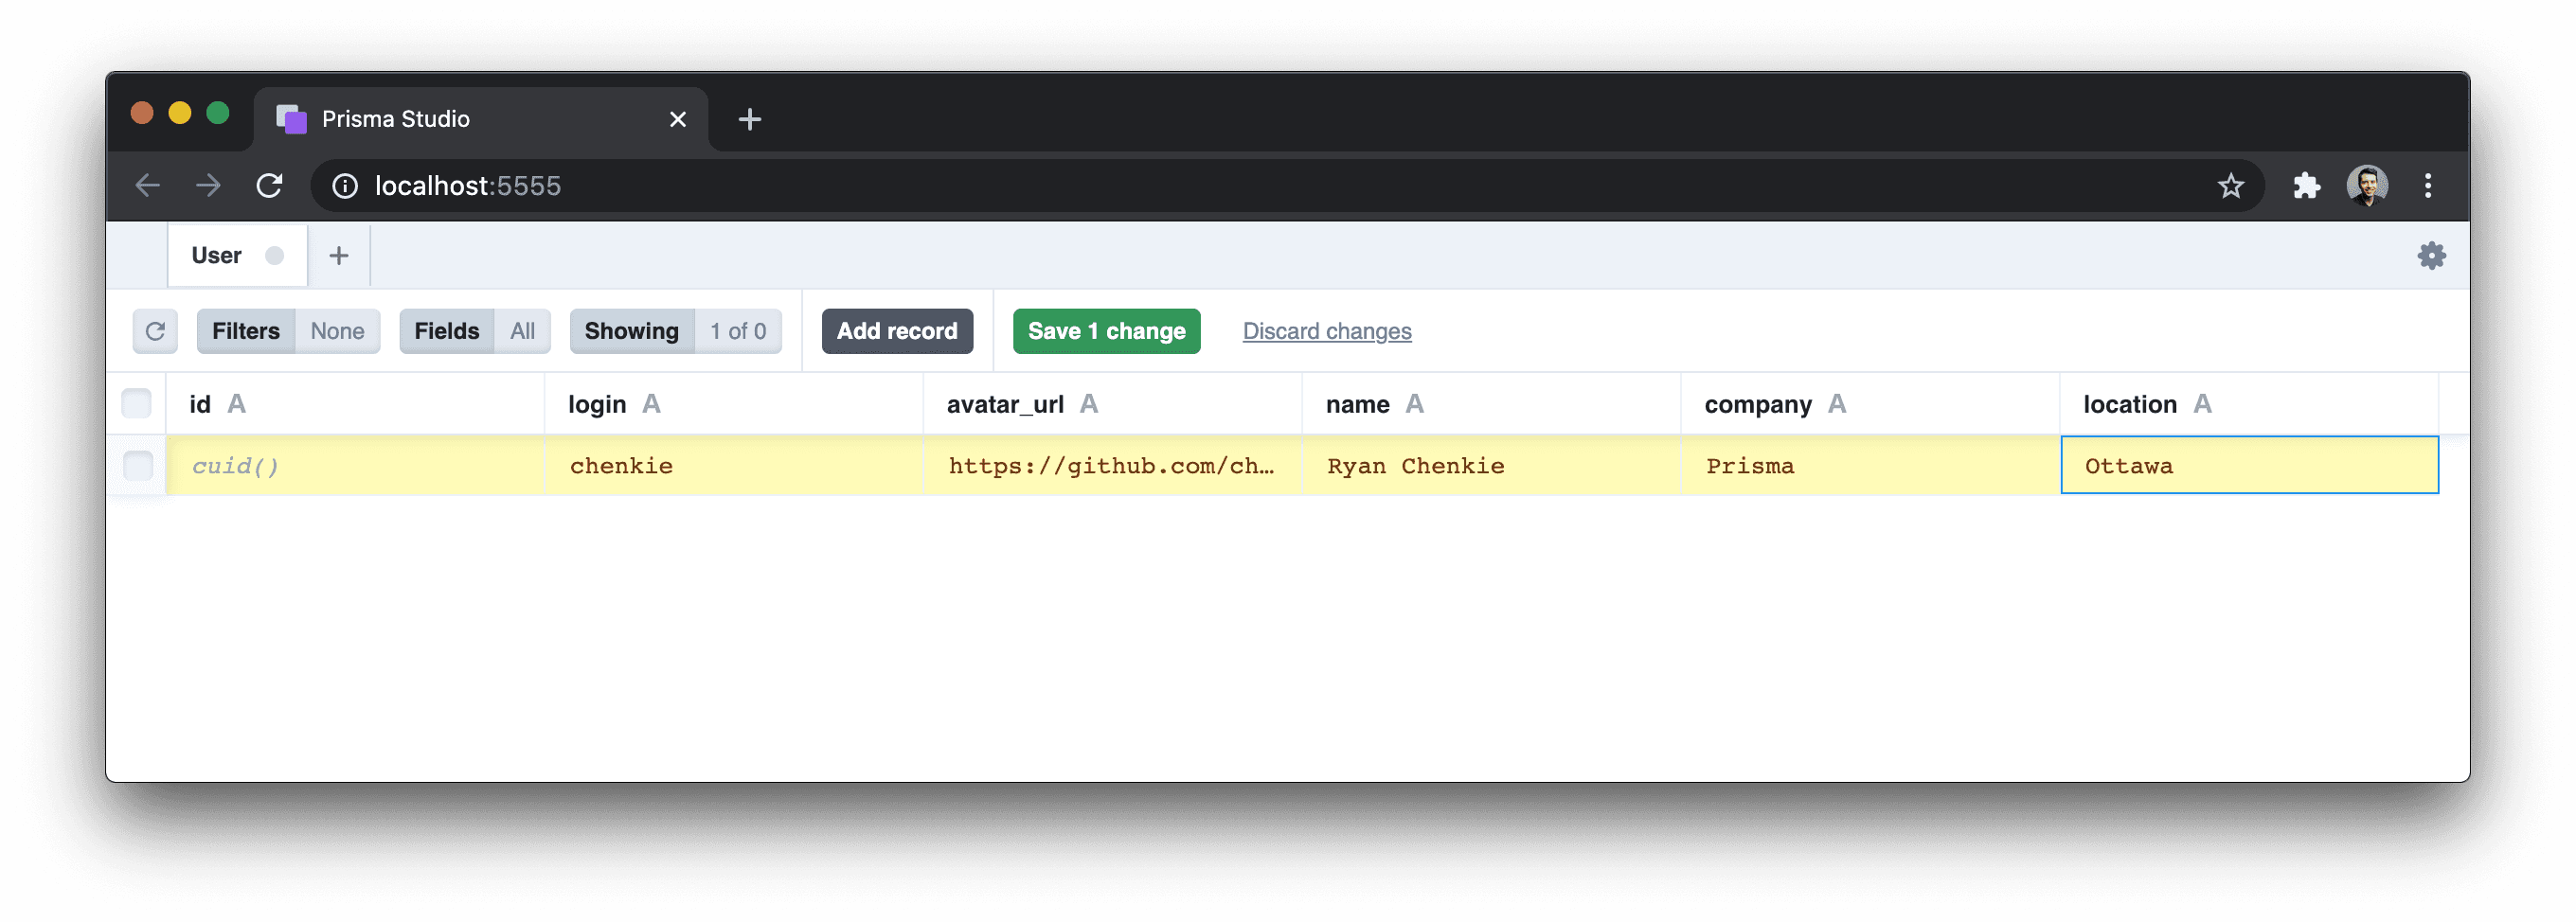
Open up schema.prisma and put in a User model. This will represent a table which holds all of our user's data.
datasource db {
  provider = "sqlite"
  url      = "file:./dev.db"
}

generator client {
  provider = "prisma-client-js"
}

model User {
  id         String @id @default(cuid())
  login      String
  avatar_url String
  name       String
  company    String
  location   String
}
The User model has all of the same properties we were seeing from the GitHub API. This should allow us to easily swap out the calls to GitHub with calls to our own server.
The datasource db line points to the database and connection we want to use. Prisma supports MySQL, Postgres, MSSQL, and SQLite. We'll use SQLite here as it's easy to work with and we don't need to spin anything else up.
Note: Don't worry about creating the SQLite database yet. The next command will take care of that for us!
Run Migrations
With our model in place, we can now run a command to create and run a migration.
npx prisma migrate dev --preview-featureThe prisma migrate command will create a new /prisma/migrations directory in our project and will furnish it with the SQL needed to create our database table. It will then create the SQLite database in the /prisma directory and will create our User table.
View the Database with Prisma Studio
We can now view our database table by using Prisma Studio.
npx prisma studioThis will open up Prisma Studio in the browser at http://locahost:5555.
Create an Endpoint to Get the User Data
With our database in place (and some data inside), we're now ready to create an endpoint to retieve it.
Create a file at the project root called server.ts. This will be where we new up our Express app, our Prisma Client, and where we build out a GET endpoint for our data.
import express, { Request, Response } from 'express'
import cors from 'cors'
import { PrismaClient } from '@prisma/client'

const app = express()
app.use(cors())

const prisma = new PrismaClient()

app.get('/users', async (req: Request, res: Response) => {
  const users = await prisma.user.findMany()
  res.json(users)
})

const PORT = process.env.PORT || 5001
app.listen(PORT)
console.log(`Listening on http://localhost:${PORT}`)
When we want to access our database with Prisma, we use the PrismaClient. It's where we get the typings for our data models and the guarantees of type safety when accessing our database.
The prisma variable that we've declared points to an instance of PrismaClient. On this instance we have access to a user property which points to our User model. We also get a number of methods that we can run on it to access the database, including a findMany records call, which we're using here.
Run the API and Swap Out the API Calls
Let's now run the API and swap out the calls to GitHub for a call to our server.
In the project for the API, use ts-node-dev to run the server.
ts-node-dev server.tsIn the Svelte project, let's swap our the github.com URL in the fetch call in Users.svelte with our API URL.
<script lang="ts">
  // ...

  async function getUsers(): Promise<User[]> {
    const res = await fetch("http://localhost:5001/users");
    const users = await res.json();

    if (res.ok) {
      return users;
    } else {
      throw new Error(users);
    }
  }

  // ...
</script>
With this simple change, we should now be getting data from our server instead of from GitHub.
Wrapping Up
The type safety benefits that are now readily available in Svelte apps help to make our lives easier in the long run. Like any TypeScript project, it requires more effort upfront to make the app work. That extra effort pays dividends as time goes on since we can have more confidence about how our code works and we can catch bugs before they make it to production.
Svelte and TypeScript pair up very nicely. Rounding things out with type safety on the backend using Prisma for database access makes for a compelling stack.
Keep reading

Prisma Postgres vs Neon Pricing 2026
Is Prisma Postgres or Neon cheaper? They bill for different things: operations vs compute-hours. A side-by-side breakdown to match pricing to your usage.


Prisma Next Is ~90% As Fast as Raw PG
Prisma Next performance benchmarks achieves ~90% of the raw pg driver's peak throughput, holds latency low under load, and ships as a 148.5 KB gzipped bundle for serverless and edge workloads.

Build your next app with Prisma
Start free. Scale when you’re ready.