Tutorial: Render Props in React Apollo 2.1

A new version of the React Apollo client has been released. Learn how to use the new API in this fullstack tutorial.
Render props have seen a big hype in the React community lately. Last week, Apollo introduced a new version of their React client, now making use of this new pattern that allows to reuse code among React components.
⚠️ This article is outdated as it uses Prisma 1 which is now deprecated. To learn more about the most recent version of Prisma, read the documentation. ⚠️
In this fullstack tutorial, you will rebuild the React & GraphQL fullstack boilerplate project and learn how to use Apollo’s new API. You can find the final version of the code on GitHub.
The app you are going to build is a simple blogging application with the following features:
- Viewing a feed of published posts
- Viewing unpublished drafts
- Creating new drafts
- Publishing drafts so they become visible in the feed
- Deleting unpublished drafts and published posts
What are render props?
Overview
Render props are a pattern to share code between React components using a prop whose value is a function.
From the official documentation: “A component with a render prop takes a function that returns a React element and calls it instead of implementing its own render logic.” Here is a simple example of what the usage of a render prop function might look like:
<DataProvider render={data => <h1>Hello {data.target}</h1>} />Render props vs Higher-order components
In general, render props enable code reuse and therefore are often used as an alternative to React’s higher-order components (HOCs). It should also be noted that while React Apollo 2.1. introduces this new render props API, you don’t have to use it. You might very well keep on using the good ol’ graphql HOC the same way you did before. So, when to use which?
I can do anything you're doing with your HOC using a regular component with a render prop. Come fight me.
— MICHAEL JACKSON (@mjackson) July 14, 2017
Generally, the new render prop components Query, Mutation and Subscription tend to be simpler and more straightforward to use than the HOC counterpart. This is mostly because they are being used like any other React component and can just be included in your JSX code with corresponding tags (e.g. Query). Higher-order components always require another level of indirection in that your React components need to be wrapped with the HOC function. This can be less intuitive, especially for newcomers.
Because of that, they also lend themselves for simple use cases, e.g. where one React component depends on a single query and mutation and therefore easily can be wrapped inside a Query or Mutation render prop component.
Another great use case where the render props components might come in handy is when a component uses multiple queries that depend on each other. This can easily be implemented by nesting the Query components inside each other.
If you’re already comfortable with using HOCs you might not feel the need to use the new render props API. In the end, it very much depends on your personal preference as both the graphql HOC and the new render props component provide the same functionality. Consider the new API as another tool in your toolbox to help structure your application in the way you like.
This article is not about render props per se. If you want to learn more about them and why many developer prefer using render props over HOCs, make sure to read this article by Michael Jackson.
1. Getting started
In this section, you’ll prepare everything to get started with the new render props API of React Apollo 2.1. If you don’t want to actually follow the tutorial but only want to read about the new render props API, feel free to skip ahead.
1.1. Download the starter code
To kick this tutorial off, you first need to download the starter code for it. Open your terminal and run the following command:
curl https://codeload.github.com/nikolasburk/react-apollo-tutorial/tar.gz/starter | tar -xz react-apollo-tutorial-starterThis downloads the code from the starter branch of this GitHub repository and puts it into a new directory called react-apollo-tutorial-starter.
1.2. Exploring the frontend app
Feel free to make yourself familiar with the codebase. You can start the app by running yarn start inside the react-apollo-tutorial-starter directory. Don’t forget to install the dependencies before by running yarn install.
The directory you downloaded already contains the entire UI for the app, but there’s no actual functionality because that all depends on the backend.
1.3. Exploring the GraphQL server
Speaking of the backend, the code for the GraphQL server is located inside the server directory. Check out server/src/schema.graphql to see the GraphQL schema of the app and learn what API operations are supported.
You can start the server by running yarn start inside the server directory (again, don’t forget running yarn install before). Once the server is running, you can open a GraphQL Playground under the URL http://localhost:4000 (this also is the endpoint your frontend will connect to) and use it send to queries and mutations to your server.
If you’ve opened a Playground right now, you’ll see an error though:
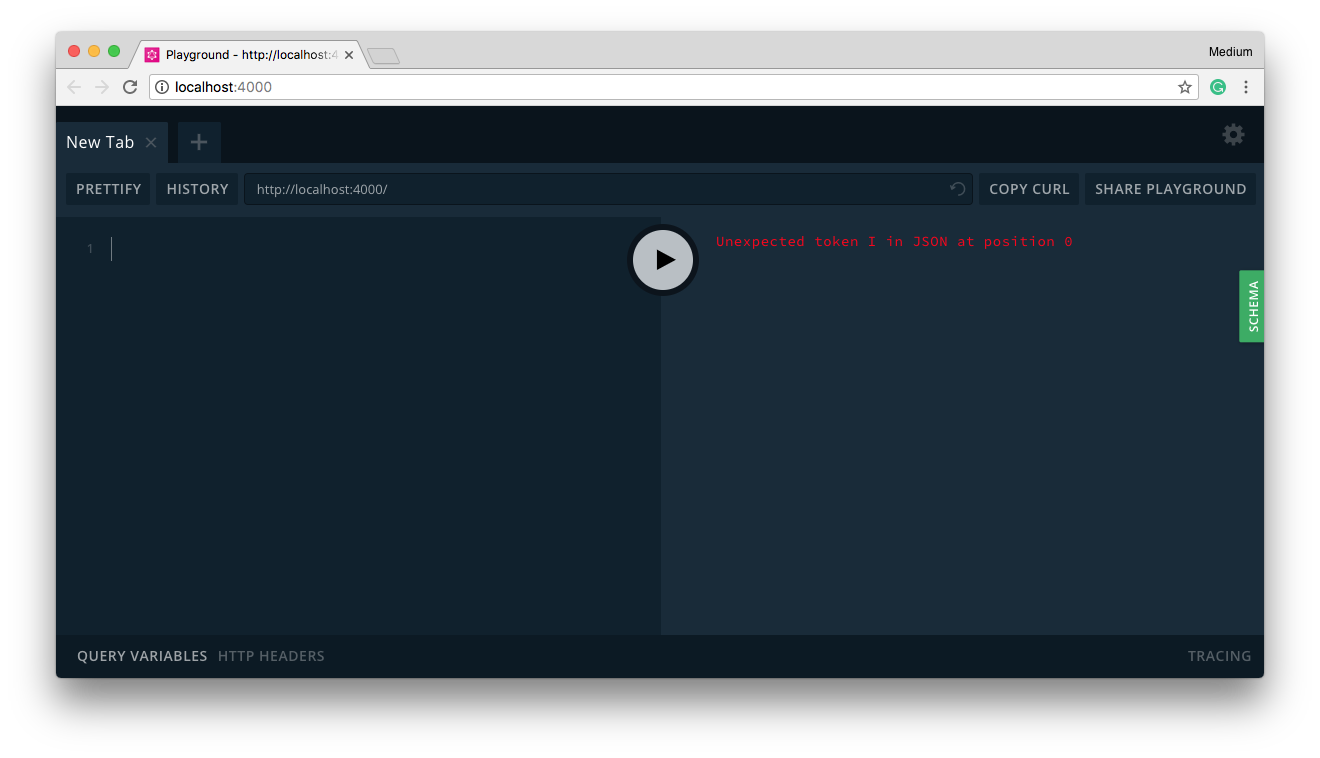
This is because the GraphQL server depends on a Prisma service as its database layer, but you haven’t deployed that Prisma service yet. So, that’s what you’ll do next.
1.4. Setting up Prisma as the database layer for your GraphQL server
To deploy the Prisma service, all you need to is navigate into the server directory and use the Prisma CLI to deploy the service:
cd react-apollo-tutorial-starter/server
yarn prisma deploy
If you have the Prisma CLI installed globally on your machine (which you can do with npm install -g prisma), you can omit the yarn prefix which invokes a script from package.json and simply run prisma deploy instead.
After you ran this command, the CLI prompts you to select a cluster to which the Prisma service can be deployed. For the purpose of this tutorial, the easiest is to select a development cluster that is free and doesn’t require to create a Prisma cloud account. When prompted by the CLI, simply select prisma-eu1 or prisma-us1 as the target cluster. (If you have Docker installed, you can also deploy to a local cluster.)
After the command has finished, it outputs the HTTP endpoint of your Prisma service. It will look somewhat similar to this: https://eu1.prisma.sh/public-warpcrow-598/blogr/dev where public-warpcrow-598 is a randomly generated ID that will look different for you.
Note that this command also seeded some initial data in your database, based on the mutation defined in server/database/seed.graphql.
The last step is to take this endpoint and paste it into src/server/index.js where the Prisma binding instance is created, replacing the current placeholder PRISMA_ENDPOINT:
const server = new GraphQLServer({
  typeDefs: './src/schema.graphql',
  resolvers,
  context: req => ({
    ...req,
    db: new Prisma({
      typeDefs: 'src/generated/prisma.graphql',
      endpoint: 'https://eu1.prisma.sh/public-warpcrow-597/blogr/dev',
      secret: 'mysecret123',
      debug: true,
    }),
  }),
})
That’s it! Your GraphQL server is now backed by a database and fully functional, so you can start sending queries and mutations in the Playground.
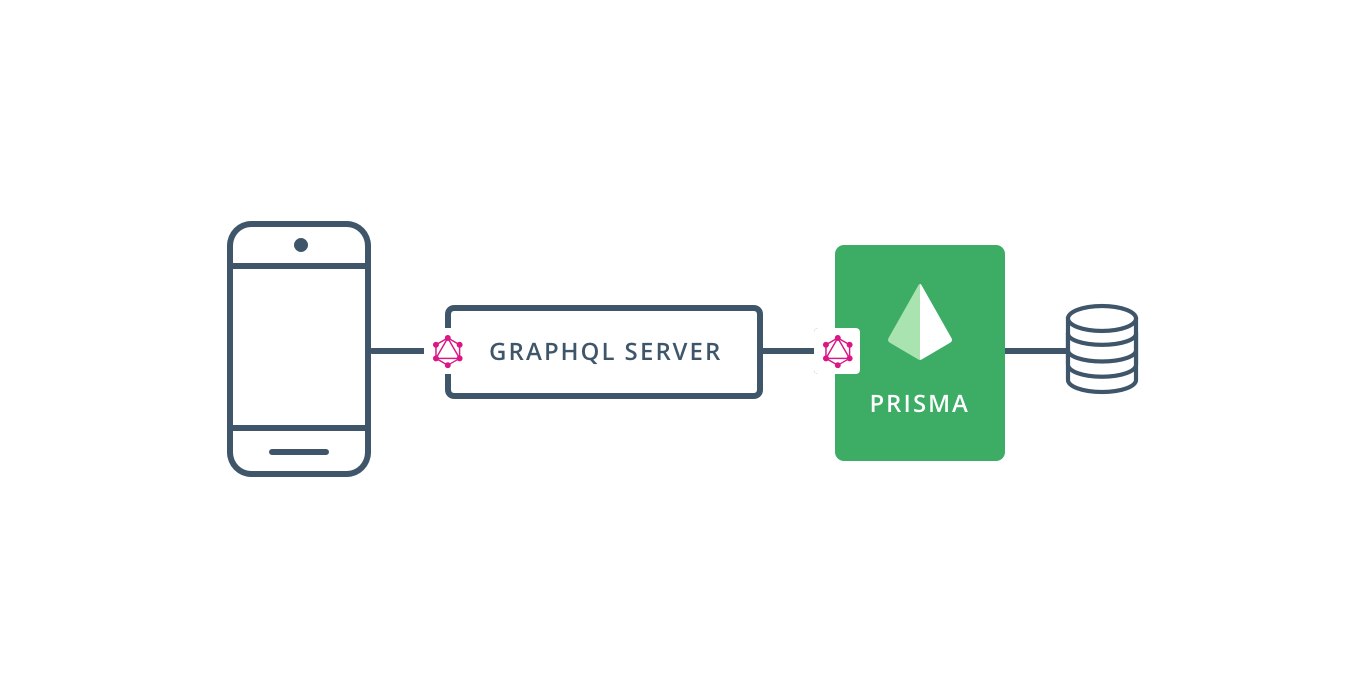
Here is a quick overview of the architecture that’s used for this app:
1.5. Install React Apollo dependencies in the frontend app
With the starter project and Prisma service in place, the next step is to install the dependencies that are required for Apollo. In your terminal, navigate back into the project’s root directory and install the dependencies there:
cd ..
yarn add apollo-boost react-apollo graphql-tag graphql
From the Apollo documentation, here is what each of the dependencies are being used for:
- apollo-boost: Contains everything you need to set up Apollo Client
- react-apollo: View layer integration for React
- graphql-tag: Necessary for parsing your GraphQL queries
- graphql: Also parses your GraphQL queries
Note that apollo-boost is a wrapper package that lets you get started quickly with Apollo Client without much configuration overhead.
1.6. Initialize ApolloClient and wrap the app with ApolloProvider
At this point, you can start writing actual code! 🙌 The first thing you need to do is connecting your frontend with the backend by creating an ApolloClient instance with the endpoint of your GraphQL server.
Open src/index.js and type the following line right after the import statements:
const client = new ApolloClient({ uri: 'http://localhost:4000' })As mentioned before, ApolloClient will connect to the GraphQL server that’s running locally on port 4000.
Next, wrap the entire JSX code inside ReactDOM.render with an ApolloProvider component which receives the client instance you just created as a prop:
ReactDOM.render(
  <ApolloProvider client={client}>
    <Router>
      <Fragment>
        <nav className="pa3 pa4-ns">
          <Link className="link dim black b f6 f5-ns dib mr3" to="/" title="Feed">
            Blog
          </Link>
          <NavLink className="link dim f6 f5-ns dib mr3 black" activeClassName="gray" exact={true} to="/" title="Feed">
            Feed
          </NavLink>
          <NavLink
            className="link dim f6 f5-ns dib mr3 black"
            activeClassName="gray"
            exact={true}
            to="/drafts"
            title="Drafts"
          >
            Drafts
          </NavLink>
          <Link to="/create" className="f6 link dim br1 ba ph3 pv2 fr mb2 dib black">
            + Create Draft
          </Link>
        </nav>
        <div className="fl w-100 pl4 pr4">
          <Switch>
            <Route exact path="/" component={FeedPage} />
            <Route path="/drafts" component={DraftsPage} />
            <Route path="/create" component={CreatePage} />
            <Route path="/post/:id" component={DetailPage} />
          </Switch>
        </div>
      </Fragment>
    </Router>
  </ApolloProvider>,
  document.getElementById('root'),
)
Thanks to the ApolloProvider, you’ll now be able to use Apollo Client’s functionality inside your app.
The last thing to do here is import the ApolloClient and ApolloProvider classes from their respective packages. Add the following two lines to the other import statements to the top of the file:
import { ApolloProvider } from 'react-apollo'
import ApolloClient from 'apollo-boost'
2. Loading and displaying drafts with render props and the new Query component
You’ll start by implementing the functionality for the /drafts route that can be found in the DraftsPage component.
2.1. Specifying the drafts query
To load the drafts from the backend, you need to use the drafts query defined in the server’s GraphQL schema.
Open /src/components/DraftsPage.js and add the following code to the bottom of the file:
export const DRAFTS_QUERY = gql`
  query DraftsQuery {
    drafts {
      id
      text
      title
      isPublished
    }
  }
Note that you’re only exporting the query because you’ll need it later in a different file when you’re updating the cache after a mutation.
2.2. Loading data with Query
Next, you will make use of React Apollo new Query component to load the data and render it to the screen. Still in DraftsPage.js, wrap everything that’s currently returned by render in this new component. While you’re at it, you can also remove the dummy post data that’s currently used. Here is what the ready component will look like:
export default class DraftsPage extends Component {
  render() {
    return (
      <Query query={DRAFTS_QUERY}>
        {({ data }) => {
          return (
            <Fragment>
              <div className="flex justify-between items-center">
                <h1>Drafts</h1>
              </div>
              {data.drafts &&
                data.drafts.map(draft => (
                  <Post
                    key={draft.id}
                    post={draft}
                    refresh={() => console.log(`Refetch`)}
                    isDraft={!draft.isPublished}
                  />
                ))}
              {this.props.children}
            </Fragment>
          )
        }}
      </Query>
    )
  }
}
Let’s quickly understand what’s going on here. By wrapping the component with Query and passing the DRAFTS_QUERY as a prop, it gets access to the result of the network call that’s initiated and managed by Apollo Client. This result contains the data object which again carries the result data for the query. The next thing you need to do is actually use the received data and display it. The code for that is already in place 🙌
Finally, you need to import the Query component, add the following import statement to the top of the file:
import { Query } from 'react-apollo'
import gql from 'graphql-tag'
If you run the app now, the DraftsPage will already load the data from the server. Don’t forget to have the server running (by calling yarn start inside src/server) whenever you want to test the app — otherwise the app misses its backend and won’t work!
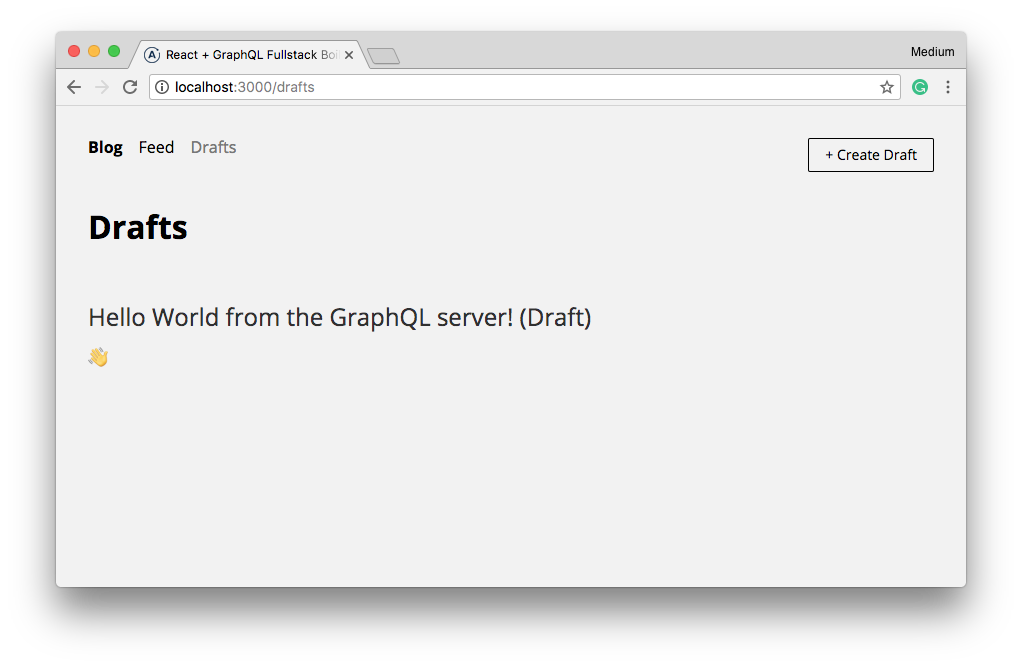
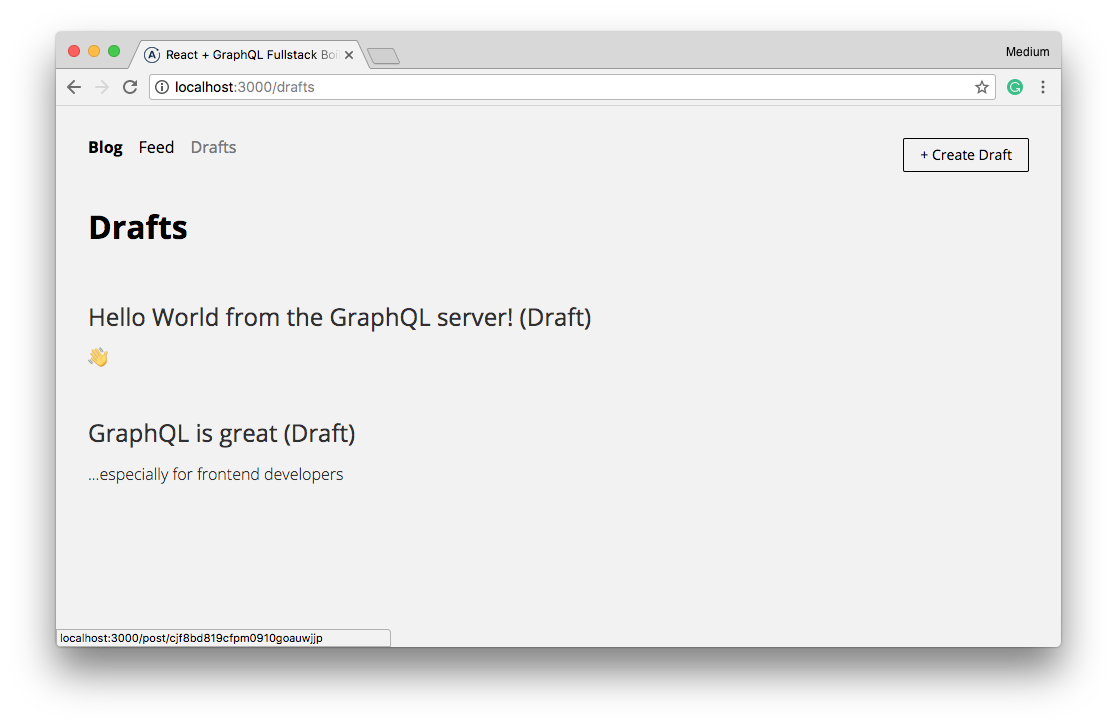
Right now, the drafts page only displays the draft that was seeded initially:
2.3. Accounting for loading and error states
All right, so the now the app load and displays the data. But what happens if the network request fails for some reason? Also, you probably want to display a loading state to your users while the request is ongoing.
Thanks to Apollo, this functionality is super straightforward. The render prop function not only receives the response data as input arguments, but at the same time also an error object as well as a boolean value loading that is true as long as the server’s response hasn’t been received.
Simply update the code inside of the Query component to account for these two additional component states:
<Query query={DRAFTS_QUERY}>
  {({ data, loading, error }) => {
    if (loading) {
      return (
        <div className="flex w-100 h-100 items-center justify-center pt7">
          <div>Loading ...</div>
        </div>
      )
    }

    if (error) {
      return (
        <div className="flex w-100 h-100 items-center justify-center pt7">
          <div>An unexpected error occured.</div>
        </div>
      )
    }
    return (
      <Fragment>
        <div className="flex justify-between items-center">
          <h1>Drafts</h1>
        </div>
        {data.drafts &&
          data.drafts.map(draft => (
            <Post
              key={draft.id}
              post={draft}
              isDraft={!draft.isPublished}
            />
          ))}
        {this.props.children}
      </Fragment>
    )
  }}
</Query>
If you’ve worked with earlier versions of Apollo, this API will feel familiar to you. It basically is the same as the one that’s used for the graphql HOC (where Apollo injects data, loading and error into the props of the component that’s wrapped with graphql). That’s it already for the drafts page!
3. Loading the feed
The implementation of the feed is analogous to the one for the drafts, except that it uses the feed instead of the drafts query. Here is what the implementation looks like (this code needs to be put into FeedPage.js, replacing the entire content in there):
import React, { Component, Fragment } from 'react'
import Post from '../src/components/Post'
import { Query } from 'react-apollo'
import gql from 'graphql-tag'

export default class FeedPage extends Component {
  render() {
    return (
      <Query query={FEED_QUERY}>
        {({ data, loading, error, refetch }) => {
          if (loading) {
            return (
              <div className="flex w-100 h-100 items-center justify-center pt7">
                <div>Loading ...</div>
              </div>
            )
          }

          if (error) {
            return (
              <div className="flex w-100 h-100 items-center justify-center pt7">
                <div>An unexpected error occured.</div>
              </div>
            )
          }

          return (
            <Fragment>
              <h1>Feed</h1>
              {data.feed &&
                data.feed.map(post => (
                  <Post key={post.id} post={post} refresh={() => refetch()} isDraft={!post.isPublished} />
                ))}
              {this.props.children}
            </Fragment>
          )
        }}
      </Query>
    )
  }
}

export const FEED_QUERY = gql`
  query FeedQuery {
    feed {
      id
      text
      title
      isPublished
    }
  }
`
4. Creating new drafts with render props and the new Mutation component
New drafts are created under the /create route which renders the CreatePage component. It shows a simple form with two inputs where the user can provide the title and the text for their new drafts.
4.1. Specifying the createDraft mutation
You’ll start by adding the createDraft mutation to the bottom of CreatePage.js:
const CREATE_DRAFT_MUTATION = gql`
  mutation CreateDraftMutation($title: String!, $text: String!) {
    createDraft(title: $title, text: $text) {
      id
      title
      text
      isPublished
    }
  }
`
This mutation takes two variables which you’ll pass to it from the component’s state before it is sent to the server.
4.2. Writing data with Mutation
The Query and Mutation components in React Apollo 2.1. are very similar. The core difference is that when wrapping another component with Mutation the render prop function also receives a function which you use the send the mutation to the server.
Like with the Query component, go ahead and wrap everything that’s returned in render with Mutation:
render() {
  return (
    <Mutation
      mutation={CREATE_DRAFT_MUTATION}
    >
      {(createDraft, { data, loading, error }) => {
        return (
          <div className="pa4 flex justify-center bg-white">
            <form
              onSubmit={async e => {
                e.preventDefault()
                const { title, text } = this.state
                await createDraft({
                  variables: { title, text },
                })
                this.props.history.replace('/drafts')
              }}
            >
              <h1>Create Draft</h1>
              <input
                autoFocus
                className="w-100 pa2 mv2 br2 b--black-20 bw1"
                onChange={e => this.setState({ title: e.target.value })}
                placeholder="Title"
                type="text"
                value={this.state.title}
              />
              <textarea
                className="db w-100 ba bw1 b--black-20 pa2 br2 mb2"
                cols={50}
                onChange={e => this.setState({ text: e.target.value })}
                placeholder="Content"
                rows={8}
                value={this.state.text}
              />
              <input
                className={`pa3 bg-black-10 bn ${this.state.text &&
                  this.state.title &&
                  'dim pointer'}`}
                disabled={!this.state.text || !this.state.title}
                type="submit"
                value="Create"
              />
              <a className="f6 pointer" onClick={this.props.history.goBack}>
                or cancel
              </a>
            </form>
          </div>
        )
      }}
    </Mutation>
  )
}
The data, loading and error arguments that are being passed into the render prop function have the same semantics as the ones you just saw with the Query component. The very first argument of the function, createDraft, is used to send the CREATE_DRAFT_MUTATION to the server. It is being called in the onSubmit callback of the form element.
To make this work, import Mutation and gql at the top of the file:
import { Mutation } from 'react-apollo'
import gql from 'graphql-tag'
Now, when running the app and navigating to the /create route, you can submit new drafts that are stored in the database on the server-side:
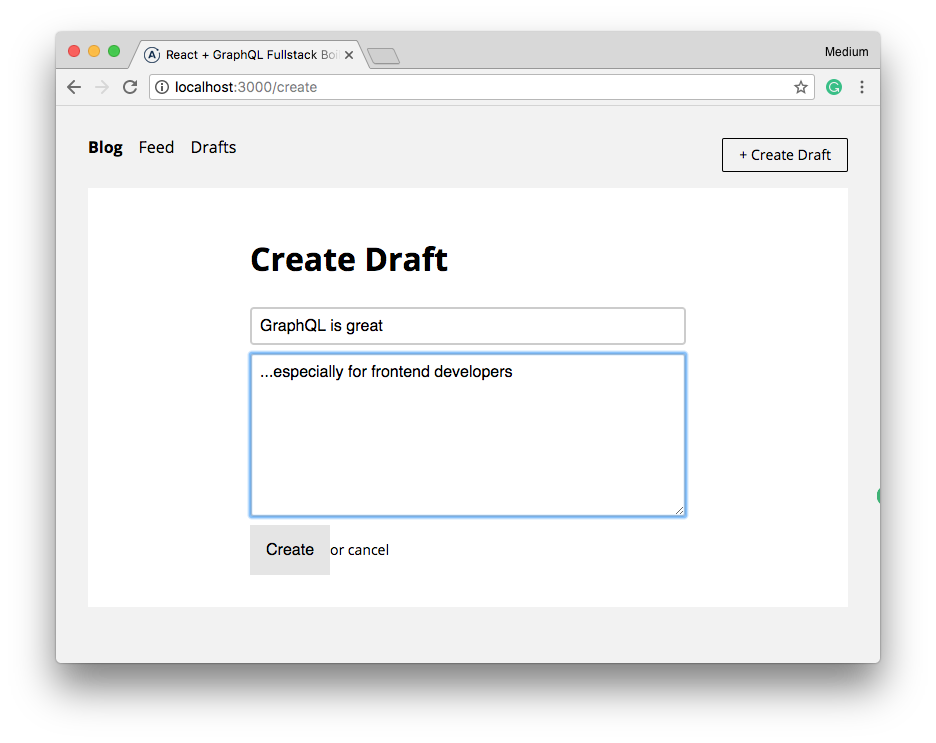
However, after you clicked the Create-button and the app automatically navigated back to the /drafts route, you’ll notice that the page actually hasn’t updated. Only after refreshing the page, the newly created draft will appear 🤔
The reason for this is that the drafts page only displays already cached data. To fix this, you manually need to update the cache after the mutation was performed.
4.3. Updating the cache with the imperative store API
Apollo’s imperative store API allows to read and write directly from/to the Apollo cache. Again, if you’ve already used the imperative store API in an earlier version of Apollo, the following will feel very familiar to you. The big difference in the new version is that update is not passed as an argument to the function that performs the mutation, but instead passed as a prop to the Mutation component.
The API of the update function remains the same: It receives an object that serves as an interface to the cache and allows to update it as well as the server’s response.
Here is how you’ll implement it:
<Mutation
  mutation={CREATE_DRAFT_MUTATION}
  update={(cache, { data }) => {
    const { drafts } = cache.readQuery({ query: DRAFTS_QUERY })
    cache.writeQuery({
      query: DRAFTS_QUERY,
      data: { drafts: drafts.concat([data.createDraft]) },
    })
  }}
>
  ... like before ...
</Mutation>
Inside update, you first extract the previous results of the DRAFTS_QUERY from the cache (here’s also the reason why you previously needed to export it from DraftsPage). Then, you’re using writeQuery to update the the contents of the cache by manually adding the new draft object that was returned by the server (which is stored in data.createDraft).
Great, when you’re testing the app again, you’ll see that the /drafts page is now updated directly after the mutation was performed.
Note that we’re omitting accounting for error and loading states here for the sake of brevity.
5. Publishing posts
Once a draft is published, it will appear in the app’s feed. The functionality for that is implemented in DetailPage component which displays two buttons for the post that it displays: Publish and Delete
5.1. Loading the selected post
Whenever a post is clicked (either from the drafts or from the feed page), it will be displayed using the DetailPage component. This also loads the data for the post from the network.
Just like before, start by adding the query that’s required in this case:
const POST_QUERY = gql`
  query PostQuery($id: ID!) {
    post(id: $id) {
      id
      title
      text
      isPublished
    }
  }
`
The id variable is passed to the Query component as a prop. It is read from the current URL which contain’s the id of the selected post.
Here is what the updated render function looks like:
render() {
  return (
    <Query query={POST_QUERY} variables={{ id: this.props.match.params.id }}>
      {({ data, loading, error }) => {
        if (loading) {
          return (
            <div className="flex w-100 h-100 items-center justify-center pt7">
              <div>Loading ...</div>
            </div>
          )
        }

        if (error) {
          return (
            <div className="flex w-100 h-100 items-center justify-center pt7">
              <div>An unexpected error occured.</div>
            </div>
          )
        }

        const { post } = data
        const action = this._renderAction(post)
        return (
          <Fragment>
            <h1 className="f3 black-80 fw4 lh-solid">{data.post.title}</h1>
            <p className="black-80 fw3">{data.post.text}</p>
            {action}
          </Fragment>
        )
      }}
    </Query>
  )
}
To finish this up, you need to import Query and gql again:
import { Query } from 'react-apollo'
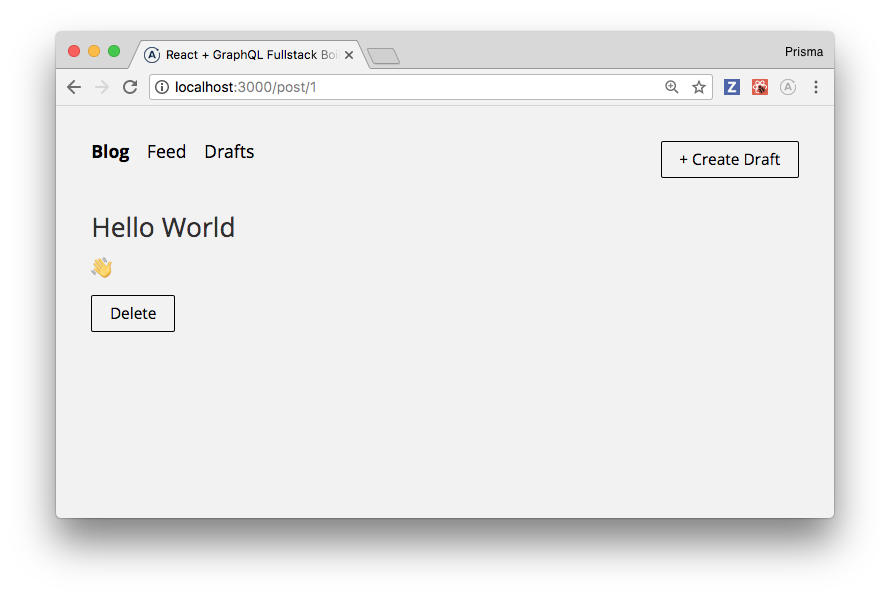
import gql from 'graphql-tag'Now, you can select a draft from the /drafts route and the app will display the corresponding DetailPage for it, including the Publish- and Delete-buttons:
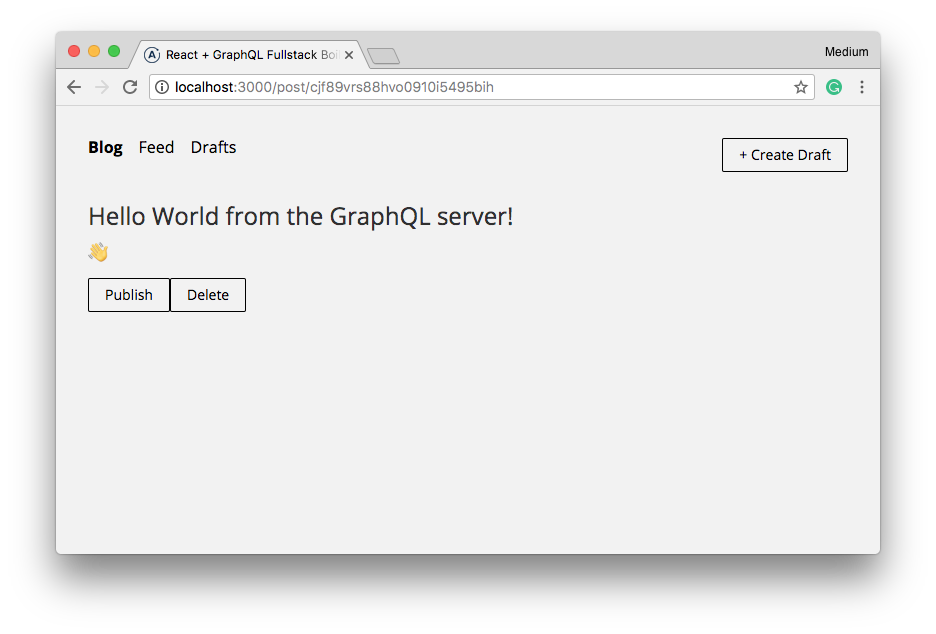
These currently don’t work, so let’s implement for them next!
5.2. Publishing a draft
To publish a draft, you’ll use the publish mutation from the server’s GraphQL API. First, add the mutation to DetailPage.js:
const PUBLISH_MUTATION = gql`
  mutation PublishMutation($id: ID!) {
    publish(id: $id) {
      id
      isPublished
    }
  }
`
The buttons are created inside _renderAction, so that’s where you need to add the Mutation component this time. Go ahead and replace the definition of the publishButton variable with the following:
const publishMutation = (
  <Mutation
    mutation={PUBLISH_MUTATION}
    update={(cache, { data }) => {
      const { drafts } = cache.readQuery({ query: DRAFTS_QUERY })
      const { feed } = cache.readQuery({ query: FEED_QUERY })
      cache.writeQuery({
        query: FEED_QUERY,
        data: { feed: feed.concat([data.publish]) },
      })
      cache.writeQuery({
        query: DRAFTS_QUERY,
        data: {
          drafts: drafts.filter(draft => draft.id !== data.publish.id),
        },
      })
    }}
  >
    {(publish, { data, loading, error }) => {
      return (
        <a
          className="f6 dim br1 ba ph3 pv2 mb2 dib black pointer"
          onClick={async () => {
            await publish({
              variables: { id },
            })
            this.props.history.replace('/')
          }}
        >
          Publish
        </a>
      )
    }}
  </Mutation>
)
This code isn’t using any new concepts. The actual button is wrapped inside a Mutation component which receives the PUBLISH_MUTATION as well as an update function as its props.
Inside update, the published post first is manually removed from the previously cached results of the DRAFTS_QUERY and then added to the FEED_QUERY.
Also note that the publish function that’s passed into the render prop function is invoked whenever the button Publish-button gets clicked.
Next, you need to update what’s returned from the _renderAction function:
return isPublished ? (
  deleteButton
) : (
  <Fragment>
    {publishMutation}
    {deleteButton}
  </Fragment>
)
Finally, you need to ensure the Mutation component and the referenced queries are imported:
import { Query, Mutation } from 'react-apollo'
import { DRAFTS_QUERY } from './DraftsPage'
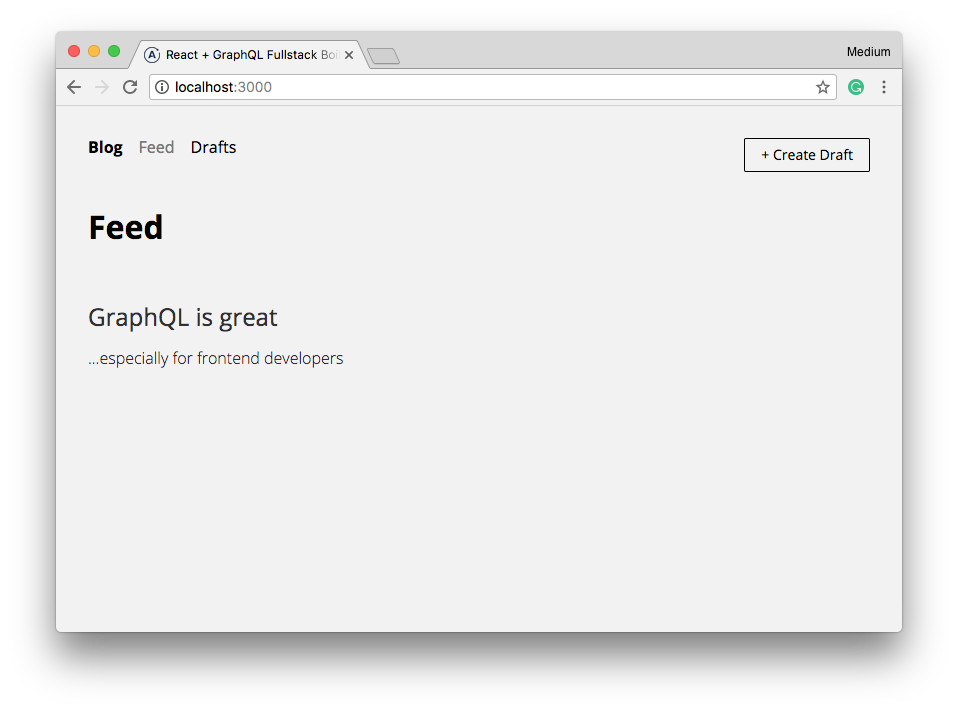
import { FEED_QUERY } from './FeedPage'Go ahead and test the new functionality! You’ll see that a draft that is published through the UI will now indeed appear in the feed:
5.3. Deleting posts
The implementation of the delete functionality is very similar to the one of publishing posts. To keep this tutorial short, we’ll leave the implementation of that feature as an exercise to the attentive reader. If you find yourself lost, just check the final version of the project on GitHub.
Summary
In this tutorial, you learned how to use the new API of React Apollo 2.1. This API is based on the new Query and Mutation components that are making use of the render props pattern for sharing code among React components.
For the purpose of this tutorial, you rebuilt the basic boilerplate from the React & GraphQL fullstack boilerplate repository.
In a future tutorial, you’ll learn how to implement realtime updates inside your app using the new Subscription component of React Apollo 2.1 ⚡️