Building a REST API with NestJS and Prisma: Input Validation & Transformation

Welcome to the second tutorial on the series about building a REST API with NestJS, Prisma and PostgreSQL! In this tutorial, you will learn how to perform input validation and transformation in your API.
Table Of Contents
- Introduction
- Perform input validation
- Use
ParseIntPipeto transform dynamic URL paths - Summary and final remarks
Introduction
In the first part of this series, you created a new NestJS project and integrated it with Prisma, PostgreSQL and Swagger. Then, you built a rudimentary REST API for the backend of a blog application.
In this part, you will learn how to validate the input, so it conforms to your API specifications. Input validation is performed to ensure only properly formed data from the client passes through your API. It is best practice to validate the correctness of any data sent into a web application. This can help prevent malformed data and abuse of your API.
You will also learn how to perform input transformation. Input transformation is a technique that allows you to intercept and transform data sent from the client before being processed by the route handler for that request. This is useful for converting data to appropriate types, applying default values to missing fields, sanitizing input, etc.
Development environment
To follow along with this tutorial, you will be expected to have:
- Node.js installed.
- Docker or PostgreSQL installed.
- Installed the Prisma VSCode Extension. (optional)
- Access to a Unix shell (like the terminal/shell in Linux and macOS) to run the commands provided in this series. (optional)
Note:
The optional Prisma VS Code extension adds some nice IntelliSense and syntax highlighting for Prisma.
If you don't have a Unix shell (for example, you are on a Windows machine), you can still follow along, but the shell commands may need to be modified for your machine.
Clone the repository
The starting point for this tutorial is the ending of part one of this series. It contains a rudimentary REST API built with NestJS. I would recommend finishing the first tutorial before starting this one.
The starting point for this tutorial is available in the begin-validation branch of the GitHub repository. To get started, clone the repository and checkout the begin-validation branch:
git clone -b begin-validation git@github.com:prisma/blog-backend-rest-api-nestjs-prisma.gitNow, perform the following actions to get started:
- Navigate to the cloned directory:
- Install dependencies:
- Start the PostgreSQL database with docker:
- Apply database migrations:
- Start the project:
Note: Step 4 will also generate Prisma Client and seed the database.
Now, you should be able to access the API documentation at http://localhost:3000/api/.
Project structure and files
The repository you cloned should have the following structure:
median
  ├── node_modules
  ├── prisma
  │   ├── migrations
  │   ├── schema.prisma
  │   └── seed.ts
  ├── src
  │   ├── app.controller.spec.ts
  │   ├── app.controller.ts
  │   ├── app.module.ts
  │   ├── app.service.ts
  │   ├── main.ts
  │   ├── articles
  │   └── prisma
  ├── test
  │   ├── app.e2e-spec.ts
  │   └── jest-e2e.json
  ├── README.md
  ├── .env
  ├── docker-compose.yml
  ├── nest-cli.json
  ├── package-lock.json
  ├── package.json
  ├── tsconfig.build.json
  └── tsconfig.json
The notable files and directories in this repository are:
- The
srcdirectory contains the source code for the application. There are three modules:- The
appmodule is situated in the root of thesrcdirectory and is the entry point of the application. It is responsible for starting the web server. - The
prismamodule contains the Prisma Client, your database query builder. - The
articlesmodule defines the endpoints for the/articlesroute and accompanying business logic.
- The
- The
prismamodule has the following:- The
schema.prismafile defines the database schema. - The
migrationsdirectory contains the database migration history. - The
seed.tsfile contains a script to seed your development database with dummy data.
- The
- The
docker-compose.ymlfile defines the Docker image for your PostgreSQL database. - The
.envfile contains the database connection string for your PostgreSQL database.
Note: For more information about these components, go through part one of this tutorial series.
Perform input validation
To perform input validation, you will be using NestJS Pipes. Pipes operate on the arguments being processed by a route handler. Nest invokes a pipe before the route handler, and the pipe receives the arguments destined for the route handler. Pipes can do a number of things, like validate the input, add fields to the input, etc. Pipes are similar to middleware, but the scope of pipes is limited to processing input arguments. NestJS provides a few pipes out-of-the-box, but you can also create your own custom pipes.
Pipes have two typical use cases:
- Validation: Evaluate input data and, if valid, pass it through unchanged; otherwise, throw an exception when the data is incorrect.
- Transformation: Transform input data to the desired form (e.g., from string to integer).
A NestJS validation pipe will check the arguments passed to a route. If the arguments are vaid, the pipe will pass the arguments to the route handler without any modification. However, if the arguments violate any of the specified validation rules, the pipe will throw an exception.
The following two diagrams shows how validation pipe works, for an arbitrary /example route.
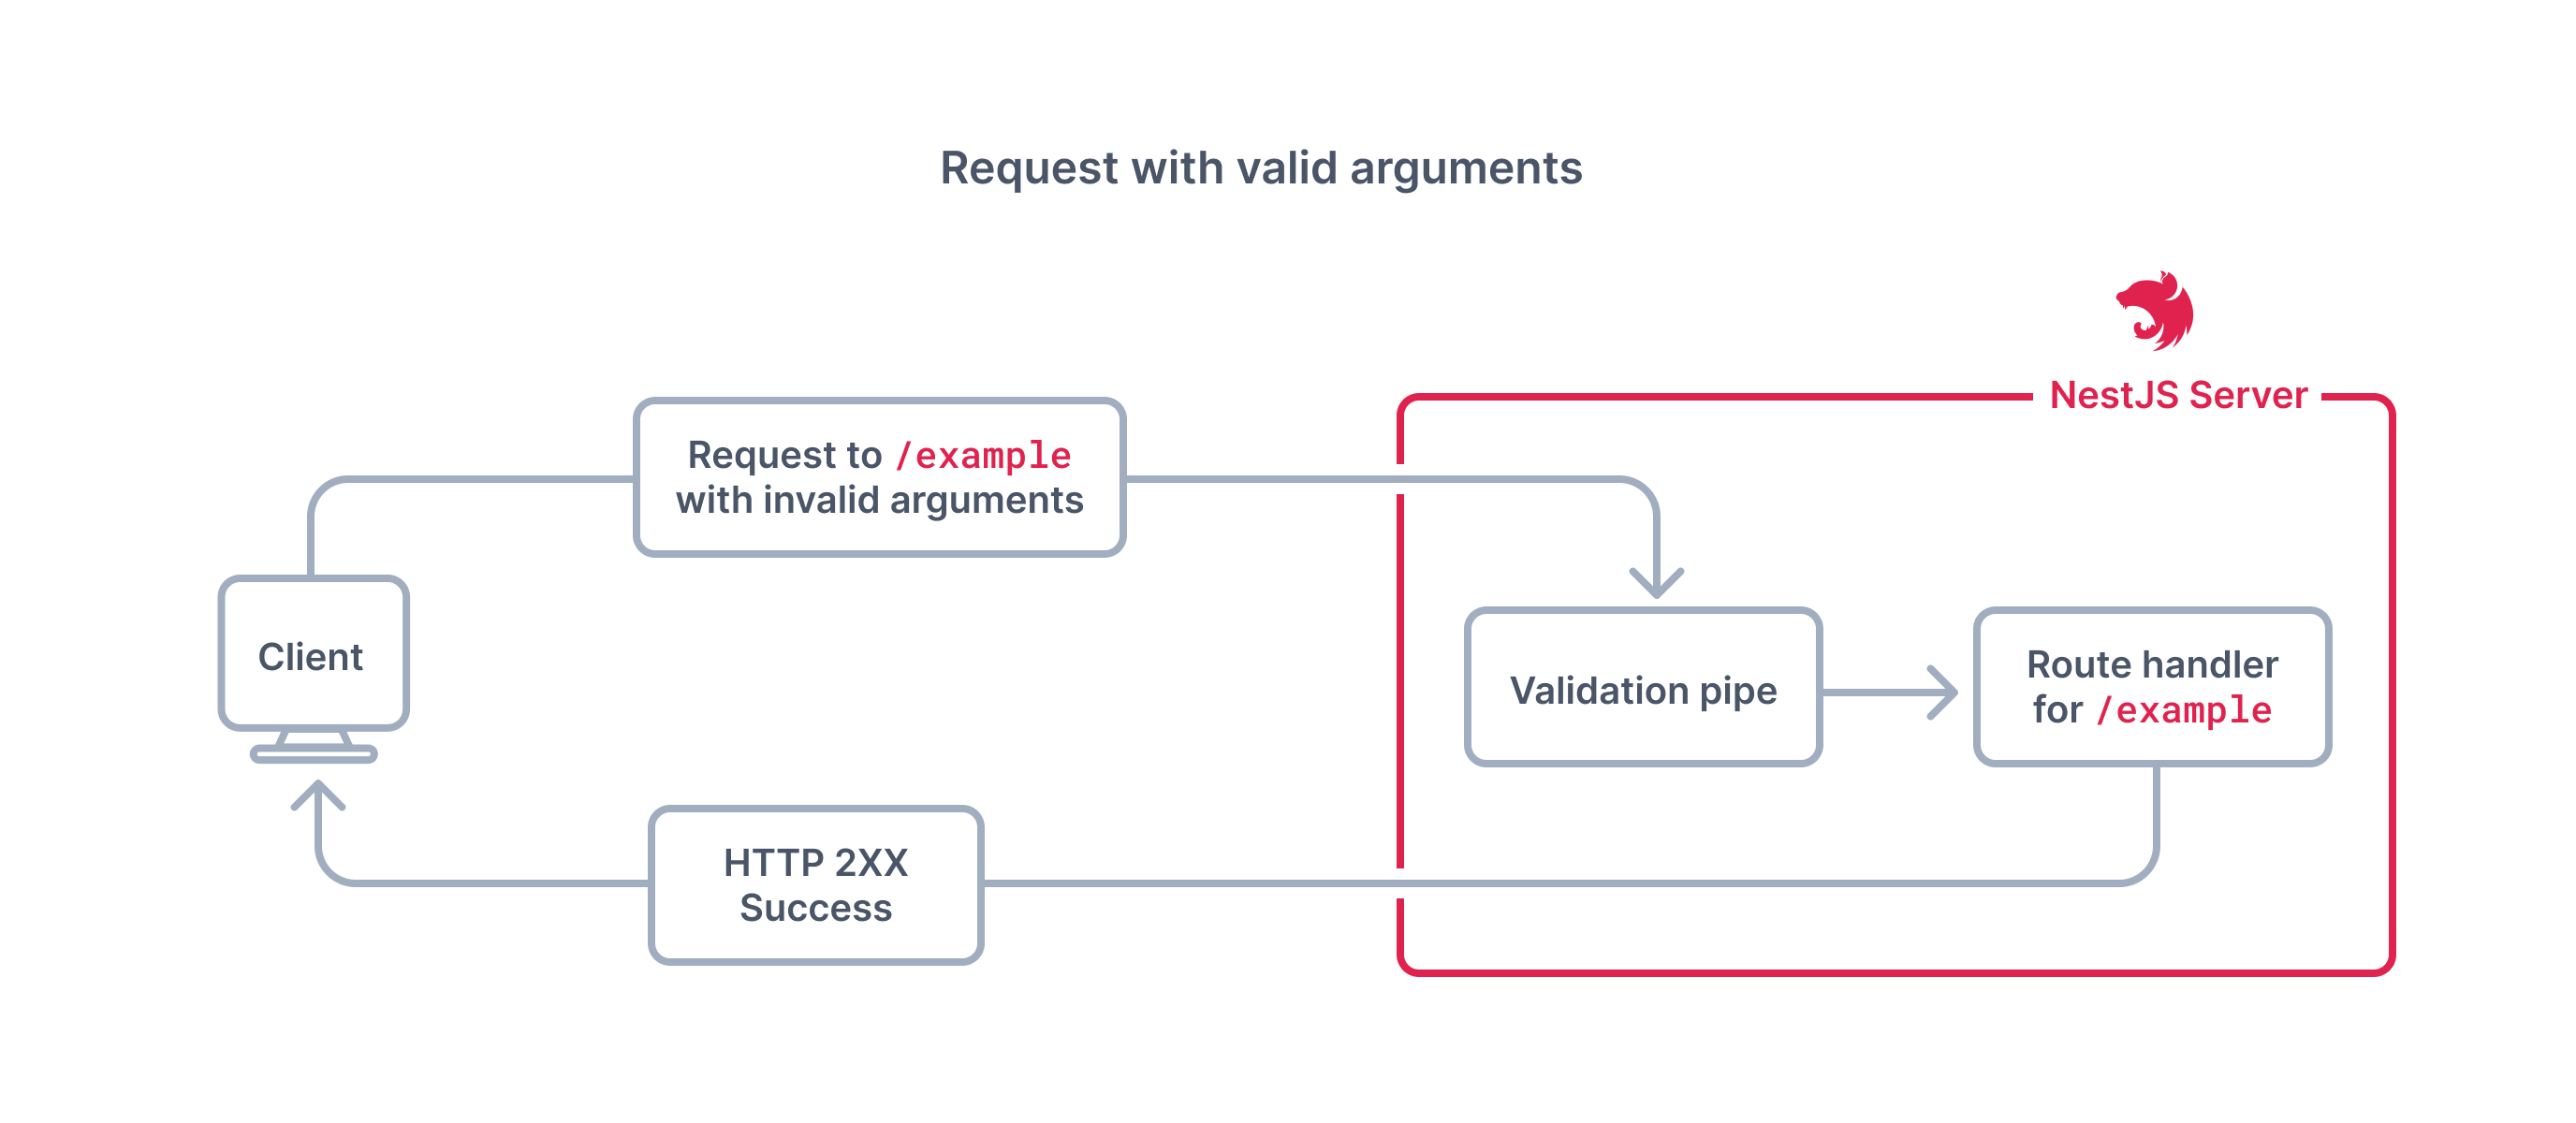
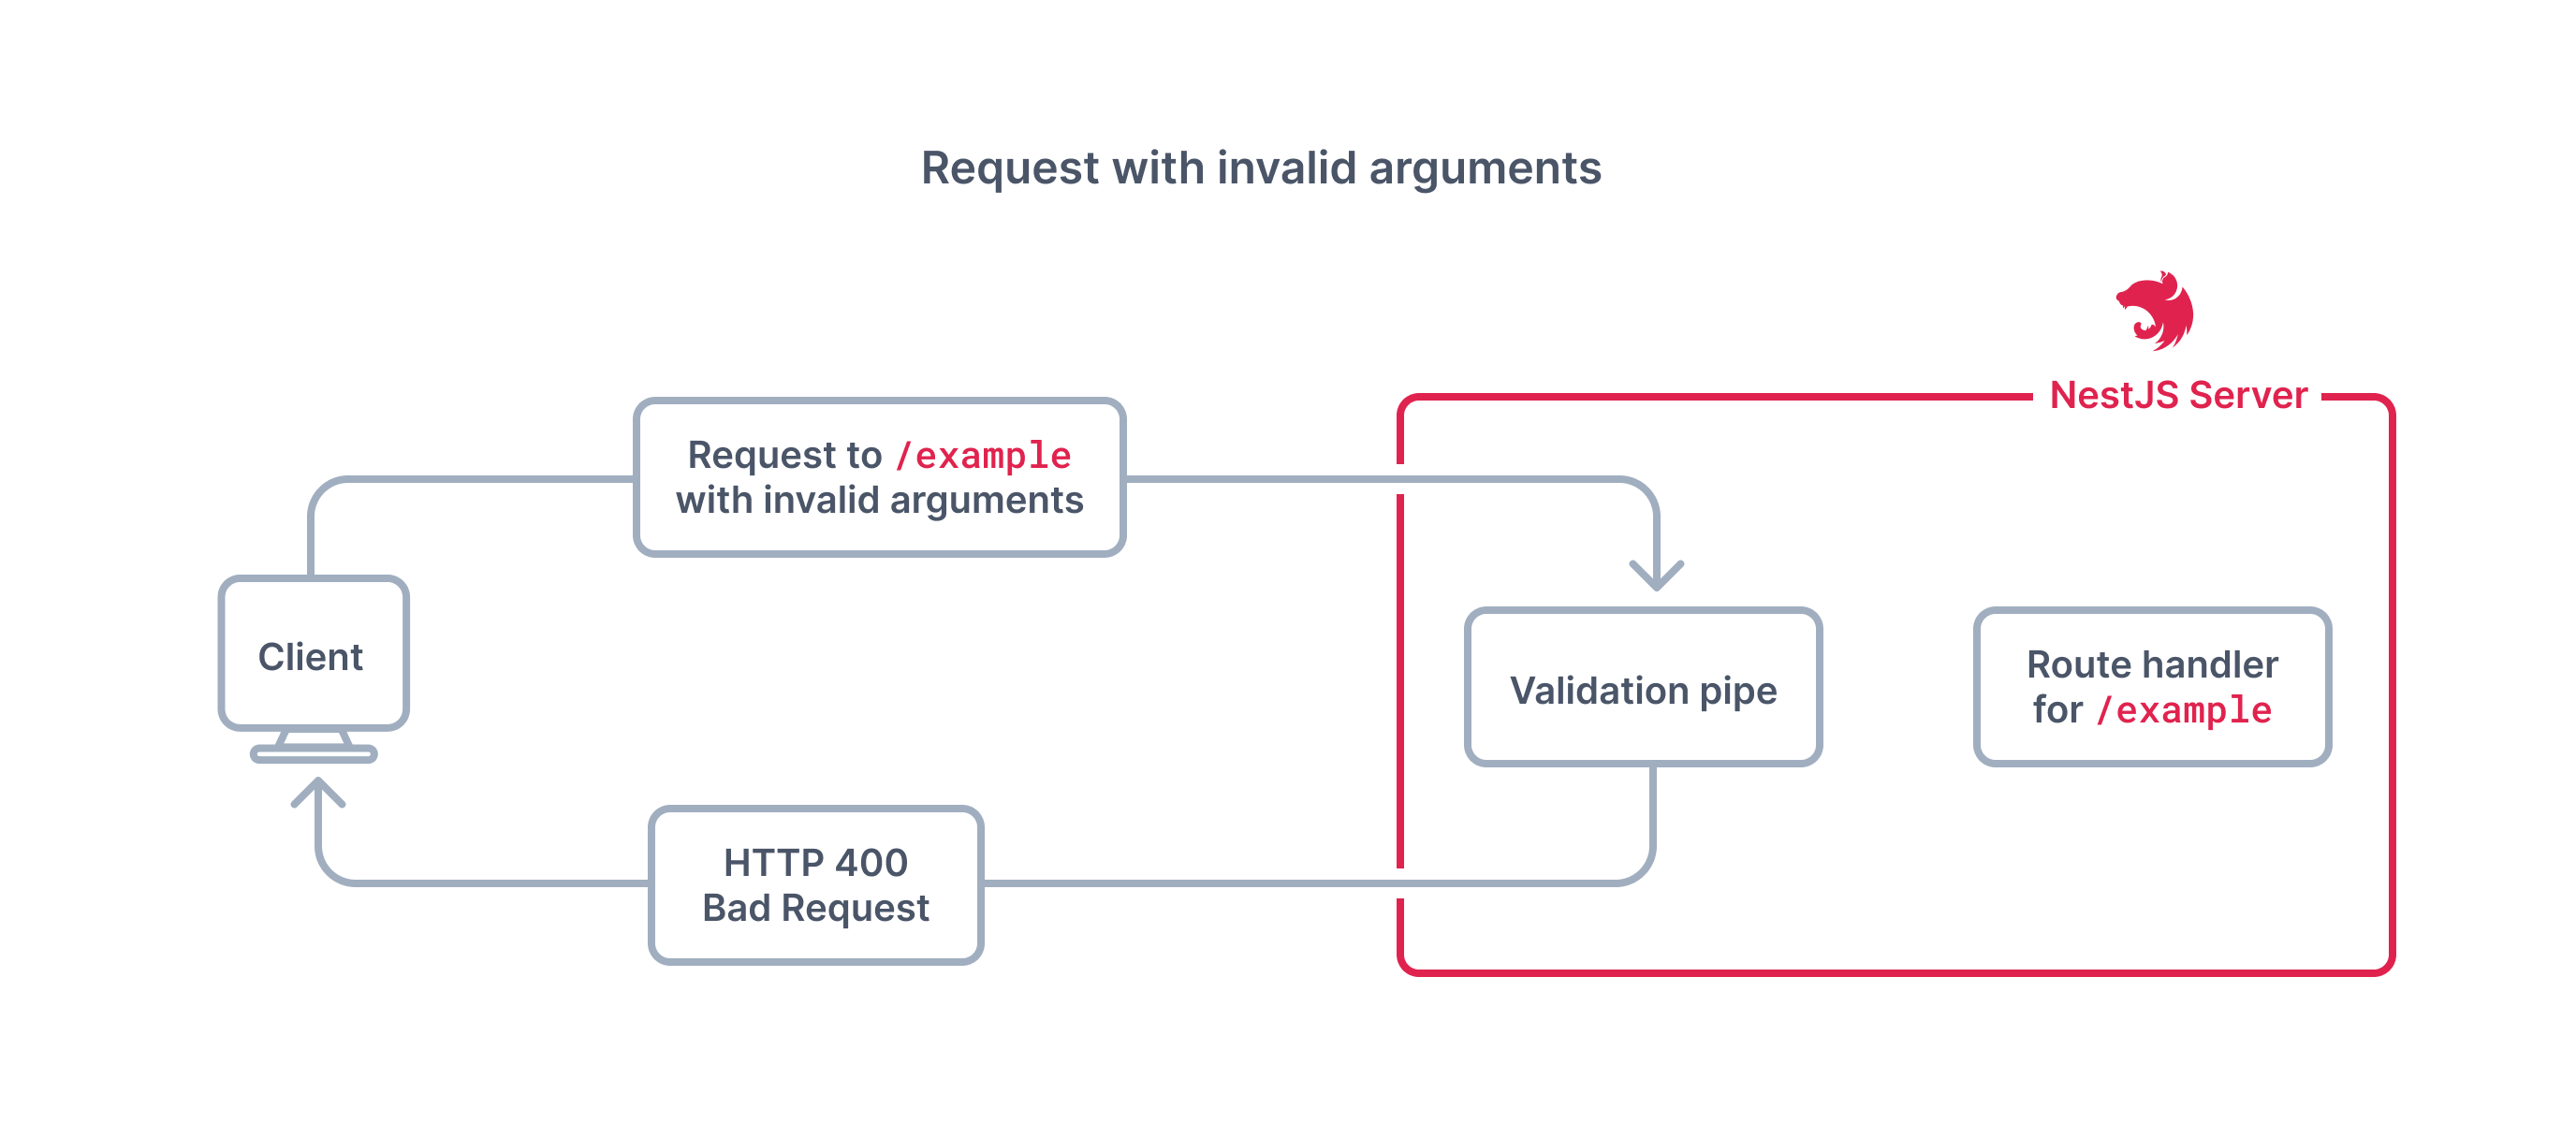
In this section, you will focus on the validation use case.
Set up ValidationPipe globally
To perform input validation, you will be using the built-in NestJS ValidationPipe. The ValidationPipe provides a convenient approach to enforce validation rules for all incoming client payloads, where the validation rules are declared with decorators from the class-validator package.
To use this feature, you will need to add two packages to your project:
npm install class-validator class-transformerThe class-validator package provides decorators for validating input data, and the class-transformer package provides decorators to transform input data to the desired form. Both packages are well integrated with NestJS pipes.
Now import the ValidationPipe in your main.ts file and use the app.useGlobalPipes method to make it available globally in your application:
diff // src/main.ts

import { NestFactory } from '@nestjs/core';
import { AppModule } from './app.module';
import { SwaggerModule, DocumentBuilder } from '@nestjs/swagger';
+import { ValidationPipe } from '@nestjs/common';

async function bootstrap() {
  const app = await NestFactory.create(AppModule);

+  app.useGlobalPipes(new ValidationPipe());

  const config = new DocumentBuilder()
    .setTitle('Median')
    .setDescription('The Median API description')
    .setVersion('0.1')
    .build();
  const document = SwaggerModule.createDocument(app, config);
  SwaggerModule.setup('api', app, document);

  await app.listen(3000);
}
bootstrap();
Add validation rules to CreateArticleDto
You will now use the class-validator package to add validation decorators to CreateArticleDto. You will apply the following rules to CreateArticleDto:
titlecan't be empty or shorter than 5 characters.descriptionhas to have a maximum length of 300.bodyanddescriptioncan't be empty.title,descriptionandbodymust be of typestringandpublishedmust be of typeboolean.
Open the src/articles/dto/create-article.dto.ts file and replace its contents with the following:
// src/articles/dto/create-article.dto.ts

import { ApiProperty } from '@nestjs/swagger';
import {
  IsBoolean,
  IsNotEmpty,
  IsOptional,
  IsString,
  MaxLength,
  MinLength,
} from 'class-validator';

export class CreateArticleDto {
  @IsString()
  @IsNotEmpty()
  @MinLength(5)
  @ApiProperty()
  title: string;

  @IsString()
  @IsOptional()
  @IsNotEmpty()
  @MaxLength(300)
  @ApiProperty({ required: false })
  description?: string;

  @IsString()
  @IsNotEmpty()
  @ApiProperty()
  body: string;

  @IsBoolean()
  @IsOptional()
  @ApiProperty({ required: false, default: false })
  published?: boolean = false;
}
These rules will be picked up by the ValidationPipe and applied automatically to your route handlers. One of the advantages of using decorators for validation is that the CreateArticleDto remains the single source of truth for all arguments to the POST /articles endpoint. So you don't need to define a separate validation class.
Test out the validation rules you have in place. Try creating an article using the POST /articles endpoint with a very short placeholder title like this:
{
  "title": "Temp",
  "description": "Learn about input validation",
  "body": "Input validation is...",
  "published": false
}
You should get an HTTP 400 error response along with details in the response body about what validation rule was broken.
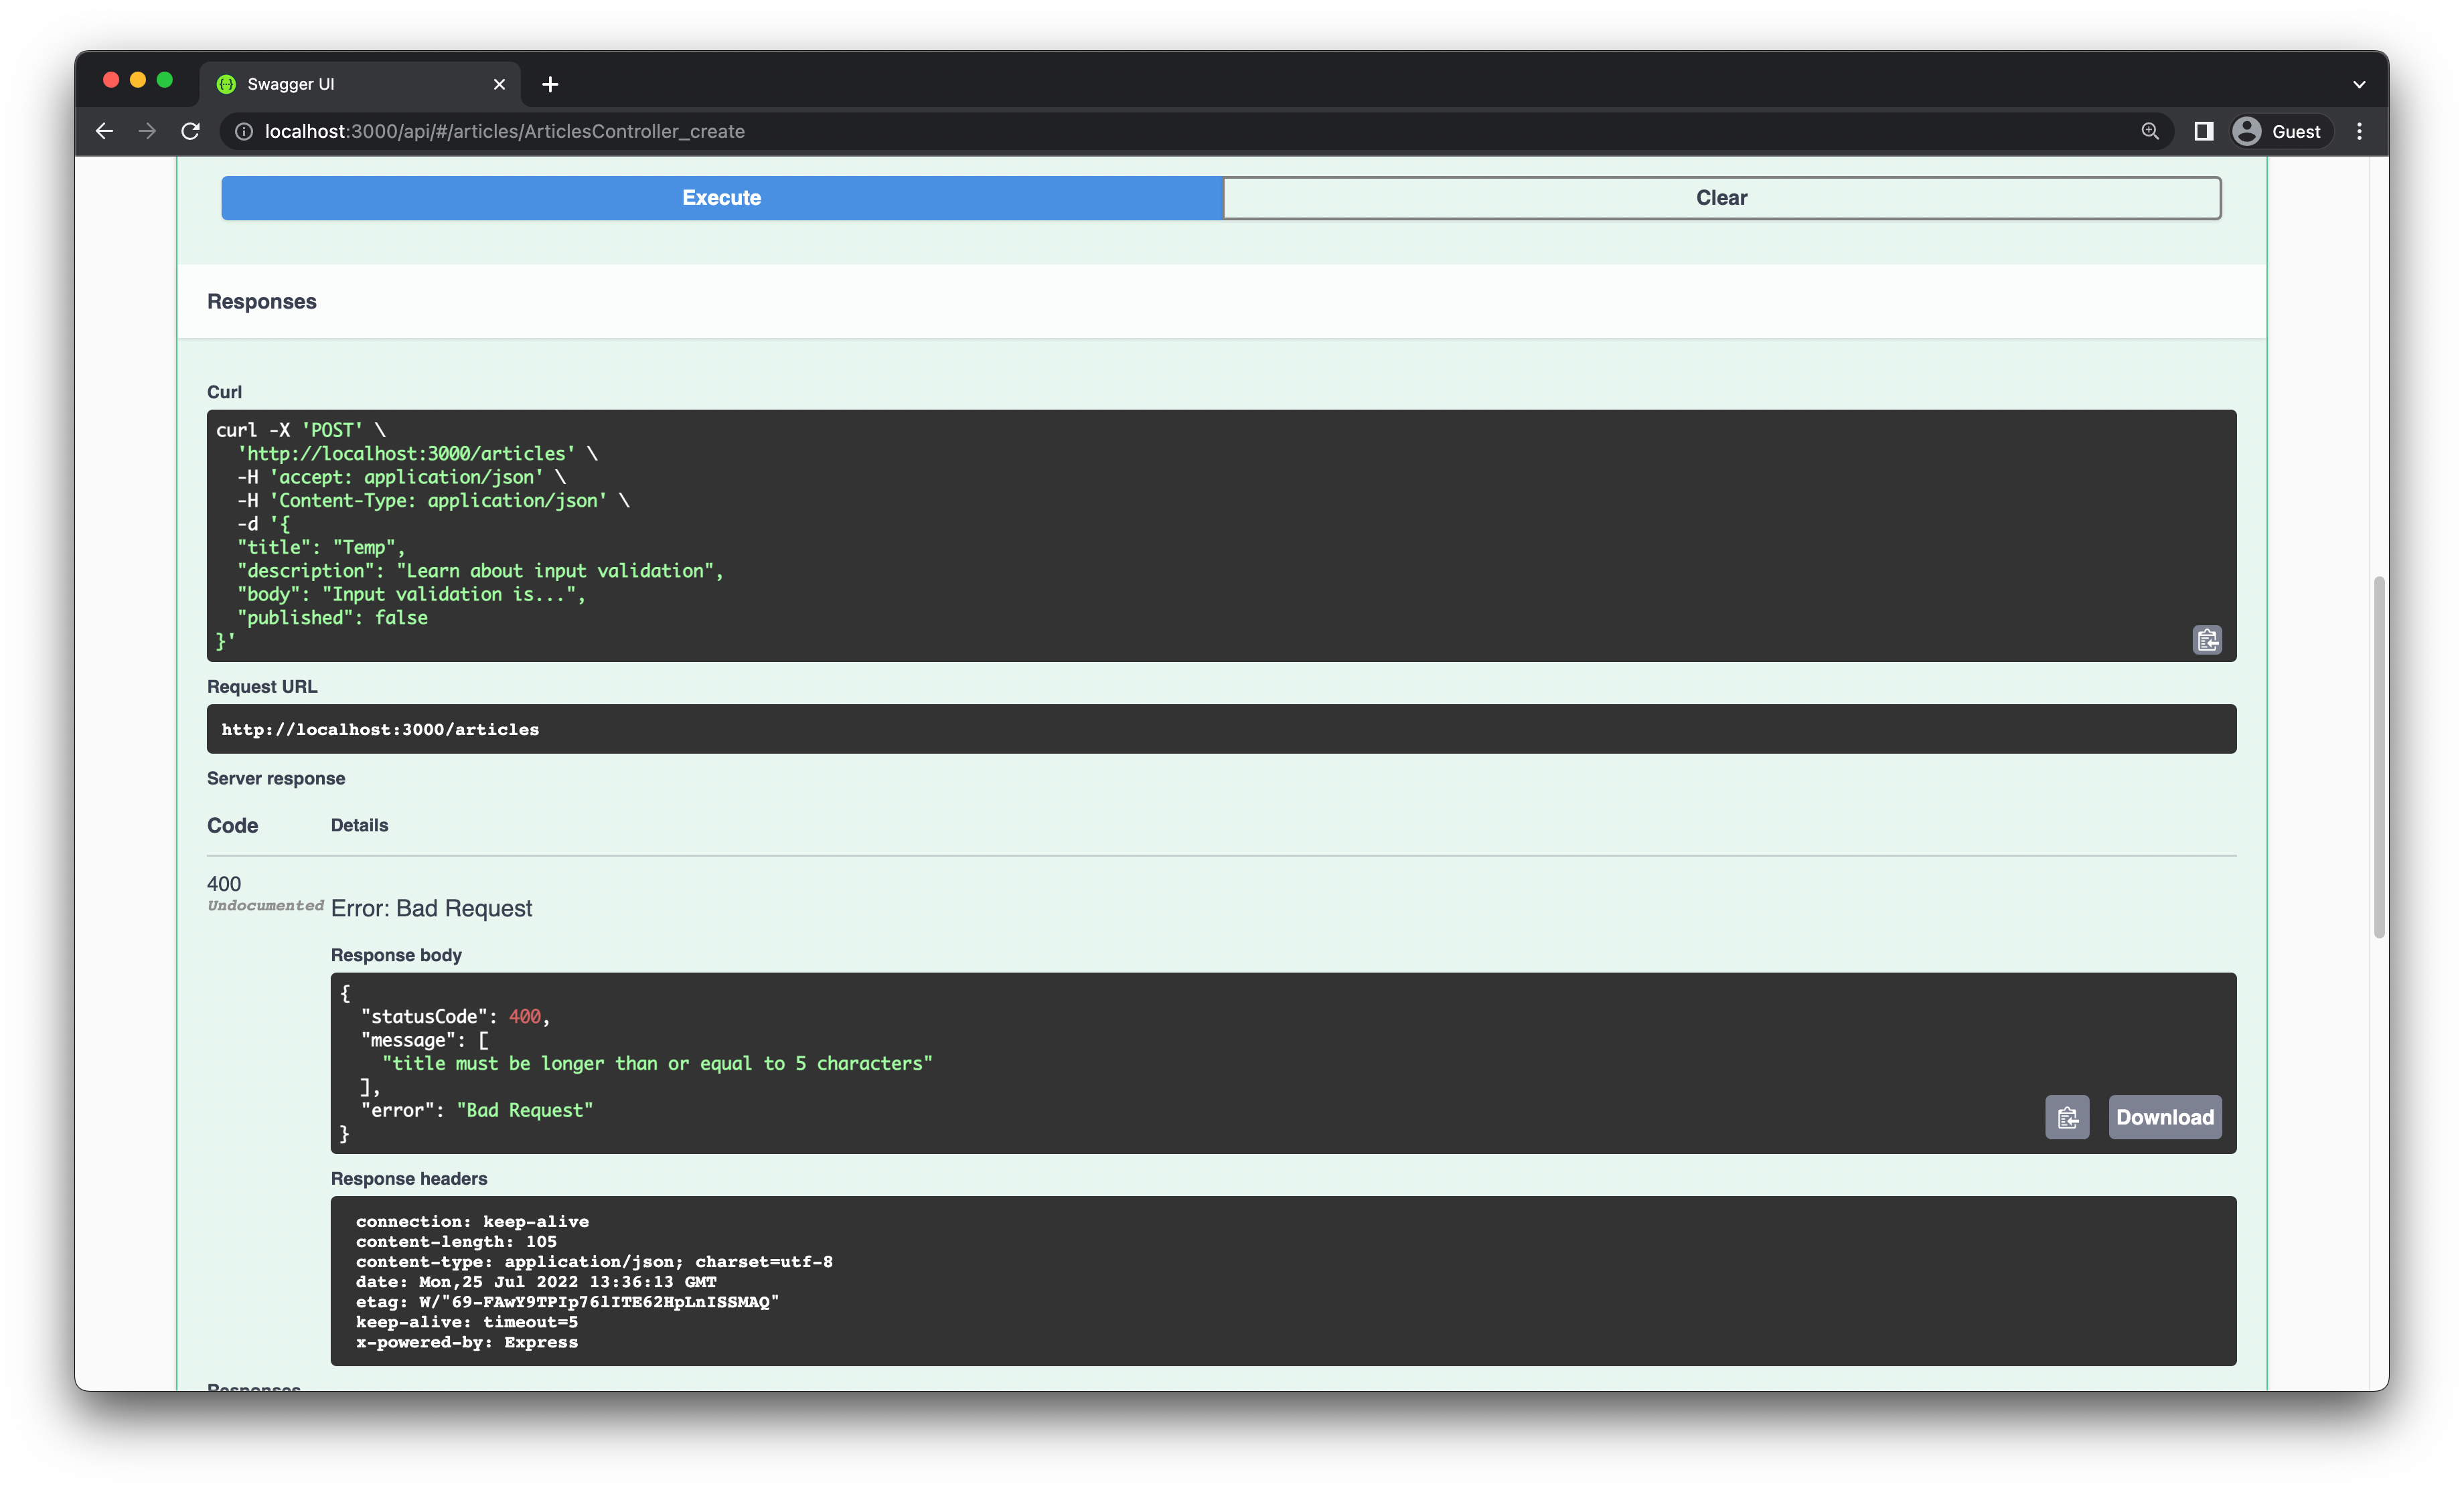
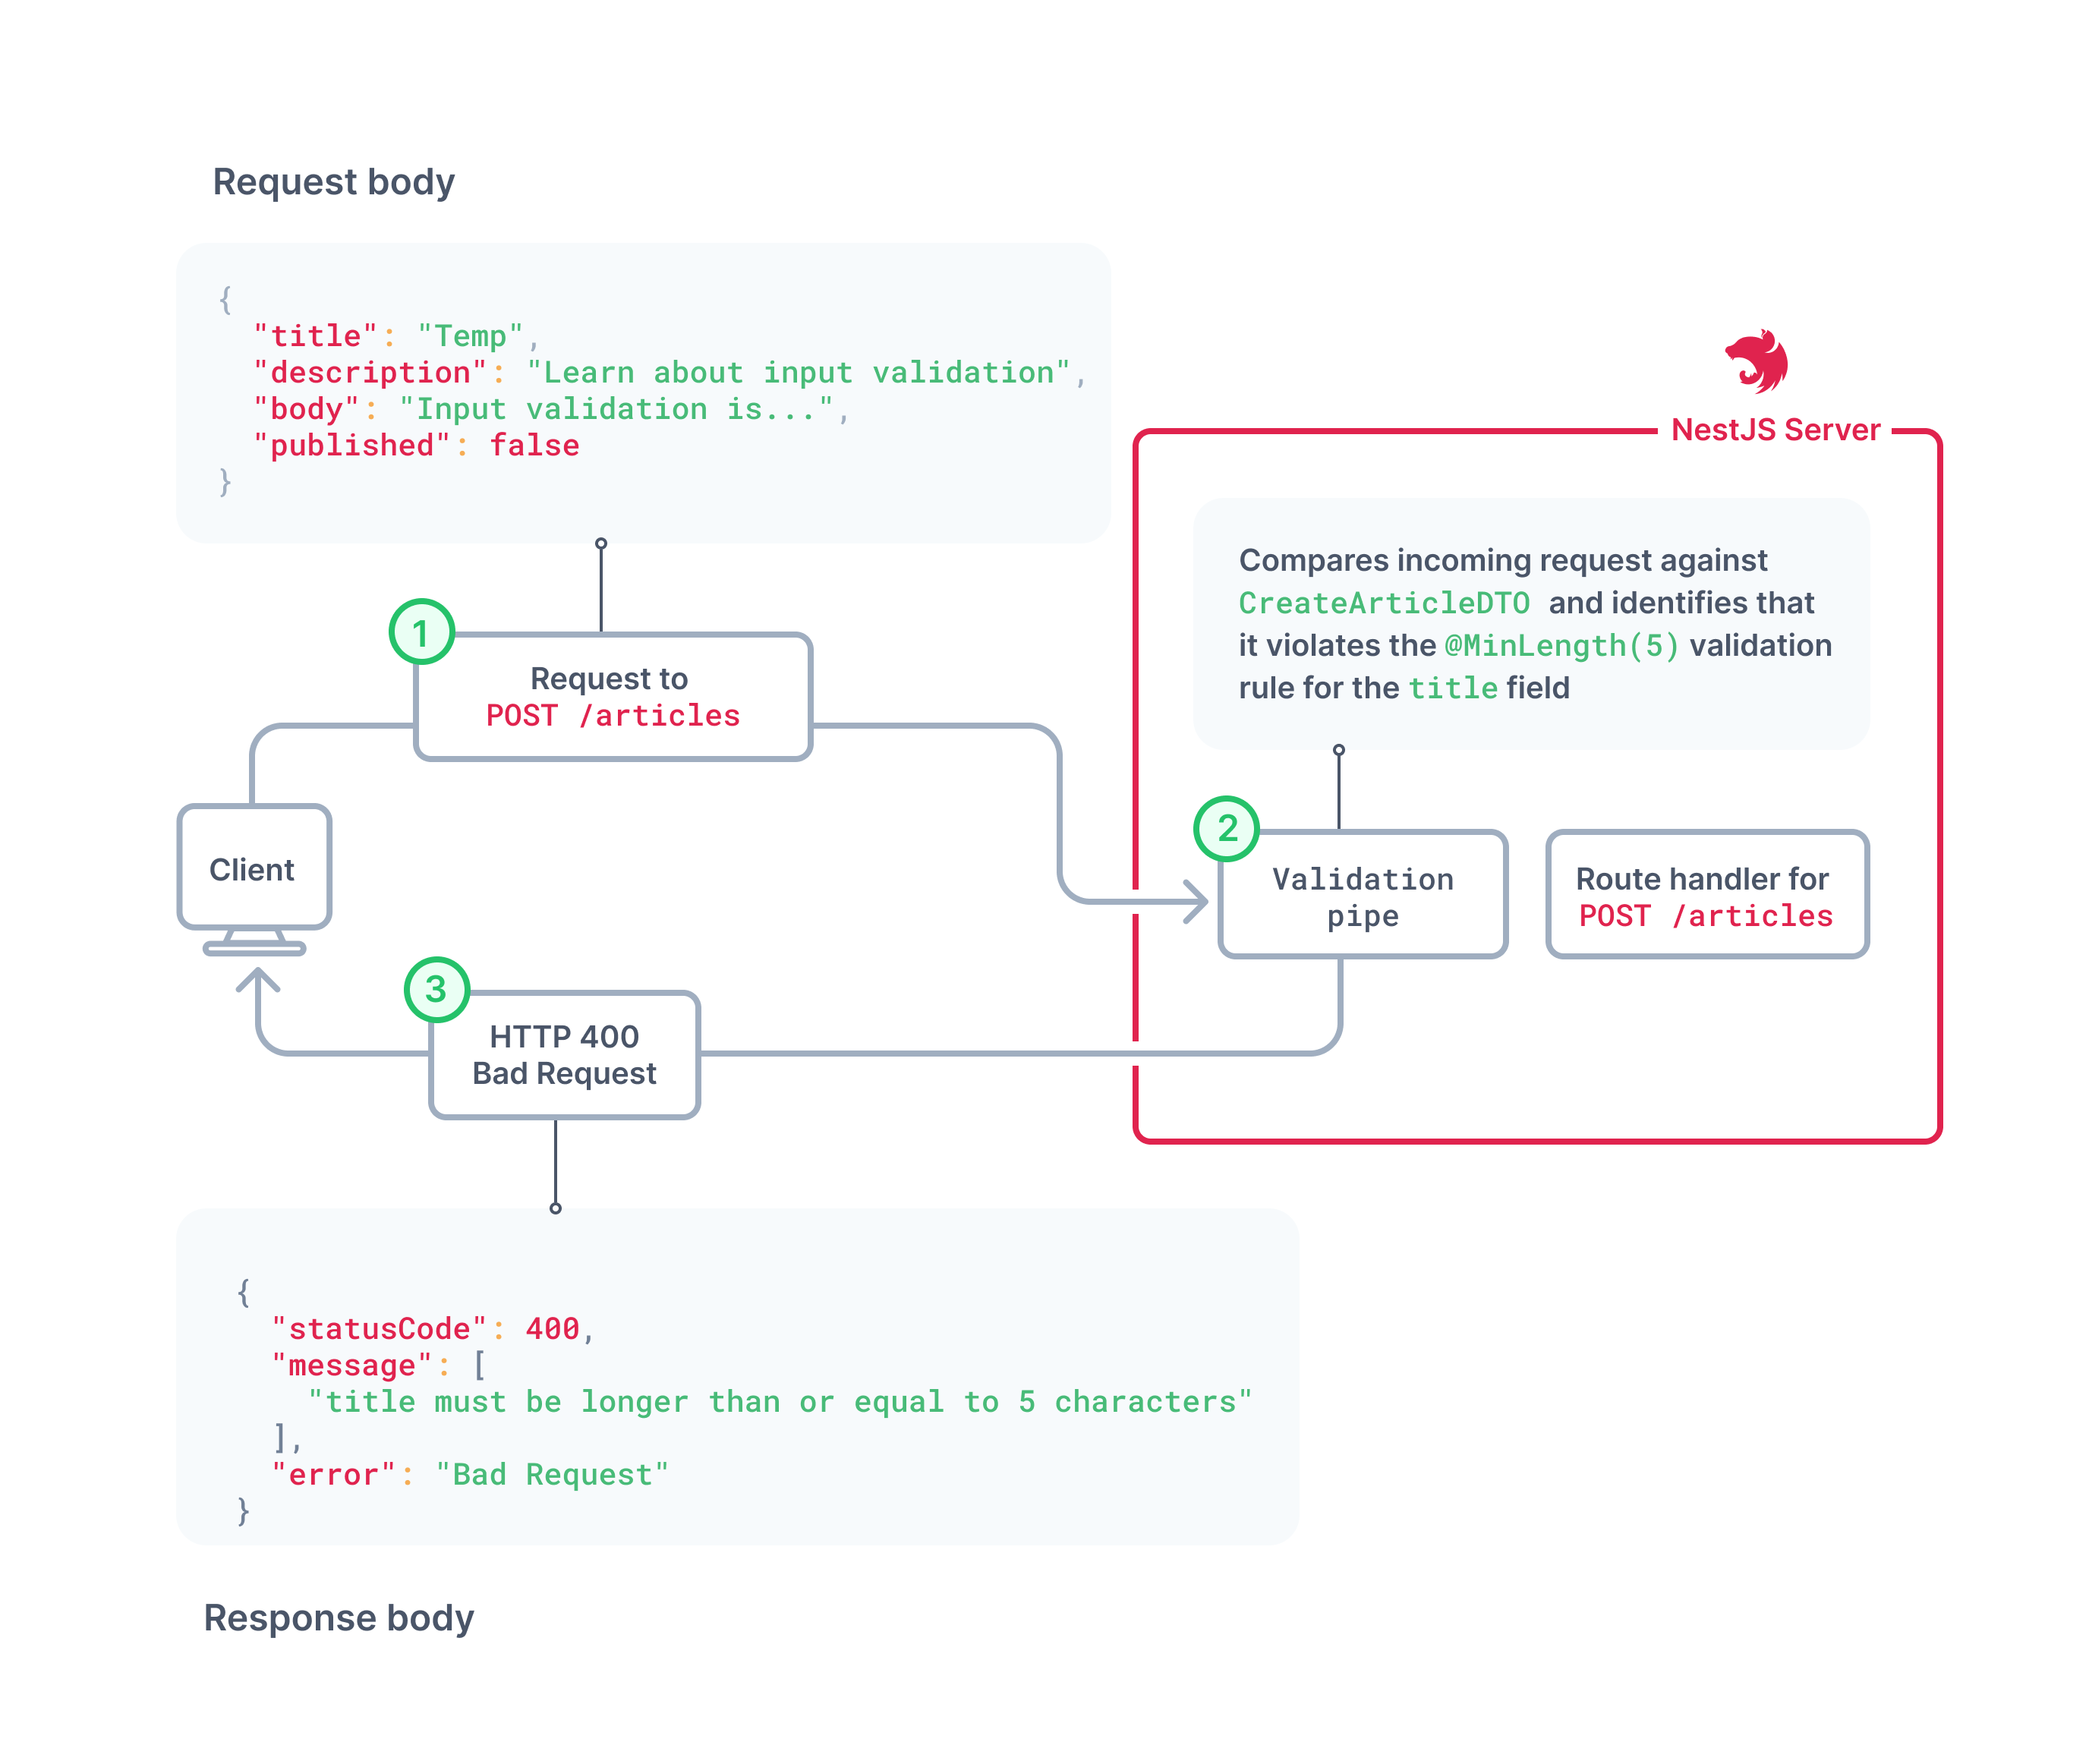
This diagram explains what the ValidationPipe is doing under the hood for invalid inputs to the /articles route:
Strip unnecessary properties from client requests
The CreateArticleDTO defines the properties that need to be sent to the POST /articles endpoint to create a new article. UpdateArticleDTO does the same, but for the PATCH /articles/{id} endpoint.
Currently, for both of these endpoints it is possible to send additional properties that are not defined in the DTO. This can lead to unforeseen bugs or security issues. For example, you could manually pass invalid createdAt and updatedAt values to the POST /articles endpoint. Since TypeScript type information is not available at run-time, your application will not be able to identify that these fields are not available in the DTO.
To give an example, try sending the following request to the POST /articles endpoint:
{
  "title": "example-title",
  "description": "example-description",
  "body": "example-body",
  "published": true,
  "createdAt": "2010-06-08T18:20:29.309Z",
  "updatedAt": "2021-06-02T18:20:29.310Z"
}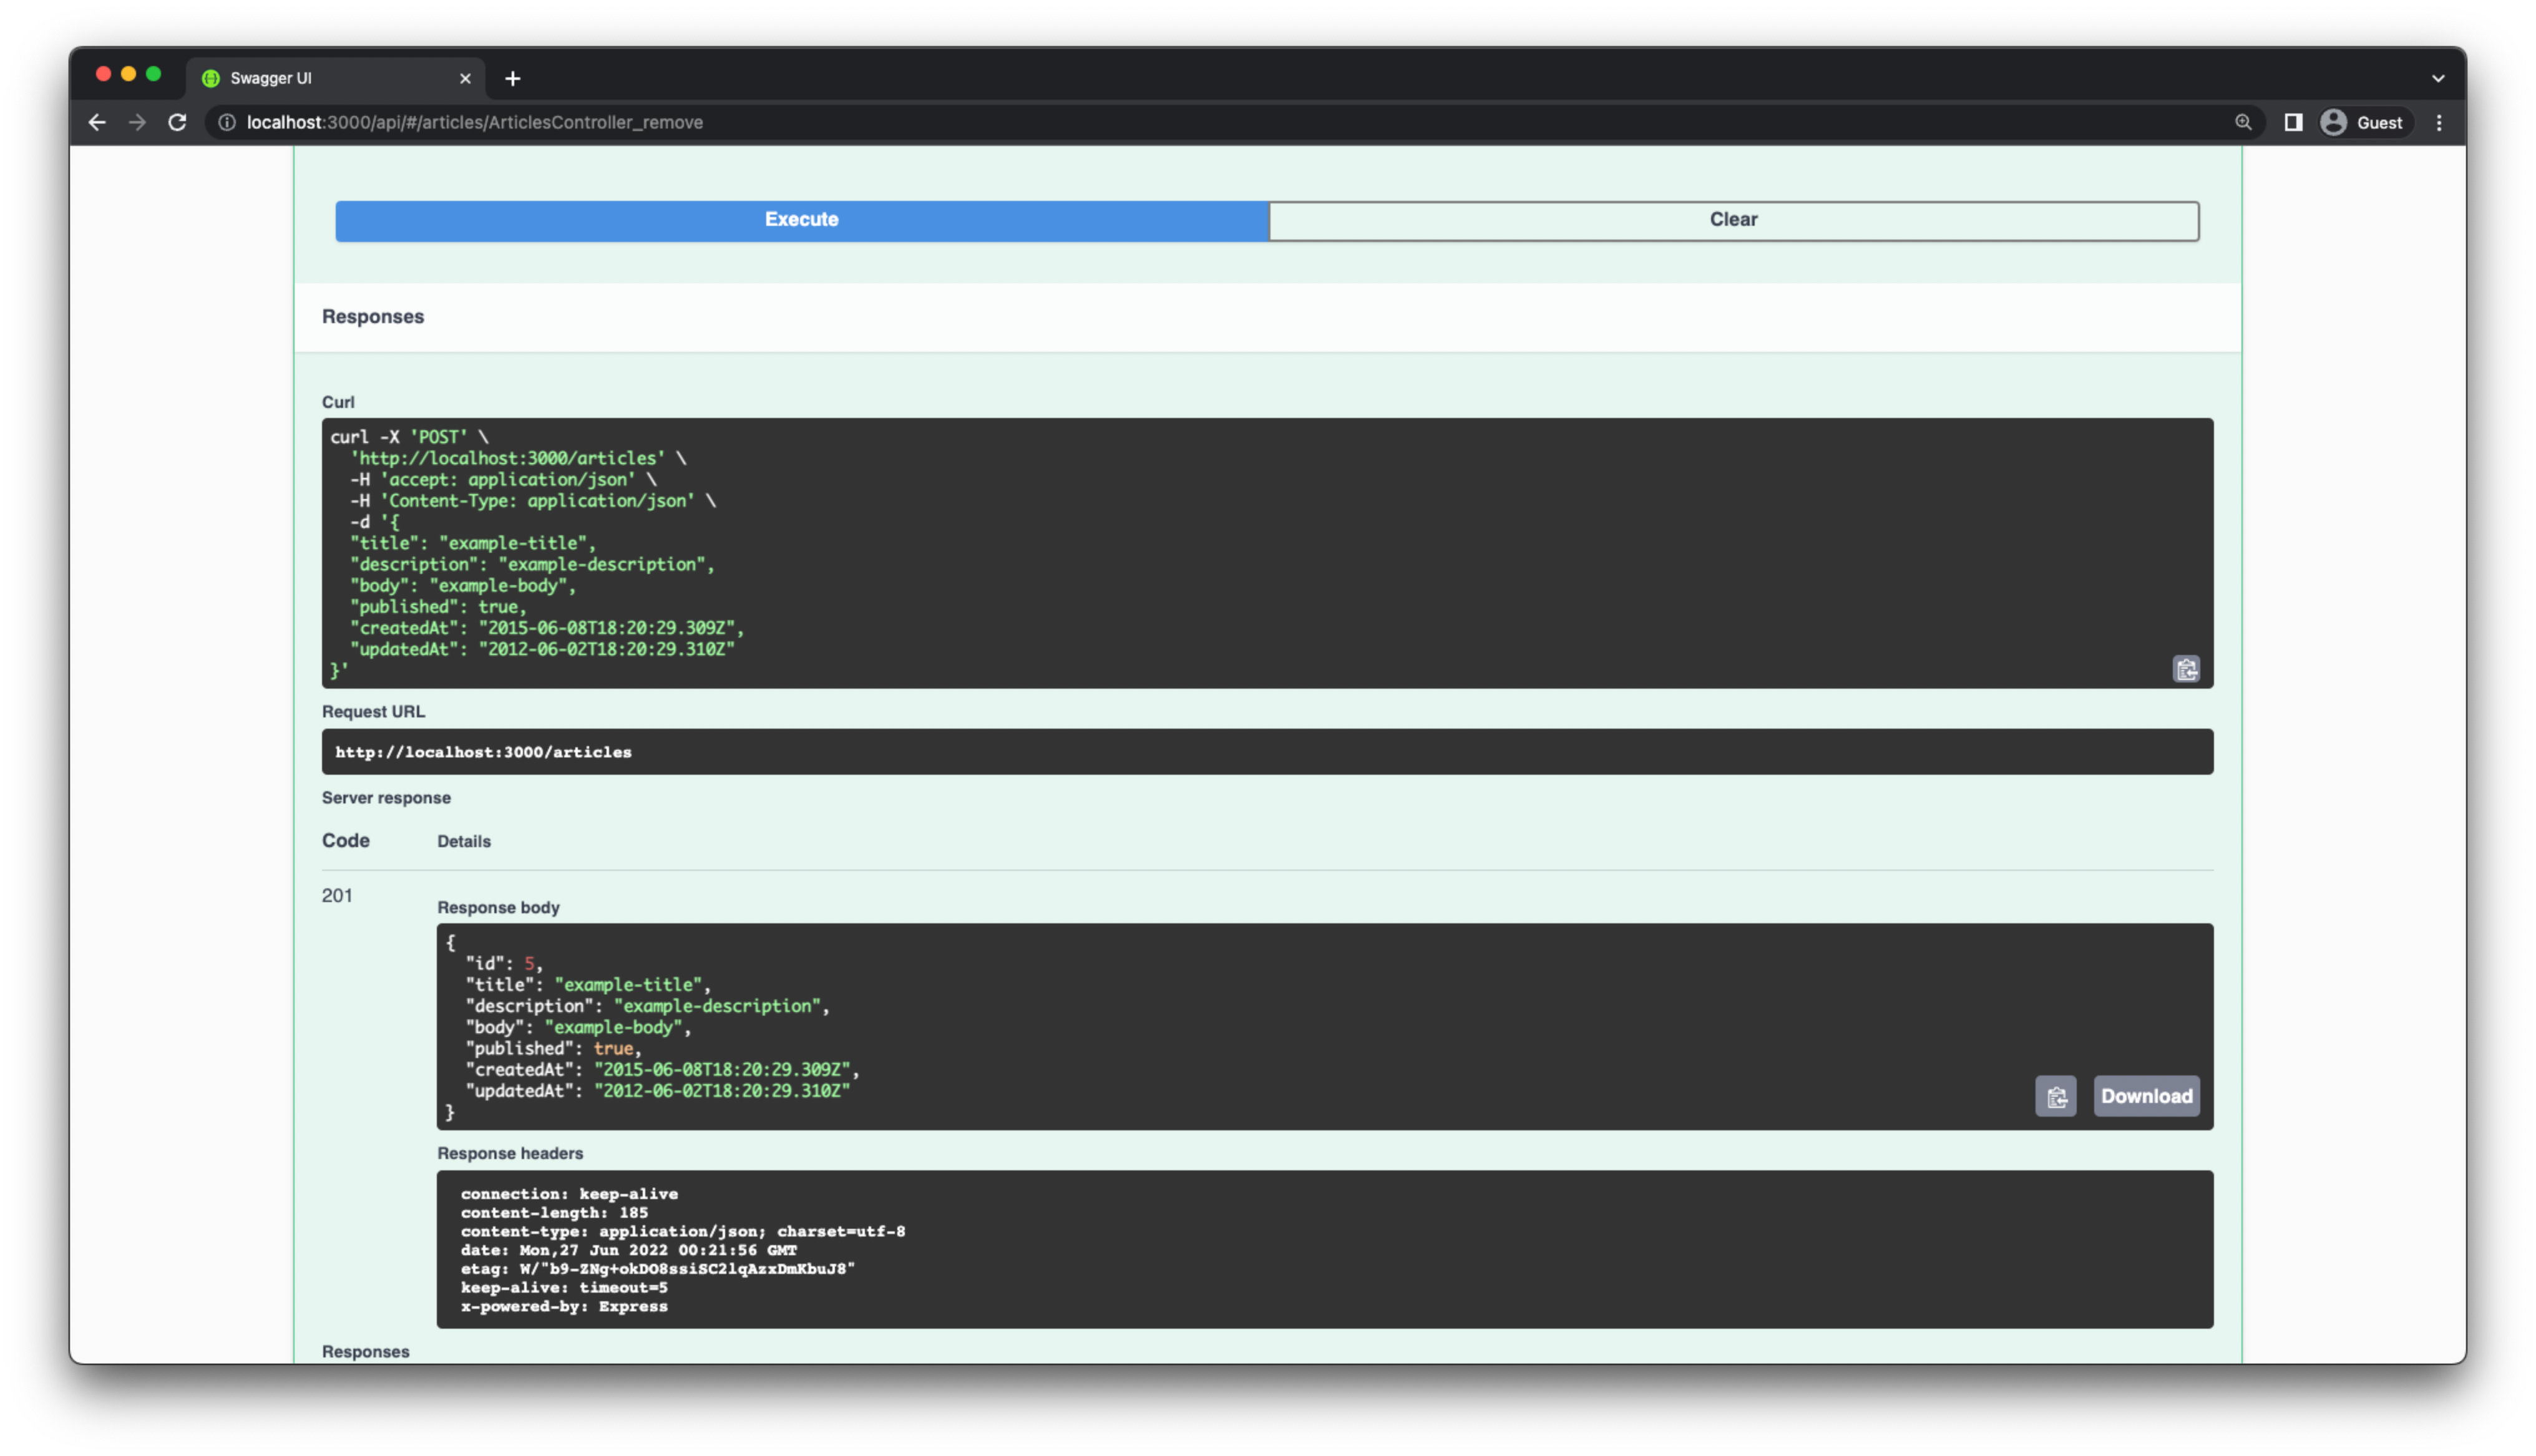
In this way, you can inject invalid values. Here you have created an article that has an updatedAt value that precedes createdAt, which does not make sense.
To prevent this, you will need to filter any unnecessary fields/properties from client requests. Fortunately, NestJS provides an out-of-the-box for this as well. All you need to do is pass the whitelist: true option when initializing the ValidationPipe inside your application.
diff // src/main.ts

import { NestFactory } from '@nestjs/core';
import { AppModule } from './app.module';
import { SwaggerModule, DocumentBuilder } from '@nestjs/swagger';
import { ValidationPipe } from '@nestjs/common';

async function bootstrap() {
  const app = await NestFactory.create(AppModule);

+  app.useGlobalPipes(new ValidationPipe({ whitelist: true }));

  const config = new DocumentBuilder()
    .setTitle('Median')
    .setDescription('The Median API description')
    .setVersion('0.1')
    .build();
  const document = SwaggerModule.createDocument(app, config);
  SwaggerModule.setup('api', app, document);

  await app.listen(3000);
}
bootstrap();
With this option set to true, ValidationPipe will automatically remove all non-whitelisted properties, where “non-whitelisted” means properties without any validation decorators. It’s important to note that this option will filter all properties without validation decorators, even if they are defined in the DTO.
Now, any additional fields/properties that are passed to the request will be stripped automatically by NestJS, preventing the previously shown exploit.
Note: The NestJS
ValidationPipeis highly configurable. All configuration options available are documented in the NestJS docs. If necessary, you can also build custom validation pipes for your application.
Transform dynamic URL paths with ParseIntPipe
Inside your API, you are currently accepting the id parameter for the GET /articles/{id} , PATCH /articles/{id} and DELETE /articles/{id} endpoints as a part of the path. NestJS parses the id parameter as a string from the URL path. Then, the string is cast to a number inside your application code before being passed to the ArticlesService. For example, take a look at the DELETE /articles/{id} route handler:
// src/articles/articles.controller.ts

@Delete(':id')
@ApiOkResponse({ type: ArticleEntity })
remove(@Param('id') id: string) {   // id is parsed as a string
  return this.articlesService.remove(+id); // id is converted to number using the expression '+id'
}
Since id is defined as a string type, the Swagger API also documents this argument as a string in the generated API documentation. This is unintuitive and incorrect.
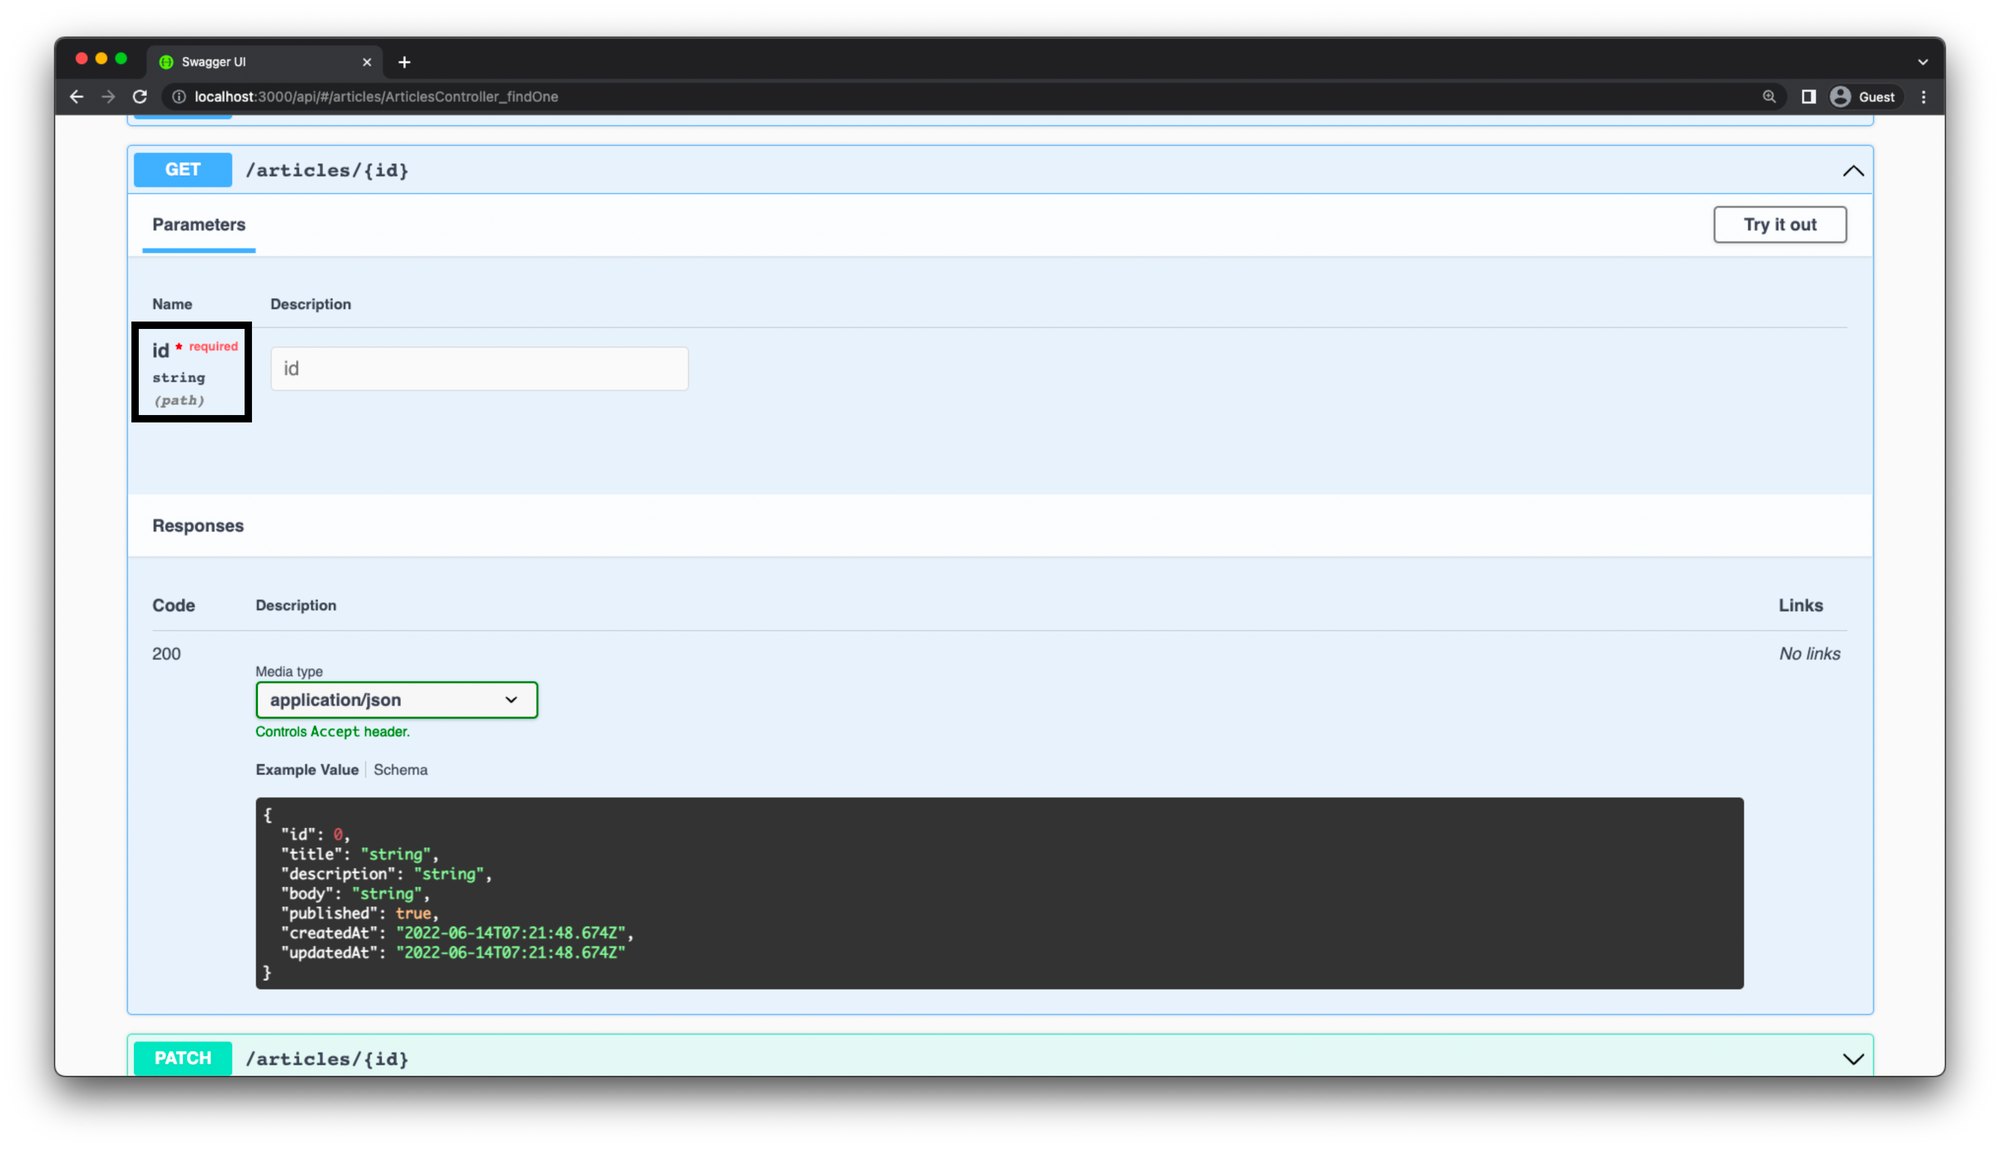
Instead of doing this transformation manually inside the route handler, you can use a NestJS pipe to convert id to a number automatically. Add the built-in ParseIntPipe to the controller route handlers for these three endpoints:
// src/articles/articles.controller.ts

import {
  Controller,
  Get,
  Post,
  Body,
  Patch,
  Param,
  Delete,
  NotFoundException,
+  ParseIntPipe,
} from '@nestjs/common';

export class ArticlesController {
  // ...

  @Get(':id')
  @ApiOkResponse({ type: ArticleEntity })
+  findOne(@Param('id', ParseIntPipe) id: number) {
+    return this.articlesService.findOne(id);
  }

  @Patch(':id')
  @ApiCreatedResponse({ type: ArticleEntity })
  update(
+    @Param('id', ParseIntPipe) id: number,
    @Body() updateArticleDto: UpdateArticleDto,
  ) {
+    return this.articlesService.update(id, updateArticleDto);
  }

  @Delete(':id')
  @ApiOkResponse({ type: ArticleEntity })
+  remove(@Param('id', ParseIntPipe) id: number) {
+    return this.articlesService.remove(id);
  }
}
The ParseIntPipe will intercept the id parameter of string type and automatically parse it to a number before passing it to the appropriate route handler. This also has the advantage of documenting the id parameter correctly as a number inside Swagger.
Summary and final remarks
Congratulations! In this tutorial, you took an existing REST API and:
- Integrated validation using the
ValidationPipe. - Stripped client request of unnecessary properties.
- Integrated
ParseIntPipeto parse astringpath variable and convert it to anumber.
You might have noticed that NestJS heavily relies on decorators. This is a very intentional design choice. NestJS aims to improve code readability and modularity by heavily leveraging decorators for various kinds of cross-cutting concerns. As a result, controllers and service methods do not need to be bloated with boilerplate code for doing things like validation, caching, logging, etc.
If you want to extend the project further, the Prisma getting started guide and Prisma Migrate docs are good next steps, and Prisma Postgres is an easy way to stand up the database layer for follow-on work.
You can find the finished code for this tutorial in the end-validation branch of the GitHub repository. Please feel free to raise an issue in the repository or submit a PR if you notice a problem. You can also reach out to me directly on Twitter.