Building a REST API with NestJS and Prisma: Error Handling

Welcome to the third tutorial in this series about building a REST API with NestJS, Prisma and PostgreSQL! In this tutorial, you will learn how to perform error handling in a NestJS application.
Table Of Contents
- Introduction
- Detect and throw exceptions directly
- Handle exceptions by using exception filters
- Bonus: Handle Prisma exceptions with the
nestjs-prismapackage - Summary and final remarks
Introduction
In the first chapter of this series, you created a new NestJS project and integrated it with Prisma, PostgreSQL and Swagger. Then, you built a rudimentary REST API for the backend of a blog application. In the second chapter you learnt how to do input validation and transformation.
In this chapter you will learn how to handle errors in NestJS. You will look at two different strategies:
- First, you will learn how to detect and throw errors directly in your application code inside the controllers of your API.
- Next, you will learn how to use an exception filter to process unhandled exceptions throughout your application.
In this tutorial, you will be using the REST API built in the first chapter. You do not need to complete the second chapter to follow this tutorial.
Development environment
To follow along with this tutorial, you will be expected to:
- ... have Node.js installed.
- ... have Docker and Docker Compose installed. If you are using Linux, please make sure your Docker version is 20.10.0 or higher. You can check your Docker version by running
docker versionin the terminal. - ... optionally have the Prisma VS Code Extension installed. The Prisma VS Code extension adds some really nice IntelliSense and syntax highlighting for Prisma.
- ... optionally have access to a Unix shell (like the terminal/shell in Linux and macOS) to run the commands provided in this series.
If you don't have a Unix shell (for example, you are on a Windows machine), you can still follow along, but the shell commands may need to be modified for your machine.
Clone the repository
The starting point for this tutorial is the ending of part one of this series. It contains a rudimentary REST API built with NestJS.
The starting point for this tutorial is available in the end-rest-api-part-1 branch of the GitHub repository. To get started, clone the repository and checkout the end-rest-api-part-1 branch:
git clone -b end-rest-api-part-1 git@github.com:prisma/blog-backend-rest-api-nestjs-prisma.gitNow, perform the following actions to get started:
- Navigate to the cloned directory:
- Install dependencies:
- Start the PostgreSQL database with Docker:
- Apply database migrations:
- Start the project:
Note: Step 4 will also generate Prisma Client and seed the database.
Now, you should be able to access the API documentation at http://localhost:3000/api/.
Project structure and files
The repository you cloned should have the following structure:
median
  ├── node_modules
  ├── prisma
  │   ├── migrations
  │   ├── schema.prisma
  │   └── seed.ts
  ├── src
  │   ├── app.controller.spec.ts
  │   ├── app.controller.ts
  │   ├── app.module.ts
  │   ├── app.service.ts
  │   ├── main.ts
  │   ├── articles
  │   └── prisma
  ├── test
  │   ├── app.e2e-spec.ts
  │   └── jest-e2e.json
  ├── README.md
  ├── .env
  ├── docker-compose.yml
  ├── nest-cli.json
  ├── package-lock.json
  ├── package.json
  ├── tsconfig.build.json
  └── tsconfig.json
The notable files and directories in this repository are:
- The
srcdirectory contains the source code for the application. There are three modules:- The
appmodule is situated in the root of thesrcdirectory and is the entry point of the application. It is responsible for starting the web server. - The
prismamodule contains Prisma Client, your interface to the database. - The
articlesmodule defines the endpoints for the/articlesroute and accompanying business logic.
- The
- The
prismamodule has the following:- The
schema.prismafile defines the database schema. - The
migrationsdirectory contains the database migration history. - The
seed.tsfile contains a script to seed your development database with dummy data.
- The
- The
docker-compose.ymlfile defines the Docker image for your PostgreSQL database. - The
.envfile contains the database connection string for your PostgreSQL database.
Note: For more information about these components, go through part one of this tutorial series.
Detect and throw exceptions directly
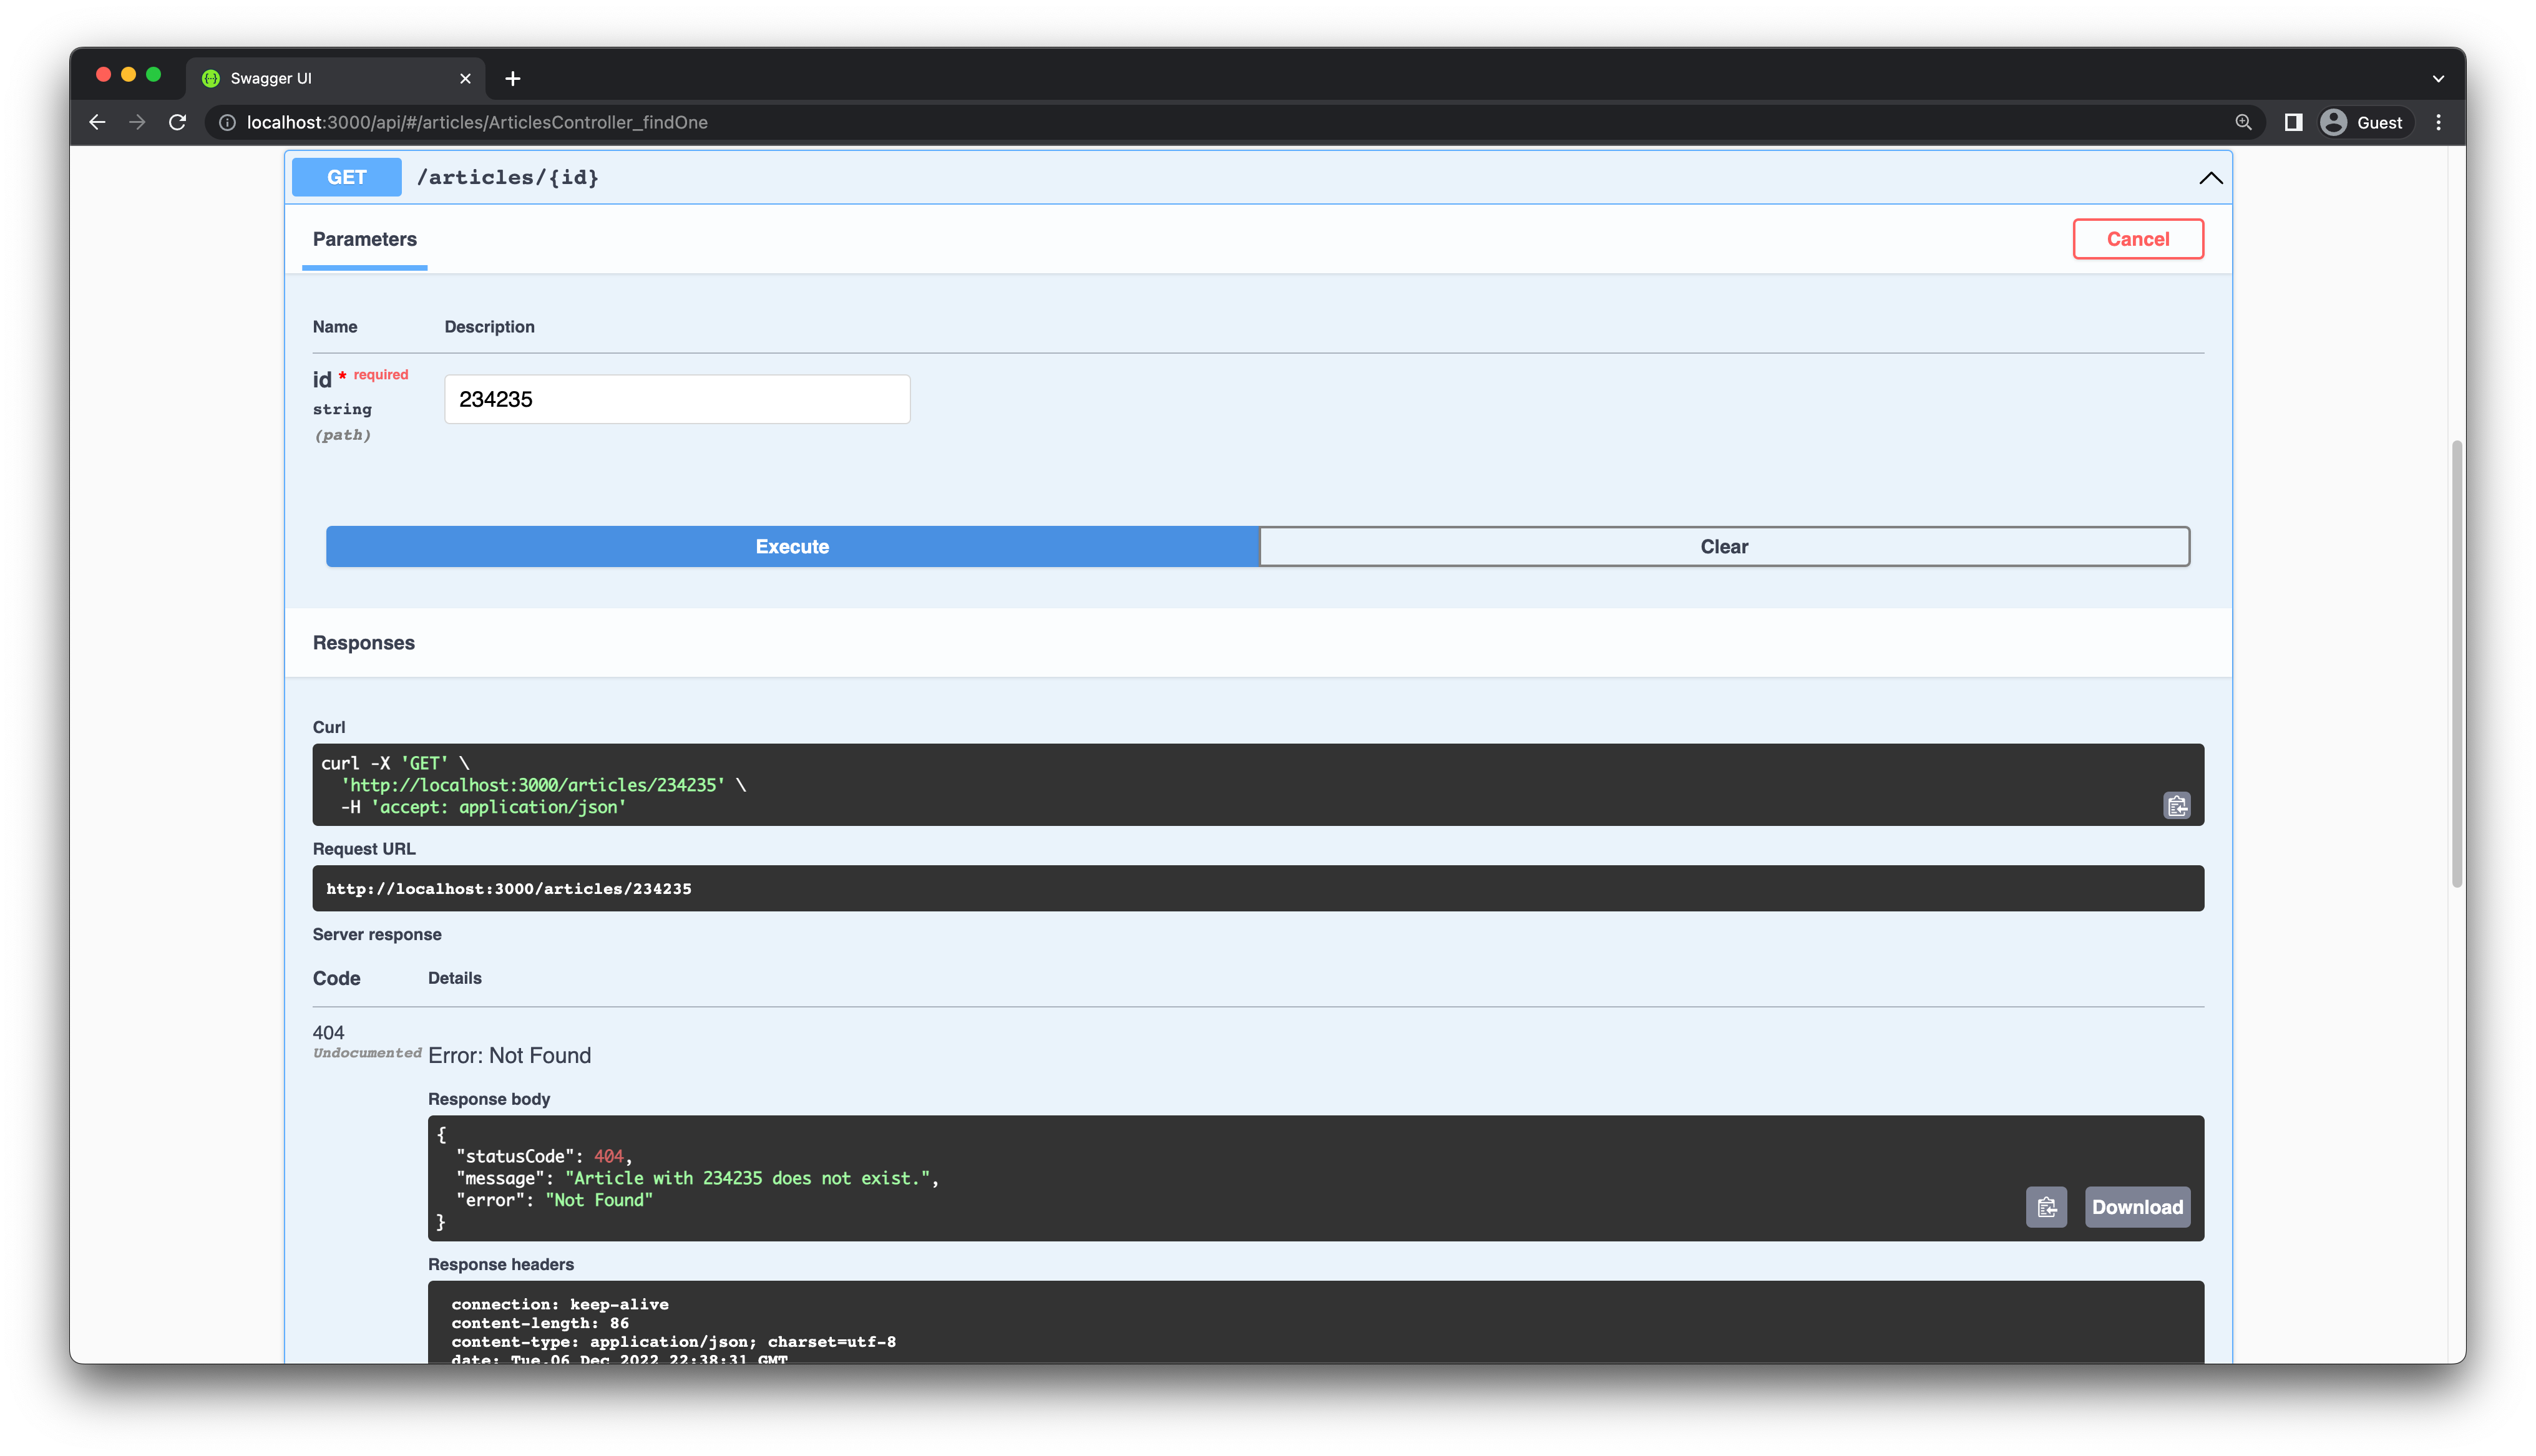
This section will teach you how to throw exceptions directly in your application code. You will address an issue in the GET /articles/:id endpoint. Currently, if you provide this endpoint with an id value that does not exist, it will return nothing with an HTTP 200 status instead of an error.
For example, try making a GET /articles/234235 request:
To fix this, you have to change the findOne method in articles.controller.ts. If the article does not exist, you will throw a NotFoundException, a built-in exception provided by NestJS.
Update the findOne method in articles.controller.ts:
// src/articles/articles.controller.ts

import {
  Controller,
  Get,
  Post,
  Body,
  Patch,
  Param,
  Delete,
+  NotFoundException,
} from '@nestjs/common';

  @Get(':id')
  @ApiOkResponse({ type: ArticleEntity })
-  findOne(@Param('id') id: string) {
-    return this.articlesService.findOne(+id);
+  async findOne(@Param('id') id: string) {
+    const article = await this.articlesService.findOne(+id);
+    if (!article) {
+      throw new NotFoundException(`Article with ${id} does not exist.`);
+    }
+    return article;
  }
If you make that same request again, you should get a user friendly error message:
Handle exceptions by using exception filters
Advantages of a dedicated exception layer
You detected an error state in the previous section and manually threw an exception. In many cases, an exception will automatically be generated by your application code. In such cases, you should process the exception and return an appropriate HTTP error to the user.
While it's possible to handle exceptions case by case in each controller manually, it is not a good idea for many reasons:
- It will clutter your core application logic with a lot of error handling code.
- Many of your endpoints will deal with similar errors, such as a resource not being found. You will have to duplicate the same error handling code in many places.
- It would be hard to change your error handling logic since it is scattered across many locations.
To solve these issues, NestJS has an exception layer which is responsible for processing unhandled exceptions across your application. In NestJS, you can create exception filters that define how to handle different kinds of exceptions thrown inside your application.
NestJS global exception filter
NestJS has a global exception filter, which catches all unhandled exceptions. To understand the global exception filter, let's look at an example. Send two requests to the POST /articles endpoints with the following body:
{
  "title": "Let’s build a REST API with NestJS and Prisma.",
  "description": "NestJS Series announcement.",
  "body": "NestJS is one of the hottest Node.js frameworks around. In this series, you will learn how to build a backend REST API with NestJS, Prisma, PostgreSQL and Swagger.",
  "published": true
}
The first request will succeed, but the second request will fail because you already created an article with the same title field. You will get the following error:
{
  "statusCode": 500,
  "message": "Internal server error"
}
If you take a look at the terminal window running your NestJS server, you should see the following error:
[Nest] 6803  - 12/06/2022, 3:25:40 PM   ERROR [ExceptionsHandler]
Invalid `this.prisma.article.create()` invocation in
/Users/tasinishmam/my-code/median/src/articles/articles.service.ts:11:32

   8 constructor(private prisma: PrismaService) {}
   9
  10 create(createArticleDto: CreateArticleDto) {
→ 11   return this.prisma.article.create(
  Unique constraint failed on the fields: (`title`)
Error:
Invalid `this.prisma.article.create()` invocation in
/Users/tasinishmam/my-code/median/src/articles/articles.service.ts:11:32
8 constructor(private prisma: PrismaService) {}
   9
  10 create(createArticleDto: CreateArticleDto) {
→ 11   return this.prisma.article.create(
  Unique constraint failed on the fields: (`title`)
From the logs you can see that Prisma Client throws an unique constraint validation error because of the title field, which is marked as @unique in the Prisma schema. The exception is of type PrismaClientKnownRequestError and is exported at the Prisma namespace level.
Since the PrismaClientKnownRequestError is not being handled directly by your application, it is automatically processed by the built-in global exception filter. This filter generates the HTTP 500 "Internal Server Error" response.
Create a manual exception filter
In this section, you will create a custom exception filter to handle the PrismaClientKnownRequestError that you saw. This filter will catch all exceptions of type PrismaClientKnownRequestError and return a clear user friendly error message to the user.
Start by generating a filter class by using the Nest CLI:
npx nest generate filter prisma-client-exceptionThis will create a new file src/prisma-client-exception.filter.ts with the following content:
// src/prisma-client-exception.filter.ts

import { ArgumentsHost, Catch, ExceptionFilter } from '@nestjs/common';

@Catch()
export class PrismaClientExceptionFilter<T> implements ExceptionFilter {
  catch(exception: T, host: ArgumentsHost) {}
}Note: There is a second file created called
src/prisma-client-exception.filter.spec.tsfor creating tests. You can ignore this file for now.
You will get an error from eslint since the catch method is empty. Update the catch method implementation in PrismaClientExceptionFilter as follows:
// src/prisma-client-exception.filter.ts

+import { ArgumentsHost, Catch } from '@nestjs/common';
+import { BaseExceptionFilter } from '@nestjs/core';
+import { Prisma } from '@prisma/client';

+@Catch(Prisma.PrismaClientKnownRequestError)  // 1
+export class PrismaClientExceptionFilter extends BaseExceptionFilter { // 2
+  catch(exception: Prisma.PrismaClientKnownRequestError, host: ArgumentsHost) {
+    console.error(exception.message);  // 3

    // default 500 error code
+    super.catch(exception, host);
  }
}
Here you have made the following changes:
- To ensure that this filter catches exceptions of type
PrismaClientKnownRequestError, you added it to the@Catchdecorator. - The exception filter extends the
BaseExceptionFilterclass from the NestJS core package. This class provides a default implementation for thecatchmethod that returns an "Internal server error" response to the user. You can learn more about this in the NestJS docs. - You added a
console.errorstatement to log the error message to the console. This is useful for debugging purposes.
Prisma throws the PrismaClientKnownRequestError for many different kinds of errors. So you will need to figure out how to extract the error code from the PrismaClientKnownRequestError exception. The PrismaClientKnownRequestError exception has a code property that contains the error code. You can find the list of error codes in the Prisma Error Message reference.
The error code you are looking for is P2002, which occurs for unique constraint violations. You will now update the catch method to throw an HTTP 409 Conflict response in case of this error. You will also provide a custom error message to the user.
Update your exception filter implementation like this:
//src/prisma-client-exception.filter.ts

+import { ArgumentsHost, Catch, HttpStatus } from '@nestjs/common';
import { BaseExceptionFilter } from '@nestjs/core';
import { Prisma } from '@prisma/client';
+import { Response } from 'express';

@Catch(Prisma.PrismaClientKnownRequestError)
export class PrismaClientExceptionFilter extends BaseExceptionFilter {
  catch(exception: Prisma.PrismaClientKnownRequestError, host: ArgumentsHost) {
    console.error(exception.message);
+    const ctx = host.switchToHttp();
+    const response = ctx.getResponse<Response>();
+    const message = exception.message.replace(/\n/g, '');

+    switch (exception.code) {
+      case 'P2002': {
+        const status = HttpStatus.CONFLICT;
+        response.status(status).json({
+          statusCode: status,
+          message: message,
+        });
+        break;
+      }
+      default:
        // default 500 error code
        super.catch(exception, host);
+        break;
+    }
  }
}
Here you are accessing the underlying framework Response object and directly modifying the response. By default, express is the HTTP framework used by NestJS under the hood. For any exception code besides P2002, you are sending the default "Internal server error" response.
Note: For production applications, be careful to not leak any sensitive information to the user in the error message.
Apply the exception filter to your application
Now, for the PrismaClientExceptionFilter to come into effect, you need to apply it to a certain scope. An exception filter can be scoped to individual routes (method-scoped), entire controllers (controller-scoped) or across the entire application (global-scoped).
Apply the exception filter to your entire application by updating the main.ts file:
// src/main.ts

+import { HttpAdapterHost, NestFactory } from '@nestjs/core';
import { AppModule } from './app.module';
import { SwaggerModule, DocumentBuilder } from '@nestjs/swagger';
+import { PrismaClientExceptionFilter } from './prisma-client-exception.filter';

async function bootstrap() {
  const app = await NestFactory.create(AppModule);

  const config = new DocumentBuilder()
    .setTitle('Median')
    .setDescription('The Median API description')
    .setVersion('0.1')
    .build();

  const document = SwaggerModule.createDocument(app, config);
  SwaggerModule.setup('api', app, document);

+  const { httpAdapter } = app.get(HttpAdapterHost);
+  app.useGlobalFilters(new PrismaClientExceptionFilter(httpAdapter));

  await app.listen(3000);
}
bootstrap();
Now, try making the same request to the POST /articles endpoint:
{
  "title": "Let’s build a REST API with NestJS and Prisma.",
  "description": "NestJS Series announcement.",
  "body": "NestJS is one of the hottest Node.js frameworks around. In this series, you will learn how to build a backend REST API with NestJS, Prisma, PostgreSQL and Swagger.",
  "published": true
}
This time you will get a more user-friendly error message:
{
  "statusCode": 409,
  "message": "Invalid `this.prisma.article.create()` invocation in /Users/tasinishmam/my-code/median/src/articles/articles.service.ts:11:32   8 constructor(private prisma: PrismaService) {}   9   10 create(createArticleDto: CreateArticleDto) {→ 11   return this.prisma.article.create(Unique constraint failed on the fields: (`title`)"
}
Since the PrismaClientExceptionFilter is a global filter, it can handle this particular type of error for all routes in your application.
I recommend extending the exception filter implementation to handle other errors as well. For example, you can add a case to handle the P2025 error code, which occurs when a record is not found in the database. You should return the status code HttpStatus.NOT_FOUND for this error. This would be useful for the PATCH /articles/:id and DELETE /articles/:id endpoints.
Bonus: Handle Prisma exceptions with the nestjs-prisma package
So far, you have learned different techniques for manually handling Prisma exceptions in a NestJS application. There is a dedicated package for using Prisma with NestJS called nestjs-prisma that you can also use to handle Prisma exceptions. This package is an excellent option to consider because it removes a lot of boilerplate code.
Instructions on installing and using the package are available in the nestjs-prisma documentation. When using this package, you will not need to manually create a separate prisma module and service, as this package will automatically make them for you.
You can learn how to use the package to handle Prisma exceptions in the Exception Filter section of the documentation. In a future chapter of this tutorial, we will cover the nestjs-prisma package in more detail.
Summary and final remarks
Congratulations! You took an existing NestJS application in this tutorial and learned how to integrate error handling. You learned two different ways to handle errors: directly in your application code and by creating an exception filter.
In this chapter you learned how to handle Prisma errors. But the techniques themselves are not limited to Prisma. You can use them to handle any type of error in your application.
If you're continuing the series, the Prisma getting started guide, Prisma Migrate docs, and Prisma Postgres are the best next resources for taking the app from tutorial to production-ready workflow.
You can find the finished code for this tutorial in the end-error-handling-part-3 branch of the GitHub repository. Please feel free to raise an issue in the repository or submit a PR if you notice a problem. You can also reach out to me directly on Twitter.
Build your next app with Prisma
Start free. Scale when you’re ready.