Building a REST API with NestJS and Prisma: Authentication

Welcome to the fifth tutorial in this series about building a REST API with NestJS, Prisma and PostgreSQL! In this tutorial, you will learn how to implement JWT authentication in your NestJS REST API.
Update (May 2026): This tutorial is still useful for the authentication flow, but if you're starting fresh you should pair it with the current NestJS + Prisma guide, Prisma ORM, and Prisma Postgres or your existing PostgreSQL database.
Table Of Contents
Introduction
In the previous chapter of this series, you learned how to handle relational data in your NestJS REST API. You created a User model and added a one-to-many relationship between User and Article models. You also implemented the CRUD endpoints for the User model.
In this chapter, you will learn how to add authentication to your API using a package called Passport:
- First, you will implement JSON Web Token (JWT) based authentication using a library called Passport.
- Next, you will protect the passwords stored in your database by hashing them using the bcrypt library.
In this tutorial, you will use the API built in the last chapter.
Development environment
To follow along with this tutorial, you will be expected to:
- ... have Node.js installed.
- ... have Docker and Docker Compose installed. If you are using Linux, please make sure your Docker version is 20.10.0 or higher. You can check your Docker version by running
docker versionin the terminal. - ... optionally have the Prisma VS Code Extension installed. The Prisma VS Code extension adds some really nice IntelliSense and syntax highlighting for Prisma.
- ... optionally have access to a Unix shell (like the terminal/shell in Linux and macOS) to run the commands provided in this series.
If you don't have a Unix shell (for example, you are on a Windows machine), you can still follow along, but the shell commands may need to be modified for your machine.
Clone the repository
The starting point for this tutorial is the ending of chapter two of this series. It contains a rudimentary REST API built with NestJS.
The starting point for this tutorial is available in the end-validation branch of the GitHub repository. To get started, clone the repository and checkout the end-validation branch:
git clone -b end-relational-data git@github.com:prisma/blog-backend-rest-api-nestjs-prisma.gitNow, perform the following actions to get started:
- Navigate to the cloned directory:
cd blog-backend-rest-api-nestjs-prisma- Install dependencies:
npm install- Start the PostgreSQL database with Docker:
docker-compose up -d- Apply database migrations:
npx prisma migrate dev- Start the project:
npm run start:devNote: Step 4 will also generate Prisma Client and seed the database.
Now, you should be able to access the API documentation at http://localhost:3000/api/.
Project structure and files
The repository you cloned should have the following structure:
median
  ├── node_modules
  ├── prisma
  │   ├── migrations
  │   ├── schema.prisma
  │   └── seed.ts
  ├── src
  │   ├── app.controller.spec.ts
  │   ├── app.controller.ts
  │   ├── app.module.ts
  │   ├── app.service.ts
  │   ├── main.ts
  │   ├── articles
  │   ├── users
  │   └── prisma
  ├── test
  │   ├── app.e2e-spec.ts
  │   └── jest-e2e.json
  ├── README.md
  ├── .env
  ├── docker-compose.yml
  ├── nest-cli.json
  ├── package-lock.json
  ├── package.json
  ├── tsconfig.build.json
└── tsconfig.jsonNote: You might notice that this folder comes with a
testdirectory as well. Testing won't be covered in this tutorial. However, if you want to learn about how best practices for testing your applications with Prisma, be sure to check out this tutorial series: The Ultimate Guide to Testing with Prisma
The notable files and directories in this repository are:
- The
srcdirectory contains the source code for the application. There are three modules:- The
appmodule is situated in the root of thesrcdirectory and is the entry point of the application. It is responsible for starting the web server. - The
prismamodule contains Prisma Client, your interface to the database. - The
articlesmodule defines the endpoints for the/articlesroute and accompanying business logic. - The
usersmodule defines the endpoints for the/usersroute and accompanying business logic.
- The
- The
prismafolder has the following:- The
schema.prismafile defines the database schema. - The
migrationsdirectory contains the database migration history. - The
seed.tsfile contains a script to seed your development database with dummy data.
- The
- The
docker-compose.ymlfile defines the Docker image for your PostgreSQL database. - The
.envfile contains the database connection string for your PostgreSQL database.
Note: For more information about these components, go through chapter one of this tutorial series.
Implement authentication in your REST API
In this section, you will implement the bulk of the authentication logic for your REST API. By the end of this section, the following endpoints will be auth protected 🔒:
GET /usersGET /users/:idPATCH /users/:idDELETE /users/:id
There are two main types of authentication used on the web: session-based authentication and token-based authentication. In this tutorial, you will implement token-based authentication using JSON Web Tokens (JWT).
Note: This short video explains the basics of both kinds of authentication.
To get started, create a new auth module in your application. Run the following command to generate a new module:
npx nest generate resourceYou will be given a few CLI prompts. Answer the questions accordingly:
What name would you like to use for this resource (plural, e.g., "users")?authWhat transport layer do you use?REST APIWould you like to generate CRUD entry points?No
You should now find a new auth module in the src/auth directory.
Install and configure passport
passport is a popular authentication library for Node.js applications. It is highly configurable and supports a wide range of authentication strategies. It is meant to be used with the Express web framework, which NestJS is built on. NestJS has a first-party integration with passport called @nestjs/passport that makes it easy to use in your NestJS application.
Get started by installing the following packages:
npm install --save @nestjs/passport passport @nestjs/jwt passport-jwt
npm install --save-dev @types/passport-jwt
Now that you have installed the required packages, you can configure passport in your application. Open the src/auth.module.ts file and add the following code:
//src/auth/auth.module.ts
import { Module } from '@nestjs/common';
import { AuthService } from './auth.service';
import { AuthController } from './auth.controller';
+import { PassportModule } from '@nestjs/passport';
+import { JwtModule } from '@nestjs/jwt';
+import { PrismaModule } from 'src/prisma/prisma.module';

+export const jwtSecret = 'zjP9h6ZI5LoSKCRj';

@Module({
+  imports: [
+    PrismaModule,
+    PassportModule,
+    JwtModule.register({
+      secret: jwtSecret,
+      signOptions: { expiresIn: '5m' }, // e.g. 30s, 7d, 24h
+    }),
+  ],
  controllers: [AuthController],
  providers: [AuthService],
})
export class AuthModule {}
The @nestjs/passport module provides a PassportModule that you can import into your application. The PassportModule is a wrapper around the passport library that provides NestJS specific utilities. You can read more about the PassportModule in the official documentation.
You also configured a JwtModule that you will use to generate and verify JWTs. The JwtModule is a wrapper around the jsonwebtoken library. The secret provides a secret key that is used to sign the JWTs. The expiresIn object defines the expiration time of the JWTs. It is currently set to 5 minutes.
Note: Remember to generate a new token if the previous one has expired.
You can use the jwtSecret shown in the code snippet or generate your own using OpenSSL.
Note: In a real application, you should never store the secret directly in your codebase. NestJS provides the
@nestjs/configpackage for loading secrets from environment variables. You can read more about it in the official documentation.
Implement a POST /auth/login endpoint
The POST /login endpoint will be used to authenticate users. It will accept a username and password and return a JWT if the credentials are valid. First you create a LoginDto class that will define the shape of the request body.
Create a new file called login.dto.ts inside the src/auth/dto directory:
mkdir src/auth/dto
touch src/auth/dto/login.dto.ts
Now define the LoginDto class with a email and password field:
//src/auth/dto/login.dto.ts
import { ApiProperty } from '@nestjs/swagger';
import { IsEmail, IsNotEmpty, IsString, MinLength } from 'class-validator';

export class LoginDto {
  @IsEmail()
  @IsNotEmpty()
  @ApiProperty()
  email: string;

  @IsString()
  @IsNotEmpty()
  @MinLength(6)
  @ApiProperty()
  password: string;
}
You will also need to define a new AuthEntity that will describe the shape of the JWT payload. Create a new file called auth.entity.ts inside the src/auth/entity directory:
mkdir src/auth/entity
touch src/auth/entity/auth.entity.ts
Now define the AuthEntity in this file:
//src/auth/entity/auth.entity.ts
import { ApiProperty } from '@nestjs/swagger';

export class AuthEntity {
  @ApiProperty()
  accessToken: string;
}
The AuthEntity just has a single string field called accessToken, which will contain the JWT.
Now create a new login method inside AuthService:
//src/auth/auth.service.ts
import {
  Injectable,
  NotFoundException,
  UnauthorizedException,
} from '@nestjs/common';
import { PrismaService } from './../prisma/prisma.service';
import { JwtService } from '@nestjs/jwt';
import { AuthEntity } from './entity/auth.entity';

@Injectable()
export class AuthService {
  constructor(private prisma: PrismaService, private jwtService: JwtService) {}

  async login(email: string, password: string): Promise<AuthEntity> {
    // Step 1: Fetch a user with the given email
    const user = await this.prisma.user.findUnique({ where: { email: email } });

    // If no user is found, throw an error
    if (!user) {
      throw new NotFoundException(`No user found for email: ${email}`);
    }

    // Step 2: Check if the password is correct
    const isPasswordValid = user.password === password;

    // If password does not match, throw an error
    if (!isPasswordValid) {
      throw new UnauthorizedException('Invalid password');
    }

    // Step 3: Generate a JWT containing the user's ID and return it
    return {
      accessToken: this.jwtService.sign({ userId: user.id }),
    };
  }
}
The login method first fetches a user with the given email. If no user is found, it throws a NotFoundException. If a user is found, it checks if the password is correct. If the password is incorrect, it throws a UnauthorizedException. If the password is correct, it generates a JWT containing the user's ID and returns it.
Now create the POST /auth/login method inside AuthController:
//src/auth/auth.controller.ts

+import { Body, Controller, Post } from '@nestjs/common';
import { AuthService } from './auth.service';
+import { ApiOkResponse, ApiTags } from '@nestjs/swagger';
+import { AuthEntity } from './entity/auth.entity';
+import { LoginDto } from './dto/login.dto';

@Controller('auth')
+@ApiTags('auth')
export class AuthController {
  constructor(private readonly authService: AuthService) {}

+  @Post('login')
+  @ApiOkResponse({ type: AuthEntity })
+  login(@Body() { email, password }: LoginDto) {
+    return this.authService.login(email, password);
+  }
}
Now you should have a new POST /auth/login endpoint in your API.
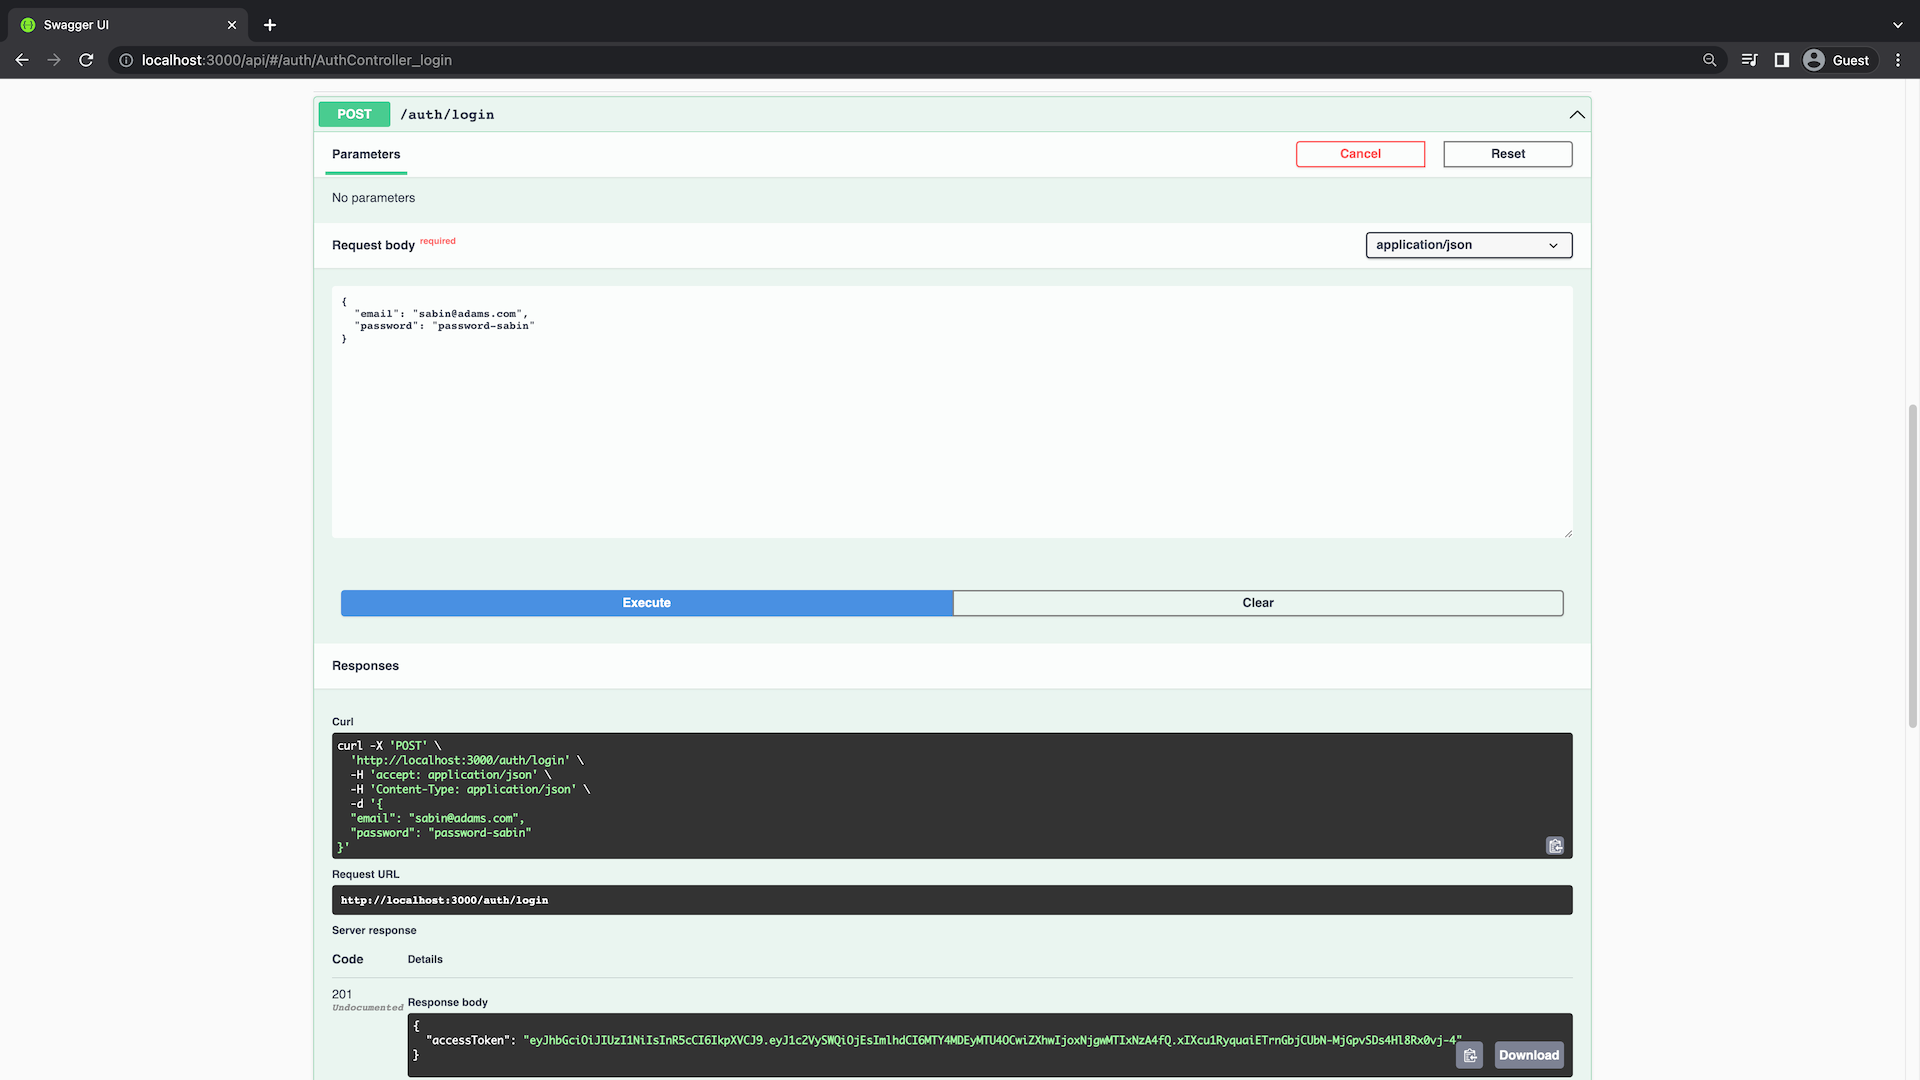
Go to the http://localhost:3000/api page and try the POST /auth/login endpoint. Provide the credentials of a user that you created in your seed script
You can use the following request body:
{
  "email": "sabin@adams.com",
  "password": "password-sabin"
}
After executing the request you should get a JWT in the response.
In the next section, you will use this token to authenticate users.
Implement JWT authentication strategy
In Passport, a strategy is responsible for authenticating requests, which it accomplishes by implementing an authentication mechanism. In this section, you will implement a JWT authentication strategy that will be used to authenticate users.
You will not be using the passport package directly, but rather interact with the wrapper package @nestjs/passport, which will call the passport package under the hood. To configure a strategy with @nestjs/passport, you need to create a class that extends the PassportStrategy class. You will need to do two main things in this class:
- You will pass JWT strategy specific options and configuration to the
super()method in the constructor. - A
validate()callback method that will interact with your database to fetch a user based on the JWT payload. If a user is found, thevalidate()method is expected to return the user object.
First create a new file called jwt.strategy.ts inside the src/auth/strategy directory:
touch src/auth/jwt.strategy.tsNow implement the JwtStrategy class:
//src/auth/jwt.strategy.ts
import { Injectable, UnauthorizedException } from '@nestjs/common';
import { PassportStrategy } from '@nestjs/passport';
import { ExtractJwt, Strategy } from 'passport-jwt';
import { jwtSecret } from './auth.module';
import { UsersService } from 'src/users/users.service';

@Injectable()
export class JwtStrategy extends PassportStrategy(Strategy, 'jwt') {
  constructor(private usersService: UsersService) {
    super({
      jwtFromRequest: ExtractJwt.fromAuthHeaderAsBearerToken(),
      secretOrKey: jwtSecret,
    });
  }

  async validate(payload: { userId: number }) {
    const user = await this.usersService.findOne(payload.userId);

    if (!user) {
      throw new UnauthorizedException();
    }

    return user;
  }
}
You have created a JwtStrategy class that extends the PassportStrategy class. The PassportStrategy class takes two arguments: a strategy implementation and the name of the strategy. Here you are using a predefined strategy from the passport-jwt library.
You are passing some options to the super() method in the constructor. The jwtFromRequest option expects a method that can be used to extract the JWT from the request. In this case, you will use the standard approach of supplying a bearer token in the Authorization header of our API requests. The secretOrKey option tells the strategy what secret to use to verify the JWT. There are many more options, which you can read about in the passport-jwt repository..
For the passport-jwt, Passport first verifies the JWT's signature and decodes the JSON. The decoded JSON is then passed to the validate() method. Based on the way JWT signing works, you're guaranteed receiving a valid token that was previously signed and issued by your app. The validate() method is expected to return a user object. If the user is not found, the validate() method throws an error.
Note: Passport can be quite confusing. It's helpful to think of Passport as a mini framework in itself that abstracts the authentication process into a few steps that can be customized with strategies and configuration options. I reccomend reading the NestJS Passport recipe to learn more about how to use Passport with NestJS.
Add the new JwtStrategy as a provider in the AuthModule:
//src/auth/auth.module.ts
import { Module } from '@nestjs/common';
import { AuthService } from './auth.service';
import { AuthController } from './auth.controller';
import { PassportModule } from '@nestjs/passport';
import { JwtModule } from '@nestjs/jwt';
import { PrismaModule } from 'src/prisma/prisma.module';
+import { UsersModule } from 'src/users/users.module';
+import { JwtStrategy } from './jwt.strategy';

export const jwtSecret = 'zjP9h6ZI5LoSKCRj';

@Module({
  imports: [
    PrismaModule,
    PassportModule,
    JwtModule.register({
      secret: jwtSecret,
      signOptions: { expiresIn: '5m' }, // e.g. 7d, 24h
    }),
+    UsersModule,
  ],
  controllers: [AuthController],
+  providers: [AuthService, JwtStrategy],
})
export class AuthModule {}
Now the JwtStrategy can be used by other modules. You have also added the UsersModule in the imports, because the UsersService is being used in the JwtStrategy class.
To make UsersService accessible in the JwtStrategy class, you also need to add it in the exports of the UsersModule:
// src/users/users.module.ts
import { Module } from '@nestjs/common';
import { UsersService } from './users.service';
import { UsersController } from './users.controller';
import { PrismaModule } from 'src/prisma/prisma.module';

@Module({
  controllers: [UsersController],
  providers: [UsersService],
  imports: [PrismaModule],
+  exports: [UsersService],
})
export class UsersModule {}
Implement JWT auth guard
Guards are a NestJS construct that determines whether a request should be allowed to proceed or not. In this section, you will implement a custom JwtAuthGuard that will be used to protect routes that require authentication.
Create a new file called jwt-auth.guard.ts inside the src/auth directory:
touch src/auth/jwt-auth.guard.tsNow implement the JwtAuthGuard class:
//src/auth/jwt-auth.guard.ts
import { Injectable } from '@nestjs/common';
import { AuthGuard } from '@nestjs/passport';

@Injectable()
export class JwtAuthGuard extends AuthGuard('jwt') {}
The AuthGuard class expects the name of a strategy. In this case, you are using the JwtStrategy that you implemented in the previous section, which is named jwt.
You can now use this guard as a decorator to protect your endpoints. Add the JwtAuthGuard to routes in the UsersController:
// src/users/users.controller.ts
import {
Controller,
Get,
Post,
Body,
Patch,
Param,
Delete,
ParseIntPipe,
+ UseGuards,
} from '@nestjs/common';
import { UsersService } from './users.service';
import { CreateUserDto } from './dto/create-user.dto';
import { UpdateUserDto } from './dto/update-user.dto';
import { ApiCreatedResponse, ApiOkResponse, ApiTags } from '@nestjs/swagger';
import { UserEntity } from './entities/user.entity';
+import { JwtAuthGuard } from 'src/auth/jwt-auth.guard';
@Controller('users')
@ApiTags('users')
export class UsersController {
constructor(private readonly usersService: UsersService) {}
@Post()
@ApiCreatedResponse({ type: UserEntity })
async create(@Body() createUserDto: CreateUserDto) {
return new UserEntity(await this.usersService.create(createUserDto));
}
@Get()
+ @UseGuards(JwtAuthGuard)
@ApiOkResponse({ type: UserEntity, isArray: true })
async findAll() {
const users = await this.usersService.findAll();
return users.map((user) => new UserEntity(user));
}
@Get(':id')
+ @UseGuards(JwtAuthGuard)
@ApiOkResponse({ type: UserEntity })
async findOne(@Param('id', ParseIntPipe) id: number) {
return new UserEntity(await this.usersService.findOne(id));
}
@Patch(':id')
+ @UseGuards(JwtAuthGuard)
@ApiCreatedResponse({ type: UserEntity })
async update(
@Param('id', ParseIntPipe) id: number,
@Body() updateUserDto: UpdateUserDto,
) {
return new UserEntity(await this.usersService.update(id, updateUserDto));
}
@Delete(':id')
+ @UseGuards(JwtAuthGuard)
@ApiOkResponse({ type: UserEntity })
async remove(@Param('id', ParseIntPipe) id: number) {
return new UserEntity(await this.usersService.remove(id));
}
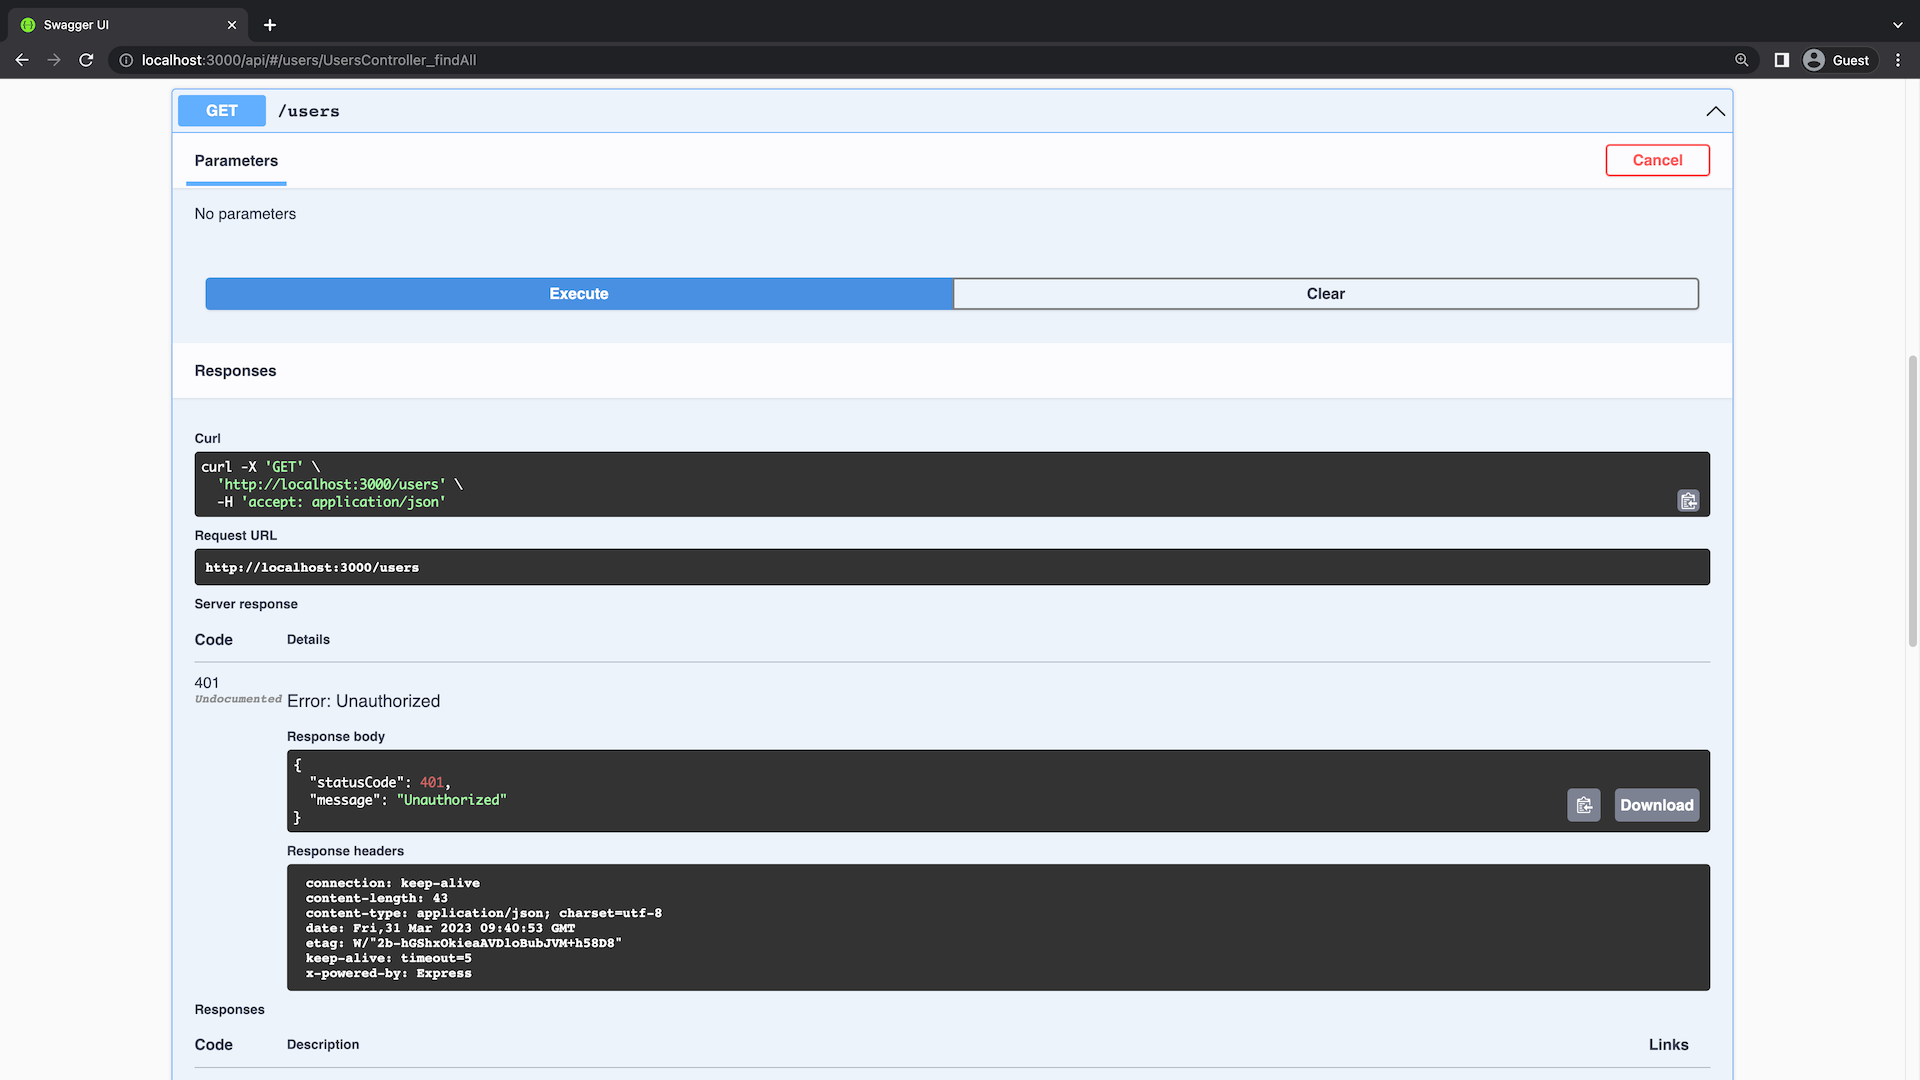
}If you try to query any of these endpoints without authentication it will no longer work.
Integrate authentication in Swagger
Currently there's no indication on Swagger that these endpoints are auth protected. You can add a @ApiBearerAuth() decorator to the controller to indicate that authentication is required:
// src/users/users.controller.ts

import {
  Controller,
  Get,
  Post,
  Body,
  Patch,
  Param,
  Delete,
  ParseIntPipe,
  UseGuards,
} from '@nestjs/common';
import { UsersService } from './users.service';
import { CreateUserDto } from './dto/create-user.dto';
import { UpdateUserDto } from './dto/update-user.dto';
+import { ApiBearerAuth, ApiCreatedResponse, ApiOkResponse, ApiTags } from '@nestjs/swagger';
import { UserEntity } from './entities/user.entity';
import { JwtAuthGuard } from 'src/auth/jwt-auth.guard';

@Controller('users')
@ApiTags('users')
export class UsersController {
  constructor(private readonly usersService: UsersService) {}

  @Post()
  @ApiCreatedResponse({ type: UserEntity })
  async create(@Body() createUserDto: CreateUserDto) {
    return new UserEntity(await this.usersService.create(createUserDto));
  }

  @Get()
  @UseGuards(JwtAuthGuard)
+  @ApiBearerAuth()
  @ApiOkResponse({ type: UserEntity, isArray: true })
  async findAll() {
    const users = await this.usersService.findAll();
    return users.map((user) => new UserEntity(user));
  }

  @Get(':id')
  @UseGuards(JwtAuthGuard)
+  @ApiBearerAuth()
  @ApiOkResponse({ type: UserEntity })
  async findOne(@Param('id', ParseIntPipe) id: number) {
    return new UserEntity(await this.usersService.findOne(id));
  }

  @Patch(':id')
  @UseGuards(JwtAuthGuard)
+  @ApiBearerAuth()
  @ApiCreatedResponse({ type: UserEntity })
  async update(
    @Param('id', ParseIntPipe) id: number,
    @Body() updateUserDto: UpdateUserDto,
  ) {
    return new UserEntity(await this.usersService.update(id, updateUserDto));
  }

  @Delete(':id')
  @UseGuards(JwtAuthGuard)
+  @ApiBearerAuth()
  @ApiOkResponse({ type: UserEntity })
  async remove(@Param('id', ParseIntPipe) id: number) {
    return new UserEntity(await this.usersService.remove(id));
  }
}
Now, auth protected endpoints should have a lock icon in Swagger 🔓

It's currently not possible to "authenticate" yourself directly in Swagger so you can test these endpoints. To do this, you can add the .addBearerAuth() method call to the SwaggerModule setup in main.ts:
// src/main.ts

import { NestFactory, Reflector } from '@nestjs/core';
import { AppModule } from './app.module';
import { SwaggerModule, DocumentBuilder } from '@nestjs/swagger';
import { ClassSerializerInterceptor, ValidationPipe } from '@nestjs/common';

async function bootstrap() {
  const app = await NestFactory.create(AppModule);

  app.useGlobalPipes(new ValidationPipe({ whitelist: true }));
  app.useGlobalInterceptors(new ClassSerializerInterceptor(app.get(Reflector)));

  const config = new DocumentBuilder()
    .setTitle('Median')
    .setDescription('The Median API description')
    .setVersion('0.1')
+    .addBearerAuth()
    .build();
  const document = SwaggerModule.createDocument(app, config);
  SwaggerModule.setup('api', app, document);

  await app.listen(3000);
}
bootstrap();
You can now add a token by clicking on the Authorize button in Swagger. Swagger will add the token to your requests so you can query the protected endpoints.
Note: You can generate a token by sending a
POSTrequest to/auth/loginendpoint with a validpassword.
Try it out yourself.

Hashing passwords
Currently, the User.password field is stored in plain text. This is a security risk because if the database is compromised, so are all the passwords. To fix this, you can hash the passwords before storing them in the database.
You can use the bcrypt cryptography library to hash passwords. Install it with npm:
npm install bcrypt
npm install --save-dev @types/bcrypt
First, you will update the create and update methods in the UsersService to hash the password before storing it in the database:
// src/users/users.service.ts
import { Injectable } from '@nestjs/common';
import { CreateUserDto } from './dto/create-user.dto';
import { UpdateUserDto } from './dto/update-user.dto';
import { PrismaService } from 'src/prisma/prisma.service';
+import * as bcrypt from 'bcrypt';

+export const roundsOfHashing = 10;

@Injectable()
export class UsersService {
  constructor(private prisma: PrismaService) {}

+  async create(createUserDto: CreateUserDto) {
+    const hashedPassword = await bcrypt.hash(
+      createUserDto.password,
+      roundsOfHashing,
+    );

+    createUserDto.password = hashedPassword;

    return this.prisma.user.create({
      data: createUserDto,
    });
  }

  findAll() {
    return this.prisma.user.findMany();
  }

  findOne(id: number) {
    return this.prisma.user.findUnique({ where: { id } });
  }

+  async update(id: number, updateUserDto: UpdateUserDto) {
+    if (updateUserDto.password) {
+      updateUserDto.password = await bcrypt.hash(
+        updateUserDto.password,
+        roundsOfHashing,
+      );
+    }

    return this.prisma.user.update({
      where: { id },
      data: updateUserDto,
    });
  }

  remove(id: number) {
    return this.prisma.user.delete({ where: { id } });
  }
}
The bcrypt.hash function accepts two arguments: the input string to the hash function and the number of rounds of hashing (also known as cost factor). Increasing the rounds of hashing increases the time it takes to calculate the hash. There is a trade off here between security and performance. With more rounds of hashing, it takes more time to calculate the hash, which helps prevent brute force attacks. However, more rounds of hashing also mean more time to calculate the hash when a user logs in. This stack overflow answer has a good discussion on this topic.
bcrypt also automatically uses another technique called salting to make it harder to brute force the hash. Salting is a technique where a random string is added to the input string before hashing. This way, attackers cannot use a table of precomputed hashes to crack the password, as each password has a different salt value.
You also need to update your database seed script to hash the passwords before inserting them into the database:
// prisma/seed.ts
import { PrismaClient } from '@prisma/client';
+import * as bcrypt from 'bcrypt';

// initialize the Prisma Client
const prisma = new PrismaClient();

+const roundsOfHashing = 10;

async function main() {
  // create two dummy users
+  const passwordSabin = await bcrypt.hash('password-sabin', roundsOfHashing);
+  const passwordAlex = await bcrypt.hash('password-alex', roundsOfHashing);

  const user1 = await prisma.user.upsert({
    where: { email: 'sabin@adams.com' },
+    update: {
+      password: passwordSabin,
+    },
    create: {
      email: 'sabin@adams.com',
      name: 'Sabin Adams',
+      password: passwordSabin,
    },
  });

  const user2 = await prisma.user.upsert({
    where: { email: 'alex@ruheni.com' },
+    update: {
+      password: passwordAlex,
+    },
    create: {
      email: 'alex@ruheni.com',
      name: 'Alex Ruheni',
+      password: passwordAlex,
    },
  });

  // create three dummy posts
  // ...
}

// execute the main function
// ...
Run the seed script with npx prisma db seed and you should see that the passwords stored in the database are now hashed.
...
Running seed command `ts-node prisma/seed.ts` ...
{
  user1: {
    id: 1,
    name: 'Sabin Adams',
    email: 'sabin@adams.com',
    password: '$2b$10$XKQvtyb2Y.jciqhecnO4QONdVVcaghDgLosDPeI0e90POYSPd1Dlu',
    createdAt: 2023-03-20T22:05:56.758Z,
    updatedAt: 2023-04-02T22:58:05.792Z
  },
  user2: {
  id: 2,
  name: 'Alex Ruheni',
  email: 'alex@ruheni.com',
  password: '$2b$10$0tEfezrEd1a2g51lJBX6t.Tn.RLppKTv14mucUSCv40zs5qQyBaw6',
  createdAt: 2023-03-20T22:05:56.772Z,
  updatedAt: 2023-04-02T22:58:05.808Z
},
...
The value of the password field will be different for you since a different salt value is used each time. The important thing is that the value is now a hashed string.
Now, if you try to use the login with the correct password, you will face a HTTP 401 error. This is because the login method tries to compare the plaintext password from the user request with the hashed password in the database. Update the login method to use hashed passwords:
//src/auth/auth.service.ts
import { AuthEntity } from './entity/auth.entity';
import { PrismaService } from './../prisma/prisma.service';
import {
  Injectable,
  NotFoundException,
  UnauthorizedException,
} from '@nestjs/common';
import { JwtService } from '@nestjs/jwt';
+import * as bcrypt from 'bcrypt';

@Injectable()
export class AuthService {
  constructor(private prisma: PrismaService, private jwtService: JwtService) {}

  async login(email: string, password: string): Promise<AuthEntity> {
    const user = await this.prisma.user.findUnique({ where: { email } });

    if (!user) {
      throw new NotFoundException(`No user found for email: ${email}`);
    }

+    const isPasswordValid = await bcrypt.compare(password, user.password);

    if (!isPasswordValid) {
      throw new UnauthorizedException('Invalid password');
    }

    return {
      accessToken: this.jwtService.sign({ userId: user.id }),
    };
  }
}
You can now login with the correct password and get a JWT in the response.
Summary and final remarks
In this chapter, you learned how to implement JWT authentication in your NestJS REST API. You also learned about salting passwords and integrating authentication with Swagger.
To keep the series moving, review the Prisma getting started guide, explore Prisma Migrate for schema changes, or use Prisma Postgres as the database for your next NestJS API.
You can find the finished code for this tutorial in the end-authentication branch of the GitHub repository. Please feel free to raise an issue in the repository or submit a PR if you notice a problem. You can also reach out to me directly on Twitter.
Build your next app with Prisma
Start free. Scale when you’re ready.