End-To-End Type-Safety with GraphQL, Prisma & React: API Prep

In this series you are learning how to implement end-to-end type safety using React, GraphQL, Prisma, and some other helpful tools that tie those three together.
Table Of Contents
Introduction
In this section, you will set up all of the pieces needed to build a GraphQL API. You will start up a TypeScript project, provision a PostgreSQL database, initialize Prisma in your project, and finally seed your database.
In the process, you will set up an important piece of the end-to-end type-safety puzzle: a source of truth for the shape of your data.
Create a TypeScript project
To kick things off, create a new folder in your working directory that will contain your GraphQL server's code wherever you would like:
mkdir graphql-server # Example folderThis project will use npm, a package manager for Node.js, to manage and install new packages. Navigate into your new folder and initialize npm using the following commands:
cd graphql-server
npm init -y
Install the basic packages
While building this API, you will install various packages that will help in the development of your application. For now, install the following development packages:
ts-node-dev: Allows you to execute TypeScript code with live-reload on file changestypescript: The TypeScript package that allows you to provide typings to your JavaScript applications@types/node: TypeScript type definitions for Node.js
npm i -D ts-node-dev typescript @types/nodeNote: These dependencies were installed as development dependencies because they are only needed during development. None of them are part of the production deployment.
Set up TypeScript
With TypeScript installed in your project, you can now initialize the TypeScript configuration file using the tsc command-line interface tool (CLI):
npx tsc --initThe above command will create a new file named tsconfig.json at the root of your project and comes with a default set of configurations for how to compile and handle your TypeScript code.
For the purposes of this series, you will leave the default settings.
Create a new folder named src and within that folder a new file named index.ts:
mkdir src
touch src/index.ts
This will be the entry point to your TypeScript code. Within that file, add a simple console.log:
// src/index.ts

console.log('Hey there! 👋');
Add a development script
In order to run your code, you will use ts-node-dev, which will compile and run your TypeScript code and watch for file changes.
When a file is changed in your application, it will re-compile and re-run your code.
Within package.json, in the "scripts" section, add a new script named "dev" that uses ts-node-dev to run your entry file:
// package.json

// ...
"scripts": {
    "test": "echo \"Error: no test specified\" && exit 1",
    "dev": "ts-node-dev src/index.ts"
},
// ...
You can now use the following command to run your code:
npm run dev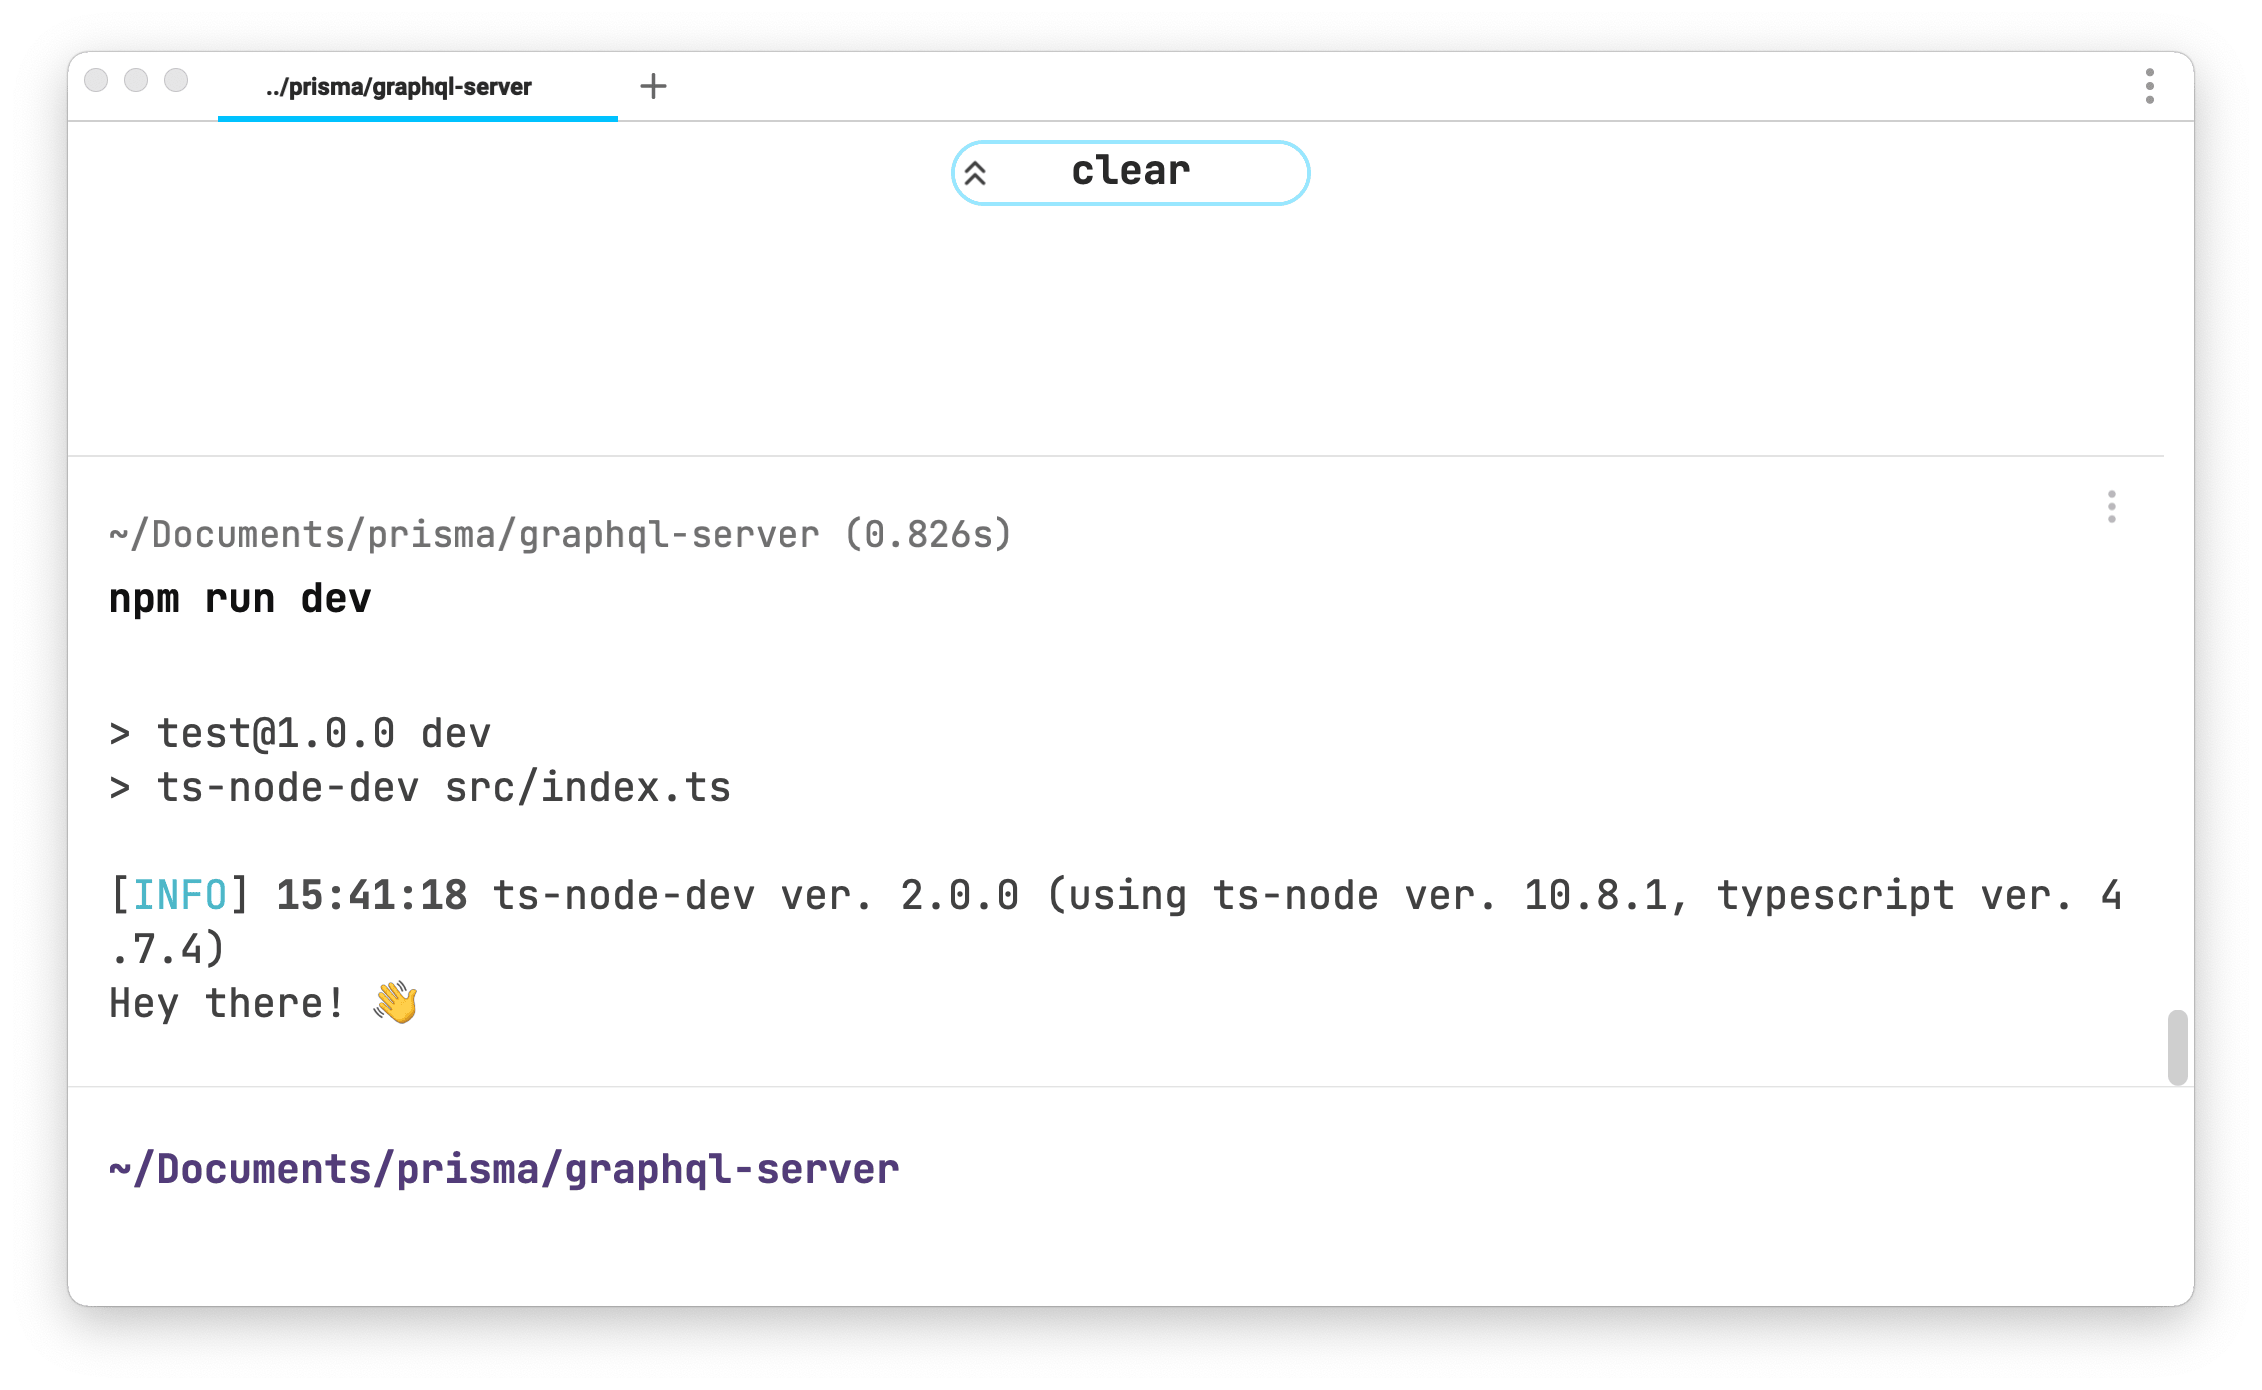
Set up the database
The next piece you will set up is the database. You will be using a PostgreSQL database for this application. There are many different ways to host and work with a PostgreSQL database, however, one of the simplest ways is to deploy your database using Railway.
Head over to https://railway.app and, if you don't already have one, create an account.
After creating an account and logging in, you should see a page like this:
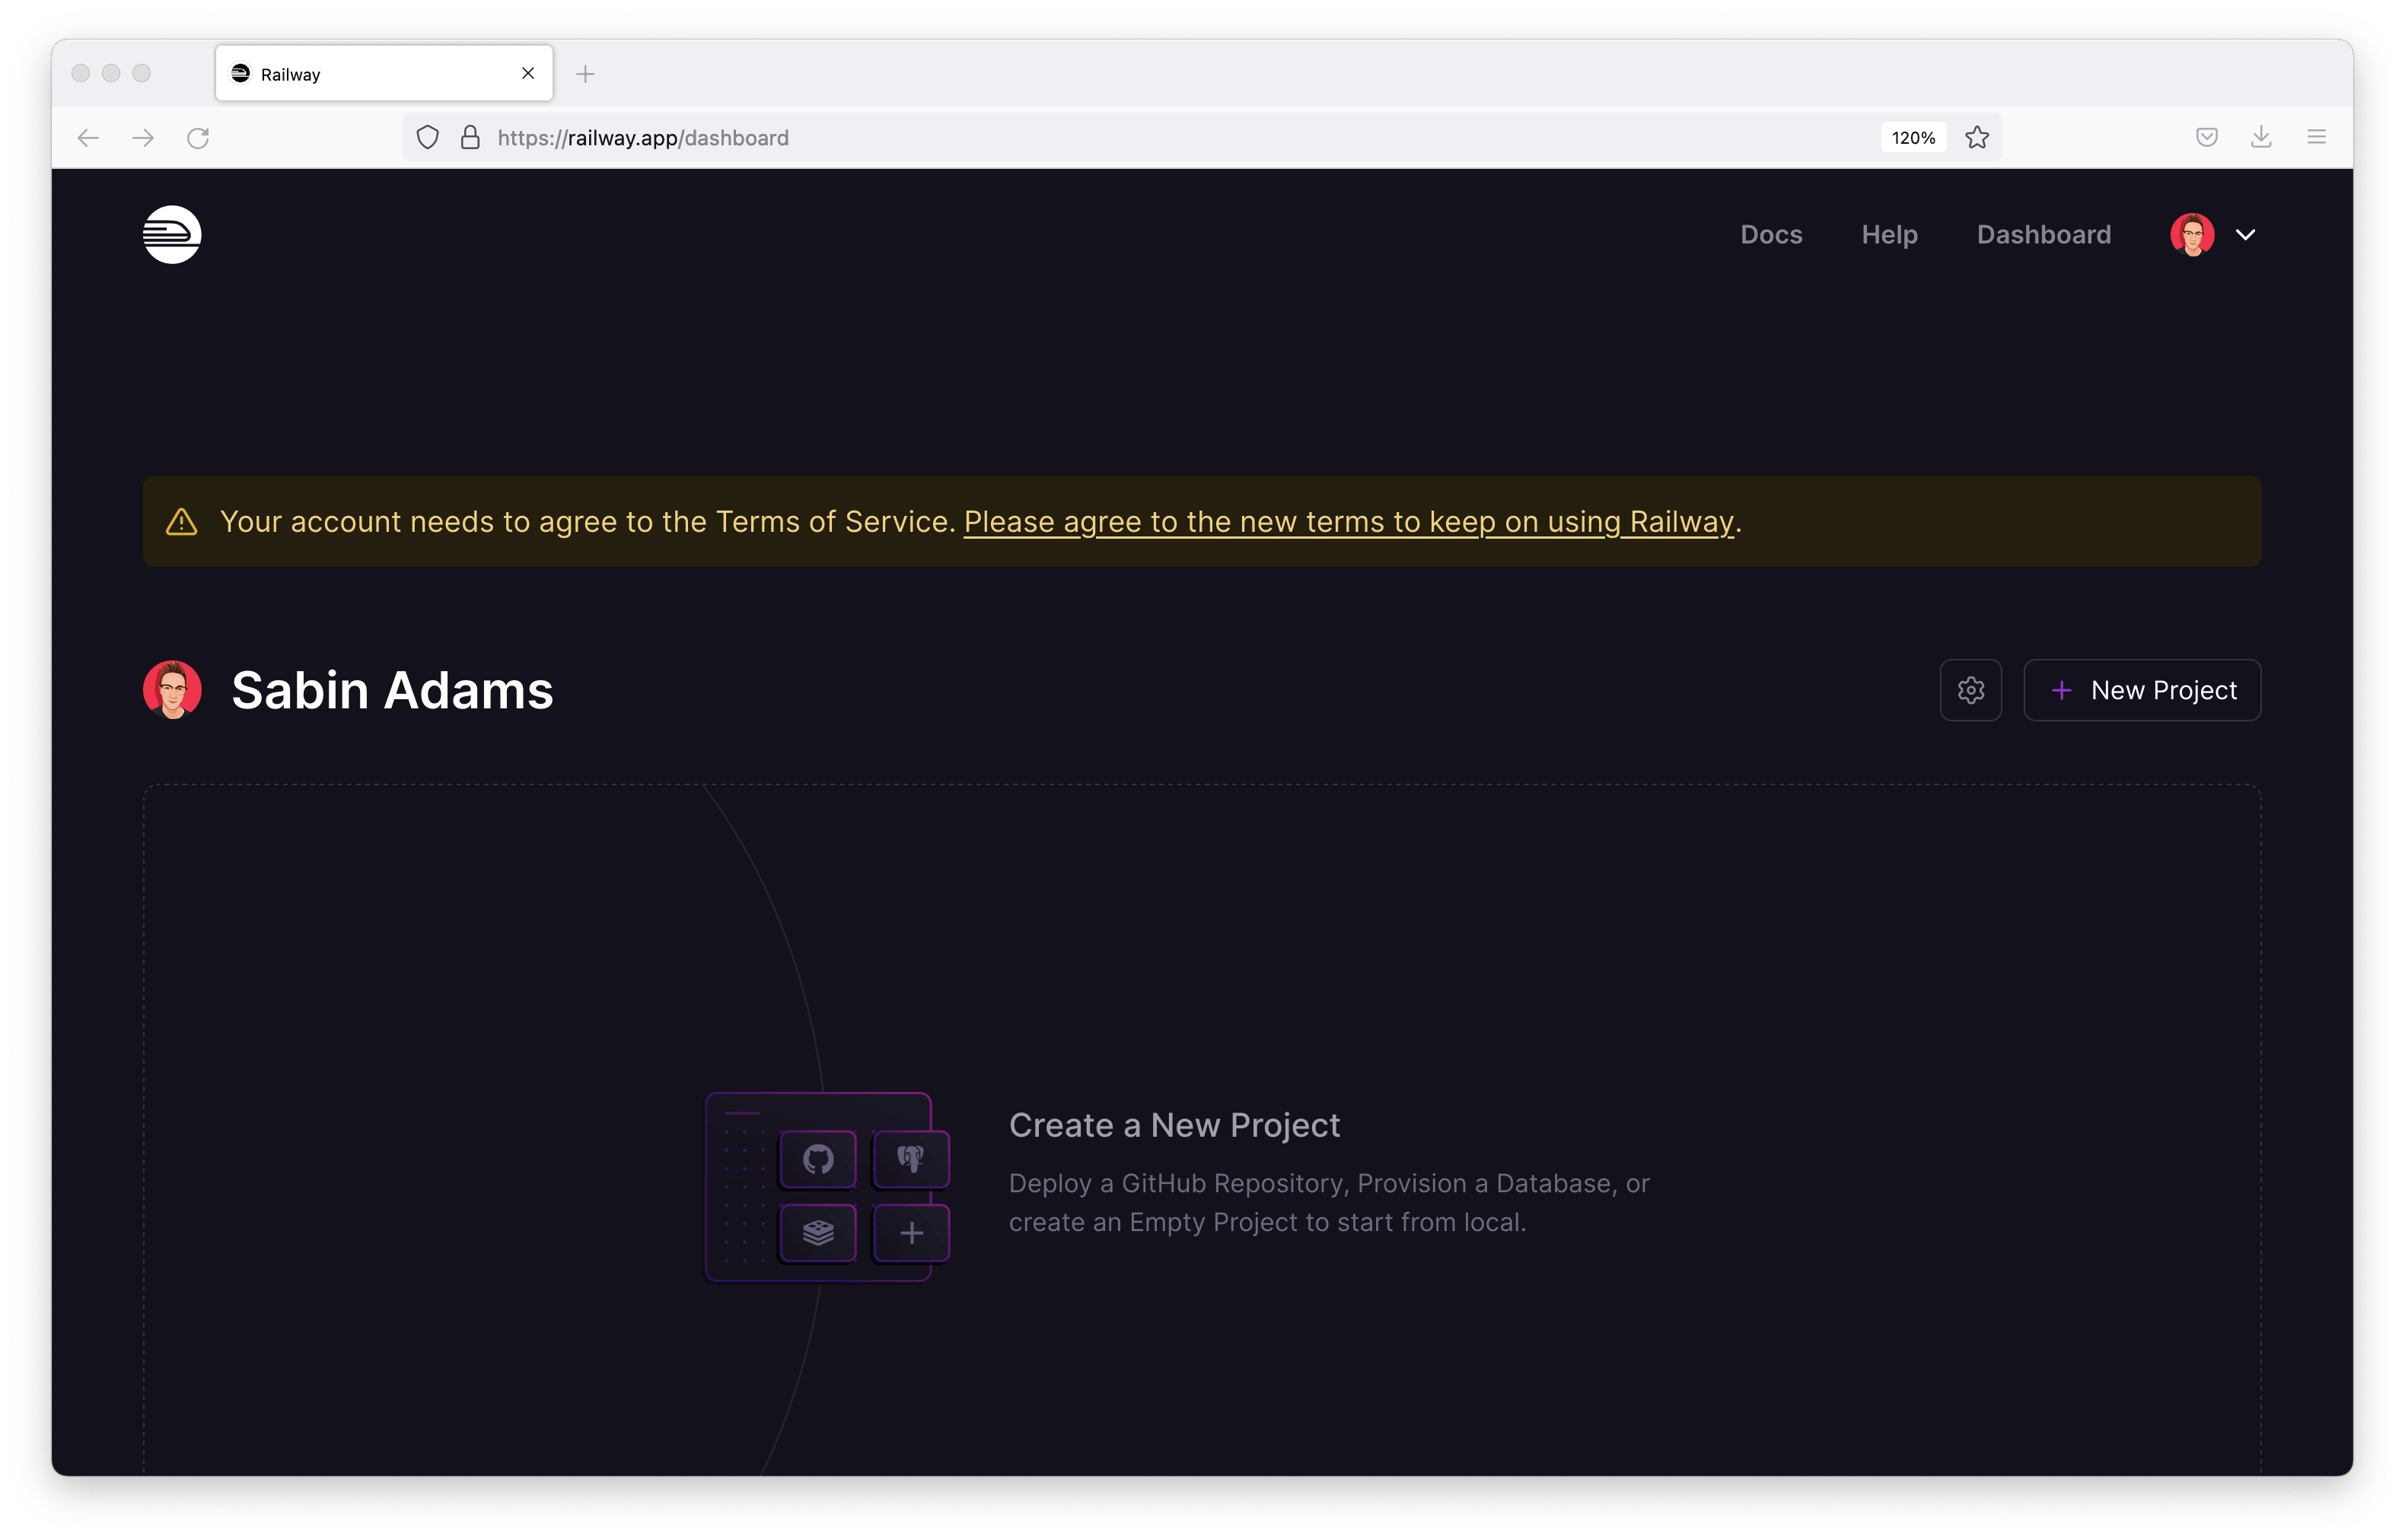
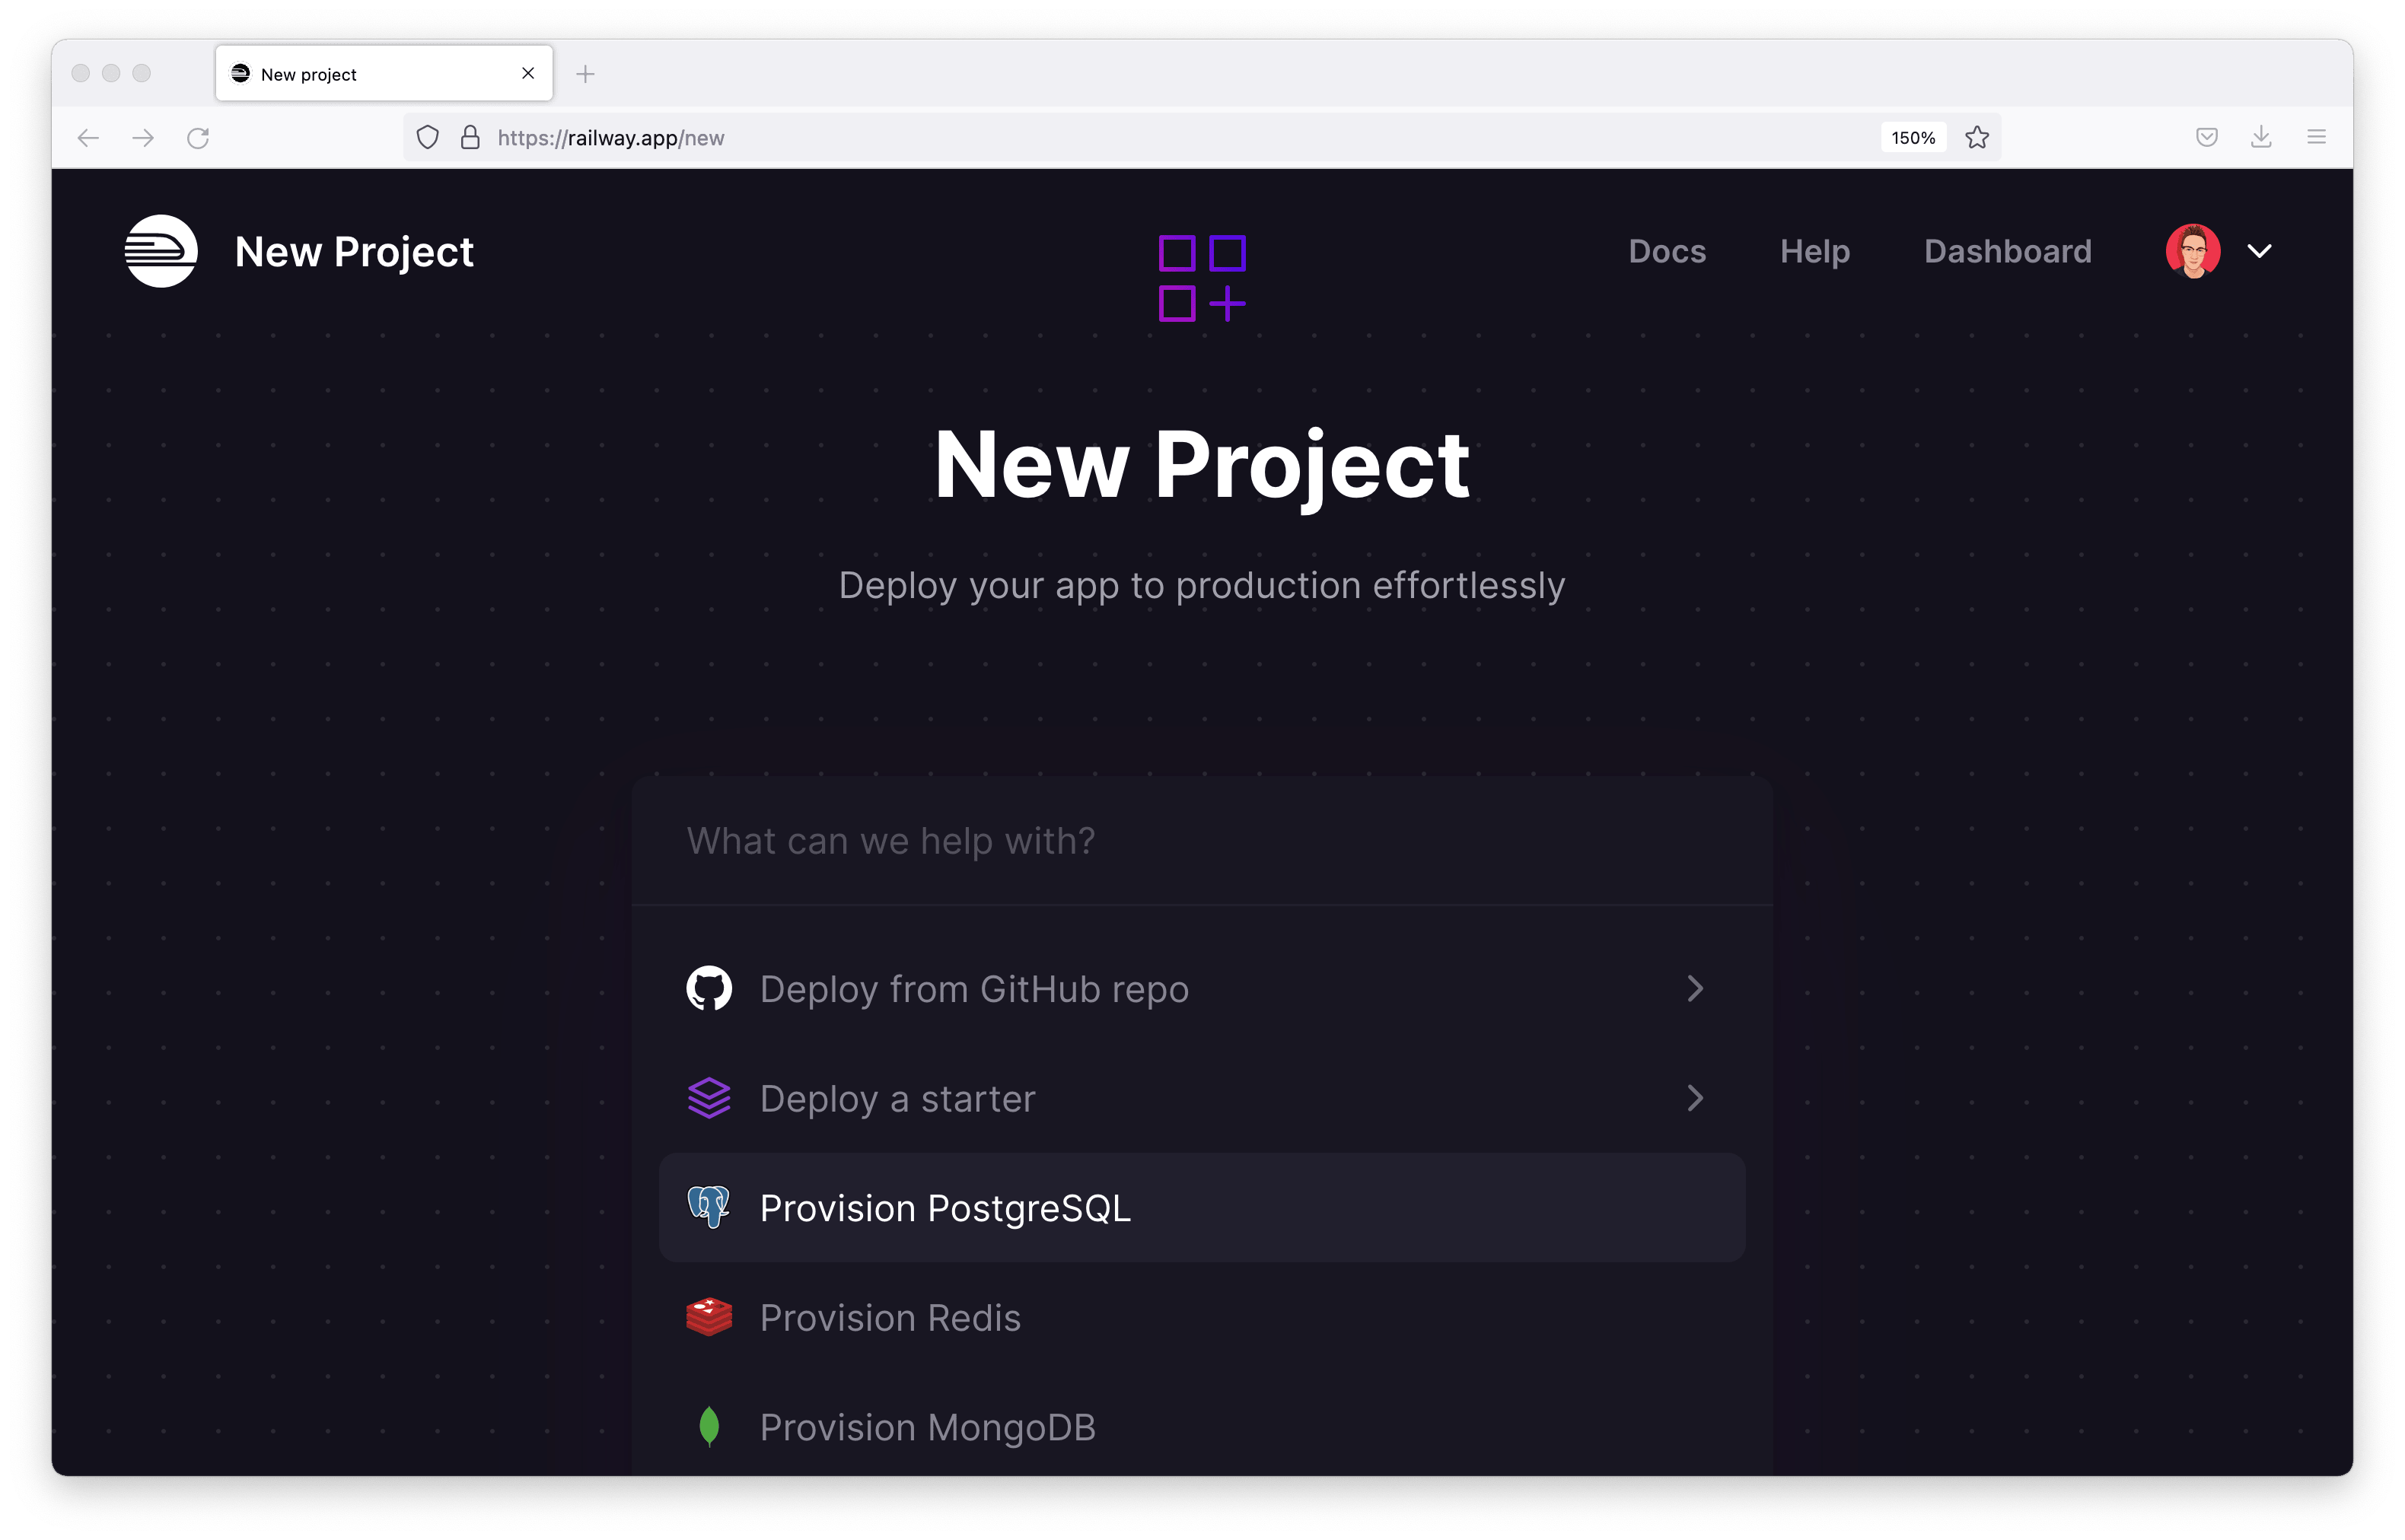
Hit the New Project button, or simply click the Create a New Project area.
You will be presented with a search box and a few common options. Select the Provision PostgreSQL option.
The option selected above creates a new PostgreSQL database and deploys it. Once the server is ready, you should see your provisioned database on the screen. Click the PostgreSQL instance.
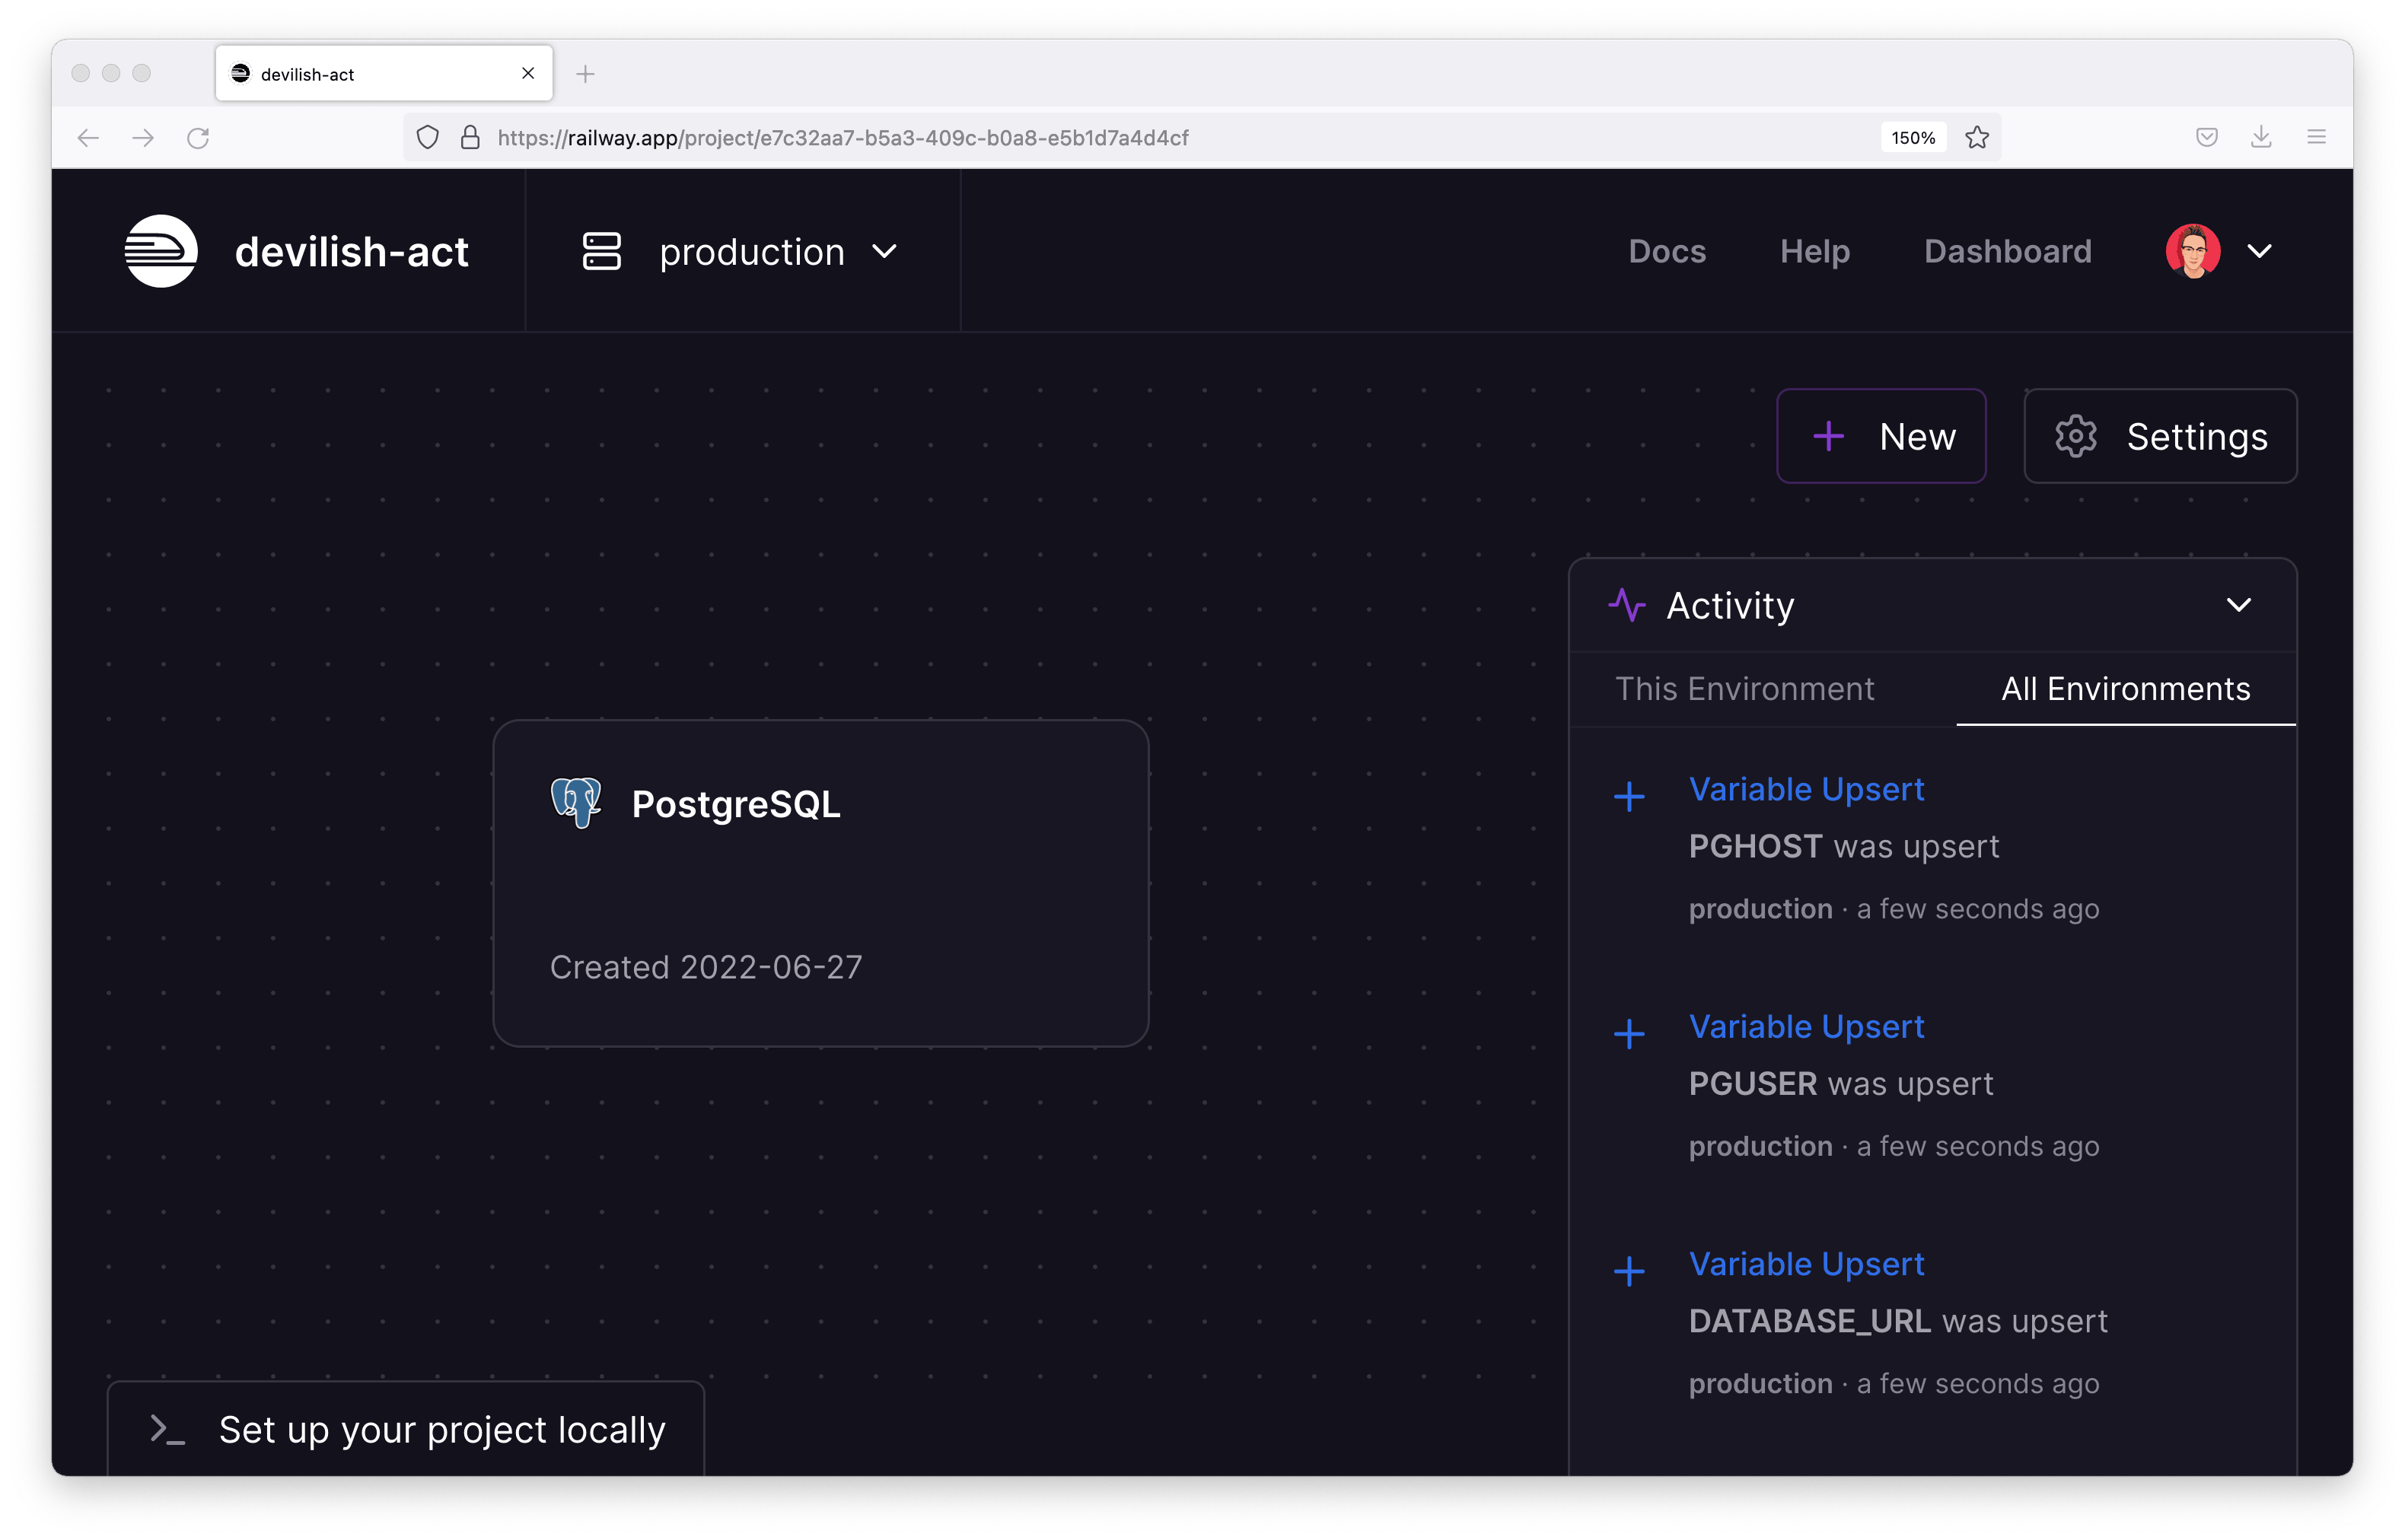
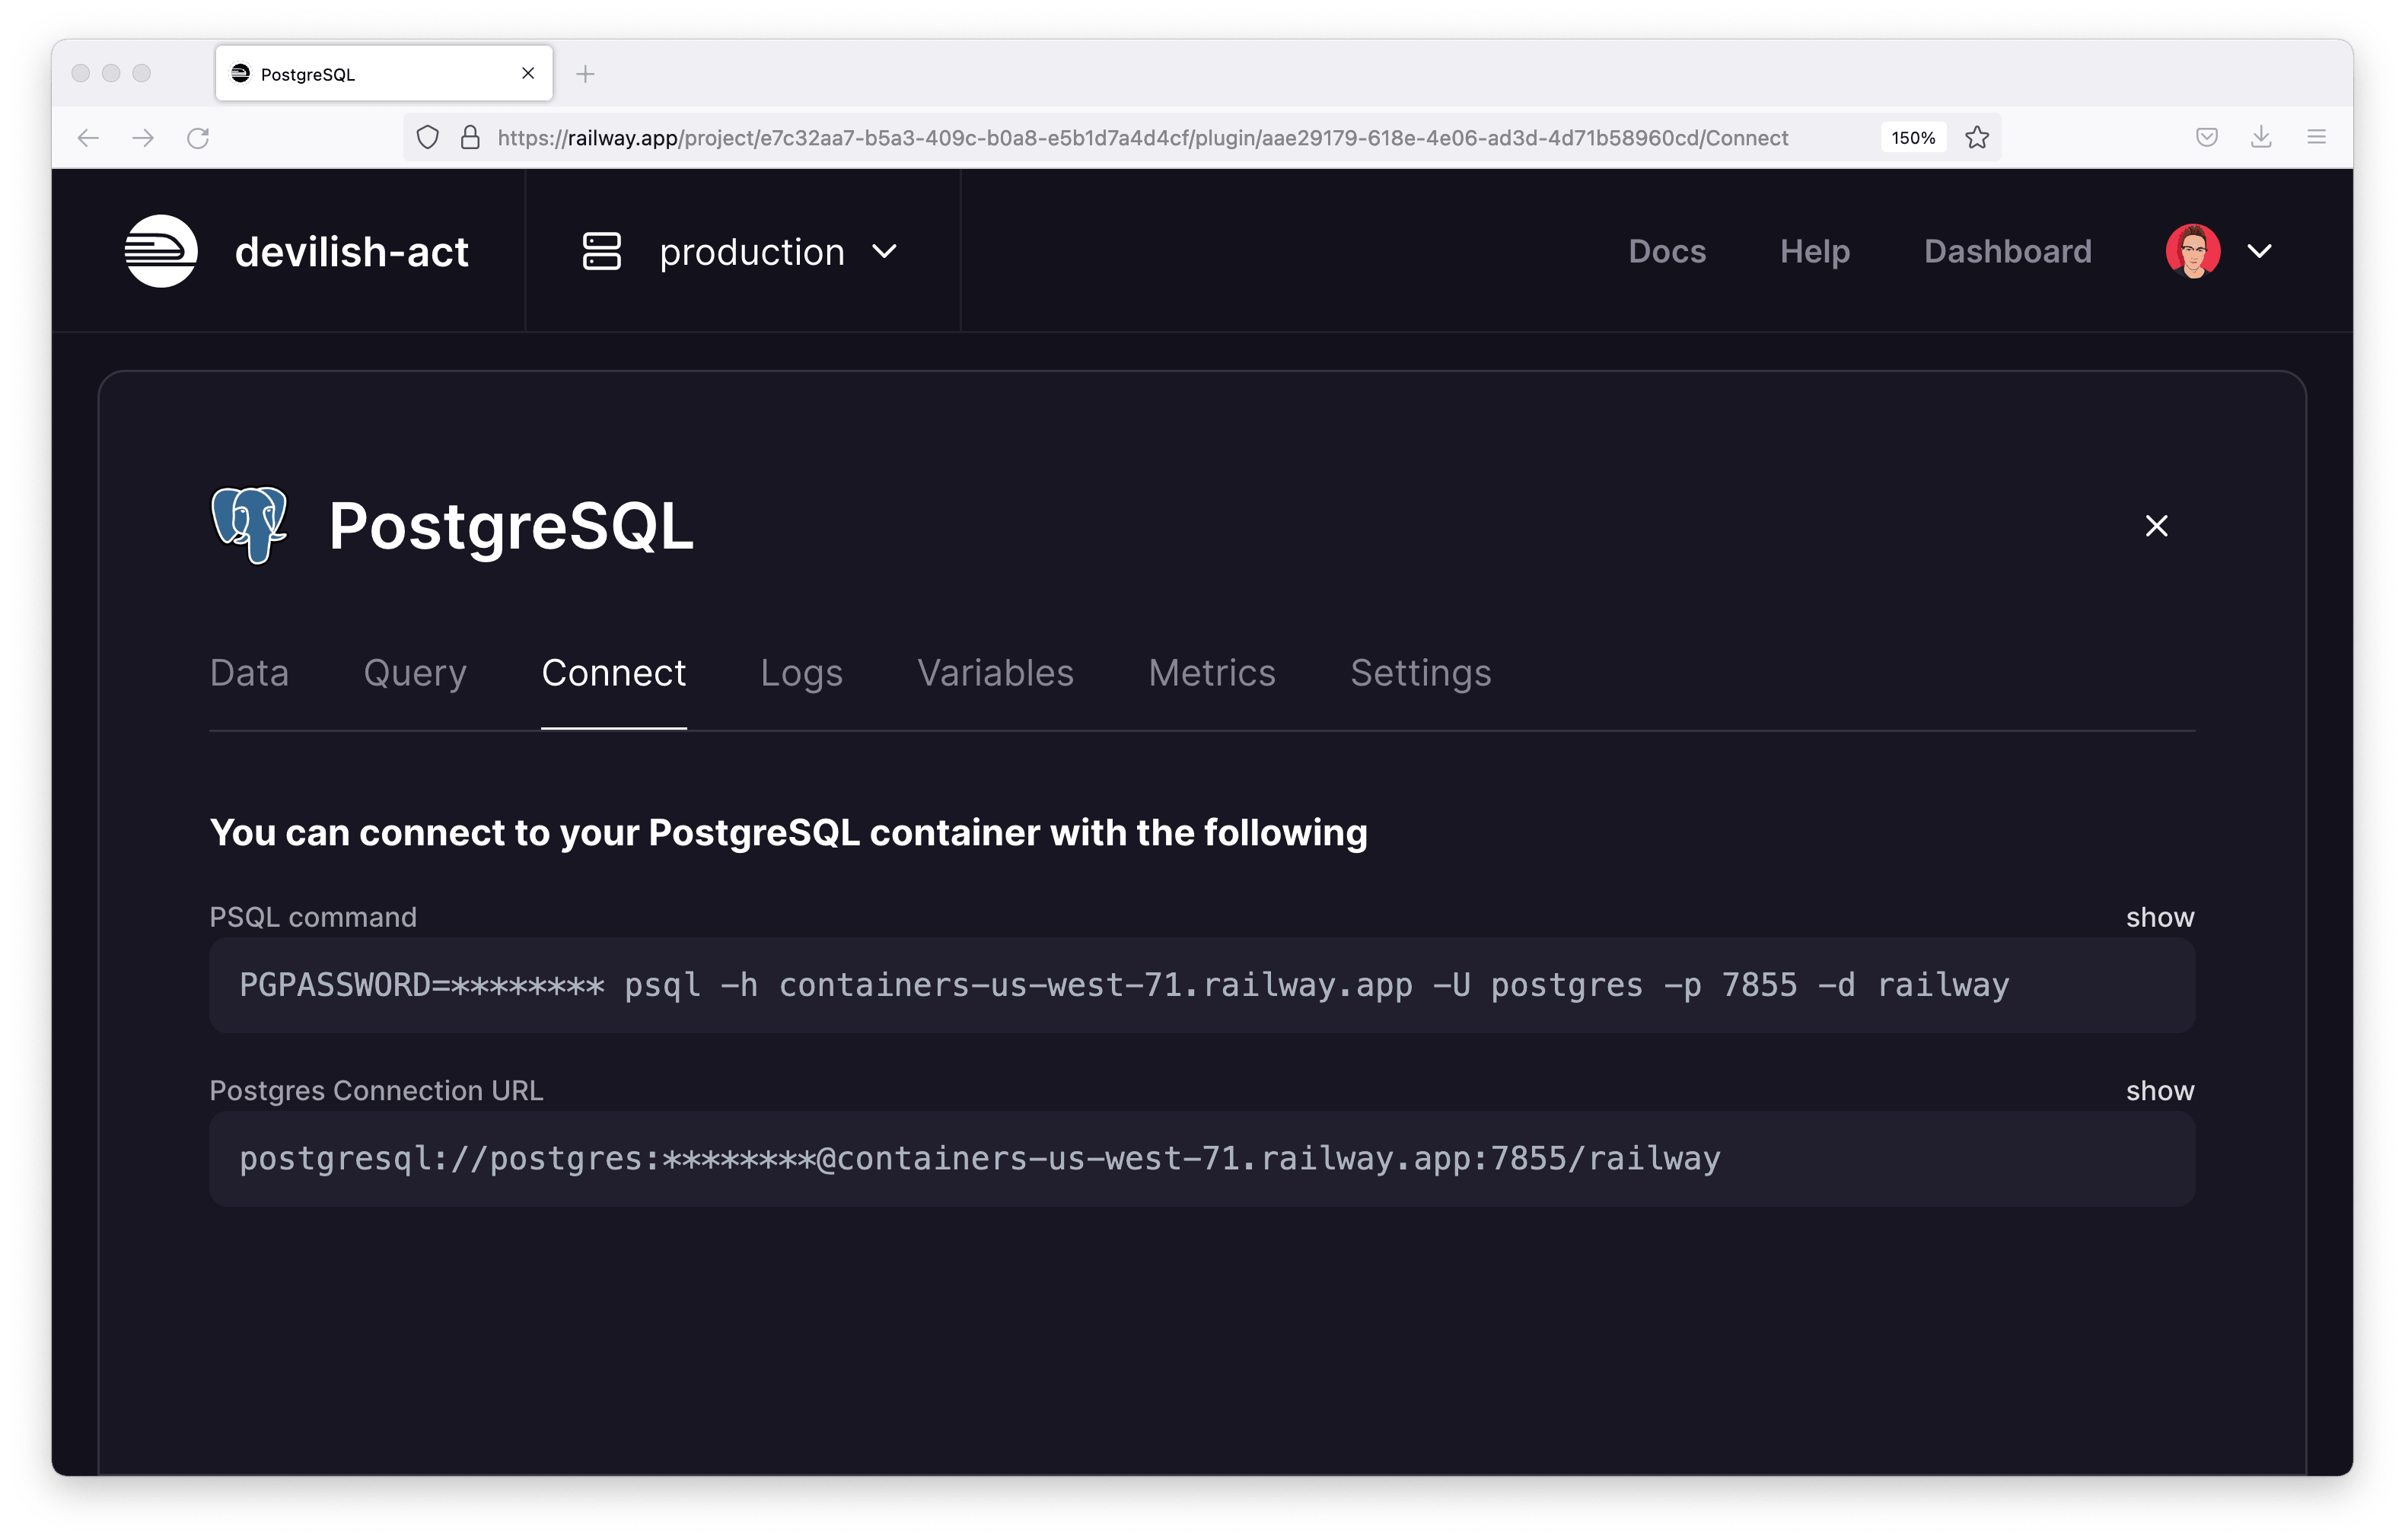
That will open up a menu with a few different tabs. On the Connect tab, you will find your database's connection string. Take note of where to find this string as you will need them in just a little while.
Set up Prisma
Next you will set up Prisma. Your GraphQL server will use Prisma Client to query your PostgreSQL database.
To set up Prisma, you first need to install Prisma CLI as a development dependency:
npm i -D prismaInitialize Prisma
With Prisma CLI installed, you will have access to a set of useful tools and commands provided by Prisma. The command you will use here is called init, and will initialize Prisma in your project:
npx prisma initThis command will create a new prisma folder within your project. Inside this folder you will find a file, schema.prisma, which contains the start of a Prisma schema.
That file uses the Prisma Schema Language (PSL) and is where you will define your database's tables and fields. It currently looks as follows:
// prisma/schema.prisma

generator client {
  provider = "prisma-client-js"
}

datasource db {
  provider = "postgresql"
  url      = env("DATABASE_URL")
}
Within the datasource block, note the url field. This fields equals a value env("DATABASE_URL"). This value tells Prisma to look within the environment variables for a
variable named DATABASE_URL to find the database's connection string.
Set the environment variable
prisma init also created a .env file for you with a single variable named DATABASE_URL. This variable holds the connection string Prisma will use to connect to your database.
Replace the current default contents of that variable with the connection string you retrieved via the Railway UI:
# .env

# Example: postgresql://postgres:Pb98NuLZM22ptNuR4Erq@containers-us-west-63.railway.app:6049/railway
DATABASE_URL="<your-connection-string>"
Model your data
The application you are building will need two different database tables: User and Message. Each "user" will be able to have many associated "messages".
Note: Think back to the previous article, where you set up manually written types that define the user and message models.
Begin by modeling the User table. This table will need the following columns:
id: The unique ID of the database recordname: The name of the usercreatedAt: A timestamp of when each user was created
Add the following model block to your Prisma schema:
// prisma/schema.prisma

model User {
  id        Int      @id @default(autoincrement())
  name      String
  createdAt DateTime @default(now())
}
Next, add a Message model with the following fields:
id: The unique ID of the database recordbody: The contents of the messagecreatedAt: A timestamp of when each message was created
// prisma/schema.prisma

model Message {
  id        Int      @id @default(autoincrement())
  body   String
  createdAt DateTime @default(now())
}
Finally, set up a one-to-many relation between the User and Message tables.
diff
// prisma/schema.prisma

model User {
  id        Int       @id @default(autoincrement())
  name      String
  createdAt DateTime  @default(now())
+  messages  Message[]
}

model Message {
  id        Int      @id @default(autoincrement())
  body   String
  createdAt DateTime @default(now())
+  userId    Int
+  user      User     @relation(fields: [userId], references: [id])
}
This data modeling step is an important one. What you have done here is set up the source of truth for the shape of your data. You database's schema is now defined in one central place, and used to generate a type-safe API that interacts with that database.
Note: Think of the Prisma Schema as the glue between the shape of your database and the API that interacts with it.
Perform the first migration
Your database schema is now modeled and you are ready to apply this schema to your database. You will use Prisma Migrate to manage your database migrations.
Run the following command to create and apply a migration to your database:
npx prisma migrate dev --name initThe above command will create a new migration file named init, apply that migration to your database, and finally generate Prisma Client based off of that schema.
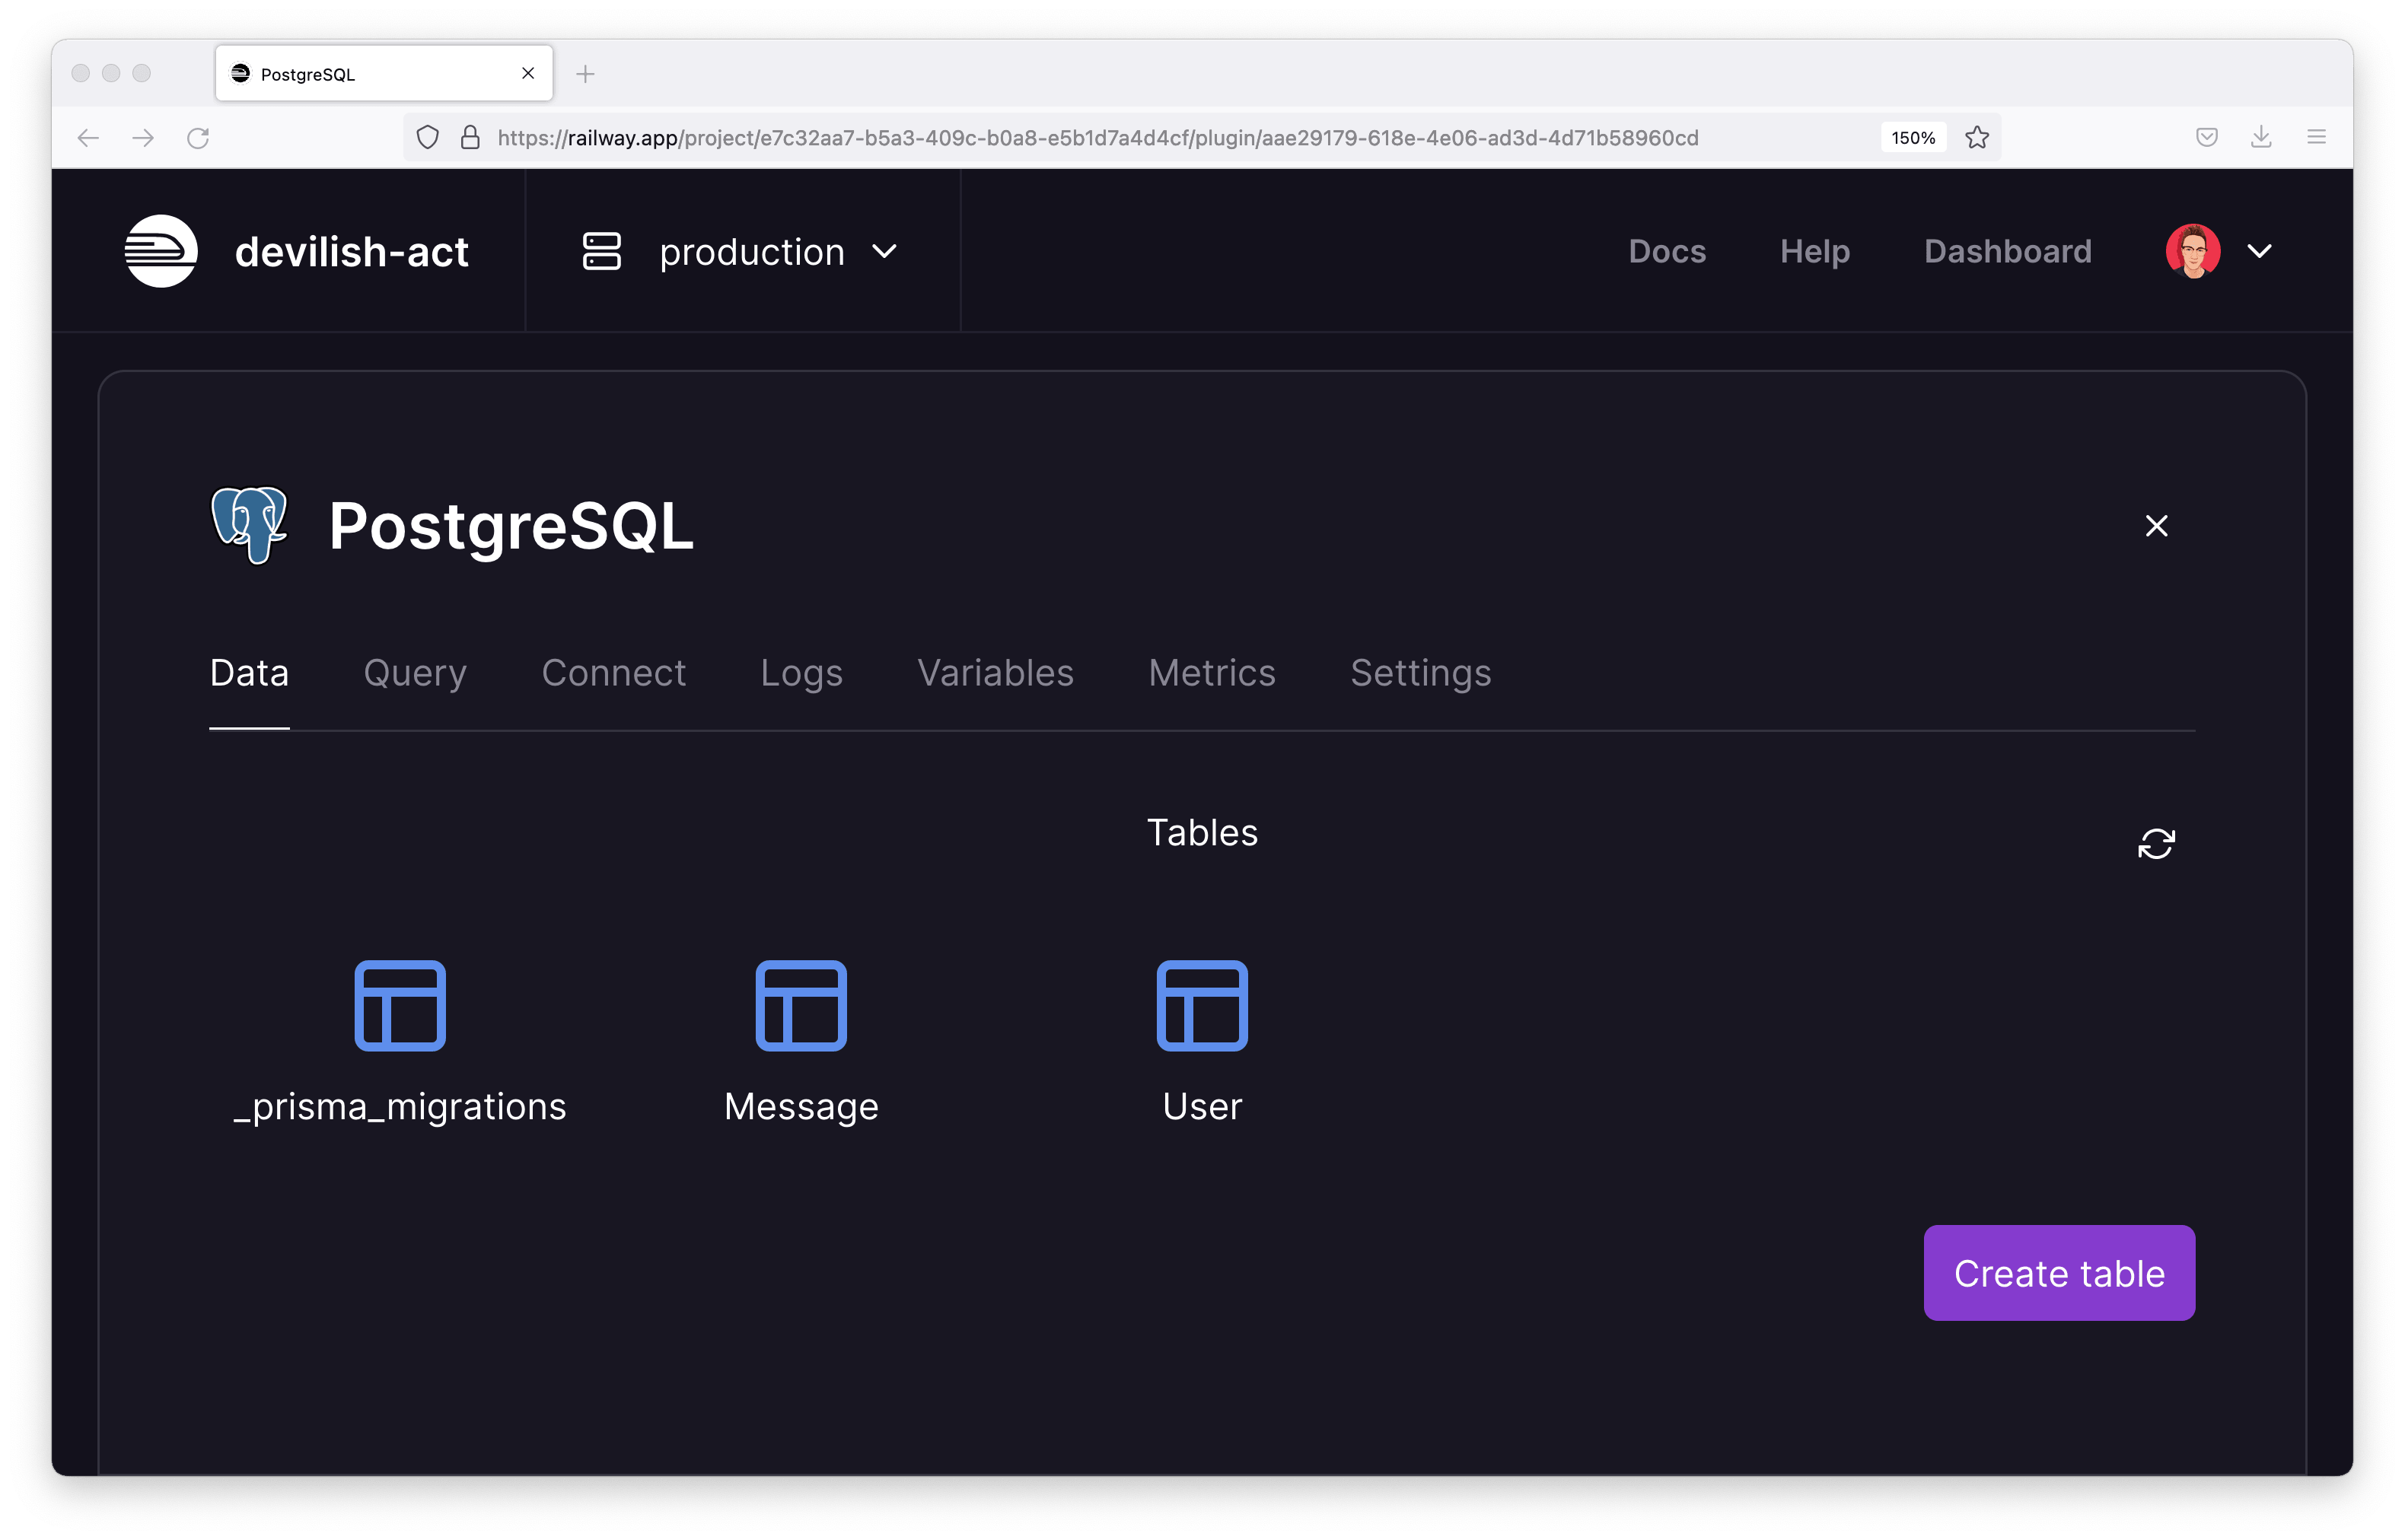
If you head back over to the Railway UI, in the Data tab you should see your tables listed. If so, the migration worked and your database is ready to be put to work!
Seed the database 🌱
That last thing to do before beginning to build out your GraphQL API is seed the database with some initial data for you to interact with.
Within the prisma folder, create a new file named seed.ts:
touch prisma/seed.tsPaste the following contents into that file:
// prisma/seed.ts
import { PrismaClient } from "@prisma/client";
const prisma = new PrismaClient();
async function main() {
// Delete all `User` and `Message` records
await prisma.message.deleteMany({});
await prisma.user.deleteMany({});
// (Re-)Create dummy `User` and `Message` records
await prisma.user.create({
data: {
name: "Jack",
messages: {
create: [
{
body: "A Note for Jack",
},
{
body: "Another note for Jack",
},
],
},
},
});
await prisma.user.create({
data: {
name: "Ryan",
messages: {
create: [
{
body: "A Note for Ryan",
},
{
body: "Another note for Ryan",
},
],
},
},
});
await prisma.user.create({
data: {
name: "Adam",
messages: {
create: [
{
body: "A Note for Adam",
},
{
body: "Another note for Adam",
},
],
},
},
});
}
main().then(() => {
console.log("Data seeded...");
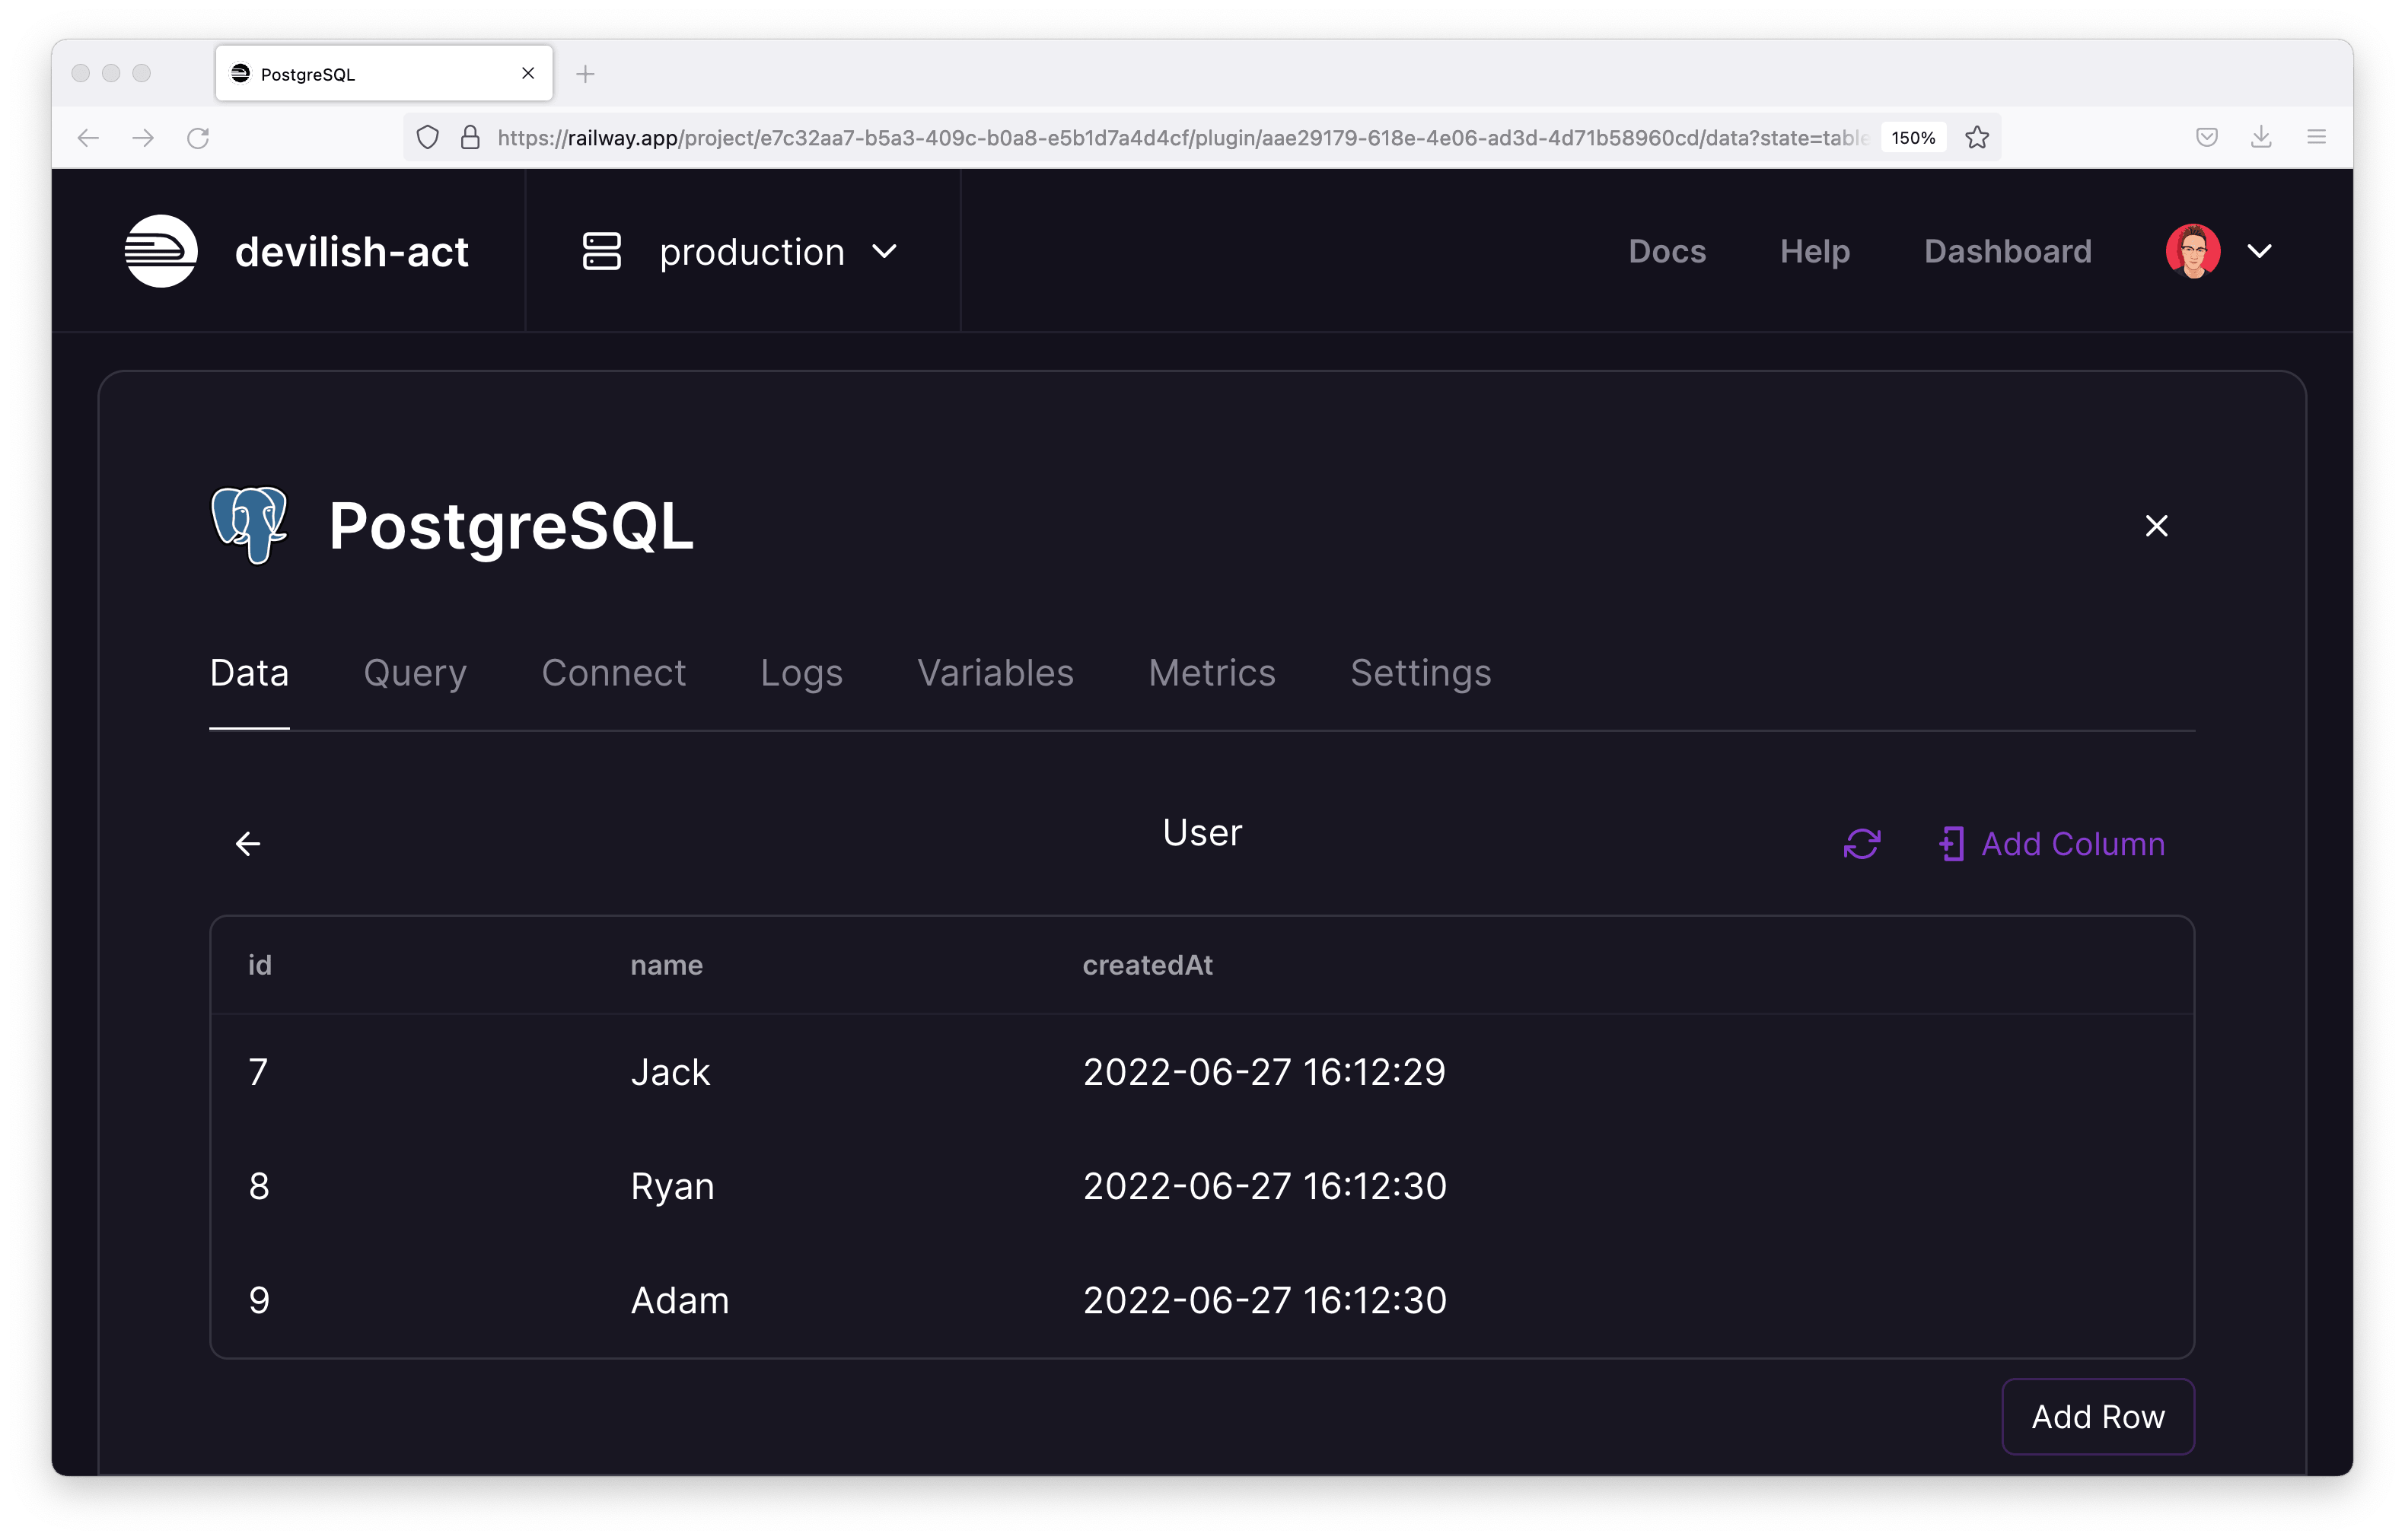
});This script clears out the database and then creates three users. Each user is given two messages associated with it.
Note: In the next article, you will dive deeper into the process writing a few queries using Prisma Client.
Now that the seed script is available, head over to your package.json file and add the following key to the JSON object:
// package.json

// ...
"prisma": {
  "seed": "ts-node-dev prisma/seed.ts"
},
// ...
Use the following command to run your seed script:
npx prisma db seedAfter running the script, if you head back to the Railway UI and into the Data tab, you should be able to navigate through the newly added data.
Summary & What's next
In this article, you set up all of the pieces necessary to build your GraphQL API. Along the way, you:
- Set up a TypeScript project that will hold your GraphQL server
- Spun up a PostgreSQL database using Railway
- Initialized Prisma
- Modeled the database schema
- Seeded the database
In the next article, you will build a type-safe GraphQL server using Prisma, GraphQL Yoga, and a code-first GraphQL schema builder called Pothos.
Build your next app with Prisma
Start free. Scale when you’re ready.