The Ultimate Guide to Testing with Prisma: Unit Testing

Unit testing involves testing individual, isolated units of code to ensure they work as expected. In this article, you will learn how to identify areas of your codebase that should be unit tested, how to write those tests, and how to handle tests against functions using Prisma Client.
Table Of Contents
- Table Of Contents
- Introduction
- Prerequisites
- Explore the API
- Set up Vitest
- Files that don't need to be tested
- What you will test
- Test the tags service
- Summary & What's next
Introduction
Unit testing is one of the primary methods of ensuring the individual units of code (e.g. a function) in your applications function as you'd expect them to.
It can be very difficult for someone new to testing to understand what unit testing is. Not only do they have to understand how their application works, how to write tests, and how to prepare a testing environment, but they also have to understand what they should be testing for!
For that reason, developers often take this approach to testing:
Note: Shoutout to @RoxCodes for his honesty 😉
In this series, you will be working with a fully functional application. The only thing missing in its codebase is a suite of tests to validate it works as intended.
Over the course of this series you will consider various areas of the code and walk through what should be tested, why it needs to be tested, and how to write those tests. This will include unit testing, integration testing, end-to-end testing, as well as setting up Continuous Integration(CI) and Continuous Development(CD) workflows that run those tests.
In this article specifically, you will zoom into specific areas of the code and write unit tests against them to ensure the individual building blocks of those areas are working properly.
What is unit testing?
Unit testing is a type of testing that involves writing tests against small, isolated pieces of code. Unit tests target small units of code to ensure they work as expected in various situations.
Typically, a unit test will target an individual function as functions are usually the smallest singular units of code in a JavaScript application.
Take the function below as an example:
function reverseString(str) {
  return str.split('').reverse().join('')
}
This function, while simple, is a good candidate for a unit test. It contains a singular set of functionality wrapped into one function. To ensure this function works properly, you might provide it the string 'abcde' and make sure the string 'edcba' is returned.
The associated suite of tests, or set of tests, could look like the following:
import { it } from 'vitest'
import { reverseString } from './utils'
it('reverses a string', () => {
  const string = reverseString('abcde')
  expect(string).toBe('edcba')
})
import { it } from 'vitest'
import { reverseString } from './utils'
it('throws an error if given an invalid input', () => {
expect(() => reverseString(1)).toThrow()
})As you may have noticed above, the goal of a unit test is simply to ensure the smallest building blocks of your application work properly. In doing this, you build the confidence that as you begin to combine those building blocks the resulting behavior is predictable.

The reason this is so important is illustrated above. When running your unit tests, if all tests pass you can be sure every building block works and, as a result, your application works as intended. If even one test fails, however, you can assume your application is not working as intended and you will know based on the failed test(s) exactly what is wrong.
What isn't unit testing?
In a unit test, the goal is to make sure your custom code works as intended. The important thing to note from the previous sentence is the phrase "custom code".
As a JavaScript developer, you have access to a rich ecosystem of community-built modules and packages via npm. Using external libraries allows you to save a lot of time where you might otherwise re-invent the wheel.
While there is nothing wrong with using an external module, there are some considerations to make when thinking about testing functions that use those modules. Most importantly, it is important to keep this in mind:
If you don't trust an external package and feel you should write tests against it, you probably should not be using that particular package.
Take the following function as an example:
import randomColor from 'randomColor'

function getSquare(side: number) {
  if (side <= 0) return null
  return {
    height: side,
    width: side,
    area: side * side,
    color: randomColor()
  }
}
This function takes in the length of one side of a square and returns an object containing a more defined square, including a unique color for the square.
You may want to verify the following when writing unit tests for the function above:
- The function returns
nullwhen a number smaller than one is provided - The function calculates the area properly
- The function returns an object of the correct shape with the correct values
- The
randomColorfunction was invoked once
Notice there is no mention of a test to make sure each square actually gets a unique color. This is because randomColor is assumed to work properly as it is an external module.
Note: Whether
randomColorwas provided via an npm package or even a custom-built function in another file, it should be assumed to work correctly in this context. IfrandomColorwas a function you wrote in another file, it should be tested in its own isolated context. Think 'building blocks'!
This concept is important because it also applies to Prisma Client. When using Prisma in your application, Prisma Client is an external module. Because of this, any tests should assume the functions provided by your client work as expected.
Technologies you will use
Prerequisites
Assumed knowledge
The following would be helpful to have coming in to this series:
- Basic knowledge of JavaScript or TypeScript
- Basic knowledge of Prisma Client and its functionalities
- Some experience with Express would be nice
Development environment
To follow along with the examples provided, you will be expected to have:
This series will make heavy use of this GitHub repository. Make sure to clone the repository and check out the main branch.
Once you have cloned the repository, there are a few steps to take to set the project up.
First, navigate into the project and install the node_modules:
cd express_sample_app
npm i
Next, create a .env file at the root of the project:
touch .envThis file should contain a variable named API_SECRET whose value you can set to any string you want as well as one named DATABASE_URL which can be left empty for now:
# .env
API_SECRET="supersecretstring"
DATABASE_URL=""
In .env the API_SECRET variable provides a secret key used by the authentication services to encrypt your passwords. In a real-world application this value should be replaced with a long random string with numeric and alphabetic characters.
The DATABASE_URL, as the name suggests, contains the URL to your database. You currently do not have or need a real database.
Last, you will need to generate Prisma Client based on your Prisma schema:
npx prisma generateExplore the API
Now that you have a general idea of what unit testing is and isn't, take a look at the application you will be testing in this series.
The project you cloned from Github contains a fully functional Express API. This API allows a user to log in, store and organize their favorite quotes.
The application's files are organized by feature into folders within the src directory.
Within src there are three main folders:
/auth: Contains all files directly related to the authentication of the API/quotes: Contains all files directly related to the quotes feature of the API/lib: Contains any general helper files
The API itself offers the following endpoints:
| endpoint | description |
|---|---|
POST /auth/signup | Creates a new user with a username and password. |
POST /auth/signin | Logs a user in with a username and a password. |
GET /quotes | Returns all quotes related to the logged in user. |
POST /quotes | Stores a new quote related to the logged in user. |
DELETE /quotes/:id | Deletes a quote belonging to the logged in user by id. |
Feel free to take some time to explore the files in this project and get a feel for how the API works.
With a general understanding of what unit testing is and how the application works, you are now ready to start the process of writing tests to verify the application does what is intended.
Note: In a real-world setting, these tests would help ensure that as the application evolves and changes, existing functionality remains intact. Tests would likely be written as you develop the application rather than after the application is complete.
Set up Vitest
In order to begin testing, you will need to have a testing framework set up. In this series you are using Vitest.
Begin by installing vitest and vitest-mock-extended with the following command:
npm i -D vitest vitest-mock-extendedNote: For information regarding the two packages installed above, be sure to read the first article in this series.
Next, you will need to configure Vitest so it knows where your unit tests are and how to resolve any modules you may need to import into those tests.
Create a new file at the root of your project named vitest.config.unit.ts:
touch vitest.config.unit.tsThis file will define and export the configuration for your unit tests using the defineConfig function provided by Vitest:
// vitest.config.unit.ts

import { defineConfig } from 'vitest/config'

export default defineConfig({
  test: {
    include: ['src/**/*.test.ts']
  },
  resolve: {
    alias: {
      auth: '/src/auth',
      quotes: '/src/quotes',
      lib: '/src/lib'
    }
  }
})
Above you configured two options for Vitest:
- The
test.includeoption tells Vitest to look for tests within any files in thesrcdirectory that match the naming convention*.test.ts. - The
resolve.aliasconfiguration sets up file path aliases. This allows you to shorten file import paths, e.g.:src/auth/auth.servicebecomesauth/auth.service.
Lastly, in order to more easily run your tests you will configure scripts in package.json to run the Vitest CLI commands.
Add the following to the scripts section of package.json:
{
  // ...
  "scripts": {
    "dev": "ts-node src/index.ts",
    "lint": "eslint . --ext .ts,.tsx --fix",
    "lint:check": "eslint . --ext .ts,.tsx --max-warnings 0",
    "format": "prettier --write .",
    "format:check": "prettier --check .",
    "checks": "npm run format:check && npm run lint:check",
    "checks:fix": "npm run format && npm run lint",
    "prepare": "husky install",
+    "test:unit": "vitest -c ./vitest.config.unit.ts",
+    "test:unit:ui": "vitest -c ./vitest.config.unit.ts --ui"
  },
  // ...
}
Above two new scripts were added:
test:unit: This runs thevitestCLI command using the configuration file you created above.test:unit:ui: This runs thevitestCLI command using the configuration file you created above in ui mode. This opens up a GUI in your browser with tools to search, filter, and view the results of your tests.
To run these commands, you can execute the following in your terminal at the root of your project:
npm run test:unit
npm run test:unit:uiNote: If you run either of these commands right now, you will find the command fails. That is because there are no tests to run!
At this point, Vitest is configured and you are ready to begin thinking about writing your unit tests.
Files that don't need to be tested
Before jumping right in to writing tests, you will first take a look at the files that don't need to be tested and think about why.
Below is a list of files that do not need to be tested:
src/index.tssrc/auth/auth.router.tssrc/auth/auth.schemas.tssrc/quotes/quotes.router.tssrc/quotes/quotes.schemas.tssrc/quotes/quotes.service.tssrc/lib/prisma.tssrc/lib/createServer.ts
These files do not have any custom behaviors that require a unit test.
In the next two sections you will take a look at the two primary scenarios in these files that cause them to not require tests.
The file doesn't have custom behavior
Look at the following examples from the application:
// src/quotes/quotes.router.ts
import * as QuoteController from './quotes.controller'
import { CreateQuoteSchema, DeleteQuoteSchema } from './quotes.schemas'
import { Router } from 'express'
import { validate } from 'lib/middlewares'

const router = Router()

router.get('/', QuoteController.getAllQuotes)
router.post('/', validate(CreateQuoteSchema), QuoteController.createQuote)
router.delete('/:id', validate(DeleteQuoteSchema), QuoteController.deleteQuote)

export default router
// src/auth/auth.schemas.ts
import { z } from 'zod'
export const SignupSchema = z.object({
body: z.object({
username: z.string(),
password: z.string()
})
})
export type SignupSchema = z.infer<typeof SignupSchema>['body']
export const SigninSchema = SignupSchema
export type SigninSchema = SignupSchemaIn src/quotes/quotes.router.ts, the only things actually happening are invocations of functions provided by the Express framework. There are a few custom functions (validate and QuoteController.*) in play, however those are defined in separate files and will be tested in their own context.
The second file, src/auth/auth.schemas.ts, is very similar. While this file is important to the application, there really isn't anything here to test. The code simply exports schemas defined using the external module zod.
The functions only invokes an external module
Another scenario that is important to point out is the one in src/quotes/quotes.service.ts:
// src/quotes/quotes.service.ts
import prisma from 'lib/prisma'

// ...

export const deleteQuote = async (id: number) => {
  return await prisma.quote.delete({
    where: { id }
  })
}
This service exports two functions. Both functions wrap a Prisma Client function invocation and return the results.
As was mentioned previously in this article, there is no need to test external code. For that reason this file can be skipped.
If you take a look at the remaining files from the list above that do not need tests, you will find each one does not need tests for one of the reasons outlined here.
What you will test
The remaining .ts files in the project all contain functionality that should be unit tested. The complete list of files that require tests is as follows:
src/auth/auth.controller.tssrc/auth/auth.service.tssrc/lib/middlewares.tssrc/lib/utility-classes.tssrc/quotes/quotes.controller.tssrc/quotes/tags.service.ts
Each function in each of these files should be given its own suite of tests that verify it behave correctly.
As you might imagine, this can result in a lot of tests! To put this into numbers, the Express API contains thirteen different functions that need to be tested and each will likely have a suite of more than two tests. This means at the very least there will be twenty-six tests to write!
In order to keep this article to a manageable length, you will write the tests for a single file, src/quotes/tags.service.ts as this file's tests cover all of the important unit-testing concepts this article hopes to cover.
Note: If you are curious about what the entire set of tests would look like for this API, the
unit-testsbranch of the Github repository has a complete set of tests for every function.
Test the tags service
The tags service exports two functions, upsertTags and deleteOrphanedTags.
To start, create a new file in the same directory as tags.service.ts named tags.service.test.ts:
mkdir src/quotes/tests
touch src/quotes/tests/tags.service.test.tsNote: There are many ways to organize your tests. In this series, the tests will be written in a file right next to the target of the test, also known as colocating your tests.
If you are using VSCode and have v1.64 or later you have access to a cool feature that cleans up your project's file tree when colocating tests and their targets.
Within VSCode, head to Code > Preferences > Settings in the option bar at the top of the screen.
Within the settings page, search for the file nesting setting by typing in file nesting. Enable the setting below:
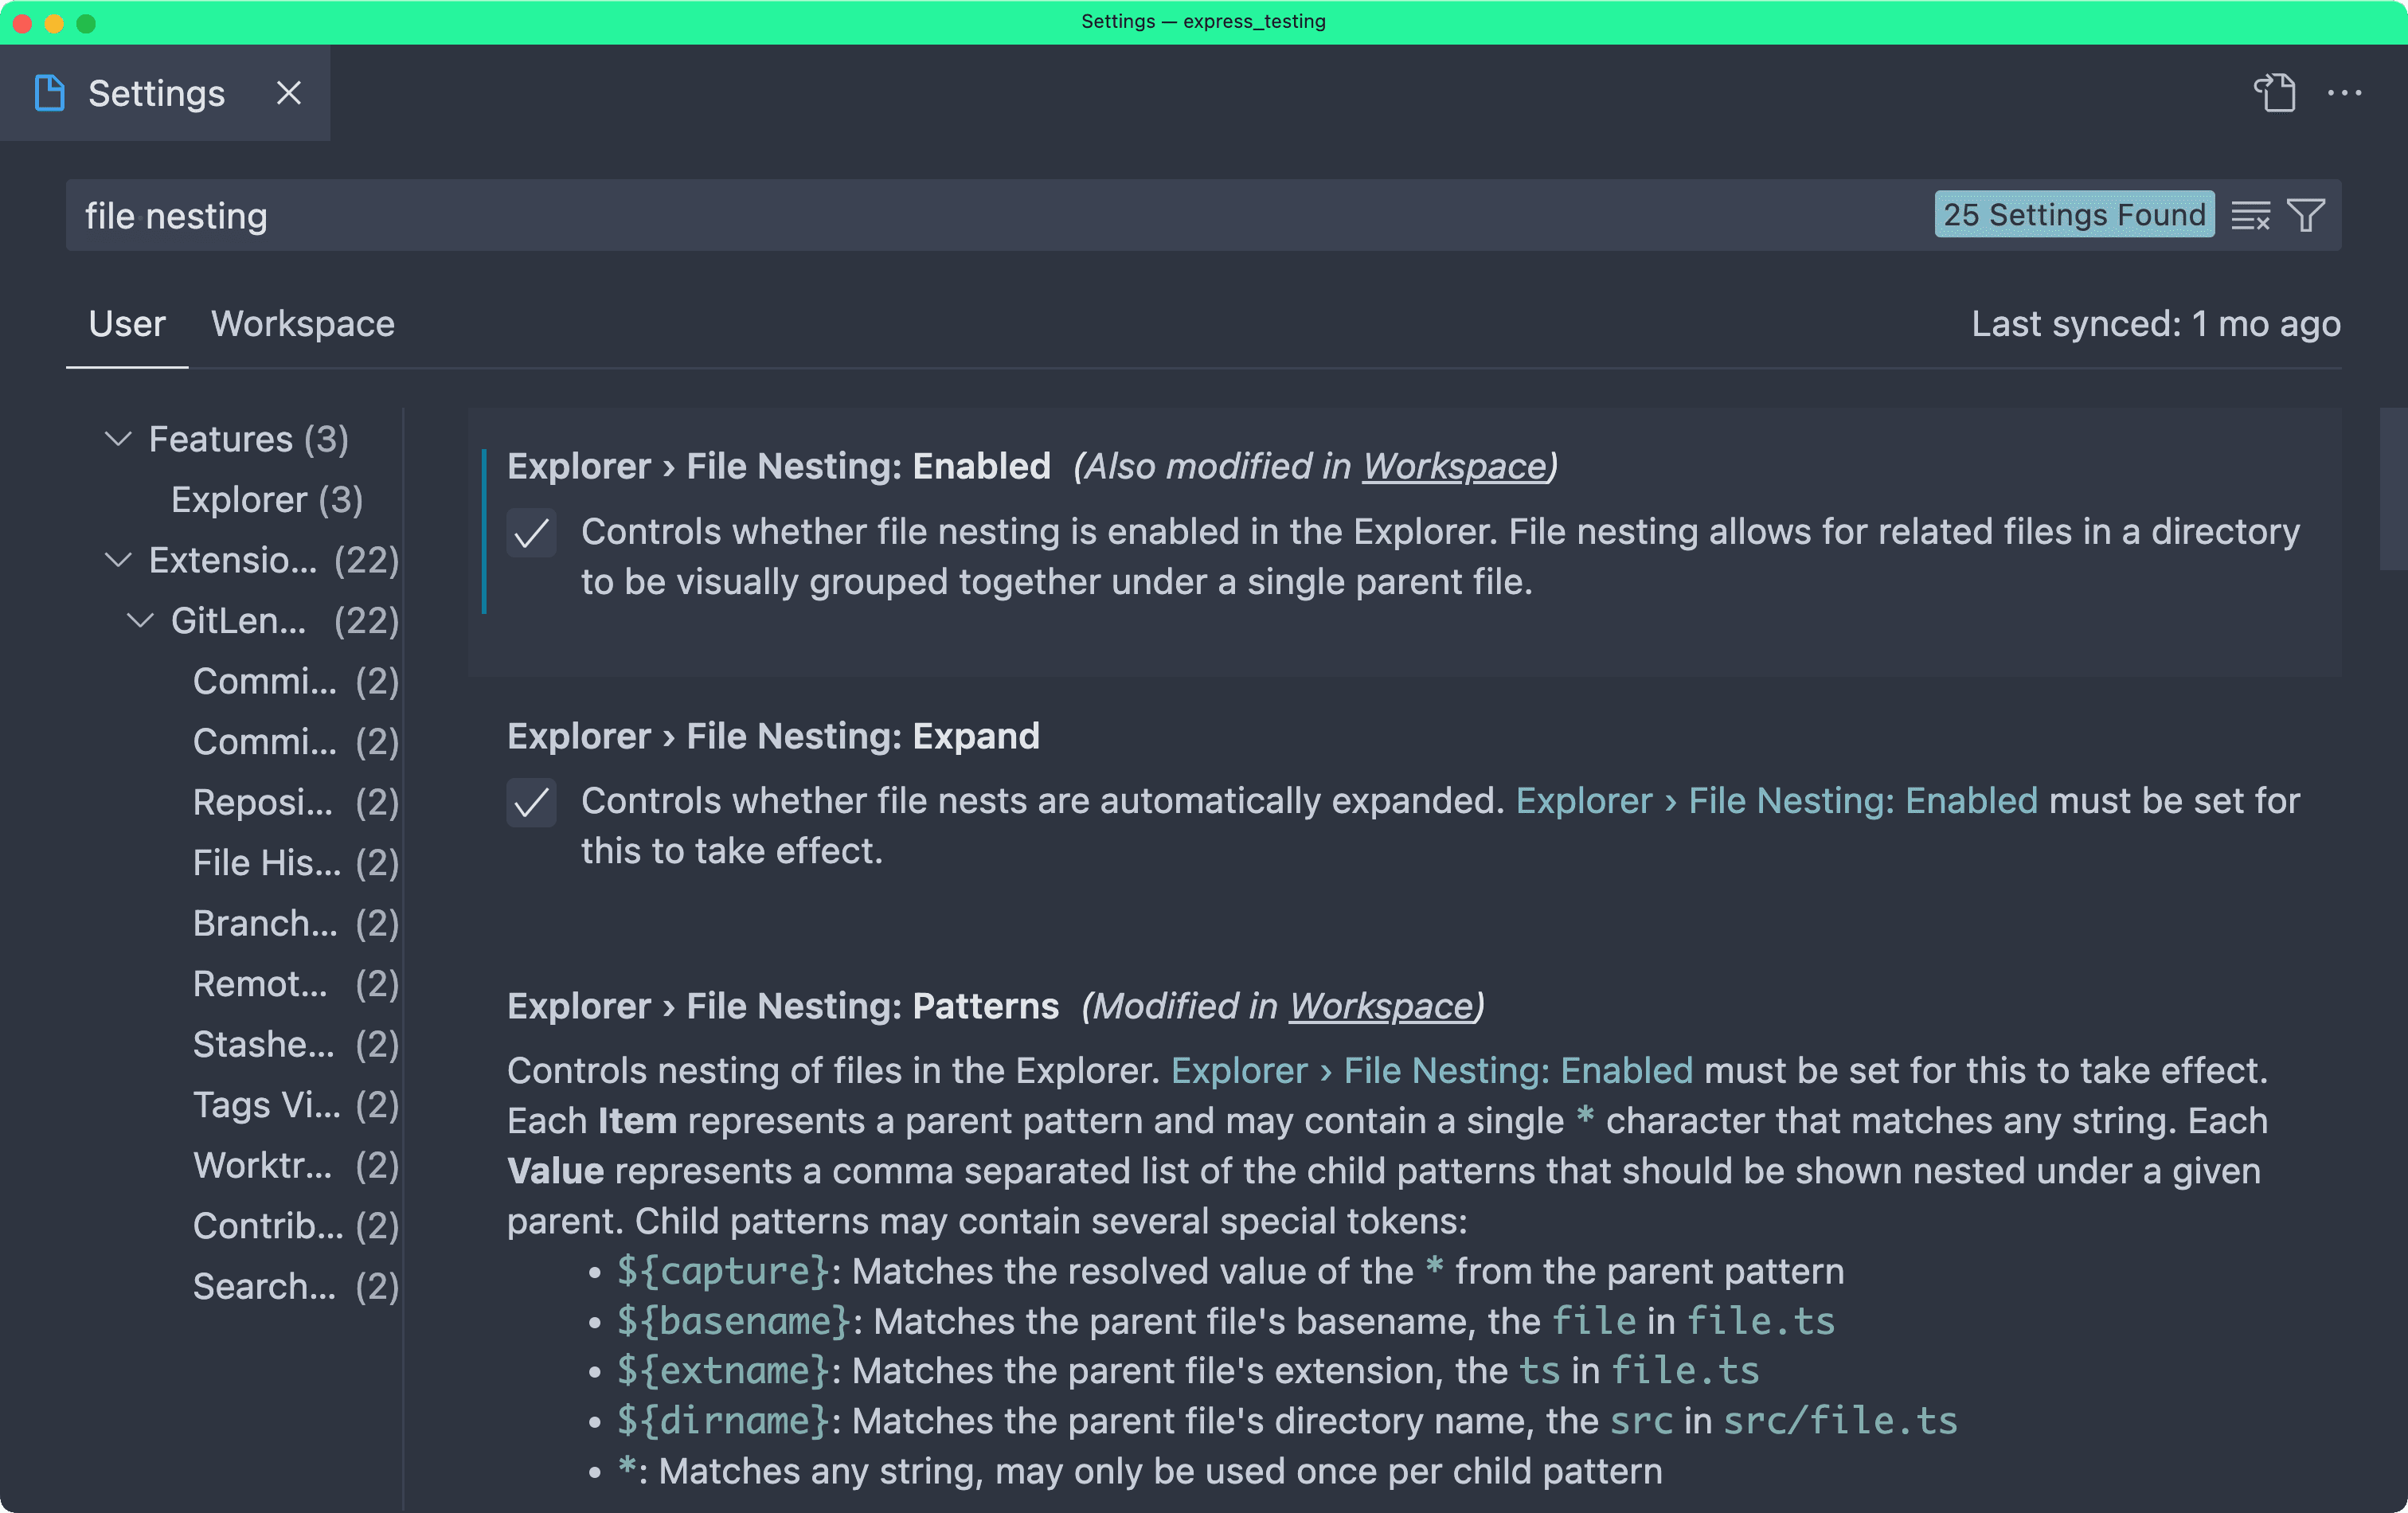
Next, scrolling a bit further down in those settings you will see a Explorer > File Nesting: Patterns section.
If an item named *.ts does not exist, create one. Then update the *.ts item's value to ${capture}.*.ts:
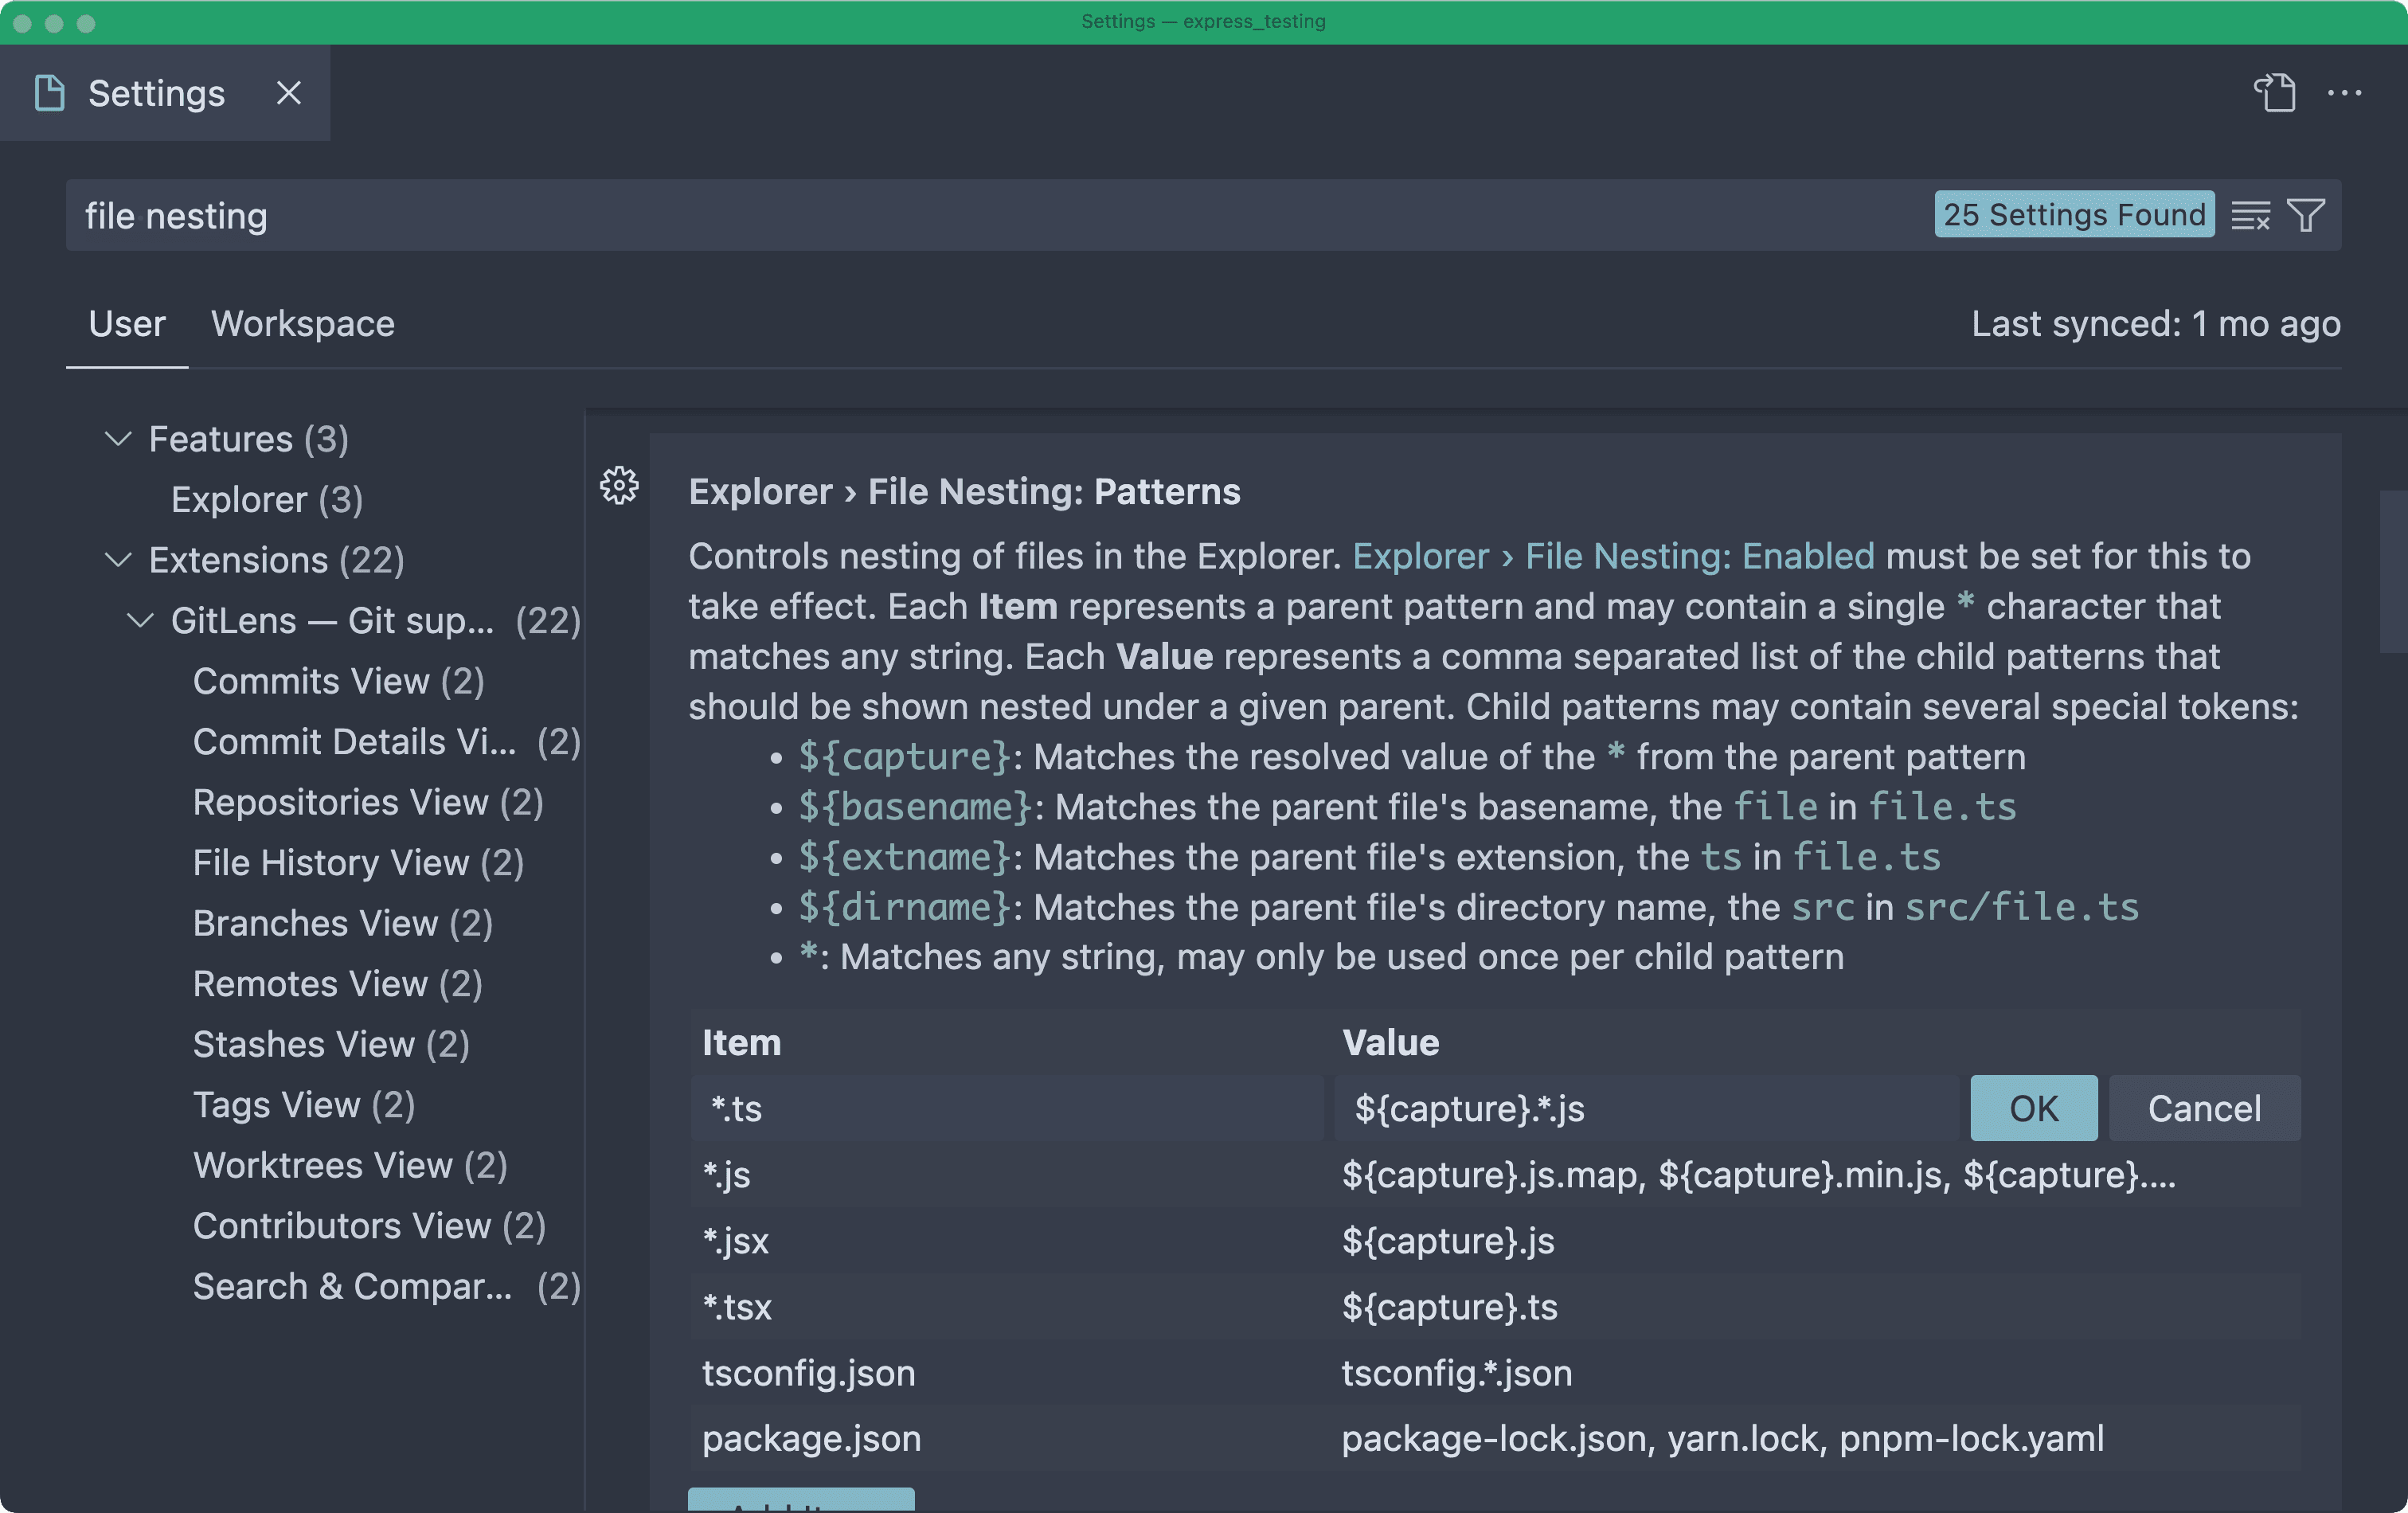
This lets VSCode to nest any files under the main file named ${capture}.ts. To better illustrate, see the following example:
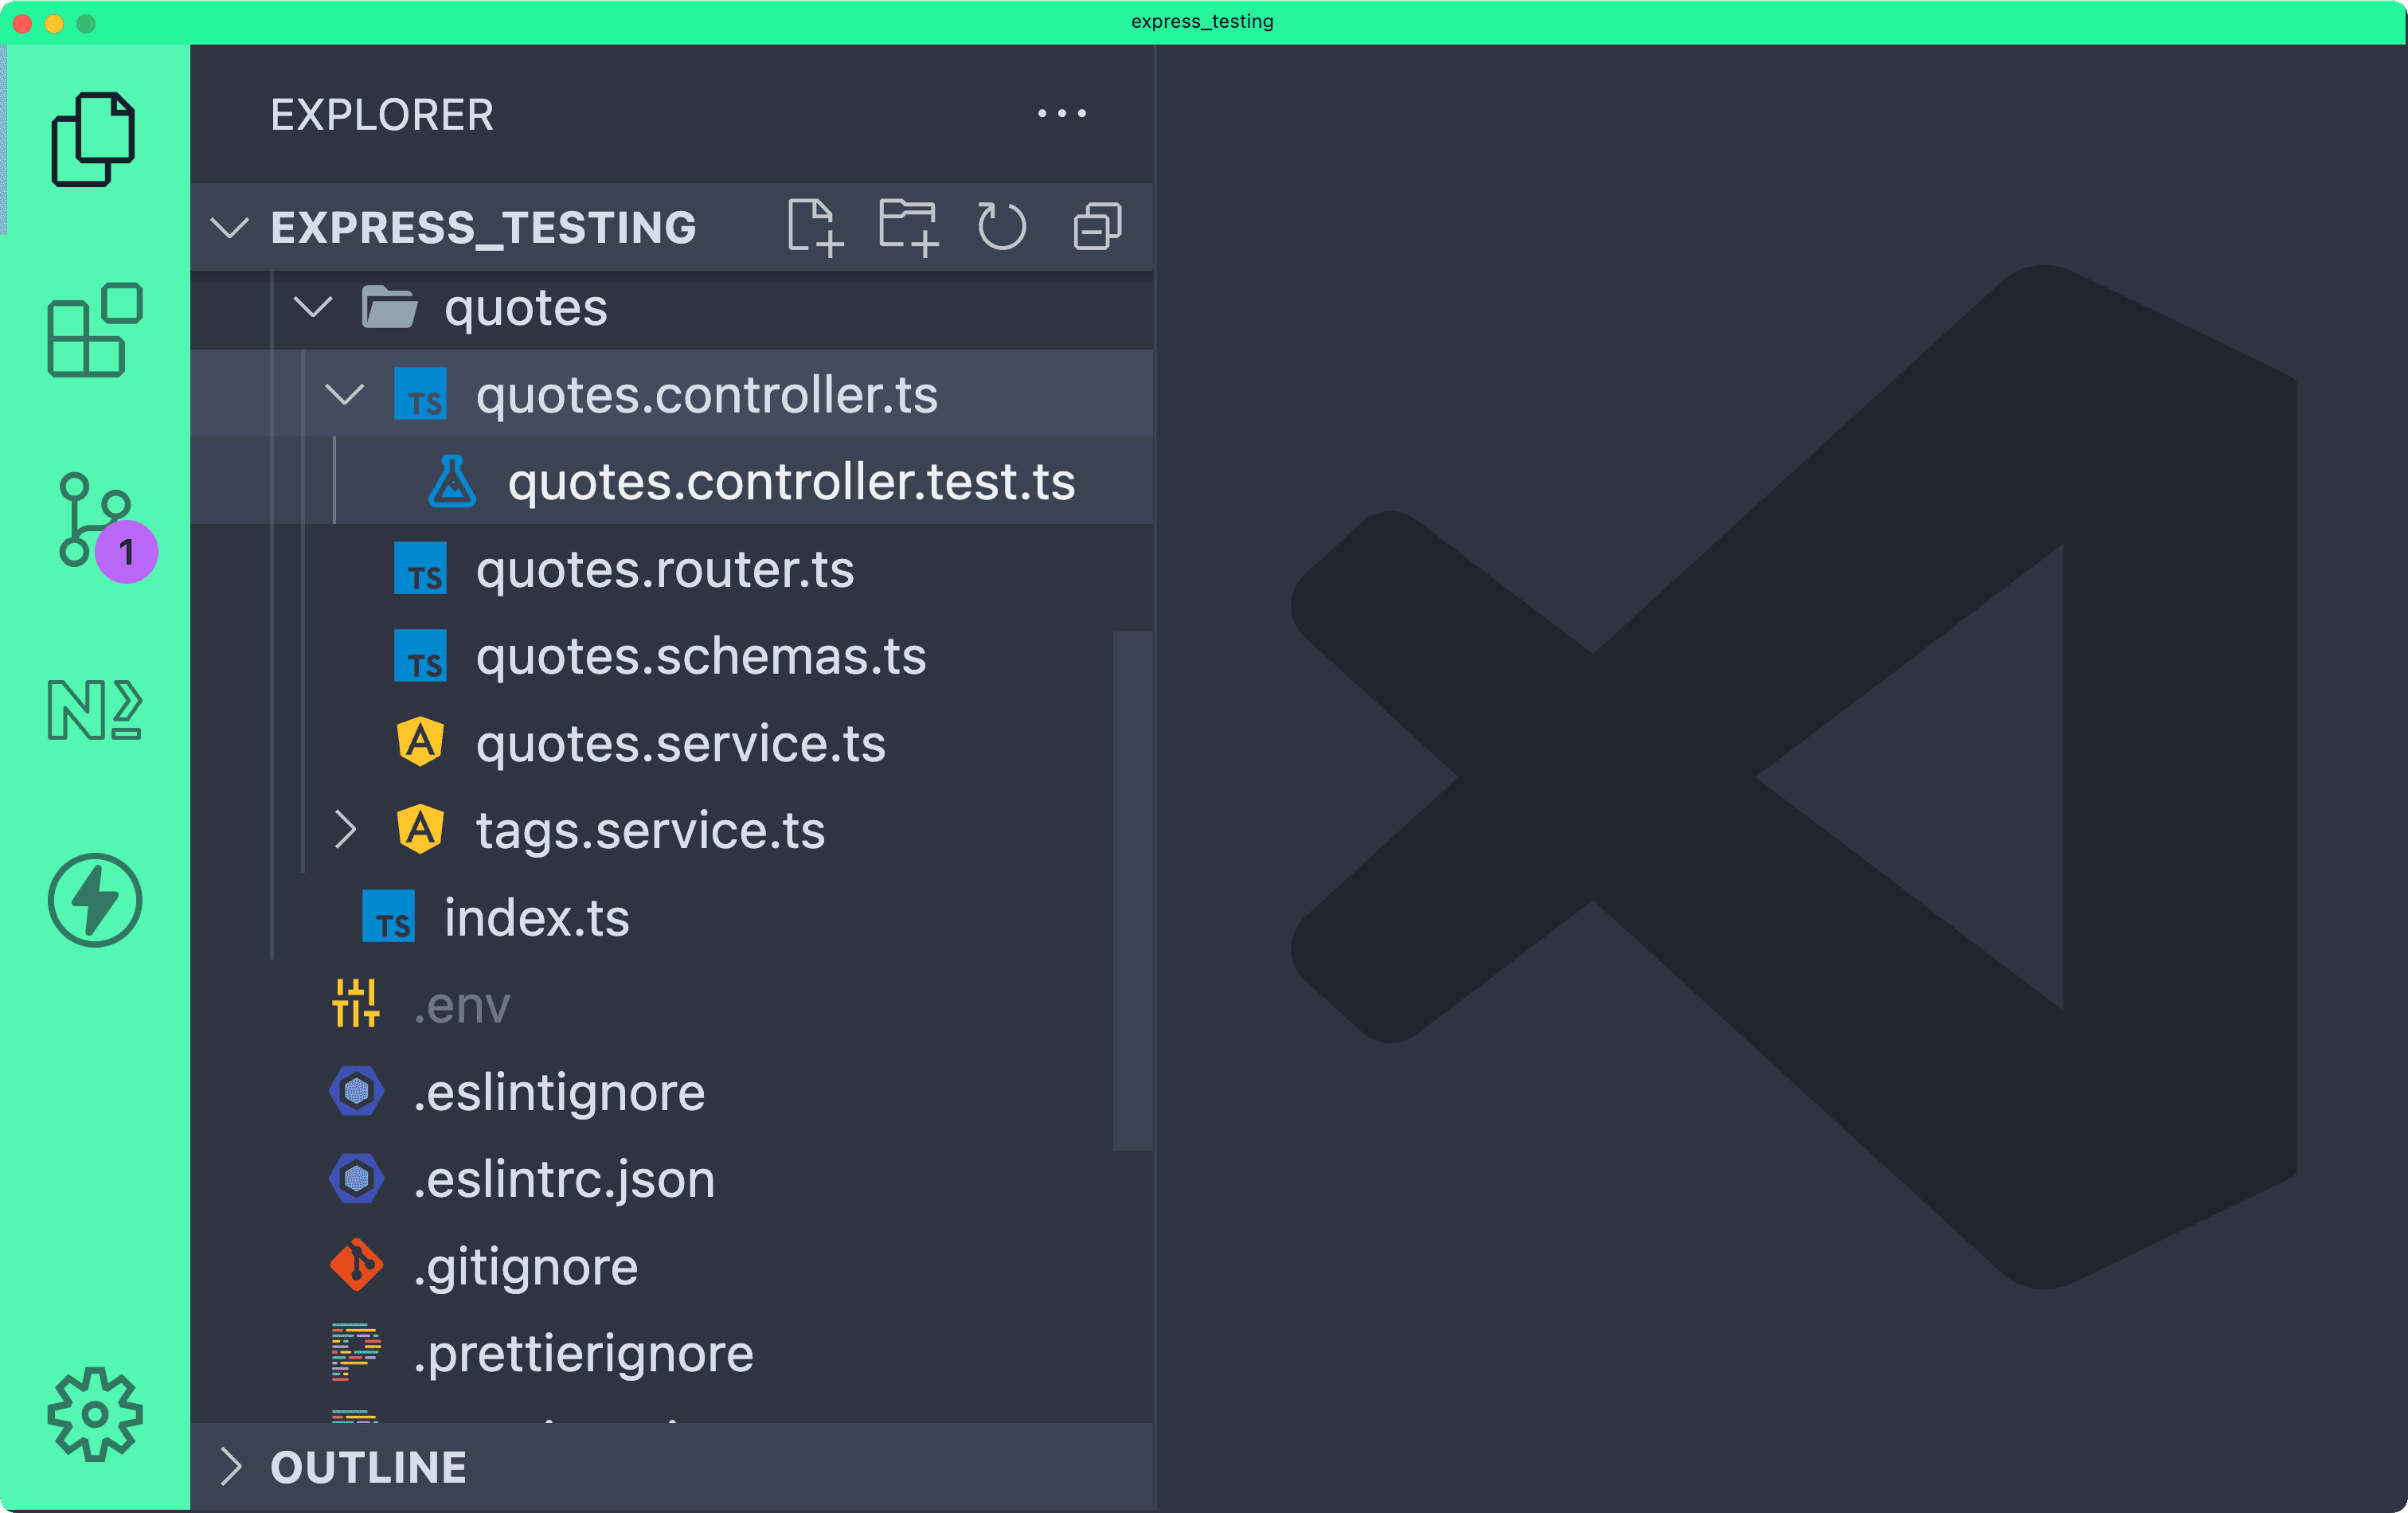
Above you can see a file named quotes.controller.ts. Nested under that file is quotes.controller.test.ts. While not strictly necessary, this setting may help clean up your file tree a bit when colocating your unit tests.
Import required modules
At the top of the new tags.service.test.ts file you will need to import a few things that will allow you to write your tests:
// src/quotes/tags.service.test.ts
import * as TagService from '../tags.service'
import prismaMock from 'lib/__mocks__/prisma'
import randomColor from 'randomcolor'
import { describe } from 'vitest'
Below is what each of these imports will be used for:
TagsService: This is the service you are writing tests against. You need to import it so you can invoke its functions.prismaMock: This is the mocked version of Prisma Client provided atlib/__mocks__/prisma.randomColor: The library used within theupsertTagsfunction to generate random colors.describe: A function provided byvitestthat allows you to describe a suite of tests.
Important to note is the prismaMock import. This is the mocked Prisma Client instance which allows you to perform prisma queries without actually hitting a database. Because it is mocked, you can also manipulate the query responses and spy on its methods.
Note: If you are unsure about what the
prismaMockimport is and how it works, be sure to read the previous article in this series where this module's role is explained.
Describe the test suite
You can now describe this particular set of tests using the describe function provided by Vitest:
// src/quotes/tags.service.test.ts
// ...
describe('tags.service', () => {})
This will group the tests within this file into one section when outputting the test results making it easier to see which suites passed and failed.
Mock any modules used by the target file
The last thing to do before writing the actual test suite is mock the external modules used within the tags.service.ts file. This will give you the ability to control the output of those modules as well as ensure your tests are not polluted by external code.
Within this service there are two modules to mock: PrismaClient and randomColor.
Mock those modules by adding the following:
// src/quotes/tags.service.test.ts
// ...
// Added `beforeEach` and `vi` 👇🏻
import { describe, beforeEach, vi } from 'vitest'

vi.mock('lib/prisma')
vi.mock('randomcolor', () => ({
  default: vi.fn(() => '#ffffff')
}))

describe('tags.service', () => {
  beforeEach(() => {
    vi.restoreAllMocks()
  })
})
Above, the lib/prisma module was mocked using Vitest's automatic mock detection algorithm which looks in the same directory as the "real" Prisma module for a folder named __mocks__ and a __mocks__/prisma.ts file. This file's exports are used as the mocked module in place of the real module's exports.
The randomColor mock is a bit different as the module exports only a default value, which is a function. The second parameter of vi.mock is a function that returns the object the module should return when imported. The snippet above adds a default key to this object and sets its value to a spyable function with a static return value of '#ffffff'.
Within the test suite's context, beforeEach and vi.restoreAllMocks are used to ensure that between every individual test the mocks are restored to their original state. This is important as in some tests you will modify the behavior of a mock for that specific test.
Note: If you are unsure about how these mocks work, be sure to refer to the previous article in this series where mocking was covered.
Whenever these modules are imported within TagsService, the mocked versions will now be imported instead.
Test the upsertTags function
The upsertTags function takes in an array of tag names and creates a new tag for each name. It will not create a tag, however, if an existing tag in the database has the same name. The returned value of the function is the array of tag IDs associated with all of the tag names provided to the functions, both new and existing.
Right below the beforeEach invocation within the test suite, add another describe to describe the suite of tests relating to the upsertTags function. Again, this is done to group the output of the tests making it easy to see which tests related to this specific function passed.
// src/quotes/tags.service.test.ts
//...

describe('tags.service', () => {
  beforeEach(() => {
    vi.restoreAllMocks()
  })
+  describe('upsertTags', () => {})
})
Now it is time to decide what the tests you write should cover. Taking a look at the upsertTags function, consider what specific behaviors it has. Each desired behavior should be tested.
Below, comments have been added showing each behavior that should be tested in this function. The comments are numbered, indicating which order the tests will be written in:
// src/quotes/tags.service.ts
// ...
export const upsertTags = async (tags: string[]) => {
  return await prisma.$transaction(async tx => {
    const existingTags = await tx.tag.findMany({
      select: { id: true, name: true },
      where: { name: { in: tags } }
    })

    const existingNames = existingTags.map(tag => tag.name)
    const existingIDs = existingTags.map(tag => tag.id)

    // 2. should only create tags that do not already exist
    const createdCount = await tx.tag.createMany({
      data: tags
        .filter(tag => !existingNames.includes(tag))
        .map(tag => ({
          name: tag,
          // 3. should give new tags random colors
          color: randomColor({ luminosity: 'light' })
        }))
    })

    const tagIds = existingTags.map(tag => tag.id)

    // 4. should find and return new tag IDs
    if (createdCount.count) {
      const createdTags = await tx.tag.findMany({
        select: { id: true },
        where: {
          name: { in: tags },
          id: { notIn: existingIDs }
        }
      })

      const createdIds = createdTags.map(tag => tag.id)
      tagIds.push(...createdIds)
    }

    // 1. should return a list of tag IDs
    // 5. should return an empty array if no tags are passed
    return tagIds
  })
}
With a list of scenarios to test ready, you can now begin to write tests for each of them.
Validate the function returns a list of tag IDs
The first test will ensure that the returned value of the function is an array of tag IDs. Within the describe block for this function, add the new test:
// src/quotes/tags.service.test.ts
// ...
// Added `it` 👇🏻
import { beforeEach, describe, expect, it, vi } from 'vitest'
// ...
describe('tags.service', () => {
  beforeEach(() => {
    vi.restoreAllMocks()
  })
  describe('upsertTags', () => {
    it('should return a list of tagIds', async () => {
      // 1
      prismaMock.$transaction.mockResolvedValueOnce([1, 2, 3])
      // 2
      const tagIds = await TagService.upsertTags(['tag1', 'tag2', 'tag3'])
      // 3
      expect(tagIds).toStrictEqual([1, 2, 3])
    })
  })
})
The test above does the following:
- Mocks the response of Prisma Client's
$transactionfunction - Invokes the
upsertTagsfunction - Ensures the response of the function is equal to the expected mocked response of
$transaction
This test is important as it specifically tests for the desired outcome of the function. If this function were to change in the future, this test ensures that the results of the function remain what is expected.
Note: If you are unsure what a specific method provided by Vitest does, please refer to Vitest's documentation.
If you now run npm run test:unit you should see your test pass successfully.
Validate the function only creates tags that do not already exist
The next test planned above will verify that the function does not create duplicate tags in the database.
The function is provided a list of strings that represent tag names. The function first checks for existing tags with those names and based on the results filters creates only new tags.
The test should:
- Mock the first invocation of
prisma.tag.findManyto return a single tag. This signifies that one existing tag was found based on the names provided to the function. - Invoke
upsertTagswith three tag names. One name should betag1, the name of the mocked existing tag. - Ensure
prisma.tag.createManywas provided only the two tags that did not matchtag1.
Add the following test below the previous test within the describe block for the upsertTags function:
// src/quotes/tags.service.test.ts
// ...
describe('tags.service', () => {
beforeEach(() => {
vi.restoreAllMocks()
})
describe('upsertTags', () => {
// ...
it('should only create tags that do not already exist', async () => {
// Mock the `$transaction` function and configure it to use the mocked Prisma Client
prismaMock.$transaction.mockImplementationOnce(
callback => callback(prismaMock)
)
// Mock the first invocation of `findMany`
prismaMock.tag.findMany.mockResolvedValueOnce([
{ id: 1, name: 'tag1', color: '#ffffff' }
])
// Mock the resolved value of `createMany` to avoid invoking the real function
prismaMock.tag.createMany.mockResolvedValueOnce({ count: 0 })
// Invoke `upsertTags` with three tags, including `'tag1'`
await TagService.upsertTags(['tag1', 'tag2', 'tag3'])
// Ensure that only `'tag2'` and `'tag3'` are provided to `createMany`
expect(prismaMock.tag.createMany).toHaveBeenCalledWith({
data: [
{ name: 'tag2', color: '#ffffff' },
{ name: 'tag3', color: '#ffffff' }
]
})
})
})
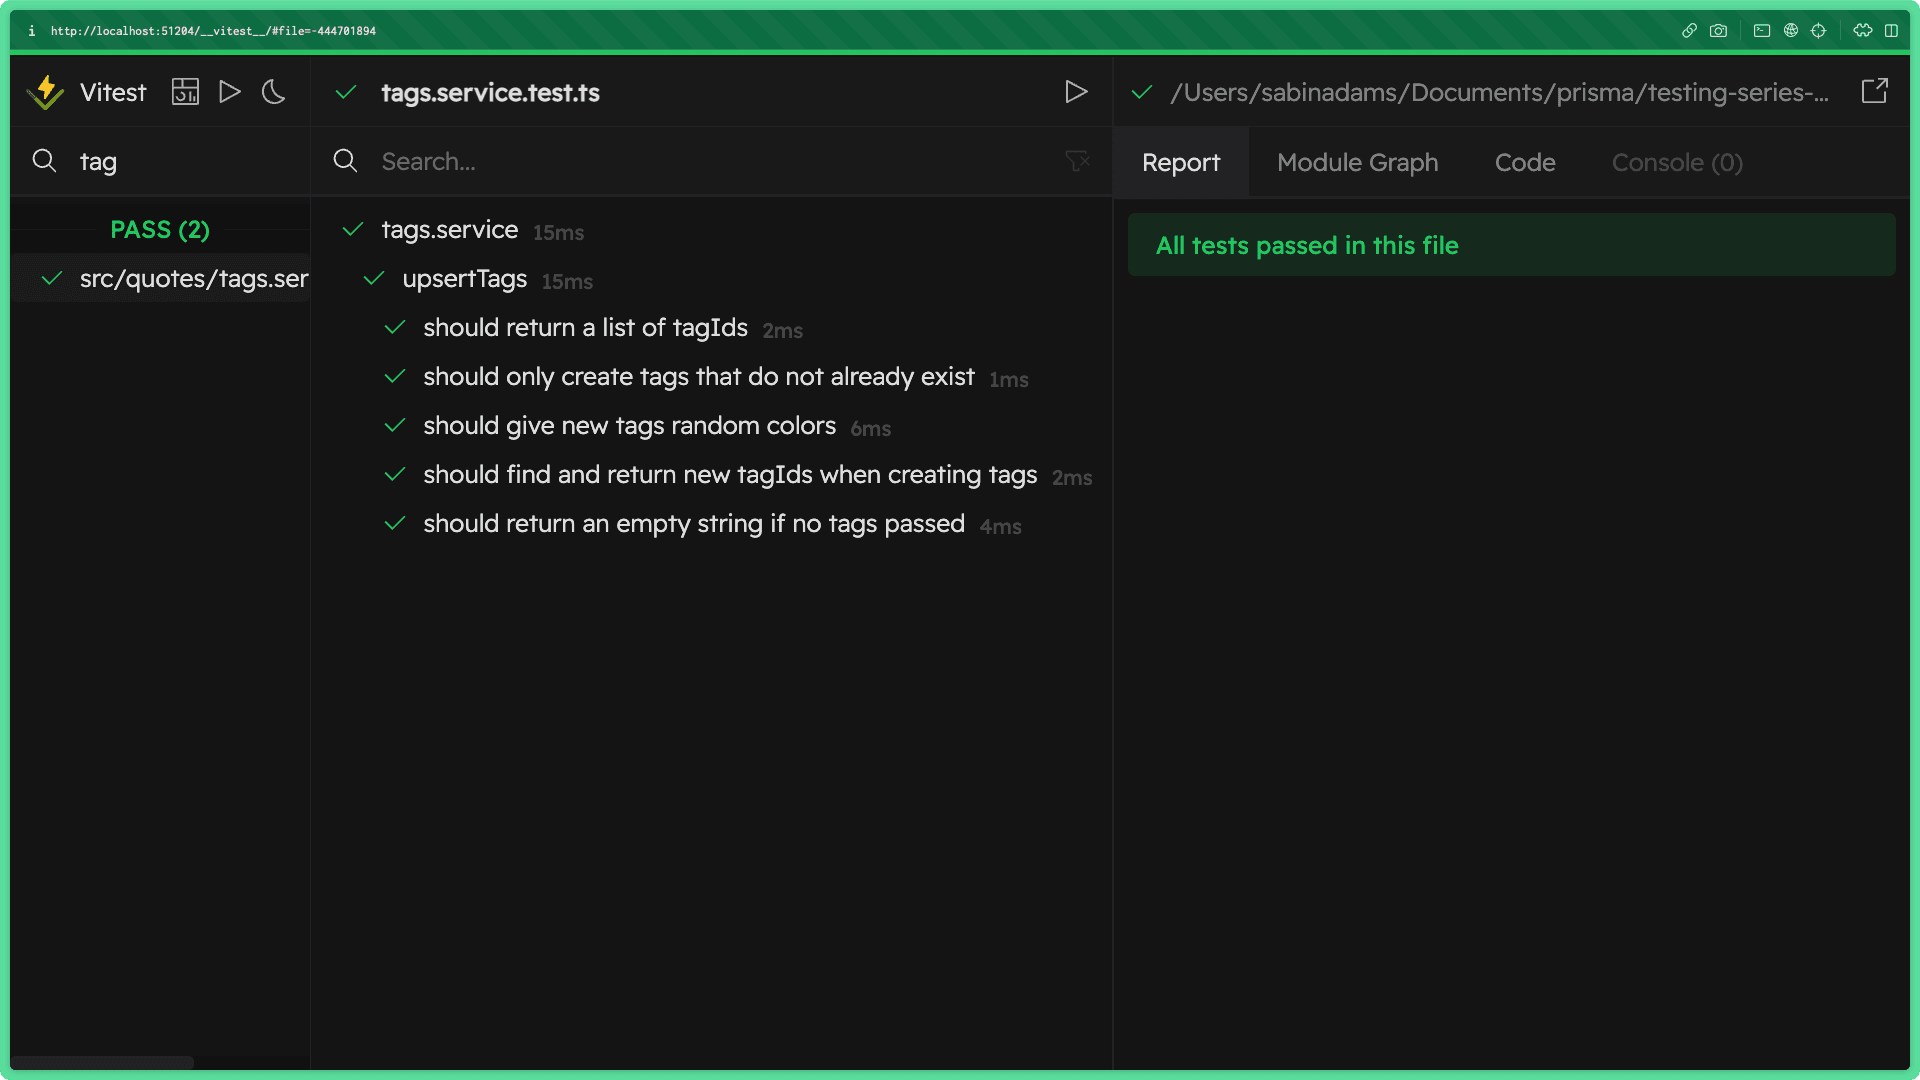
})Running npm run test:unit again should now show both of your passing tests.
Validate the function gives new tags a random color
In this next test you will need to verify that whenever a new tag is created, it is provided a new random color.
In order to do this, write a basic test that inserts three new tags. After the upsertTags function is invoked, you can then ensure that the randomColor function was invoked three times.
The snippet below shows what this test should look like. Add the new test below the previous test you wrote within the describe block for the upsertTags function:
// src/quotes/tags.service.test.ts
// ...
describe('tags.service', () => {
  beforeEach(() => {
    vi.restoreAllMocks()
  })
  describe('upsertTags', () => {
    // ...
    it('should give new tags random colors', async () => {
      // Again, configuring the `$transaction` function to use the mocked client
      prismaMock.$transaction.mockImplementationOnce(callback =>
        callback(prismaMock)
      )

      // Ensure there are no existing tags found
      prismaMock.tag.findMany.mockResolvedValue([])
      // Mock the resolved value of `createMany` so the real function isn't invoked
      prismaMock.tag.createMany.mockResolvedValueOnce({ count: 3 })
      // Invoke the function with three new tags
      await TagService.upsertTags(['tag1', 'tag2', 'tag3'])
      // Validate the `randomColor` function was called three times
      expect(randomColor).toHaveBeenCalledTimes(3)
    })
  })
})
The npm run test:unit command should result in three successful tests.
You may be wondering how the test above was able to check how many times randomColor was invoked.
Remember, within the context of this file the randomColor module was mocked and its default export was configured to be a vi.fn that provides a function that returns a static string value.
Because vi.fn was used, the mocked function is now registered within Vitest as a function you can spy on.
As as result, you have access to special properties such as a count of how many times the function was invoked during the current test.
Validate the function includes the newly created tag IDs in its returned array
In this test, you will need to verify that the function returns the tag IDs associated with every tag name provided to the function. This means it should return existing tag IDs and the IDs of any newly created tags.
This test should:
- Cause the first invocation of
tag.findManyto return a tag to simulate finding an existing tag - Mock the response of
tag.createMany - Cause the second invocation of
tag.findManyto return two tags, signifying it found the two newly created tags - Invoke the
upsertTagsfunction with three tags - Ensure all three IDs are returned
Add the following test to accomplish this:
// src/quotes/tags.service.test.ts
// ...
it('should find and return new tagIds when creating tags', async () => {
  prismaMock.$transaction.mockImplementationOnce(callback =>
    callback(prismaMock)
  )
  // Simulate finding an existing tag
  prismaMock.tag.findMany.mockResolvedValueOnce([
    { id: 1, name: 'tag1', color: '#ffffff' }
  ])
  prismaMock.tag.createMany.mockResolvedValueOnce({ count: 3 })
  // Simulate finding two newly created tags
  prismaMock.tag.findMany.mockResolvedValueOnce([
    { id: 2, name: 'tag2', color: '#ffffff' },
    { id: 3, name: 'tag3', color: '#ffffff' }
  ])
  // Invoke the function with three tags
  await TagService.upsertTags(['tag1', 'tag2', 'tag3'])
  // Expect the transaction to have returned with all of the ids
  expect(prismaMock.$transaction).toHaveReturnedWith([1, 2, 3])
})
Verify the test above works by running npm run test:unit.
Validate the function returns an empty array when not provided any tag names
As you might expect, if no tag names are provided to this function it should not be able to return any tag IDs.
In this test, verify that this behavior is working by adding the following:
// src/quotes/tags.service.test.ts
// ...
it('should return an empty array if no tags passed', async () => {
  prismaMock.$transaction.mockImplementationOnce(callback =>
    callback(prismaMock)
  )

  // Ensure that all `findMany` and `createMany` invocations return empty results
  prismaMock.tag.findMany.mockResolvedValueOnce([])
  prismaMock.tag.createMany.mockResolvedValueOnce({ count: 0 })
  prismaMock.tag.findMany.mockResolvedValueOnce([])
  // Invoke `upsertTags` with no tag names
  await TagService.upsertTags([])
  // Ensure an empty array is returned
  expect(prismaMock.$transaction).toHaveReturnedWith([])
})
With that, all of the scenarios that were determined for this function have been tested!
If you run your tests using either of the scripts you added to package.json you should see that all of the tests run and pass successfully!
npm run test:unit:uiNote: If you had not yet run this command you may be prompted to install the
@vitest/uipackage and re-run the command.
Test the deleteOrphanedTags function
This function is a very different scenario than the previous function.
// src/quotes/tags.service.ts
export const deleteOrphanedTags = async (ids: number[]) => {
  return await prisma.tag.deleteMany({
    where: {
      quotes: { none: {} },
      id: { in: ids }
    }
  })
}
As you may have already determined, this function simply wraps an invocation of a Prisma Client function. Because of that... you guessed it! This function does not actually require a test!
Summary & What's next
During the course of this article you:
- Learned what unit testing is and why it is important to your applications
- Saw a few examples of situations where unit testing is not strictly necessary
- Set up Vitest
- Learned a few tricks to make life easier when writing tests
- Tried your hand at writing unit tests for a service in the API
While only one file from the quotes API was covered in this article, the concepts and methods used to test the tags service also apply to the rest of the application. I would encourage you to write tests for the remainder of the API to practice!
In the next part of this series, you will dive into integration testing and write integration tests for this same application.
Build your next app with Prisma
Start free. Scale when you’re ready.