

Backend with TypeScript, PostgreSQL & Prisma: Authentication & Authorization

Update (July 2026): This article was updated for Prisma ORM 7. Authentication and authorization are now built with Hono middleware and Hono's built-in JWT helper instead of Hapi. It uses the rust-free
prisma-clientgenerator,prisma.config.ts, and driver adapters. All commands and code work verbatim on Prisma ORM 7 with Node.js 20 or later.
In this third part of the series, you'll secure the REST API with passwordless authentication, using Prisma for token storage, and implement authorization.
Introduction
The goal of the series is to explore and demonstrate different patterns, problems, and architectures for a modern backend by solving a concrete problem: a grading system for online courses.
What the series covers
| Topic | Part |
|---|---|
| Data Modeling | Part 1 |
| CRUD | Part 1 |
| Aggregations | Part 1 |
| REST API layer | Part 2 |
| Validation | Part 2 |
| Testing | Part 2 |
| Passwordless Authentication | Part 3 (current) |
| Authorization | Part 3 (current) |
| Integration with external APIs | Part 3 (current) |
| Deployment | Coming up |
What you will learn today
In the first article, you designed a data model and wrote a seed script that uses Prisma Client to save data.
In the second article, you built a REST API with Hono on top of that data model.
In this third article, you will learn the concepts behind authentication and authorization, how they differ, and how to implement email-based passwordless authentication and authorization using JSON Web Tokens (JWT) with Hono to secure the REST API.
Concretely, you will develop the following aspects:
- Passwordless Authentication: Add the ability to log in and sign up by sending an email with a unique token. Users complete the process by sending the token back to the API and receiving a long-lived JWT, which grants access to endpoints that require authentication.
- Authorization: Add authorization logic to restrict which resources users can access and manipulate.
By the end of this article, the REST API will be secured with authentication, and a subset of endpoints will have authorization rules granting access based on the user's permissions.
Note: Throughout the guide, you'll find various checkpoints that enable you to validate whether you performed the steps correctly.
Prerequisites
This article continues from part 2. You should have the grading-app project with the Hono REST API, the migrated Prisma Postgres database, and the tests from part 2. You'll need Node.js 20 or later.
External services (optional)
The backend sends a login token by email. To send real emails, this article uses Resend, which has a free tier. Sign up, create an API key, and keep it safe.
You don't need an email provider to follow along, though: when no RESEND_API_KEY is set, the backend logs the token to the console instead of sending it, so you can complete the whole flow locally.
Authentication and authorization concepts
Before diving into the implementation, here are some concepts relating to authentication and authorization.
While the two terms are often used interchangeably, they serve different, complementary purposes. Put simply, authentication is the process of verifying who a user is, while authorization is the process of verifying what they have access to.
One example of authentication in the real world is a valid passport. The fact that you look like the person in an official document (that is hard to forge) authenticates that you are who you claim to be. In the same example, authorization is the process by which you are allowed to board the flight: you present your boarding pass, which is verified against the database of flight passengers, and the ground attendant authorizes you to board.
Authentication in web applications
Web applications typically use a username and password to authenticate users. If a valid username and password are passed, the application can verify you're the user you claim to be, because the password is supposed to be known only to you and the application.
Note: Web applications that use username/password authentication rarely store the password in clear text. Instead, they store a hash of the password. A hash function takes arbitrary input and always produces the same fixed-length output for the same input, but you cannot go from a hash back to the password. This lets the backend verify a password without storing it, which protects users if the database is breached.
In this article, you will implement email-based passwordless authentication, a two-step approach that improves both user experience and security. It works by sending a secret token to the user's email account when they attempt to log in. Once the user retrieves the token and passes it back to the application, the application can be confident the user owns that email account.
This approach relies on the user's email service, which can be assumed to have already authenticated the user. The user doesn't need to choose or remember a password, and the application is relieved of password management, which is a common attack surface.
Authentication and signup/login flow
Email-based passwordless authentication is a two-step process that involves two token types.
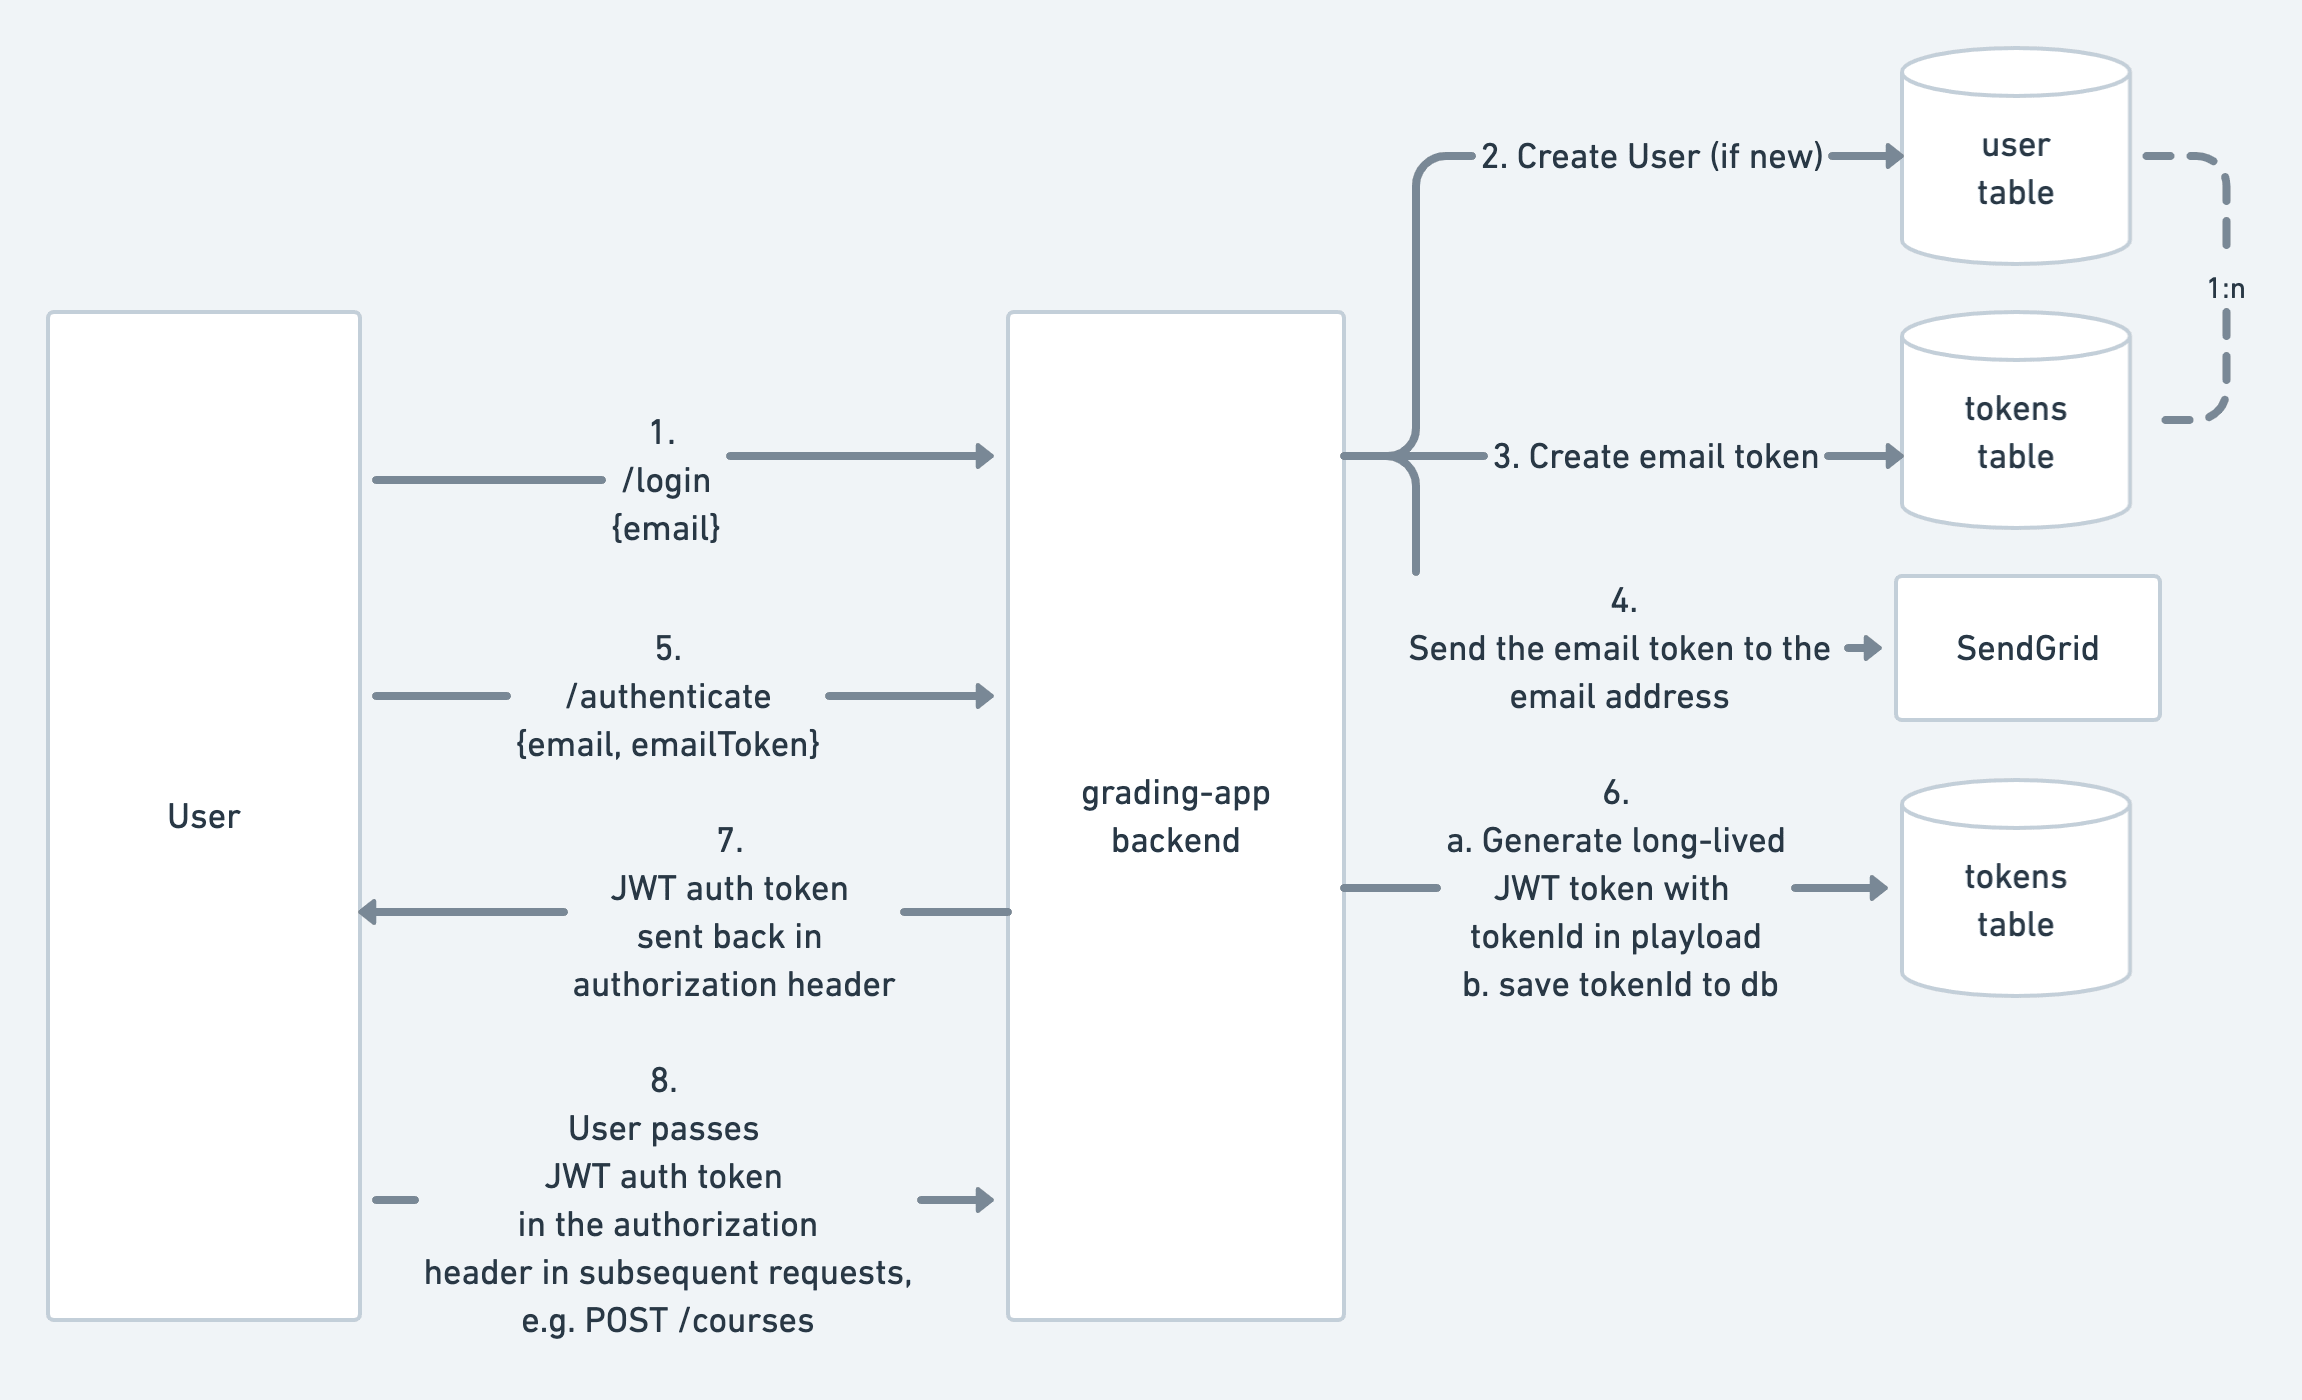
- The user calls the
/loginendpoint with their email to begin the process. - If the email is new, the user is created in the
Usertable. - An email token is generated by the backend and saved in the
Tokentable. - The email token is sent to the user's email.
- The user sends the email token and their email address to the
/authenticateendpoint. - The backend validates the email token. If it's valid and hasn't expired, a JWT is generated and a corresponding token row is saved in the
Tokentable. - The JWT is sent back to the user in the
Authorizationheader.
There are two token types:
- Email token: A numerical eight-digit token that is valid for a short period, for example 10 minutes, and is sent to the user's email. Its only purpose is to validate that the user owns the email address; it doesn't grant access to any grading-app endpoints.
- Authentication token: A JWT with a
tokenIdin its payload. This token is passed in theAuthorizationheader to access protected endpoints, and it's long-lived (valid for 12 hours).
With this strategy, a single flow handles both logging in and registration. It works because the only difference between the two is whether a row is created in the User table.
JSON Web Tokens
JSON Web Tokens (JWT) are an open standard for representing claims securely between two parties. A JWT contains three Base64-encoded parts separated by a .: the header, the payload, and the signature.
The signature is created by passing the header, payload, and a secret through a signing algorithm (here, HS256). The secret is known only to the backend and is used to verify the token's authenticity.
In this article, the JWT payload contains a tokenId that references a token row in the database.
Note: This approach is known as stateful JWT, where the token references a session stored in the database. Authenticating a request requires a database lookup, but this is more secure because tokens can be revoked by the backend.
Adding a Token model to the Prisma schema
You need to store tokens in the database so they can be verified when requests are made. Open prisma/schema.prisma and make three changes: make firstName and lastName optional (so users can register with just an email), add an isAdmin flag to User, and add a new Token model.
model User {
  id        Int     @id @default(autoincrement())
  email     String  @unique
  firstName String?
  lastName  String?
  social    Json?
  isAdmin   Boolean @default(false)

  // Relation fields
  courses     CourseEnrollment[]
  testResults TestResult[]       @relation(name: "results")
  testsGraded TestResult[]       @relation(name: "graded")
  tokens      Token[]
}

model Token {
  id         Int       @id @default(autoincrement())
  createdAt  DateTime  @default(now())
  updatedAt  DateTime  @updatedAt
  type       TokenType
  emailToken String?   @unique // Only used for short-lived email tokens
  valid      Boolean   @default(true)
  expiration DateTime

  // Relation fields
  user   User @relation(fields: [userId], references: [id], onDelete: Cascade)
  userId Int
}

enum TokenType {
  EMAIL // short-lived token sent to the user's email
  API // long-lived JWT-referenced token
}
Each user can have many tokens, making the relation a one-to-many. onDelete: Cascade means that deleting a user also removes their tokens, so the DELETE /users/{userId} endpoint from part 2 keeps working once users have tokens.
Note: Unlike the Prisma 2 era, none of this needs preview feature flags.
connectOrCreate, transactions, and aggregates are all stable in Prisma ORM 7.
Create and run the migration:
npx prisma migrate dev --name add-tokenCheckpoint: You should see output similar to:
migrations/
  └─ 20260703131449_add_token/
    └─ migration.sql

Your database is now in sync with your schema.
Add email sending
The backend sends the login token by email. Create src/lib/email.ts:
// Sends the short-lived login token to the user's email.
// In development, when RESEND_API_KEY is not set, the token is logged to the
// console instead of being sent, so you can follow the flow without an email
// provider. In production, set RESEND_API_KEY to send real emails.
export async function sendEmailToken(email: string, token: string): Promise<void> {
  if (!process.env.RESEND_API_KEY) {
    console.log(`email token for ${email}: ${token}`);
    return;
  }

  const res = await fetch("https://api.resend.com/emails", {
    method: "POST",
    headers: {
      Authorization: `Bearer ${process.env.RESEND_API_KEY}`,
      "Content-Type": "application/json",
    },
    body: JSON.stringify({
      from: "login@your-domain.com",
      to: email,
      subject: "Login token for the grading app API",
      text: `Your login token is: ${token}`,
    }),
  });

  if (!res.ok) {
    throw new Error(`Failed to send email: ${res.status} ${await res.text()}`);
  }
}
Unlike the Hapi version, which registered email as a server plugin, this is a plain function you import where you need it. It logs the token in development and sends a real email once RESEND_API_KEY is set.
Authentication with Hono
In Hapi, authentication was configured with schemes and strategies. Hono takes a simpler, more explicit approach: authentication is just middleware. You'll write one middleware that verifies the JWT and loads the user, and apply it to the routes you want to protect. Hono also ships a built-in JWT helper, so you don't need any extra libraries to sign or verify tokens.
Auth helpers and middleware
Create src/lib/auth.ts. It holds the token helpers, the authentication middleware, and the authorization middlewares you'll add shortly:
import { sign, verify } from "hono/jwt";
import type { Context, Next } from "hono";
import type { AppEnv } from "./prisma";

const JWT_SECRET = process.env.JWT_SECRET || "SUPER_SECRET_JWT_SECRET";
const JWT_ALGORITHM = "HS256" as const;

const EMAIL_TOKEN_EXPIRATION_MINUTES = 10;
const AUTH_TOKEN_EXPIRATION_HOURS = 12;

export const emailTokenExpiration = () =>
  new Date(Date.now() + EMAIL_TOKEN_EXPIRATION_MINUTES * 60 * 1000);

export const authTokenExpiration = () =>
  new Date(Date.now() + AUTH_TOKEN_EXPIRATION_HOURS * 60 * 60 * 1000);

// Generate a random 8-digit number as the email token.
export function generateEmailToken(): string {
  return Math.floor(10000000 + Math.random() * 90000000).toString();
}

// Sign a JWT that references the API token stored in the database.
export function generateAuthToken(tokenId: number): Promise<string> {
  return sign({ tokenId }, JWT_SECRET, JWT_ALGORITHM);
}

// Runs on every protected request: verifies the JWT, checks the referenced
// token in the database, and attaches the user's credentials to the context.
export async function authMiddleware(c: Context<AppEnv>, next: Next) {
  const authHeader = c.req.header("Authorization");
  if (!authHeader) {
    return c.json({ error: "Missing authentication" }, 401);
  }

  const token = authHeader.replace(/^Bearer\s+/i, "");

  let payload;
  try {
    payload = await verify(token, JWT_SECRET, JWT_ALGORITHM);
  } catch {
    return c.json({ error: "Invalid token" }, 401);
  }

  const tokenId = payload.tokenId;
  if (typeof tokenId !== "number") {
    return c.json({ error: "Invalid token" }, 401);
  }

  const prisma = c.get("prisma");
  const fetchedToken = await prisma.token.findUnique({
    where: { id: tokenId },
    include: { user: true },
  });

  if (!fetchedToken || !fetchedToken.valid) {
    return c.json({ error: "Invalid token" }, 401);
  }

  if (fetchedToken.expiration < new Date()) {
    return c.json({ error: "Token expired" }, 401);
  }

  const teacherOf = await prisma.courseEnrollment.findMany({
    where: { userId: fetchedToken.userId, role: "TEACHER" },
    select: { courseId: true },
  });

  c.set("credentials", {
    tokenId,
    userId: fetchedToken.userId,
    isAdmin: fetchedToken.user.isAdmin,
    teacherOf: teacherOf.map(({ courseId }) => courseId),
  });

  await next();
}
The authMiddleware is the equivalent of Hapi's strategy validate function. It verifies the JWT, looks up the referenced token to confirm it's still valid and unexpired (the stateful part), fetches the courses the user teaches (for authorization later), and stores everything on the context with c.set("credentials", ...). Downstream handlers read it with c.get("credentials").
For the credentials to be typed, extend the AppEnv you defined in src/lib/prisma.ts in part 2:
export type AuthCredentials = {
  tokenId: number;
  userId: number;
  isAdmin: boolean;
  teacherOf: number[];
};

export type AppEnv = {
  Variables: {
    prisma: PrismaClient;
    credentials: AuthCredentials;
  };
};
Defining the login and authenticate routes
Create src/routes/auth.ts with the two open endpoints that drive the flow:
import { Hono } from "hono";
import { zValidator } from "@hono/zod-validator";
import { z } from "zod";
import type { AppEnv } from "../lib/prisma";
import { sendEmailToken } from "../lib/email";
import {
  authTokenExpiration,
  emailTokenExpiration,
  generateAuthToken,
  generateEmailToken,
} from "../lib/auth";

const auth = new Hono<AppEnv>();

// Step 1: log in or sign up. Creates the user if new, stores a short-lived
// email token, and sends it to the user's email.
auth.post("/login", zValidator("json", z.object({ email: z.email() })), async (c) => {
  const prisma = c.get("prisma");
  const { email } = c.req.valid("json");

  const emailToken = generateEmailToken();

  await prisma.token.create({
    data: {
      emailToken,
      type: "EMAIL",
      expiration: emailTokenExpiration(),
      user: {
        connectOrCreate: {
          where: { email },
          create: { email },
        },
      },
    },
  });

  await sendEmailToken(email, emailToken);

  return c.body(null, 200);
});

// Step 2: exchange the email token for a long-lived JWT. Validates the email
// token, mints an API token in the database, invalidates the email token, and
// returns the signed JWT in the Authorization header.
auth.post(
  "/authenticate",
  zValidator("json", z.object({ email: z.email(), emailToken: z.string() })),
  async (c) => {
    const prisma = c.get("prisma");
    const { email, emailToken } = c.req.valid("json");

    const fetchedToken = await prisma.token.findUnique({
      where: { emailToken },
      include: { user: true },
    });

    if (!fetchedToken || !fetchedToken.valid) {
      return c.json({ error: "Unauthorized" }, 401);
    }

    if (fetchedToken.expiration < new Date()) {
      return c.json({ error: "Token expired" }, 401);
    }

    if (fetchedToken.user.email !== email) {
      return c.json({ error: "Unauthorized" }, 401);
    }

    const createdToken = await prisma.token.create({
      data: {
        type: "API",
        expiration: authTokenExpiration(),
        user: { connect: { email } },
      },
    });

    await prisma.token.update({
      where: { id: fetchedToken.id },
      data: { valid: false },
    });

    const authToken = await generateAuthToken(createdToken.id);
    c.header("Authorization", authToken);
    return c.json({ authToken }, 200);
  },
);

export default auth;
/login uses connectOrCreate to create the user if the email is new or connect to the existing one. /authenticate verifies the email token, creates a long-lived API token row, invalidates the email token so it can't be reused, signs a JWT referencing the new token, and returns it in the Authorization header.
Wiring the middleware into the app
Update src/app.ts to mount the open routes, then apply authMiddleware so every route registered after it requires a valid JWT:
import { Hono } from "hono";
import { withPrisma, type AppEnv } from "./lib/prisma";
import { authMiddleware } from "./lib/auth";
import status from "./routes/status";
import auth from "./routes/auth";
import users from "./routes/users";

const app = new Hono<AppEnv>();

app.use("*", withPrisma);

// Open routes (no authentication required).
app.route("/", status);
app.route("/", auth);

// Everything registered below requires a valid JWT.
app.use("*", authMiddleware);
app.route("/", users);

export default app;
Because Hono runs middleware and routes in registration order, the open routes (status, auth) are matched before authMiddleware is added, while users is registered after it and is therefore protected.
Checkpoint: Start the server with npm run dev, then run the login flow with curl:
curl -X POST -H "Content-Type: application/json" -d '{"email":"grace@prisma.io"}' localhost:3000/loginYou should see the token logged by the backend, for example: email token for grace@prisma.io: 89148041. Exchange it for a JWT:
curl -i -X POST -H "Content-Type: application/json" \
  -d '{"email":"grace@prisma.io", "emailToken":"89148041"}' \
  localhost:3000/authenticate
The response has a 200 status and an Authorization header with the JWT. A request to a protected route without that token returns 401:
curl -i localhost:3000/profile          # 401 Missing authentication
curl -i -H "Authorization: Bearer <JWT>" localhost:3000/profile   # 200
Adding authorization
The authorization model defines what a user is allowed to do. Two properties grant permissions:
- Is the user an admin (the
isAdminfield)? If so, they can perform every operation. - Is the user a teacher of a course? If so, they can perform operations on that course's resources (tests, results, enrollment).
Otherwise, a user can still create courses, enroll as a student, read their own test results, and read and update their own profile.
Note: This mixes two approaches. Deriving permissions from course enrollment is resource-based authorization; granting admins full access via the
isAdminflag is role-based authorization.
Authorization rules for the endpoints
| HTTP Method | Route | Authorization rule |
|---|---|---|
POST | /login | Open |
POST | /authenticate | Open (requires email token) |
GET | /profile | Any authenticated user |
POST | /users | Only admin |
GET | /users/{userId} | Only admin or the user |
PUT | /users/{userId} | Only admin or the user |
DELETE | /users/{userId} | Only admin or the user |
PUT | /courses/{courseId} | Only admin or teacher of course |
DELETE | /courses/{courseId} | Only admin or teacher of course |
POST | /courses/{courseId}/tests | Only admin or teacher of course |
Authorization with Hono middleware
In Hapi, authorization used route pre functions. In Hono, an authorization rule is just another middleware that runs after authMiddleware and either calls next() or returns a 403. Because the rules are reusable, define them once in src/lib/auth.ts:
// Allow admins, or the user acting on their own account.
export async function isRequestedUserOrAdmin(c: Context<AppEnv>, next: Next) {
  const { userId, isAdmin } = c.get("credentials");
  if (isAdmin) {
    return next();
  }
  const requestedUserId = Number(c.req.param("userId"));
  if (requestedUserId === userId) {
    return next();
  }
  return c.json({ error: "Forbidden" }, 403);
}

// Allow admins, or a teacher of the requested course.
export async function isTeacherOfCourseOrAdmin(c: Context<AppEnv>, next: Next) {
  const { isAdmin, teacherOf } = c.get("credentials");
  if (isAdmin) {
    return next();
  }
  const courseId = Number(c.req.param("courseId"));
  if (teacherOf.includes(courseId)) {
    return next();
  }
  return c.json({ error: "Forbidden" }, 403);
}

// Allow admins only.
export async function requireAdmin(c: Context<AppEnv>, next: Next) {
  const { isAdmin } = c.get("credentials");
  if (!isAdmin) {
    return c.json({ error: "Forbidden" }, 403);
  }
  return next();
}
isRequestedUserOrAdmin and isTeacherOfCourseOrAdmin use the credentials that authMiddleware set, so they don't touch the database. This mirrors how the Hapi pre functions read request.auth.credentials.
Applying the rules to the user routes
Update src/routes/users.ts to protect the endpoints. Add a /profile route for the authenticated user, require admin for creating users, and require admin-or-self for the /users/{userId} routes:
import { Hono } from "hono";
import { zValidator } from "@hono/zod-validator";
import { z } from "zod";
import type { AppEnv } from "../lib/prisma";
import { isRequestedUserOrAdmin, requireAdmin } from "../lib/auth";

// ...userSchema, updateUserSchema, and userIdParam from part 2...

const users = new Hono<AppEnv>();

// Any authenticated user can read their own profile.
users.get("/profile", async (c) => {
  const prisma = c.get("prisma");
  const { userId } = c.get("credentials");
  const user = await prisma.user.findUnique({ where: { id: userId } });
  return c.json(user, 200);
});

// Only admins can create users directly.
users.post("/users", requireAdmin, zValidator("json", userSchema), async (c) => {
  const prisma = c.get("prisma");
  const data = c.req.valid("json");
  const createdUser = await prisma.user.create({ data, select: { id: true } });
  return c.json(createdUser, 201);
});

users.get(
  "/users/:userId",
  zValidator("param", userIdParam),
  isRequestedUserOrAdmin,
  async (c) => {
    const prisma = c.get("prisma");
    const { userId } = c.req.valid("param");
    const user = await prisma.user.findUnique({ where: { id: userId } });
    if (!user) {
      return c.body(null, 404);
    }
    return c.json(user, 200);
  },
);

// The PUT and DELETE /users/:userId routes take the same isRequestedUserOrAdmin
// middleware. The course and test routes would use isTeacherOfCourseOrAdmin.

export default users;
Each route lists its middleware before the handler, so the chain is: authMiddleware (from app.ts) sets the credentials, then the authorization middleware allows or denies, then the handler runs. Adding a rule to a route is a one-line change, and the same function is reused across routes, just like the Hapi pre functions were.
Updating the tests
After adding authentication, the part 2 tests would fail because the user routes now require a valid JWT. In Hapi you could inject fake credentials into server.inject. With Hono there's no special hook, but you don't need one: create a real user with an API token in the database and send a real signed JWT in the Authorization header. It's closer to what actually happens in production.
Add a helper to tests/users.test.ts that creates a user with a token and returns a JWT for it, mirroring what /authenticate produces:
import { generateAuthToken } from "../src/lib/auth";

async function createUserWithToken(isAdmin = false) {
  const user = await prisma.user.create({
    data: {
      email: `test-${Date.now()}-${Math.random().toString(36).slice(2)}@test.com`,
      isAdmin,
      tokens: {
        create: {
          type: "API",
          expiration: new Date(Date.now() + 7 * 24 * 60 * 60 * 1000),
        },
      },
    },
    include: { tokens: true },
  });
  const authToken = await generateAuthToken(user.tokens[0].id);
  return { user, authToken };
}

const authHeader = (token: string) => ({ Authorization: `Bearer ${token}` });
With that helper, the authorization tests read naturally. For example, a non-admin can read their own record but not someone else's:
test("a user can GET their own record", async () => {
  const { user, authToken } = await createUserWithToken();
  const res = await app.request(`/users/${user.id}`, { headers: authHeader(authToken) });
  expect(res.status).toBe(200);
  expect((await res.json()).id).toBe(user.id);
});

test("a non-admin cannot GET another user's record", async () => {
  const { authToken } = await createUserWithToken();
  const other = await createUserWithToken();
  const res = await app.request(`/users/${other.user.id}`, {
    headers: authHeader(authToken),
  });
  expect(res.status).toBe(403);
});
You can test the full login flow the same way: POST /login, read the email token from the database (it's the same value the console logs), then POST /authenticate and assert the Authorization header is present.
Checkpoint: Run npm test. With the auth and authorization tests in place, you should see all tests pass:
 ✓ tests/status.test.ts > Status route > GET / returns 200 and { up: true }
 ✓ tests/users.test.ts > User routes > protected route returns 401 without a token
 ✓ tests/users.test.ts > User routes > login + authenticate returns a JWT in the Authorization header
 ✓ tests/users.test.ts > User routes > GET /profile returns the authenticated user
 ✓ tests/users.test.ts > User routes > POST /users is forbidden for non-admins
 ✓ tests/users.test.ts > User routes > POST /users creates a user for admins
 ✓ tests/users.test.ts > User routes > a user can GET their own record
 ✓ tests/users.test.ts > User routes > a non-admin cannot GET another user's record
 ✓ tests/users.test.ts > User routes > an admin can GET another user's record
 ✓ tests/users.test.ts > User routes > a user can update their own record
 ✓ tests/users.test.ts > User routes > a user can delete their own record

 Test Files  2 passed (2)
      Tests  11 passed (11)
Summary and next steps
You implemented email-based passwordless authentication with Prisma, Hono, and JWT, and added authorization with reusable middleware. Along the way you migrated the database to add a Token model with a one-to-many relation to User, and adapted the tests to authenticate with real tokens.
The authentication middleware verifies each request's JWT against the database and populates a typed credentials object; the authorization middlewares read that object to allow or deny access. Because everything is plain middleware and the schema is the single source of truth for the token types, the types you query against are the same types Prisma generates.
As next steps, you could:
- Add authorization to the course and test routes with
isTeacherOfCourseOrAdmin. - Set the
JWT_SECRETandRESEND_API_KEYenvironment variables in production.
Your database runs on Prisma Postgres, which you can manage in the Prisma Console. If AI agents are part of your workflow, the Prisma MCP server lets them create and manage databases as they need them. In the next and final part of this series, you'll set up CI and deploy the backend with Prisma Compute, which runs your app on the same platform as your database.
This series teaches Prisma ORM 7, the current production release. To see where Prisma ORM is heading for AI-assisted development, read The Next Evolution of Prisma ORM. Prisma 8 is the agent-native evolution of the ORM, now available as a Release Candidate. The type-safe, schema-as-contract approach you used here, where the same models drive your queries, your credentials, and your migrations, is exactly what Prisma 8 builds on, with structured output that humans and coding agents can build on safely. The performance benchmark covers what the rewrite means for throughput and client size.
Keep reading
From Rust to TypeScript: A New Chapter for Prisma ORM
Why is Prisma ORM switching from Rust to TypeScript? Read the full architectural rationale and what the new Query Compiler means for your app's speed

How Solin Uses Prisma Accelerate to Serve 2.5M Database Queries per Day
Learn how Prisma Accelerate has contributed to Solin's success by enhancing performance and reliability with its scalable connection pool and global database cache.

Build your next app with Prisma
Start free. Scale when you’re ready.