Fullstack App With TypeScript, PostgreSQL, Next.js, Prisma & GraphQL: GraphQL API


This article is the second part of a course where you build a fullstack app with Next.js, GraphQL, TypeScript, Prisma, and PostgreSQL. In this article, you will create the GraphQL API and interact with it on the frontend.
Table of contents
- Introduction
- Clone the repository
- Seeding the database
- Building APIs the traditional way: REST
- REST APIs and their drawbacks
- GraphQL, an alternative to REST
- Building the GraphQL API
- The flaws with our current GraphQL setup
- Code-first GraphQL APIs using Pothos
- Client-side GraphQL queries
- Pagination
- Summary and Next-steps
Introduction
In this course you will learn how to build "awesome-links", a fullstack app where users can browse through a list of curated links and bookmark their favorite ones.
In the last part, you used Prisma to set up the database layer. By the end of this part, you will learn about GraphQL: what it is and how you can use it to build an API in a Next.js app.
Development environment
To follow along with this tutorial, you need to have Node.js and the GraphQL extension installed. You will also need to have a running PostgreSQL instance.
Note: you can set up PostgreSQL locally or a hosted instance on Heroku. Note that you will need a remote database for the deployment step at the end of the course.
Clone the repository
You can find the complete source code for the course on GitHub.
Note: Each article has a corresponding branch. This way, you can follow along as you go through it. By checking out the part-2 branch, you have the same starting point as this article.
To get started, navigate into the directory of your choice and run the following command to clone the repository.
git clone -b part-2 https://github.com/m-abdelwahab/awesome-links.gitYou can now navigate into the cloned directory, install the dependencies and start the development server:
cd awesome-links
npm install
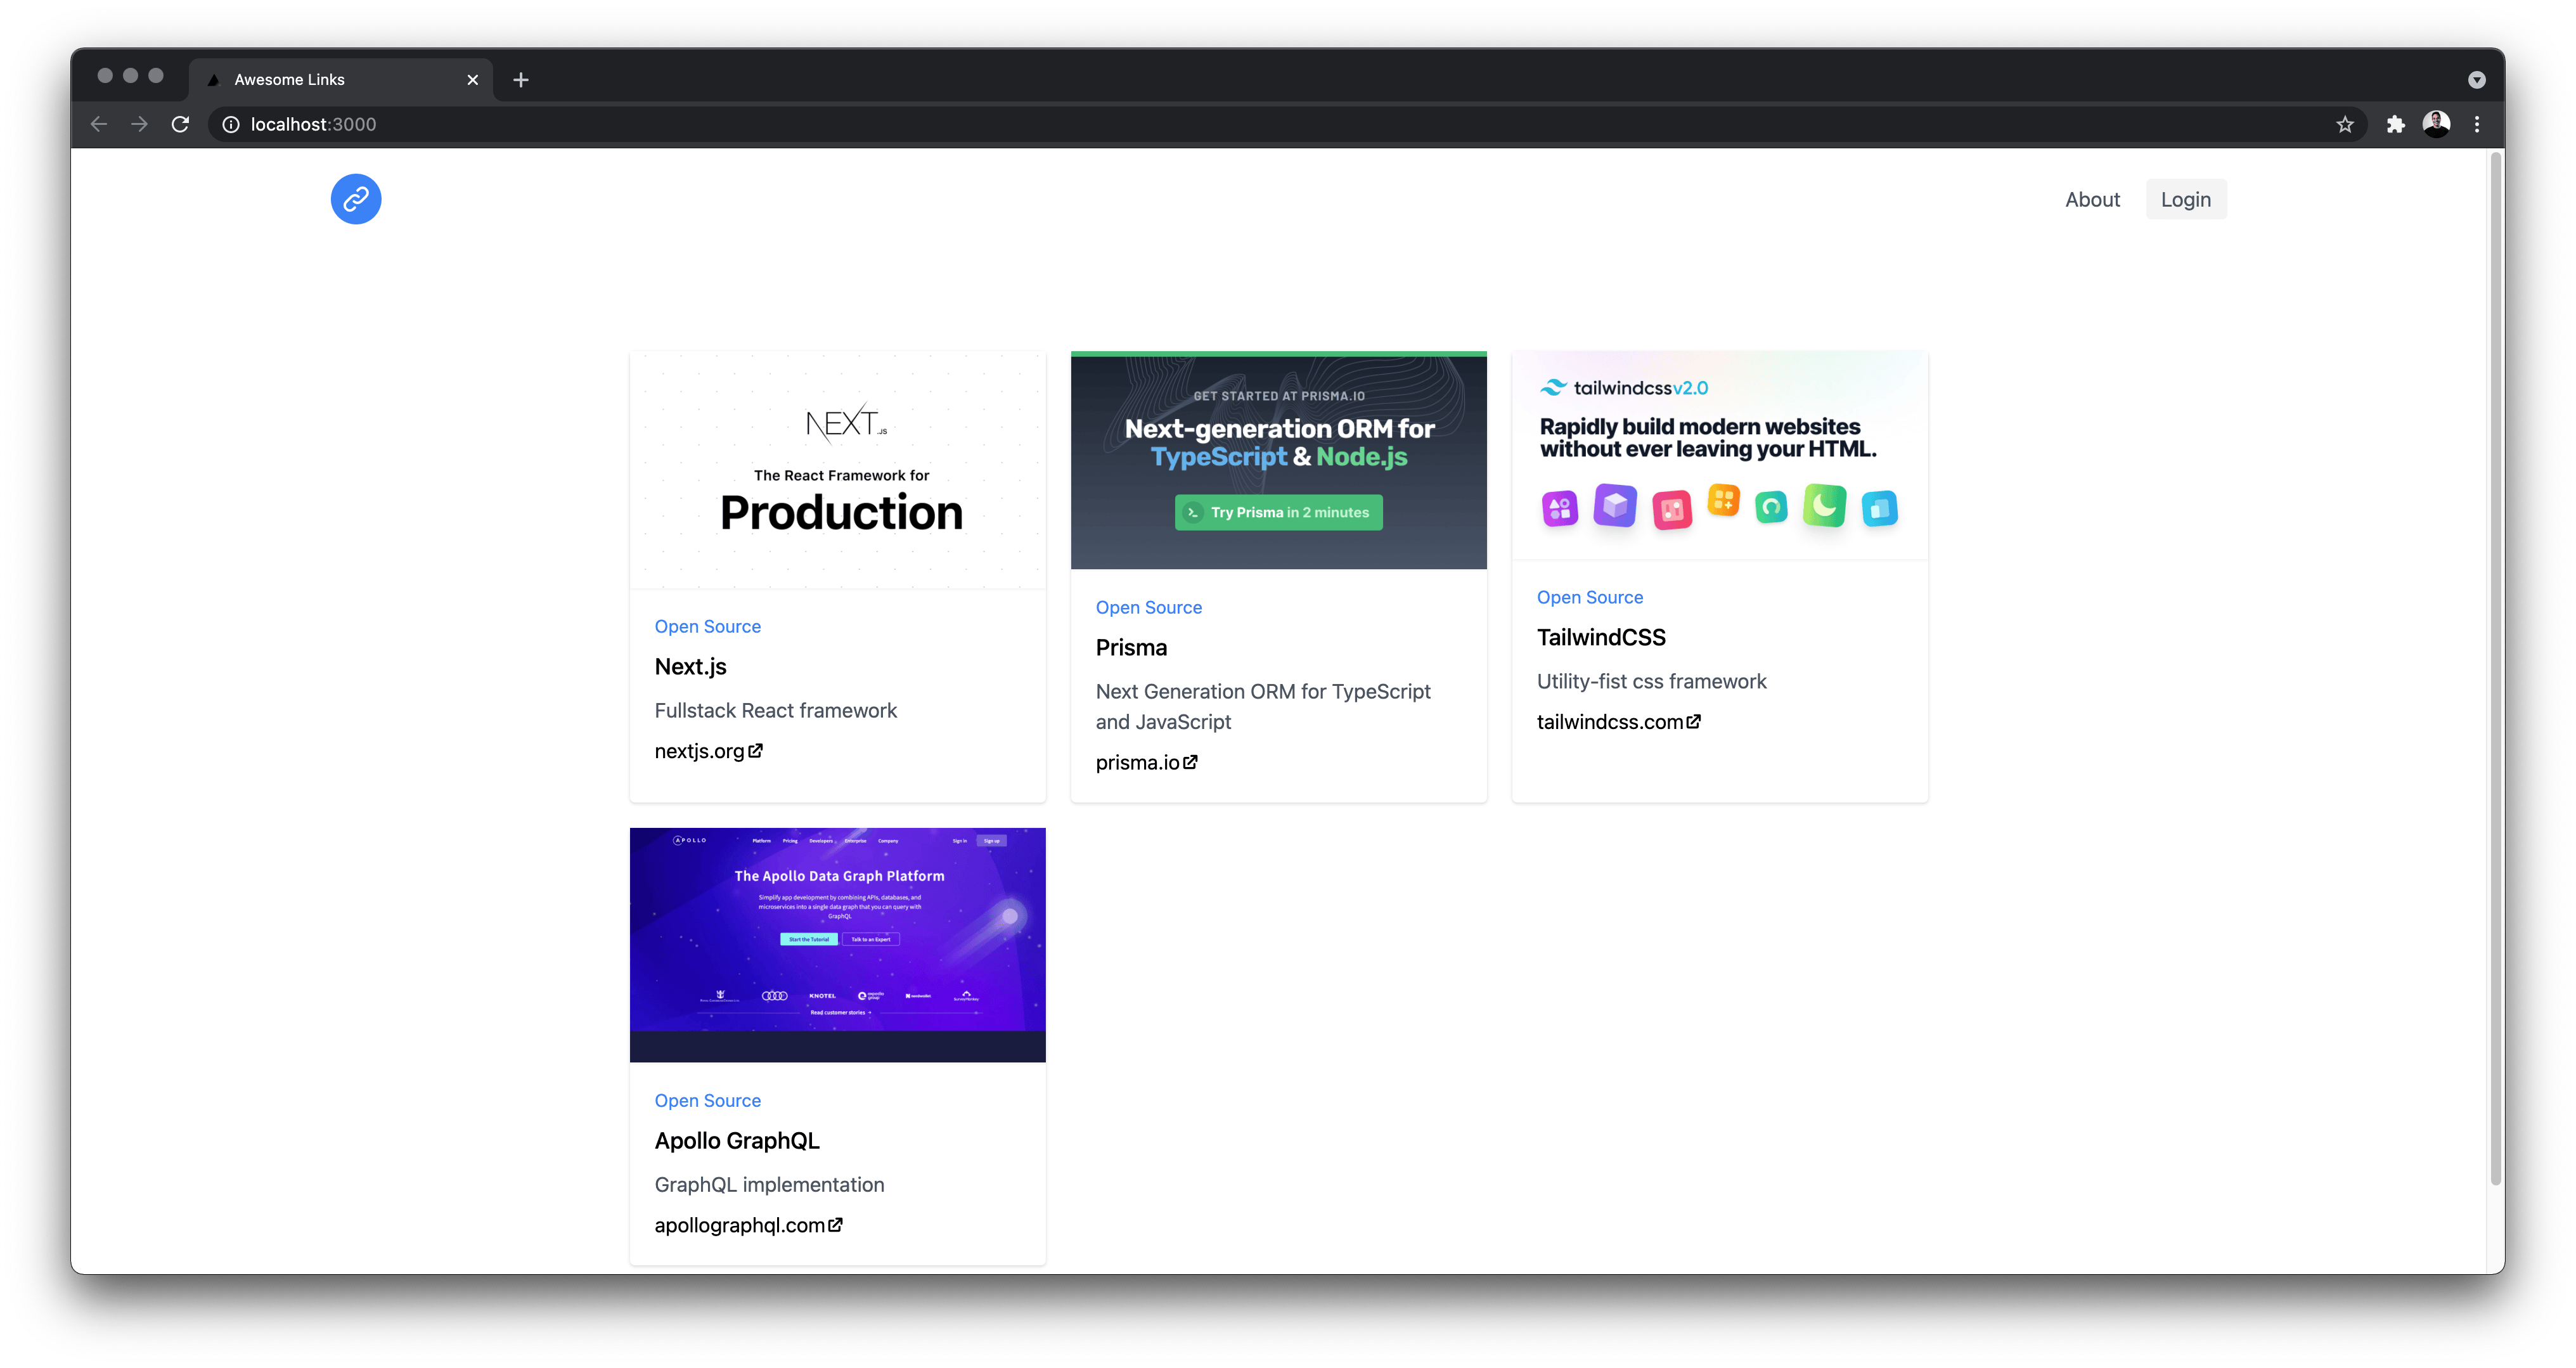
npm run devThe app will be running at http://localhost:3000/ and you will see four items. The data is hardcoded and comes from the /data/links.ts file.
Seeding the database
After setting up a PostgreSQL database, rename the env.example file to .env and set the connection string for your database. After that, run the following command to create a migration and the tables in your database:
npx prisma migrate dev --name initIf prisma migrate dev did not trigger the seed step, run the following command to seed the database:
npx prisma db seedThis command will run the seed.ts script, located in the /prisma directory. This script adds four links and one user to your database using Prisma Client.
A look at the project structure and dependencies
You will see the following folder structure
awesome-links/
┣ components/
┃ ┣ Layout/
┃ ┗ AwesomeLink.tsx
┣ data/
┃ ┗ links.ts
┣ pages/
┃ ┣ _app.tsx
┃ ┣ about.tsx
┃ ┗ index.tsx
┣ prisma/
┃ ┣ migrations/
┃ ┣ schema.prisma
┃ ┗ seed.ts
┣ public/
┣ styles/
┃ ┗ tailwind.css
┣ .env.example
┣ .gitignore
┣ next-env.d.ts
┣ package-lock.json
┣ package.json
┣ postcss.config.js
┣ README.md
┣ tailwind.config.js
┗ tsconfig.json
This is a Next.js application with TailwindCSS set up along with Prisma.
In the pages directory, you will find three files:
_app.tsx: the globalAppcomponent, which is used to add a navigation bar that persists between page changes and to add global CSS.about.tsx: this file exports a React component which renders a page located at http://localhost:3000/about.index.tsx: the home page, which contains a list of links. These links are hardcoded in the/data/links.tsfile.
Next, you will find a prisma directory which contains the following files:
schema.prisma: the schema of our database, written in PSL (Prisma Schema Language). If you want to learn how the database was modeled for this app, check out the last part of the course.seed.ts: script that will seed the database with dummy data.
Building APIs the traditional way: REST
In the last part of the course, you set up the database layer using Prisma. The next step is to build the API layer on top of the data model, which will allow you to request or send data from the client.
A common approach to structure the API is to have the client send requests to different URL endpoints. The server will retrieve or modify a resource based on the request type and send back a response. This architectural style is known as REST, and it has a couple of advantages:
- Flexible: an endpoint can handle different types of requests
- Cacheable: all you need to do is cache the response of a specific endpoint
- Separation between the client and the server: different platforms (for example, web app, mobile app, etc.) can consume the API.
REST APIs and their drawbacks
While REST APIs offer advantages, they also have some drawbacks. We will use awesome-links as an example.
Here is one possible way of structuring the REST API of awesome-links:
| Resource | HTTP Method | Route | Description |
|---|---|---|---|
User | GET | /users | returns all users and their information |
User | GET | /users/:id | returns a single user |
Link | GET | /links | returns all links |
Link | GET, PUT, DELETE | /links/:id | returns a single link, updates it or deletes it. id is the link's id |
User | GET | /favorites | returns a user's bookmarked links |
User | POST | /link/save | adds a link to the user's favorites |
Link | POST | /link/new | creates a new link (done by admin) |
Each REST API is different
Another developer may have structured their REST API differently, depending on how they see fit. This flexibility comes with a cost: every API is different.
This means every time you work with a REST API, you will need to go through its documentation and learn about:
- The different endpoints and their HTTP methods.
- The request parameters for each endpoint.
- What data and status codes are returned by every endpoint.
This learning curve adds friction and slows down developer productivity when working with the API for the first time.
On the other hand, backend developers who built the API need to manage it and maintain its documentation.
And when an app grows in complexity, so does the API: more requirements lead to more endpoints created.
This increase in endpoints will most likely introduce two issues: overfetching and underfetching data.
Overfetching and underfetching
Overfetching occurs when you fetch more data than you need. This leads to slower performance since you are consuming more bandwidth.
On the other hand, sometimes you find that an endpoint does not return all the necessary to be displayed in the UI, so you end up making one or more requests to another endpoint. This also leads to slow performance since there will be a waterfall of network requests that need to occur.
In the "awesome-links" app, if you want a page to display all users and their links, you will need to make an API call to the /users/ endpoint and then make another request to /favorites to fetch their favorites.
Having the /users endpoint return users and their favorites will not solve the problem. That is because you will end up with a significant API response that will take a long time to load.
REST APIs are not typed
Another downside about REST APIs is they are not typed. You do not know the types of data returned by an endpoint nor what type of data to send. This leads to making assumptions about the API, which can lead to bugs or unpredictable behavior.
For example, do you pass the user id as a string or a number when making a request? Which request parameters are optional, and which ones are required? That is why you will use the documentation, however, as an API evolves, documentation can get outdated. There are solutions that address these challenges, but we will not cover them in this course.
GraphQL, an alternative to REST
GraphQL is a new API standard that was developed and open-sourced by Facebook. It provides a more efficient and flexible alternative to REST, where a client can receive exactly the data it needs.
Instead of sending requests to one or more endpoints and stitching the responses, you only send requests to a single endpoint.
Here is an example of a GraphQL query that returns all links in the "awesome-links" app. You will define this query later when building the API:
query {
  links {
    id
    title
    description
  }
}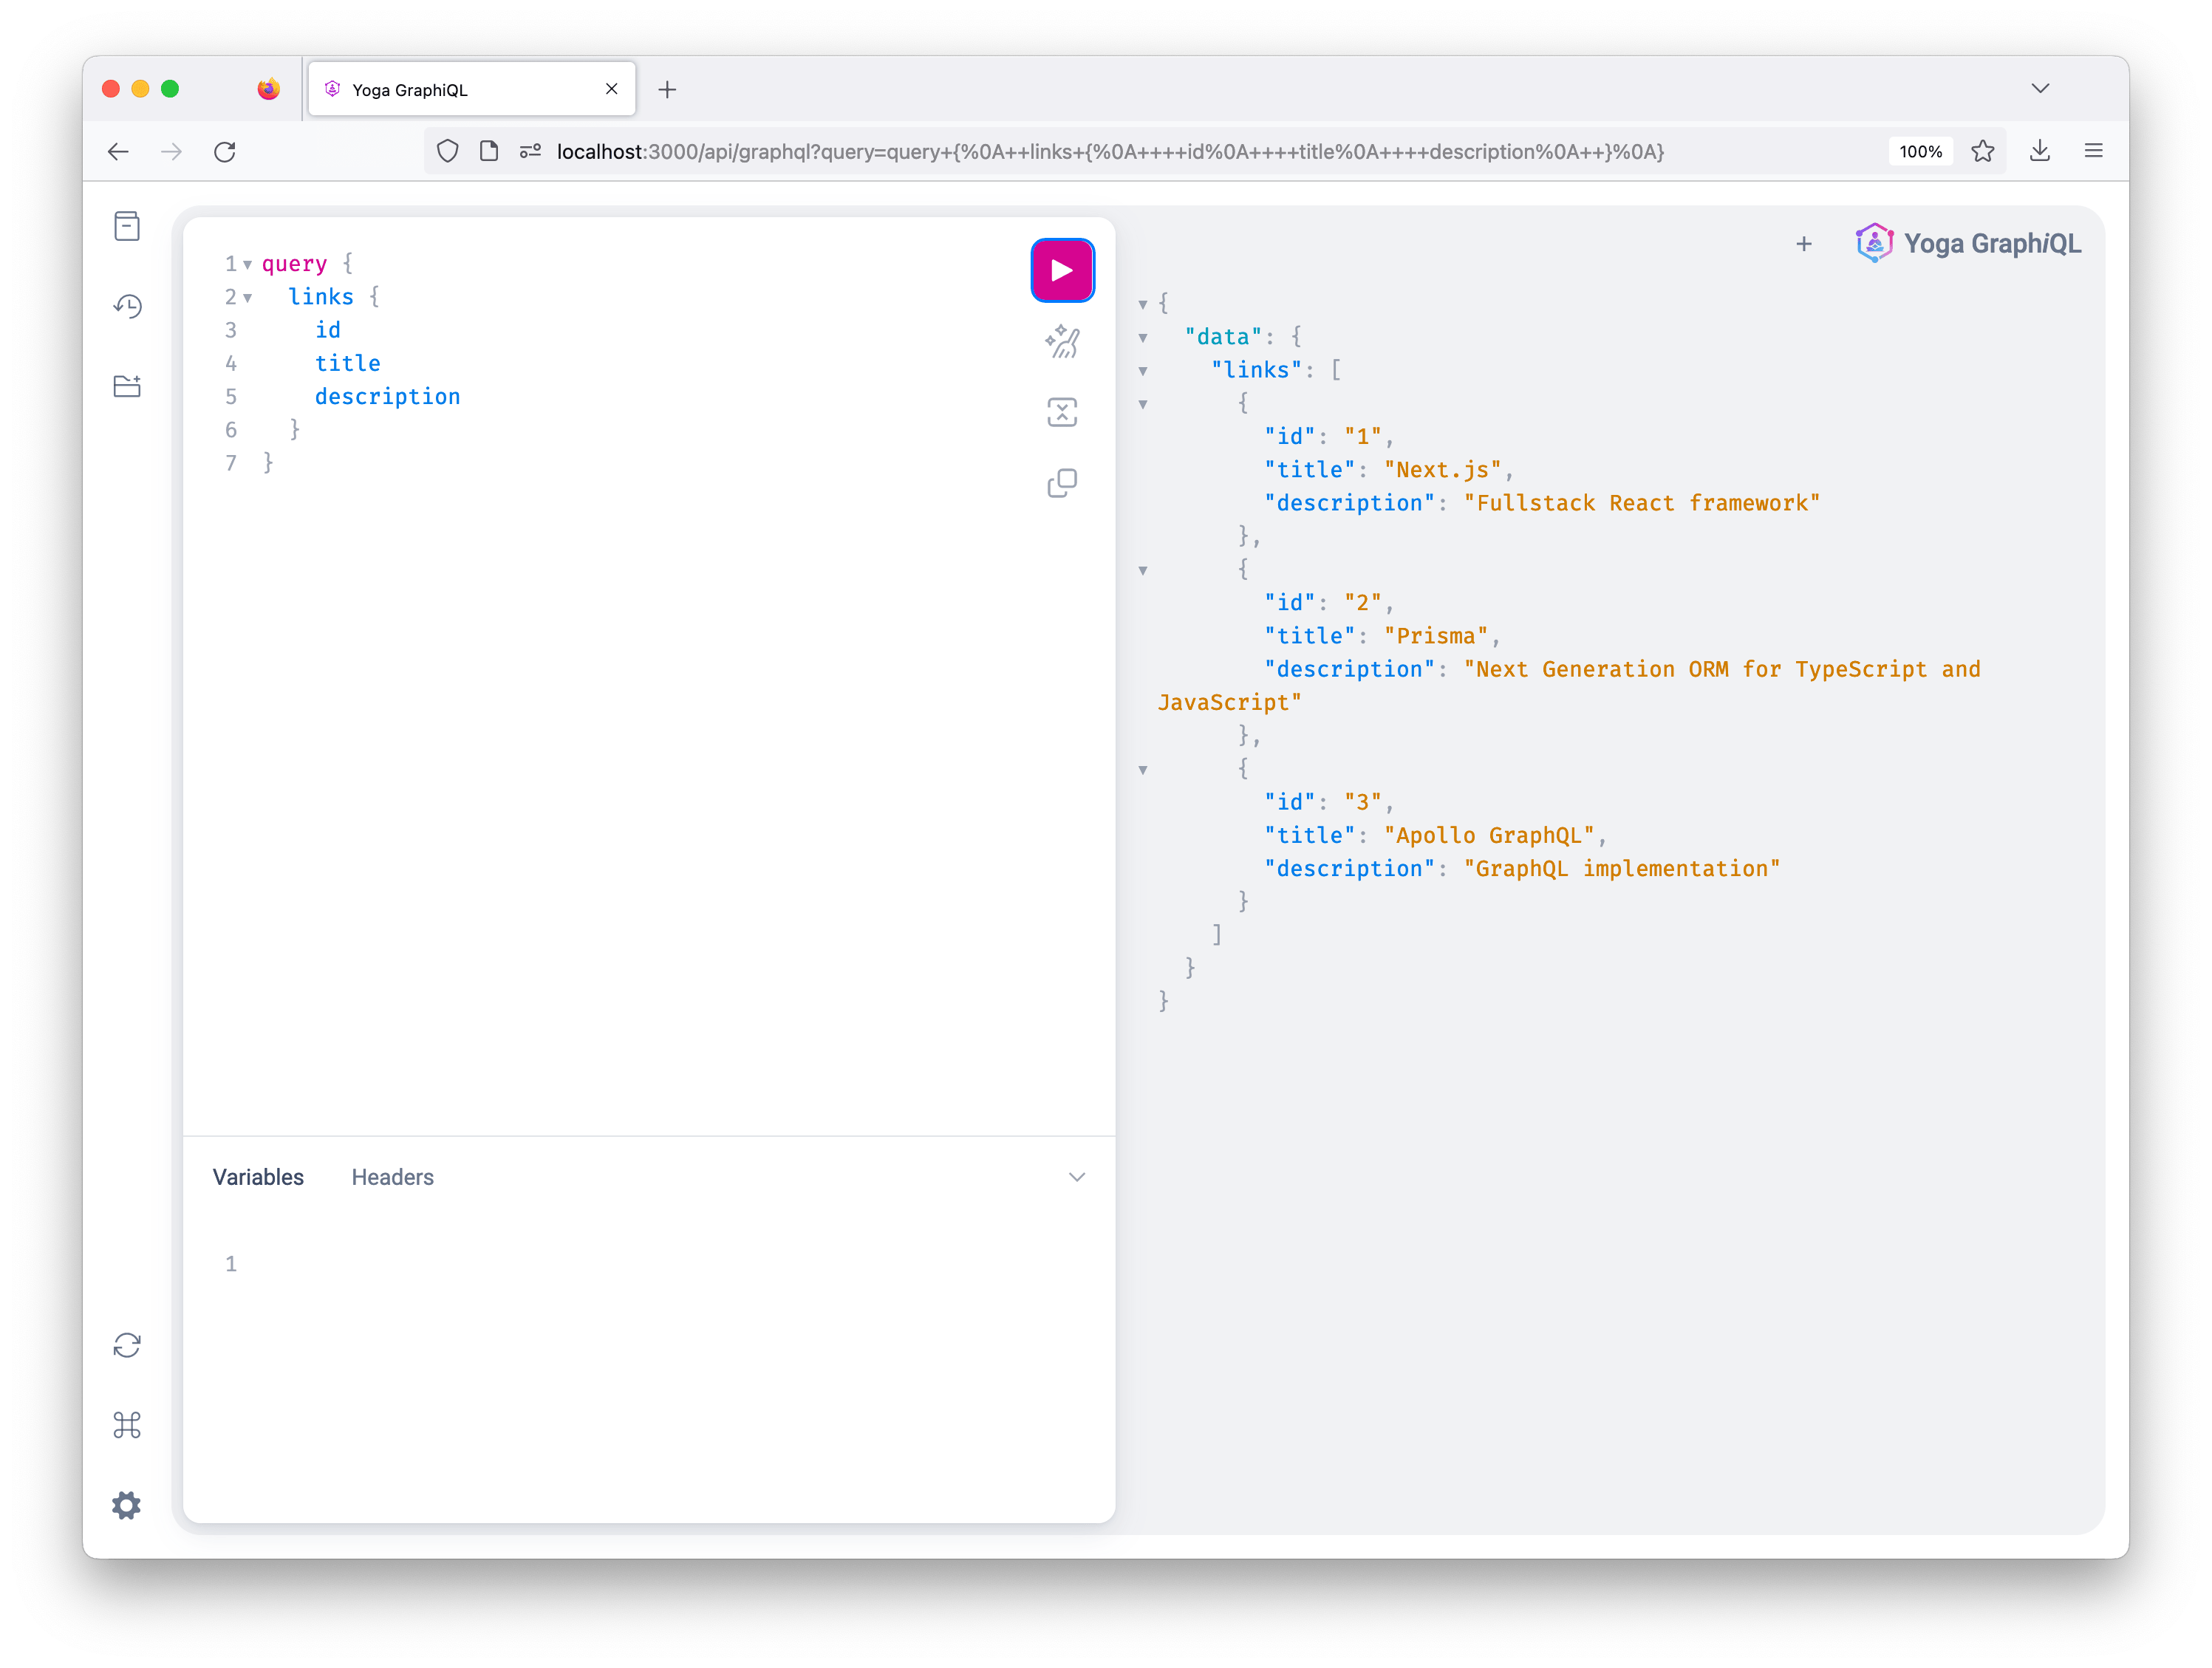
The API only returns the id and title, even though a link has more fields.
Note: this is GraphiQL, a playground for running GraphQL operations. It offers nice features which we will cover in more detail
Now you will see how you can get started with building a GraphQL API.
Defining a schema
It all starts with a GraphQL schema where you define all operations that your API can do. You also specify the operations' input arguments along with the response type.
This schema acts as the contract between the client and the server. It also serves as documentation for developers consuming the GraphQL API. You define the schema using GraphQL's SDL (Schema Definition Language).
Let's look at how you can define the GraphQL schema for the "awesome-links" app.
Defining object types and fields
The first thing you need to do is define an Object type. Object types represent a kind of object you can fetch from your API.
Each object type can have one or many fields. Since you want to have users in the app, you will need to define a User object type:
type User {
  id: ID
  email: String
  image: String
  role: Role
  bookmarks: [Link]
}

enum Role {
  ADMIN
  USER
}
The User type has the following fields:
id, which is of typeID.email, which is of typeString.image, which is of typeString.role, which is of typeRole. This is an enum, which means a user's role can take one of two values: eitherUSERorADMIN.bookmarks, which is an array of typeLink. Meaning a user can have many links. You will define theLinkobject next.
This is the definition for the Link object type:
type Link {
  id: ID
  category: String
  description: String
  imageUrl: String
  title: String
  url: String
  users: [User]
}
This is a many-to-many relation between the Link and User object types since a Link can have many users, and a User can have many links. This is modeled in the database using Prisma.
Defining Queries
To fetch data from a GrahQL API, you need to define a Query Object type. This is a type where you define an entry point of every GraphQL query.
For each entry point, you define its arguments and its return type.
Here is a query that returns all links.
type Query {
  links: [Link]!
}
The links query returns an array of type Link. The ! is used to indicate that this field is non-nullable, meaning that the API will always return a value when this field is queried.
You can add more queries depending on the type of API you want to build. For the "awesome-links" app, you can add a query to return a single link, another one to return a single user, and another to return all users.
type Query {
  links: [Link]!
  link(id: ID!): Link!
  user(id: ID!): User!
  users: [User]!
}- The
linkquery takes an argumentidof typeIDand returns aLink. Theidargument is required, and the response is non-nullable. - The
userquery takes an argumentidof typeIDand returns aUser. Theidargument is required, and the response is non-nullable. - The
usersquery returns an array of typeUser. Theidargument is required. The response is non-nullable.
Defining mutations
To create, update or delete data, you need to define a Mutation Object type. It is a convention that any operations that cause writes should be sent explicitly via a mutation. In the same way, you should not use GET requests to modify data.
For the "awesome-links" app, you will need different mutations for creating, updating and deleting a link:
type Mutation {
  createLink(category: String!, description: String!, imageUrl: String!, title: String!, url: String!): Link!
  deleteLink(id: ID!): Link!
  updateLink(category: String, description: String, id: String, imageUrl: String, title: String, url: String): Link!
}- The
createLinkmutation takes as an argument acategory, adescription, atitle, aurland animageUrl. All of these fields are of typeStringand are required. This mutation returns aLinkobject type. - The
deleteLinkmutation takes as anidof typeIDas a required argument. It returns a requiredLink. - The
updateLinkmutation takes the same arguments as thecreateLinkmutation. However, arguments are optional. This way, when updating aLinkyou will only pass the fields you want to be updated. This mutation returns a requiredLink.
Defining the implementation of queries and mutations
So far, you only defined the schema of the GraphQL API, but you haven't specified what should happen when a query or a mutation runs. The functions responsible for executing the implementation of the query or a mutation are called resolvers. Inside the resolvers, you can send queries to a database or a request to a 3rd-party API.
For this tutorial, you will use Prisma inside the resolvers to send queries to a PostgreSQL database.
Building the GraphQL API
To build the GraphQL API, you will need a GraphQL server that will serve a single endpoint.
This server will contain the GraphQL schema along with the resolvers. For this project, you will use GraphQL Yoga.
To get started, in the starter repo you cloned in the beginning, run the following command in your terminal:
npm install graphql graphql-yogaThe graphql package is the JavaScript reference implementation for GraphQL. It is a peer-dependency for graphql-yoga.
Defining the schema of the app
Next, you need to define the GraphQL schema. Create a new graphql directory in the project's root folder, and inside it, create a new schema.ts file. You will define the Link object along with a query that returns all links.
// graphql/schema.ts

export const typeDefs = `
  type Link {
    id: ID
    title: String
    description: String
    url: String
    category: String
    imageUrl: String
    users: [String]
  }

  type Query {
    links: [Link]!
  }
`
Defining resolvers
The next thing you need to do is create the resolver function for the links query. To do so, create a /graphql/resolvers.ts file and add the following code:
// /graphql/resolvers.ts
export const resolvers = {
  Query: {
    links: () => {
      return [
        {
          category: 'Open Source',
          description: 'Fullstack React framework',
          id: 1,
          imageUrl: 'https://nextjs.org/static/twitter-cards/home.png',
          title: 'Next.js',
          url: 'https://nextjs.org',
        },
        {
          category: 'Open Source',
          description: 'Next Generation ORM for TypeScript and JavaScript',
          id: 2,
          imageUrl: 'https://www.prisma.io/images/og-image.png',
          title: 'Prisma',
          url: 'https://www.prisma.io',
        },
        {
          category: 'Open Source',
          description: 'GraphQL implementation',
          id: 3,
          imageUrl: 'https://www.apollographql.com/apollo-home.png',
          title: 'Apollo GraphQL',
          url: 'https://apollographql.com',
        },
      ]
    },
  },
}
resolvers is an object where you will define the implementation for each query and mutation. The functions inside the Query object must match the names of the queries defined in the schema. Same thing goes for mutations.
Here the links resolver function returns an array of objects, where each object is of type Link.
Creating the GraphQL endpoint
To create the GraphQL endpoint, you will leverage Next.js' API routes. Any file inside the /pages/api folder is mapped to a /api/* endpoint and treated as an API endpoint.
Go ahead and create a /pages/api/graphql.ts file and add the following code:
// pages/api/graphql.ts

import { createSchema, createYoga } from 'graphql-yoga'
import type { NextApiRequest, NextApiResponse } from 'next'
import { resolvers } from '../../graphql/resolvers'
import { typeDefs } from '../../graphql/schema'


export default createYoga<{
  req: NextApiRequest
  res: NextApiResponse
}>({
  schema: createSchema({
    typeDefs,
    resolvers
  }),
  graphqlEndpoint: '/api/graphql'
})

export const config = {
  api: {
    bodyParser: false
  }
}
You created a new GraphQL Yoga server instance that is the default export. You also created a schema using the createSchema function that takes the type-definitions and resolvers as a parameter.
You then specified the path for the GraphQL API with the graphqlEndpoint property to /api/graphql.
Finally, every API route can export a config object to change the default configs. Body parsing is disabled here.
Sending queries using GraphiQL
After completing the previous steps, start the server by running the following command:
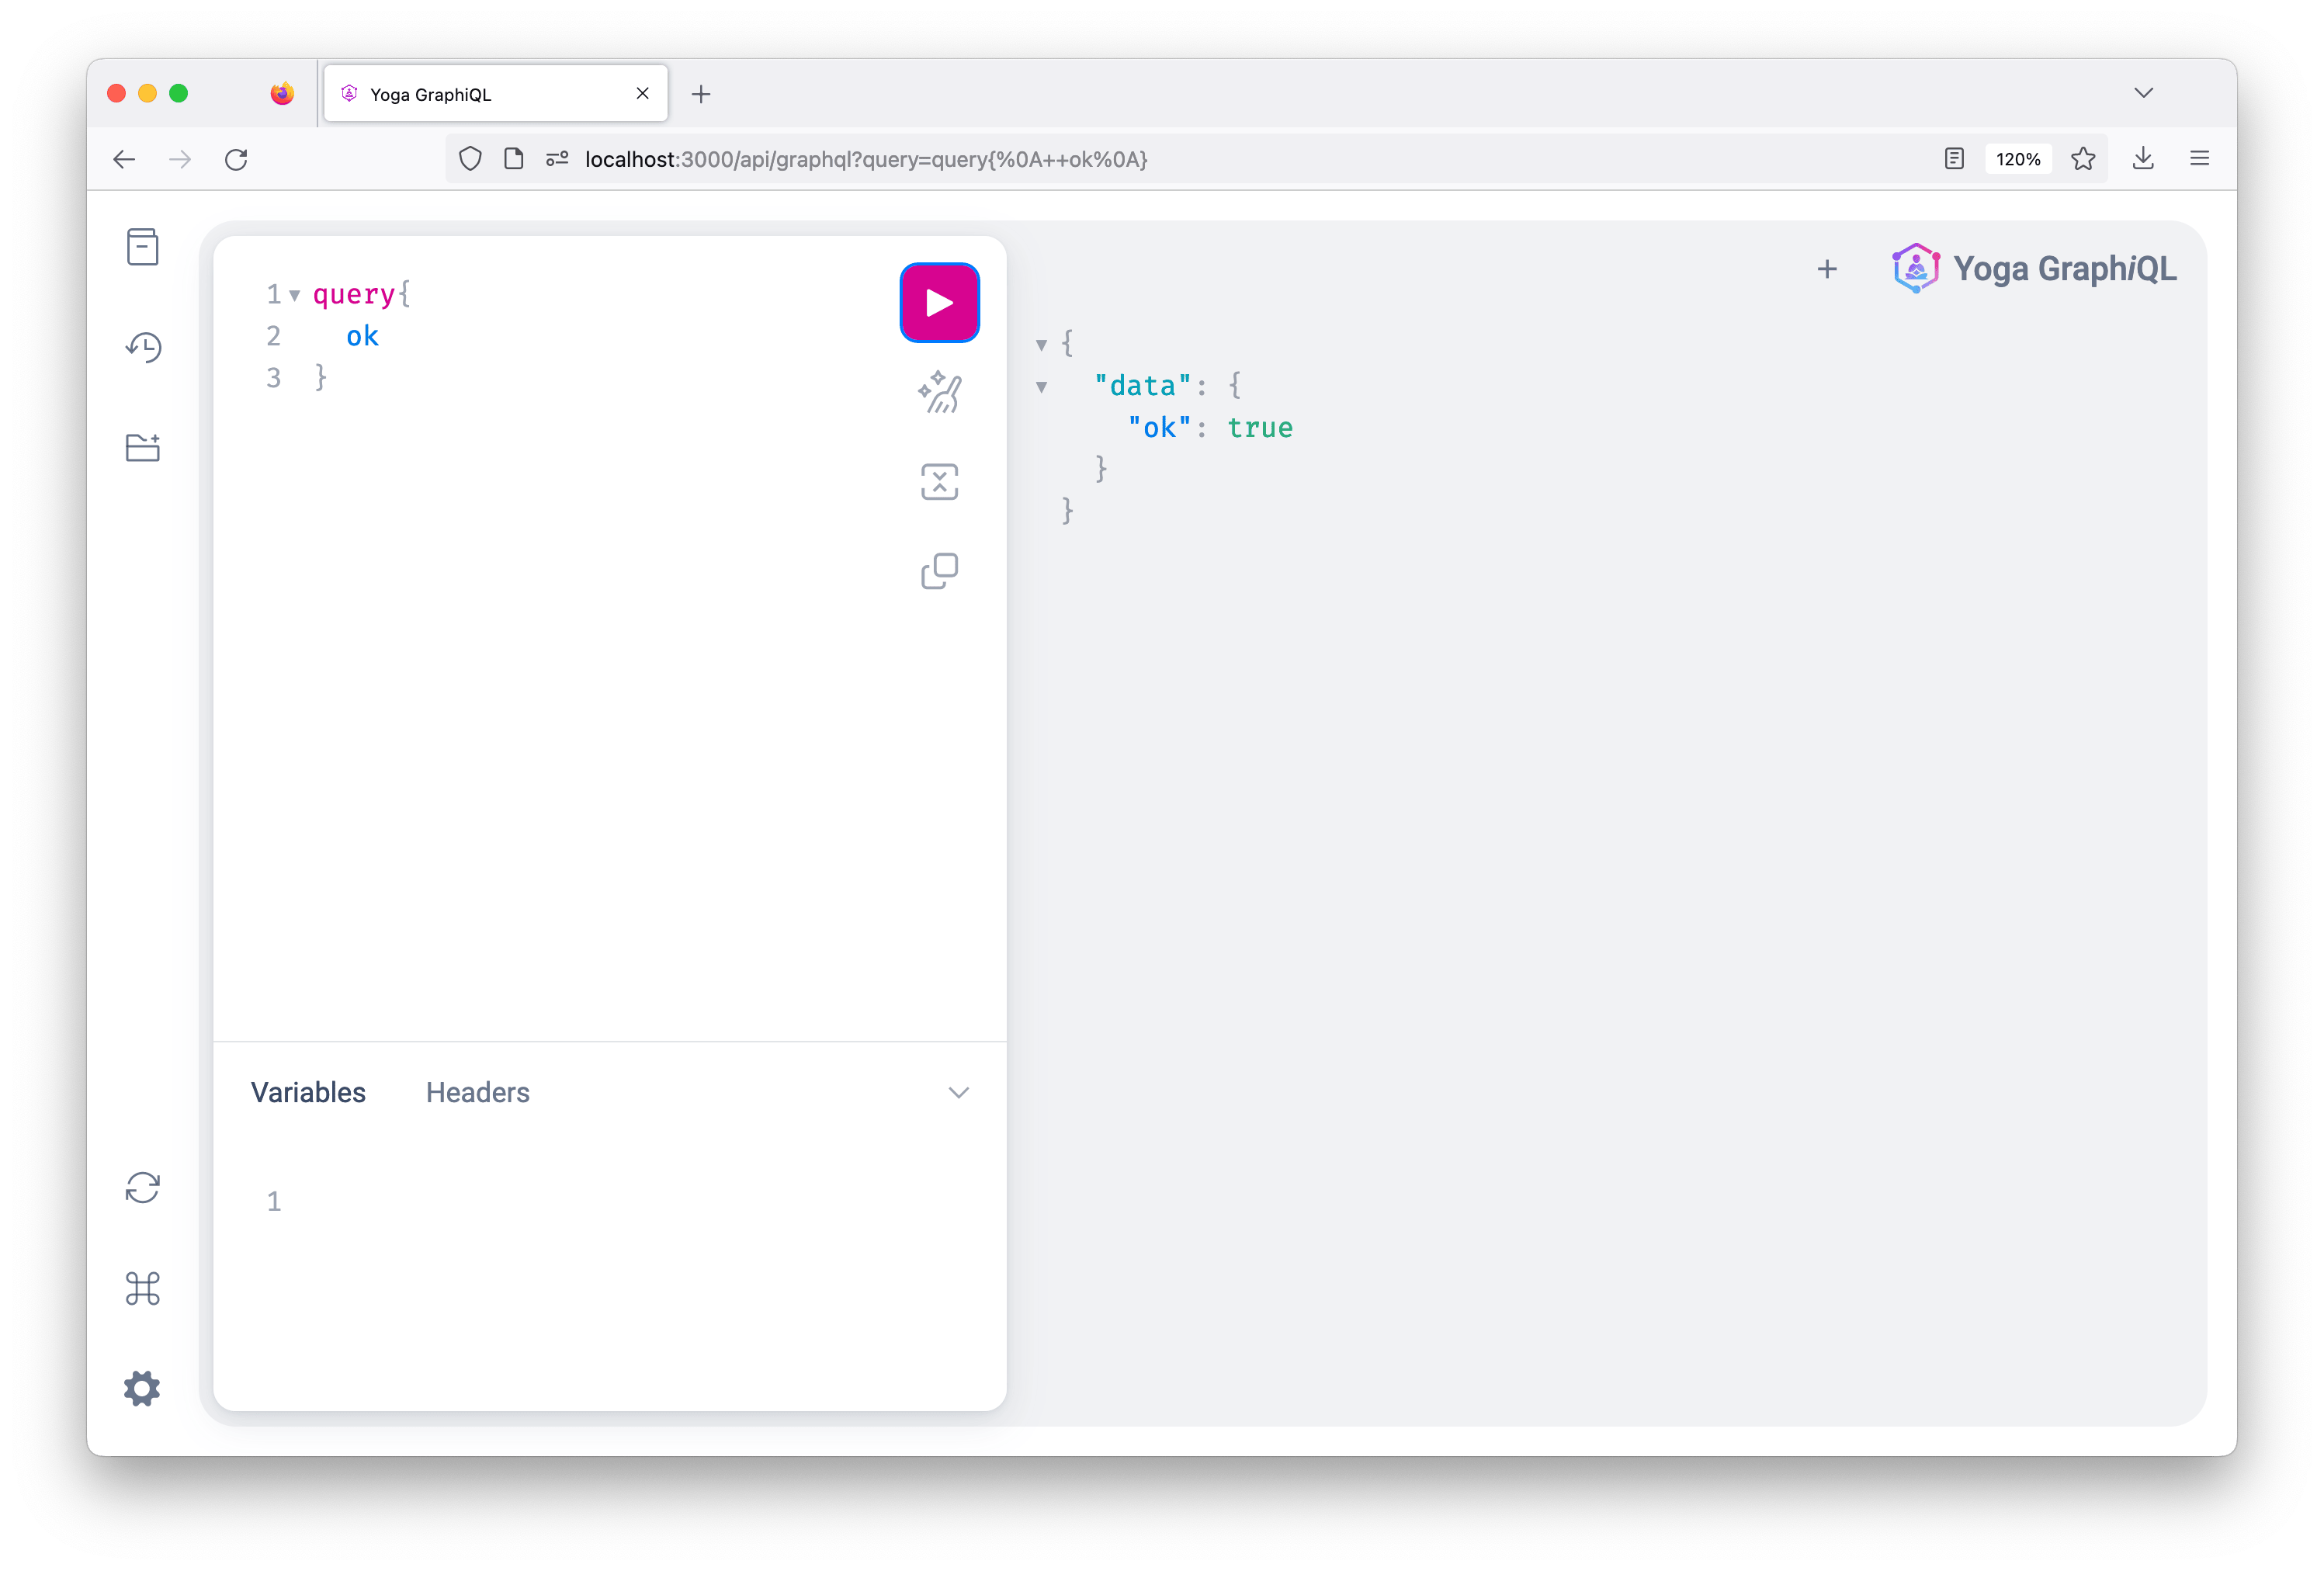
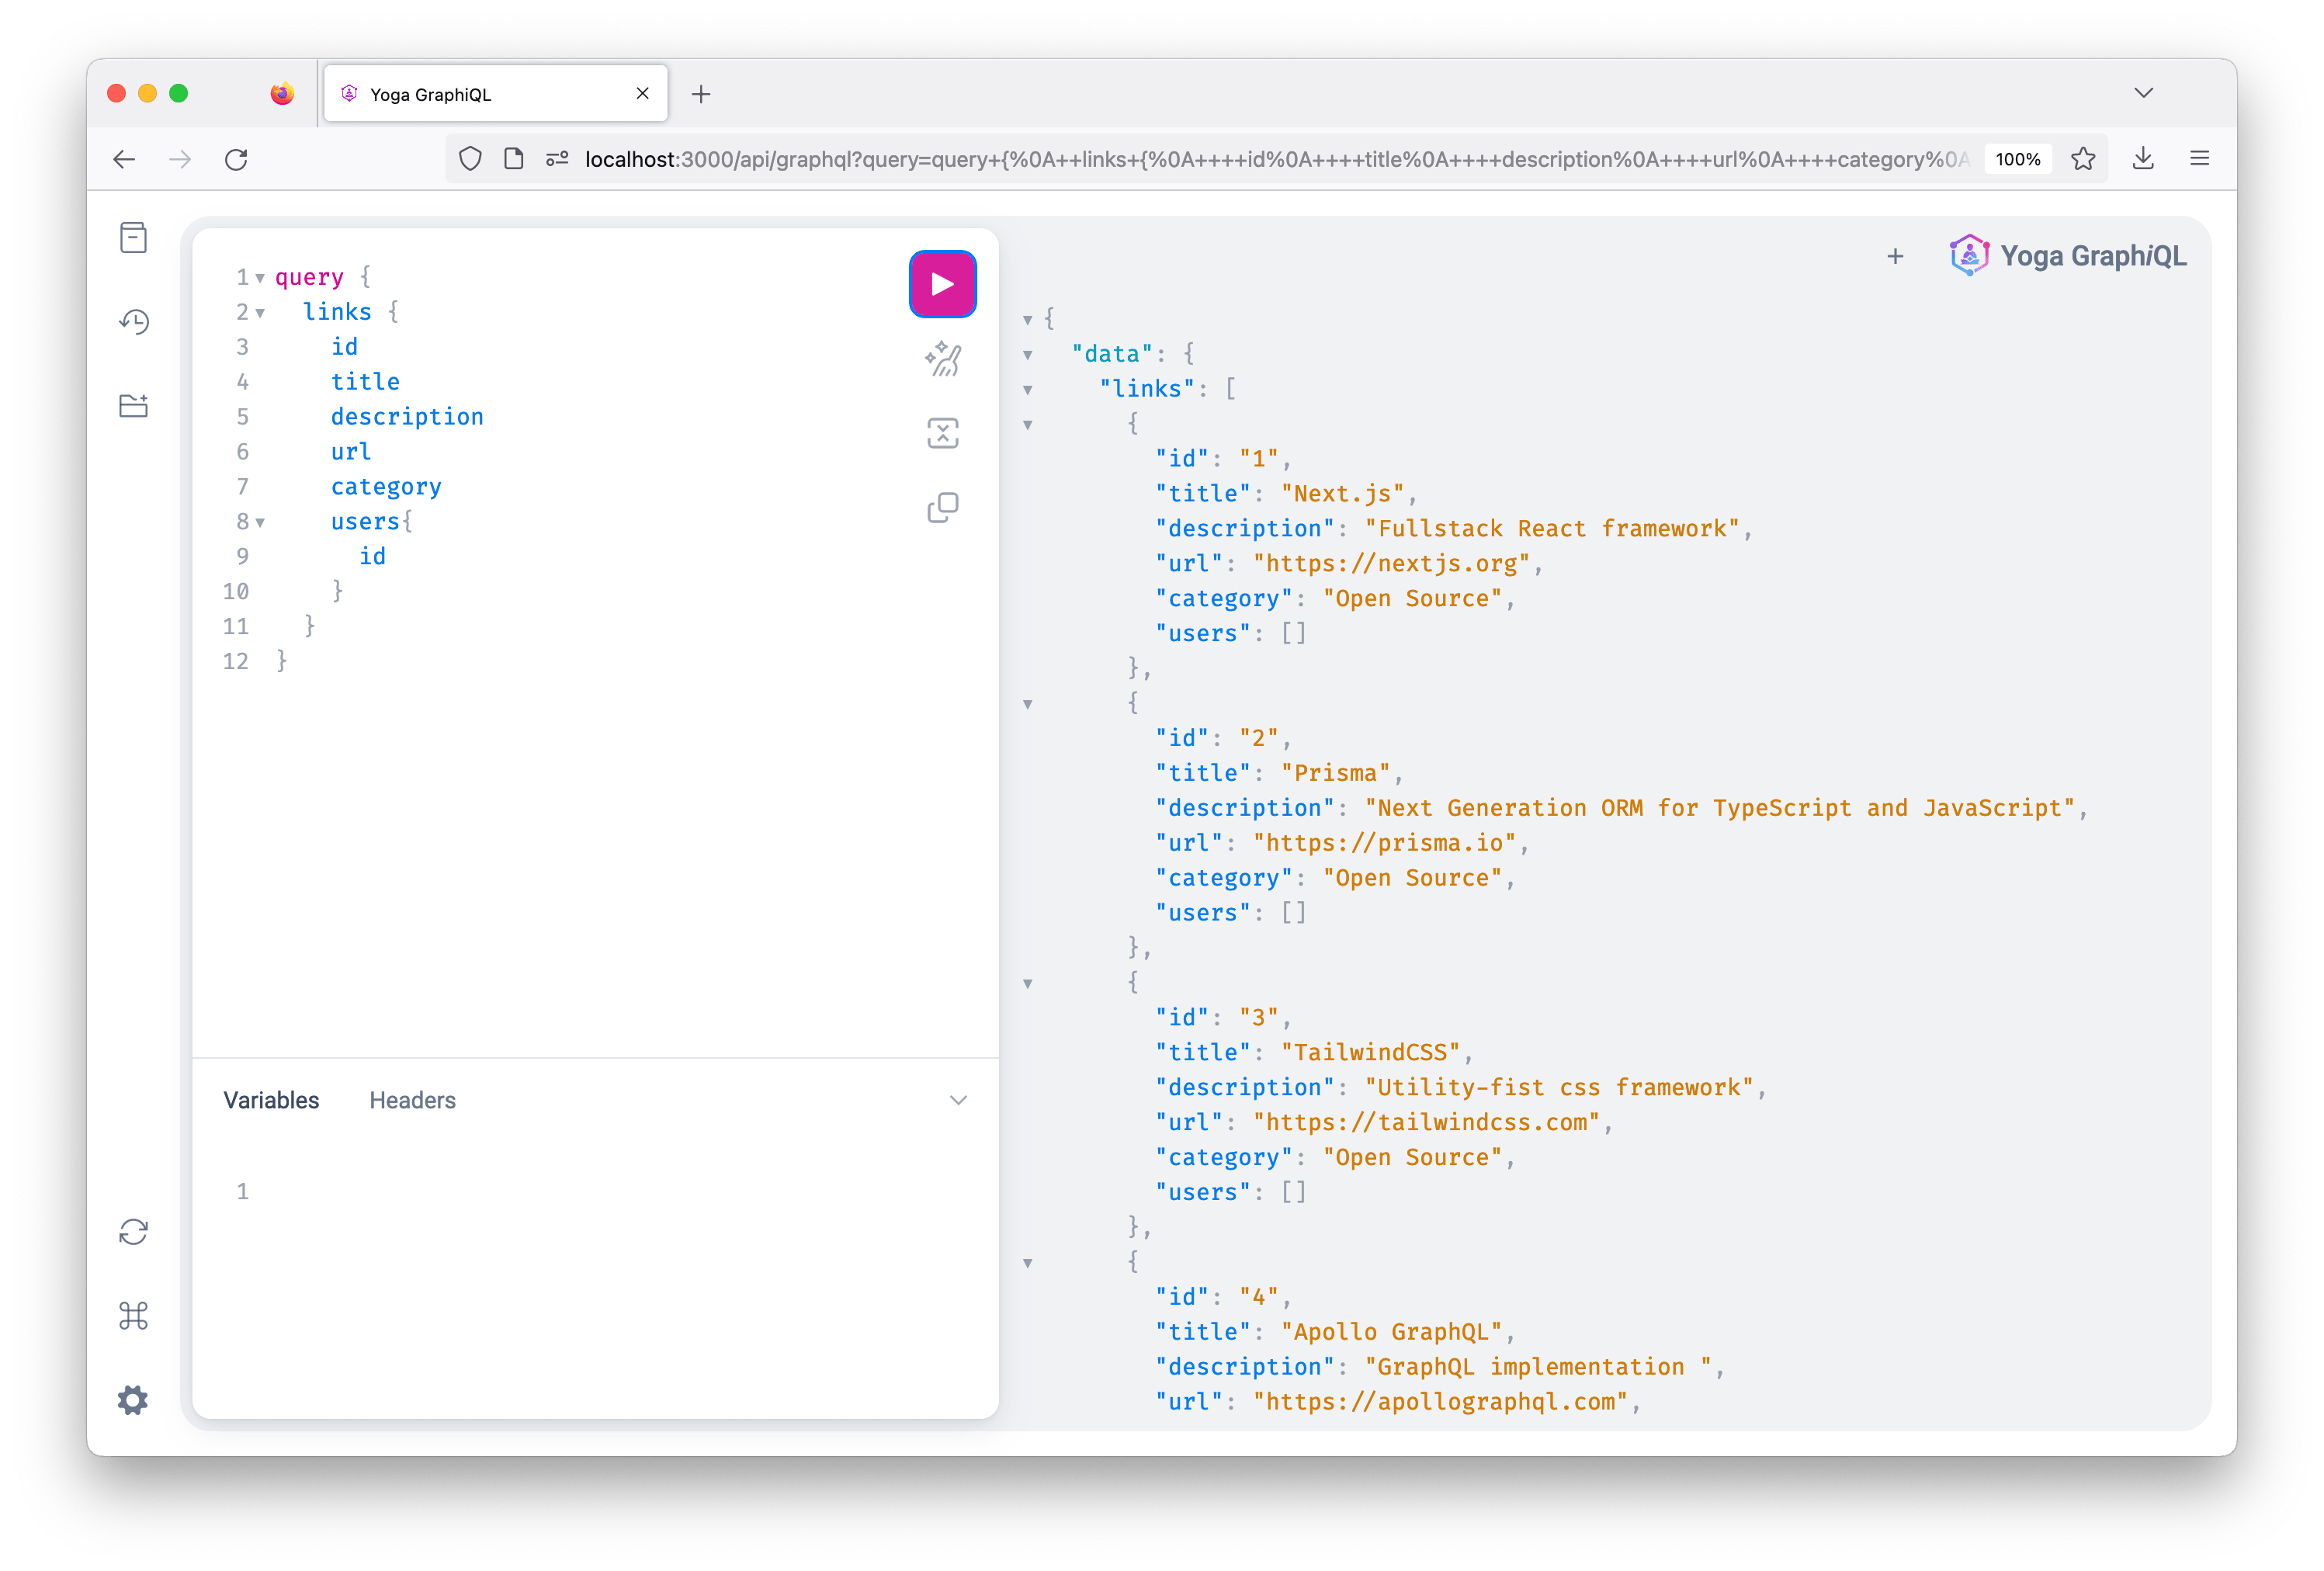
npm run devWhen you navigate to http://localhost:3000/api/graphql/, you should see the following page:
GraphQL Yoga provides an interactive playground called GraphiQL you could use to explore the GraphQL schema and interact with your API.
Update the content on the right tab with the following query and then hit CMD/CTRL + Enter to execute the query:
query {
  links {
    id
    title
    description
  }
}
The responses should be visible on the left panel, similar to the screenshot above.
The Documentation Explorer (top left button on the page) will allow you to explore each query/mutation individually, seeing the different needed arguments along with their types.
Initialize Prisma Client
So far, the GraphQL API returns hardcoded data in the resolvers function. You will use Prisma Client in these functions to send queries to the database.
Prisma Client is an auto-generated, type-safe, query builder. To be able to use it in your project, you should instantiate it once and then reuse it across the entire project. Go ahead and create a /lib folder in the project's root folder and inside it create a prisma.ts file. Next, add the following code to it:
// /lib/prisma.ts
import { PrismaClient } from '@prisma/client'

let prisma: PrismaClient

declare global {
  var prisma: PrismaClient;
}

if (process.env.NODE_ENV === 'production') {
  prisma = new PrismaClient()
} else {
  if (!global.prisma) {
    global.prisma = new PrismaClient()
  }
  prisma = global.prisma
}
export default prisma
First, you are creating a new Prisma Client instance. Then if you are not in a production environment, Prisma will be attached to the global object so that you do not exhaust the database connection limit. For more details, check out the documentation for Next.js and Prisma Client best practices.
Query the database using Prisma
Now you can update the resolver to return data from the database. Inside the /graphql/resolvers.ts file, update the links function to the following code:
// /graphql/resolvers.ts
import prisma from '../lib/prisma'
export const resolvers = {
  Query: {
    links: () => {
      return prisma.link.findMany()
    },
  },
}
If everything is set up correctly, when you go to GraphiQL,at http://localhost:3000/api/graphql and re-run the links query, the data should be retrieved from your database.
The flaws with our current GraphQL setup
When the GraphQL API grows in complexity, the current workflow of creating the schema and the resolvers manually can decrease developer productivity:
- Resolvers must match the same structure as the schema and vice-versa. Otherwise, you can end up with buggy and unpredictable behavior. These two components can accidentally go out of sync when the schema evolves or the resolver implementation changes.
- The GraphQL schema is defined as strings, so no auto-completion and build-time error checks for the SDL code.
To solve these problems, one can use a combination of tools like GraphQL code-generator. Alternatively, you can use a code-first approach when building the schema with its resolvers.
Code-first GraphQL APIs using Pothos
Pothos is a GraphQL schema construction library where you define your GraphQL schema using code. The value proposition of this approach is you are using a programming language to build your API, which has multiple benefits:
- No need to context-switch between SDL and the programming language you are using to build your business logic.
- Auto-completion from the text-editor
- Type-safety (if you are using TypeScript)
These benefits contribute to a better development experience with less friction.
For this tutorial, you will use Pothos. It also provides a great plugin for Prisma that provides a good development experience and type safety between your GraphQL types and Prisma schema.
Note: Pothos can be used in a type-safe way with Prisma without using the plugin, however that process is very manual. See details here.
To get started, run the following command to install Pothos and the Prisma plugin for Pothos:
npm install @pothos/plugin-prisma @pothos/coreNext, add the pothos generator block to your Prisma schema right below the client generator:
diff // prisma/schema.prisma

generator client {
  provider = "prisma-client-js"
}

+generator pothos {
+  provider = "prisma-pothos-types"
+}
Run the following command to re-generate Prisma Client and Pothos types:
npx prisma generateNext, create an instance of the Pothos schema builder as a shareable module. Inside the graphql folder, create a new file called builder.ts and add the following snippet:
// graphql/builder.ts

// 1.
import SchemaBuilder from "@pothos/core";
import PrismaPlugin from '@pothos/plugin-prisma';
import type PrismaTypes from '@pothos/plugin-prisma/generated';
import prisma from "../lib/prisma";

// 2.
export const builder = new SchemaBuilder<{
  // 3.
  PrismaTypes: PrismaTypes
}>({
  // 4.
  plugins: [PrismaPlugin],
  prisma: {
    client: prisma,
  }
})

// 5.
builder.queryType({
  fields: (t) => ({
    ok: t.boolean({
      resolve: () => true,
    }),
  }),
});- Defines all the libraries and utilities that will be needed
- Creates a new
SchemaBuilderinstance - Defines the static types that will be used in creating the GraphQL schema
- Defines options for the
SchemaBuildersuch as the plugins and the Prisma Client instance that will be used - Creates a
queryTypewith a query calledokthat returns a boolean
Next, in the /graphql/schema.ts file replace the typeDefs with the following code, which will create a GraphQL schema from Pothos' builder:
// graphql/schema.ts

import { builder } from "./builder";

export const schema = builder.toSchema()
Finally, update the import in the /pages/api/graphql.ts file:
diff
// /pages/api/graphql.ts
-import { createSchema, createYoga } from 'graphql-yoga'
+import { createYoga } from 'graphql-yoga'
import type { NextApiRequest, NextApiResponse } from 'next'
-import { resolvers } from '../../graphql/resolvers'
-import { typeDefs } from '../../graphql/schema'
+import { schema } from '../../graphql/schema'

export default createYoga<{
  req: NextApiRequest
  res: NextApiResponse
}>({
-  schema: createSchema({
-    typeDefs,
-    resolvers
-  }),
+  schema,
  graphqlEndpoint: '/api/graphql'
})

export const config = {
  api: {
    bodyParser: false
  }
}Make sure the server is running and navigate to http://localhost:3000/api/graphql. You will be able to send a query with an ok field, which will return true
Defining the schema using Pothos
The first step is defining a Link object type using Pothos. Go ahead and create a /graphql/types/Link.ts file, add the following code:
// /graphql/types/Link.ts
import { builder } from "../builder";

builder.prismaObject('Link', {
  fields: (t) => ({
    id: t.exposeID('id'),
    title: t.exposeString('title'),
    url: t.exposeString('url'),
    description: t.exposeString('description'),
    imageUrl: t.exposeString('imageUrl'),
    category: t.exposeString('category'),
    users: t.relation('users')
  })
})
Since you're using the Pothos' Prisma plugin, the builder instance provides utility methods for defining your GraphQL schema such as prismaObject.
prismaObject accepts two arguments:
name: The name of the model in the Prisma schema you would like to expose.options: The options for defining the type you're exposing such as the description, fields, etc.
Note: You can use CTRL + Space to invoke your editor's intellisense and view the available arguments.
The fields property is used to define the fields you would like to make available from your Prisma schema using the "expose" functions. For this tutorial, we'll expose the id, title, url, imageUrl, and category fields.
The t.relation method is used to define the relation fields you would wish to expose from your Prisma schema.
Now create a new /graphql/types/User.ts file and add the following to code to create the User type:
// /graphql/types/User.ts
import { builder } from "../builder";

builder.prismaObject('User', {
  fields: (t) => ({
    id: t.exposeID('id'),
    email: t.exposeString('email', { nullable: true, }),
    image: t.exposeString('image', { nullable: true, }),
    role: t.expose('role', { type: Role, }),
    bookmarks: t.relation('bookmarks'),
  })
})

const Role = builder.enumType('Role', {
  values: ['USER', 'ADMIN'] as const,
})
Since the email and image fields in the Prisma schema are nullable, pass the nullable: true as a second argument to the expose method.
The default type for the role field when "exposing" it's type from the generated schema. In the above example, you've defined an explicit enum type called Role which is then used to resolve the role's field type.
To make the defined object types for the schema available in the GraphQL schema, add the imports to the types you just created in the graphql/schema.ts file:
diff
// graphql/schema.ts
+import "./types/Link"
+import "./types/User"
import { builder } from "./builder";

export const schema = builder.toSchema()
Defining queries using Pothos
In the graphql/types/Link.ts file, add the following code below the Link object type definition:
// graphql/types/Link.ts
// code above unchanged

// 1.
builder.queryField("links", (t) =>
// 2.
  t.prismaField({
    // 3.
    type: ['Link'],
    // 4.
    resolve: (query, _parent, _args, _ctx, _info) =>
      prisma.link.findMany({ ...query })
  })
)
In the above snippet:
- Defines a query type called
links. - Defines the field that will resolve to the generated Prisma Client types.
- Specifies the field that Pothos will use to resolve the field. In this case, it resolves to an array of the
Linktype - Defines the logic for the query.
The query argument in the resolver function adds a select or include to your query to resolve as many relation fields as possible in a single request.
Now if you go back to the GraphiQL, you will be able to send a query that returns all links from the database.
Client-side GraphQL queries
For this project, you will be using Apollo Client. You can send a regular HTTP POST request to interact with the GraphQL API you just built. However, you get a lot of benefits when using a GraphQL Client instead.
Apollo Client takes care of requesting and caching your data, as well as updating your UI. It also includes features for query batching, query deduplication, and pagination.
Setting up Apollo Client in Next.js
To get started with Apollo Client, add to your project by running the following command:
npm install @apollo/clientNext, in the /lib directory create a new file called apollo.ts and add the following code to it:
// /lib/apollo.ts
import { ApolloClient, InMemoryCache } from '@apollo/client'

const apolloClient = new ApolloClient({
  uri: '/api/graphql',
  cache: new InMemoryCache(),
})

export default apolloClient
You are creating a new ApolloClient instance to which you are passing a configuration object with uri and cache fields.
- The
urifield specifies the GraphQL endpoint you will interact with. This will be changed to the production URL when the app is deployed. - The
cachefield is an instance of InMemoryCache, which Apollo Client uses to cache query results after fetching them.
Next, go to the /pages/_app.tsx file and add the following code to it, which sets up Apollo Client:
diff // /pages/_app.tsx
import '../styles/tailwind.css'
import Layout from '../components/Layout'
+import { ApolloProvider } from '@apollo/client'
+import apolloClient from '../lib/apollo'
import type { AppProps } from 'next/app'

function MyApp({ Component, pageProps }: AppProps) {
  return (
+    <ApolloProvider client={apolloClient}>
      <Layout>
        <Component {...pageProps} />
      </Layout>
+    </ApolloProvider>
  )
}

export default MyApp
You are wrapping the global App component with the Apollo Provider so all of the project's components can send GraphQL queries.
Note: Next.js supports different data fetching strategies. You can fetch data server-side, client-side, or at build-time. To support pagination, you need to fetch data client-side.
Sending requests using useQuery
To load data on your frontend using Apollo client, update the /pages/index.tsx file to use the following code:
// /pages/index.tsx
import Head from 'next/head'
import { gql, useQuery } from '@apollo/client'
import type { Link } from '@prisma/client'

const AllLinksQuery = gql`
  query {
    links {
      id
      title
      url
      description
      imageUrl
      category
    }
  }
`

export default function Home() {
  const { data, loading, error } = useQuery(AllLinksQuery)

  if (loading) return <p>Loading...</p>
  if (error) return <p>Oh no... {error.message}</p>

  return (
    <div>
      <Head>
        <title>Awesome Links</title>
        <link rel="icon" href="/favicon.ico" />
      </Head>

      <div className="container mx-auto max-w-5xl my-20">
        <ul className="grid grid-cols-1 md:grid-cols-2 lg:grid-cols-3 gap-5">
          {data.links.map((link: Link) => (
            <li key={link.id} className="shadow  max-w-md  rounded">
              <img className="shadow-sm" src={link.imageUrl} />
              <div className="p-5 flex flex-col space-y-2">
                <p className="text-sm text-blue-500">{link.category}</p>
                <p className="text-lg font-medium">{link.title}</p>
                <p className="text-gray-600">{link.description}</p>
                <a href={link.url} className="flex hover:text-blue-500">
                  {link.url.replace(/(^\w+:|^)\/\//, '')}
                  <svg
                    className="w-4 h-4 my-1"
                    fill="currentColor"
                    viewBox="0 0 20 20"
                    xmlns="http://www.w3.org/2000/svg"
                  >
                    <path d="M11 3a1 1 0 100 2h2.586l-6.293 6.293a1 1 0 101.414 1.414L15 6.414V9a1 1 0 102 0V4a1 1 0 00-1-1h-5z" />
                    <path d="M5 5a2 2 0 00-2 2v8a2 2 0 002 2h8a2 2 0 002-2v-3a1 1 0 10-2 0v3H5V7h3a1 1 0 000-2H5z" />
                  </svg>
                </a>
              </div>
            </li>
          ))}
        </ul>
      </div>
    </div>
  )
}
You are using the useQuery hook to send queries to the GraphQL endpoint. This hook has a required parameter of a GraphQL query string. When the component renders, useQuery returns an object which contains three values:
loading: a boolean that determines whether or not the data has been returned.error: an object that contains the error message in case an error occurs after sending the query.data: contains the data returned from the API endpoints.
After you save the file and you navigate to http://loclahost:3000, you will see a list of links which are fetched from the database.
Pagination
AllLinksQuery returns all the links you have in the database. As the app grows and you add more links, you will have a large API response that will take a long time to load. Also the database query sent by the resolver will become slower, since you are returning the links in the database using the prisma.link.findMany() function.
A common approach to improve performance is to add support for pagination. This is when you split a large data set into smaller chunks that can be requested as needed.
There are different ways to implement pagination. You can do numbered pages, for example like Google search results, or you can do infinite scrolling like Twitter's feed.

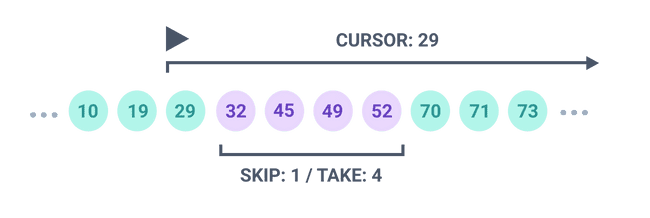
- Cursor-based pagination: you use a cursor to bookmark a location in a result set. On subsequent requests you can then jump straight to that saved location. Similar to how you can access an array by its index.
The cursor must be a unique, sequential column - such as an ID or a timestamp. This approach is more efficient than offset-based pagination and will be the one you use in this tutorial.
Pagination in GraphQL
To make the GraphQL API support pagination, you need to introduce Relay Cursor Connections Specification to the GraphQL schema. This is a specification for how a GraphQL server should expose paginated data.
Here is what the paginated query of allLinksQuery will look like:
query allLinksQuery($first: Int, $after: ID) {
  links(first: $first, after: $after) {
    pageInfo {
      endCursor
      hasNextPage
    }
    edges {
      cursor
      node {
        id
        imageUrl
        title
        description
        url
        category
      }
    }
  }
}
The query takes two arguments, first and after:
first: anIntthat specifies how many items you want the API to return.after: aIDargument that bookmarks the last item in a result set, this is the cursor.
This query returns an object containing two fields, pageInfo and edges:
pageInfoobject that helps the client determine if there is more data to be fetched. This object contains two fields,endCursorandhasNextPage:endCursor: the cursor of the last item in a result set. This cursor is of typeStringhasNextPage: a boolean returned by the API that lets the client know if there are more pages that can be fetched.
edgesis a an array of objects, where each object has acursorand anodefields. Thenodefield here returns theLinkobject type.
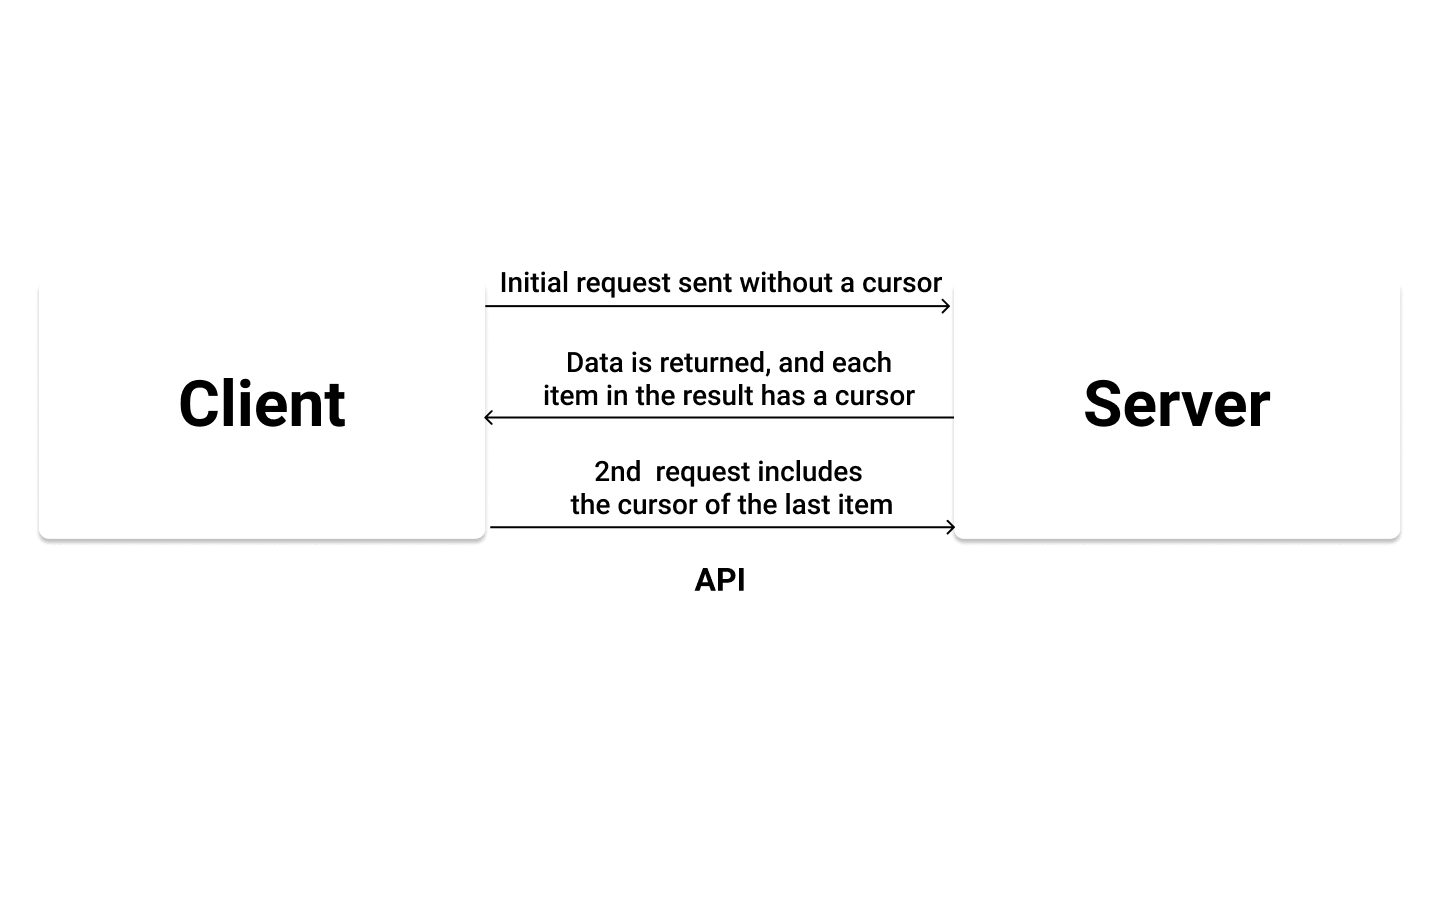
You will implement one-way pagination, where some links are requested when the page first loads, then the user can fetch more by clicking a button.
Alternatively, you can make this request as the user reaches the end of the page when scrolling.
The way this works is that you fetch some data as the page first loads. Then after clicking a button, you send a second request to the API which includes how many items you want returned and a cursor. The data is then returned and displayed on the client.
Note: an example of two-way pagination is a chat app like Slack, where you can load messages by going forwards or backwards.
Modifying the GraphQL schema
Pothos provides a plugin for handling relay-style cursor-pagination with nodes, connections, and other helpful utilities
Install the plugin with the following command:
npm install @pothos/plugin-relayUpdate the graphql/builder.ts to include the relay plugin.
diff
// graphql/builder.ts
import SchemaBuilder from "@pothos/core";
import PrismaPlugin from '@pothos/plugin-prisma';
import prisma from "../lib/prisma";
import type PrismaTypes from '@pothos/plugin-prisma/generated';
+import RelayPlugin from '@pothos/plugin-relay';


export const builder = new SchemaBuilder<{
  PrismaTypes: PrismaTypes
}>({
-  plugins: [PrismaPlugin],
+  plugins: [PrismaPlugin, RelayPlugin],
+  relayOptions: {},
  prisma: {
    client: prisma,
  }
})

builder.queryType({
  fields: (t) => ({
    ok: t.boolean({
      resolve: () => true,
    }),
  }),
});
Updating the resolver to return paginated data from the database
To use cursor-based pagination make the following update to the links query:
diff
// ./graphql/types/Link.ts
// code remains unchanged

builder.queryField('links', (t) =>
-  t.prismaField({
+  t.prismaConnection({
-    type: ['Link'],
+    type: 'Link',
+    cursor: 'id',
    resolve: (query, _parent, _args, _ctx, _info) =>
      prisma.link.findMany({ ...query })
  })
)
The prismaConnection method is used to create a connection field that also pre-loads the data inside that connection.
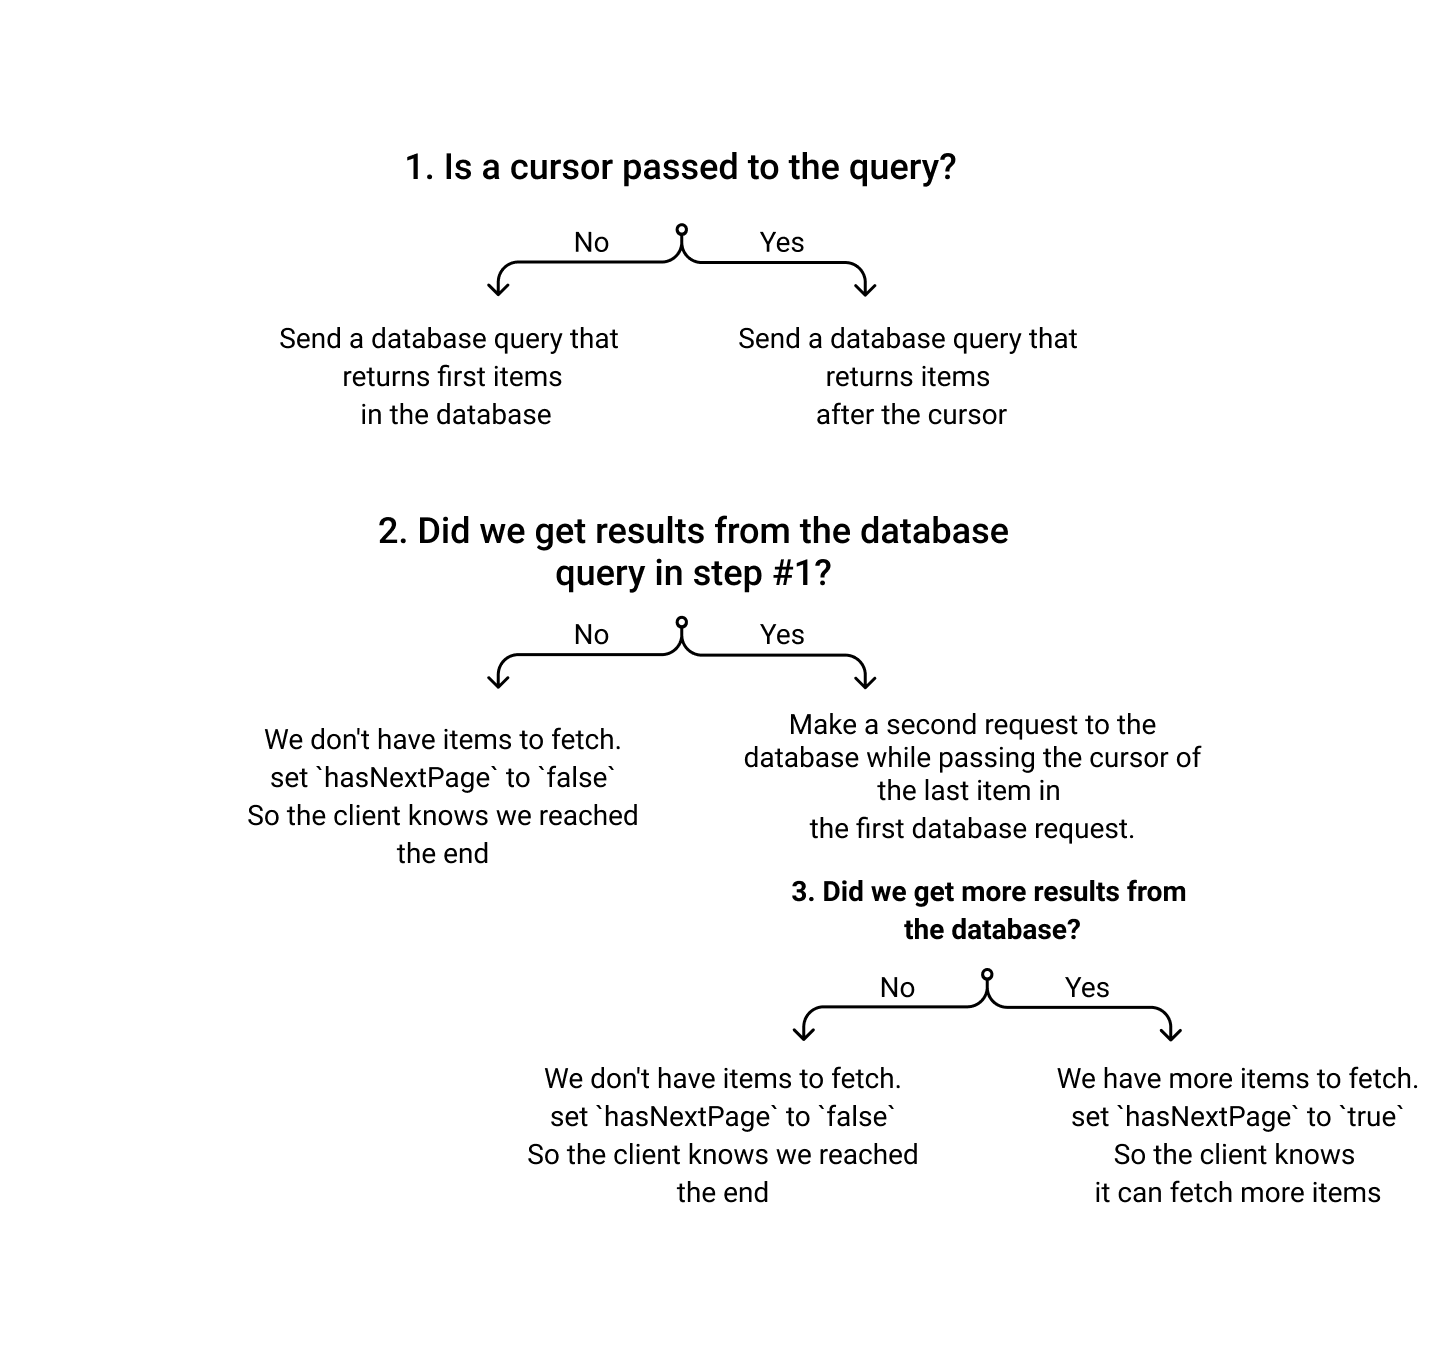
Here is a diagram that summarizes how pagination works on the server:
Pagination on the client using fetchMore()
Now that the API supports pagination, you can fetch paginated data on the client using Apollo Client.
The useQuery hook returns an object containing data, loading and errors. However, useQuery also returns a fetchMore() function, which is used to handle pagination and updating the UI when a result is returned.
Navigate to the /pages/index.tsx file and update it to use the following code to add support for pagination:
// /pages/index.tsx
import Head from "next/head";
import { gql, useQuery, useMutation } from "@apollo/client";
import { AwesomeLink } from "../components/AwesomeLink";
import type { Link } from "@prisma/client";

const AllLinksQuery = gql`
  query allLinksQuery($first: Int, $after: ID) {
    links(first: $first, after: $after) {
      pageInfo {
        endCursor
        hasNextPage
      }
      edges {
        cursor
        node {
          imageUrl
          url
          title
          category
          description
          id
        }
      }
    }
  }
`;

function Home() {
  const { data, loading, error, fetchMore } = useQuery(AllLinksQuery, {
    variables: { first: 2 },
  });


  if (loading) return <p>Loading...</p>;
  if (error) return <p>Oh no... {error.message}</p>;

  const { endCursor, hasNextPage } = data.links.pageInfo;

  return (
    <div>
      <Head>
        <title>Awesome Links</title>
        <link rel="icon" href="/favicon.ico" />
      </Head>
      <div className="container mx-auto max-w-5xl my-20">
        <div className="grid grid-cols-1 md:grid-cols-2 lg:grid-cols-3 gap-5">
          {data?.links.edges.map(({ node }: { node: Link }) => (
            <AwesomeLink
              title={node.title}
              category={node.category}
              url={node.url}
              id={node.id}
              description={node.description}
              imageUrl={node.imageUrl}
            />
          ))}
        </div>
        {hasNextPage ? (
          <button
            className="px-4 py-2 bg-blue-500 text-white rounded my-10"
            onClick={() => {
              fetchMore({
                variables: { after: endCursor },
                updateQuery: (prevResult, { fetchMoreResult }) => {
                  fetchMoreResult.links.edges = [
                    ...prevResult.links.edges,
                    ...fetchMoreResult.links.edges,
                  ];
                  return fetchMoreResult;
                },
              });
            }}
          >
            more
          </button>
        ) : (
          <p className="my-10 text-center font-medium">
            You've reached the end!{" "}
          </p>
        )}
      </div>
    </div>
  );
}

export default Home;
You are first passing a variables object to the useQuery hook, which contains a key called first with a value of 2. This means you will be fetching two links. You can set this value to any number you want.
The data variable will contain the data returned from the initial request to the API.
You are then destructuring the endCursor and hasNextPage values from the pageInfo object.
If hasNextPage is true, we will show a button that has an onClick handler. This handler returns a function that calls the fetchMore() function, which receives an object with the following fields:
- A
variablesobject that takes theendCursorreturned from the initial data. updateQueryfunction, which is responsible for updating the UI by combining the previous results with the results returned from the second query.
If hasNextPage is false, it means there are no more links that can be fetched.
If you save and your app is running, you should be able to fetch paginated data from your database.
Summary and Next-steps
Congratulations! You successfully completed the second part of the course! If you run into any issues or have any questions, feel free to reach out in our Slack community.
In this part, you learned about:
- The advantages of using GraphQL over REST
- How to build a GraphQL API using SDL
- How to build a GraphQL API using Pothos and the benefits it offers
- How to add support for pagination in your API and how to send paginated query from the client
In the next part of the course, you will:
- Add authentication using Auth0 to secure the API endpoint, this way, only logged in users can view the links
- Create a mutation so that a logged-in user can bookmark a link
- Create an admin-only route for creating links
- Set up AWS S3 to handle file uploads
- Add a mutation to create links as an admin
Build your next app with Prisma
Start free. Scale when you’re ready.