Fullstack App With TypeScript, PostgreSQL, Next.js, Prisma & GraphQL: Image upload


This article is the fourth part of the course where you build a fullstack app with Next.js, GraphQL, TypeScript, Prisma and PostgreSQL. In this article, you will learn how to add image upload using AWS S3.
Table of Contents
- Introduction
- Development environment
- Clone the repository
- Seed the database
- Project structure and dependencies
- Using AWS S3 to add support for image upload
- Summary and next steps
Introduction
In this course you will learn how to build "awesome-links", a fullstack app where users can browse through a list of curated links and bookmark their favorite ones.
In part 3, you added authentication to the app and created a page for adding new links using placeholder images.
This guide will teach you how to add support for image upload using AWS S3. If you're following along from part 3, you can skip project setup and jump into the using AWS S3 to add support for image upload section.
Note: The example code used for part 4 differs slightly by including functionality such as bookmarking favorite links. Feel free to refer to the part 4 branch to update your current application to match what is used in this tutorial.
Development environment
To follow along with this tutorial, ensure you have Node.js and the GraphQL extension installed. You will also need a PostgreSQL database running.
Note: you can set up PostgreSQL locally or a hosted instance on Heroku. Note that you will need a remote database for the deployment step at the end of the course.
Clone the repository
You can find the complete source code for the course on GitHub.
Note: Each article has a corresponding branch. This way, you can follow along as you go through it. By checking out the part-4 branch, you have the same starting point as this article. There might be a few differences between each branch, so to not run into any issues, it is recommended that you clone the branch for this part
To get started, navigate into the directory of your choice and run the following command to clone the repository:
git clone -b part-4 https://github.com/prisma/awesome-links.gitNavigate into the cloned application and install the dependencies:
cd awesome-links
npm install
Seeding the database
After setting up a PostgreSQL database, rename the env.example file to .env and set the connection string for your database. After that, run the following command to create the tables in your database:
npx prisma migrate dev --name initIf prisma migrate dev did not trigger the seed step, run the following command to seed the database:
npx prisma db seedRefer to Part 1 – Add Prisma to your Project for more details on the format of the connection string.
This command will run the seed.ts file in the /prisma directory. seed.ts creates four links and one user in your database using Prisma Client.
Note: Refer to part 3 for how to set up Auth0.
Project structure and dependencies
You will see the following folder structure:
awesome-links/
┣ components/
┃ ┣ Layout
┃ ┗ AwesomeLink.tsx
┣ data/
┃ ┗ links.ts
┣ graphql/
┃ ┣ types/
┃ ┣ context.ts
┃ ┣ schema.graphql
┃ ┗ schema.ts
┣ lib/
┃ ┣ apollo.ts
┃ ┗ prisma.ts
┣ pages/
┃ ┣ api/
┃ ┃ ┣ auth
┃ ┃ ┃ ┣ [...auth0].ts
┃ ┃ ┃ ┗ hook.ts
┃ ┃ ┗ graphql.ts
┃ ┣ link/
┃ ┣ _app.tsx
┃ ┣ admin.tsx
┃ ┣ favorites.tsx
┃ ┗ index.tsx
┣ prisma/
┃ ┣ migrations/
┃ ┣ schema.prisma
┃ ┗ seed.ts
┣ public/
┣ styles/
┃ ┗ tailwind.css
┣ .env.example
┣ .gitignore
┣ next-env.d.ts
┣ package-lock.json
┣ package.json
┣ postcss.config.js
┣ README.md
┣ tailwind.config.js
┗ tsconfig.json
This is a Next.js application that uses the following libraries and tools:
- Prisma for database access/CRUD operations
- Next.js as the fullstack React framework
- TailwindCSS for styling
- Pothos as the GraphQL schema construction library
- GraphQL Yoga as the GraphQL server
- Apollo Client as the GraphQL client
- Auth0 for authentication and authorization.
The pages directory contains the following files:
index.tsx: page that displays all links in the app. Supports paginationlink/[id].tsx: page that displays an individual link and allows users to bookmark it.admin.tsx: admin page that requires the logged in user to have theADMINrole. This page allows admins to create new links.favorites.tsx: page that shows a user's bookmarked links._app.tsx: global app component. Allows you to persist layout between page changes and keeping state when navigating pages.api/graphql.ts: GraphQL endpoint using Next.js's API routes.api/auth/[...auth0].ts: dynamic API route Auth0 creates to handle authentication.api/auth/hook.ts: API route that handles creating a user record in the database.
Using AWS S3 to add support for image upload
In the application's current state, an admin can create a link. However, the admin cannot attach an image to the created link. This guide will teach you how you can leverage AWS S3 – an object storage service – to upload images.
Note: To continue with the tutorial, you need an AWS account. You can create an account here. AWS will require you to provide a credit card to complete the signup. AWS provides a free tier that will allow you to explore different AWS services – including S3 – for free.
Create an Identity Access Management user
To interact with AWS resources, you have to create an Identity Access Management (IAM) user with the proper permissions. The IAM user will allow you to interact with resources on AWS programmatically.
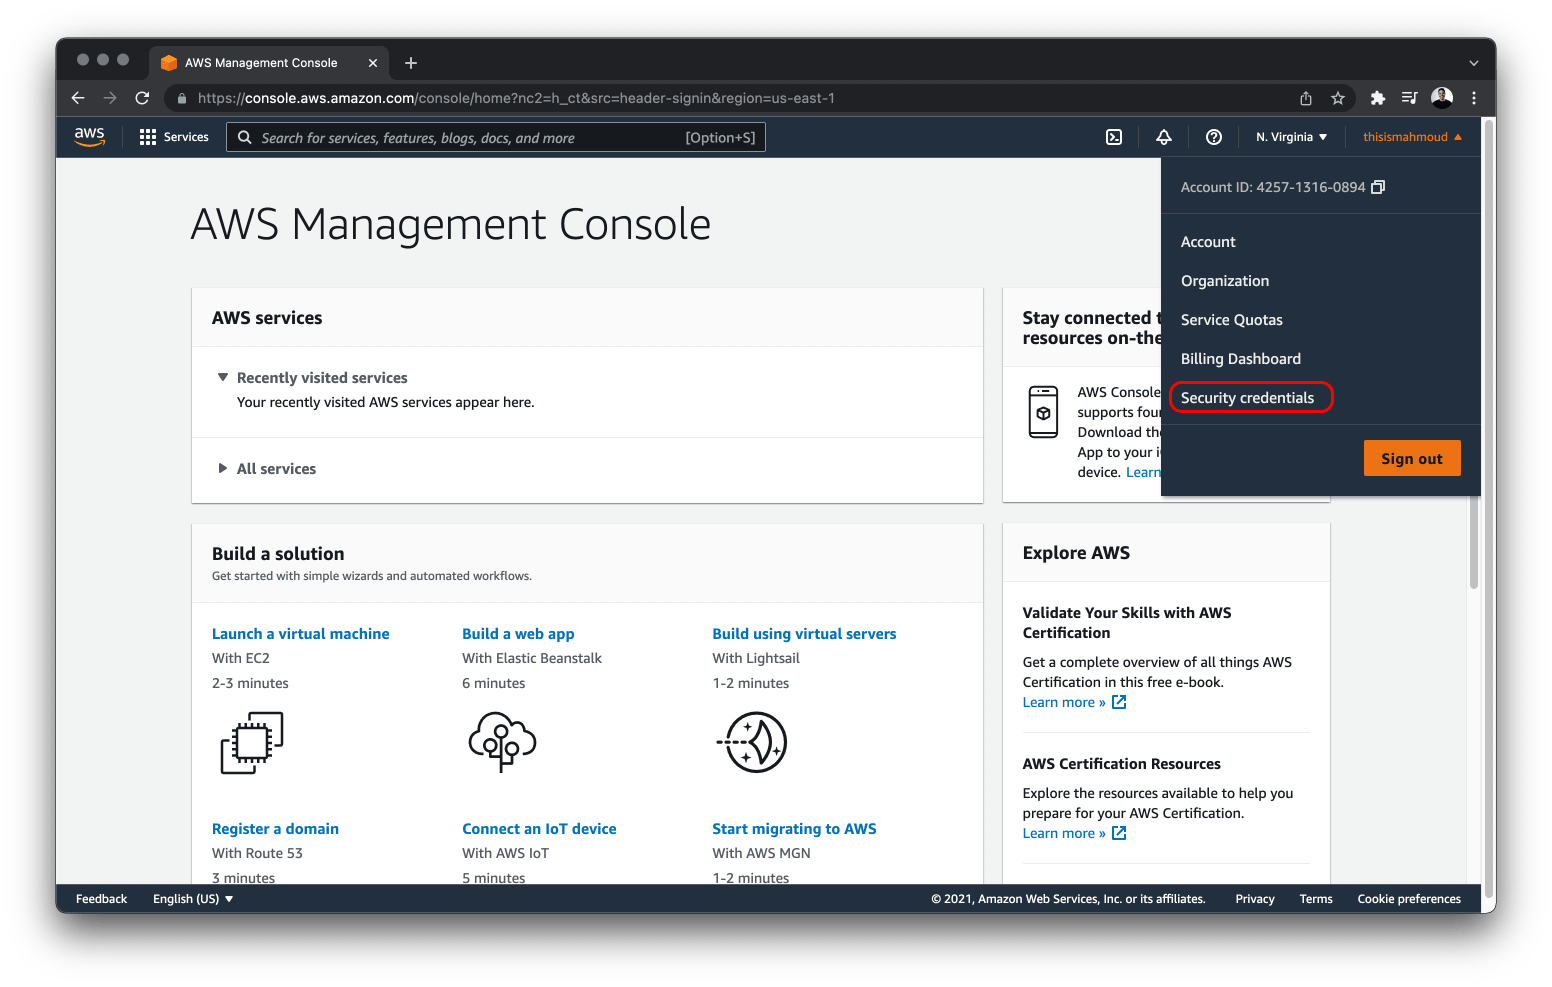
To do that, select Security Credentials from the dropdown menu located in the top right corner of the page – where your username is.
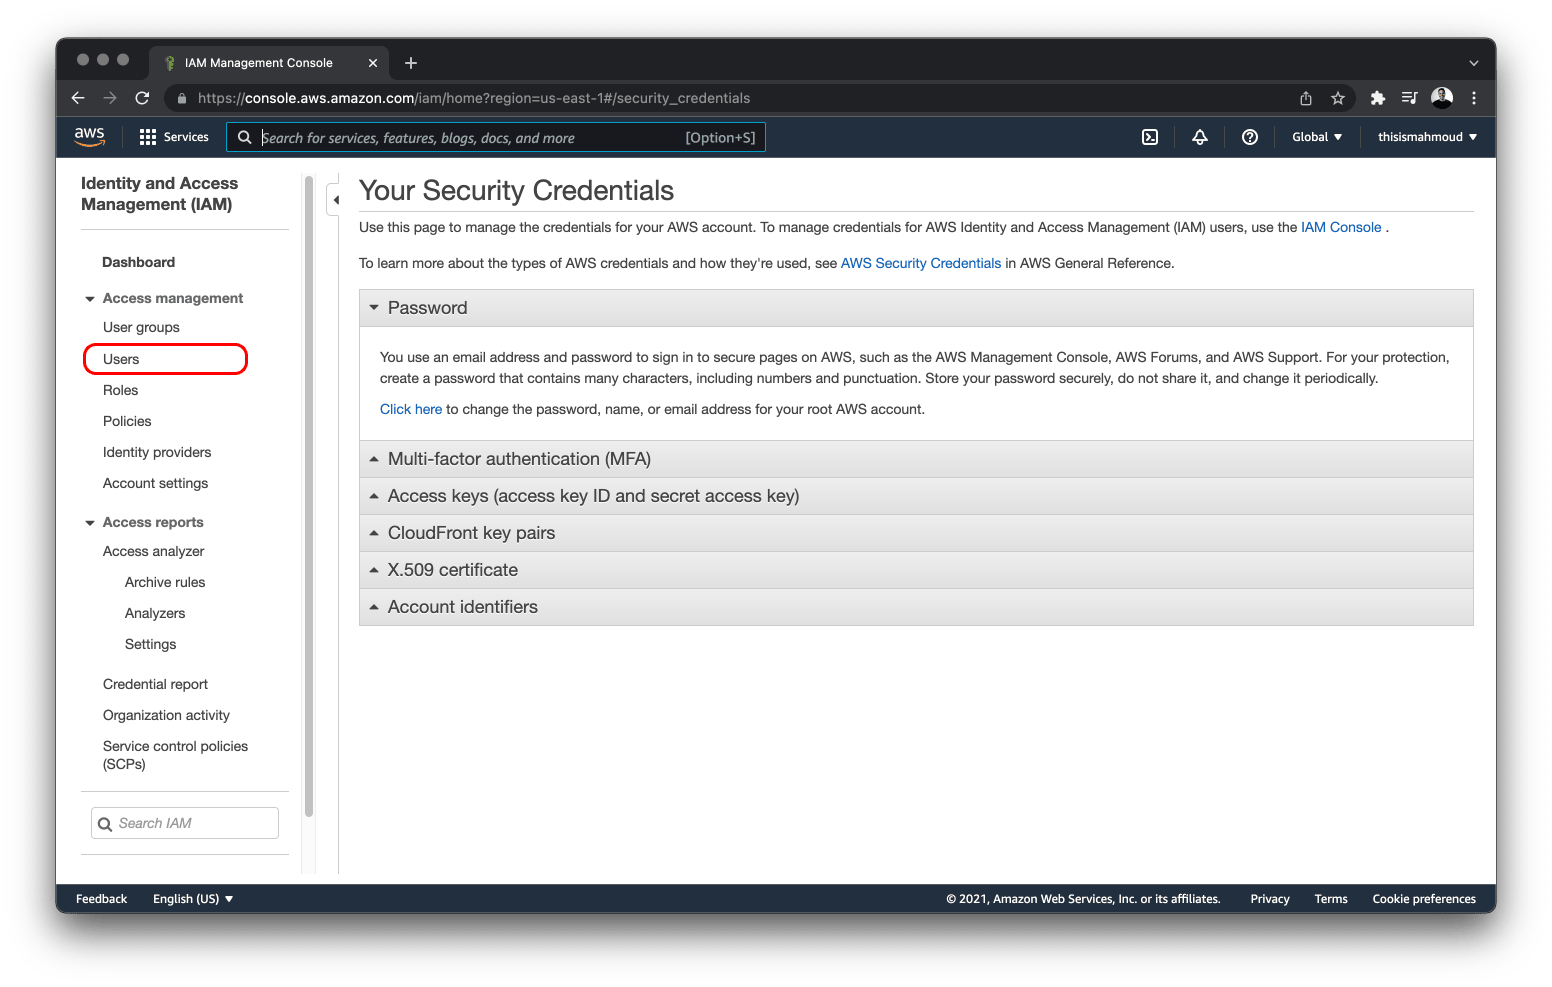
Next, select the Users option from the Access Management dropdown located in the left sidebar.
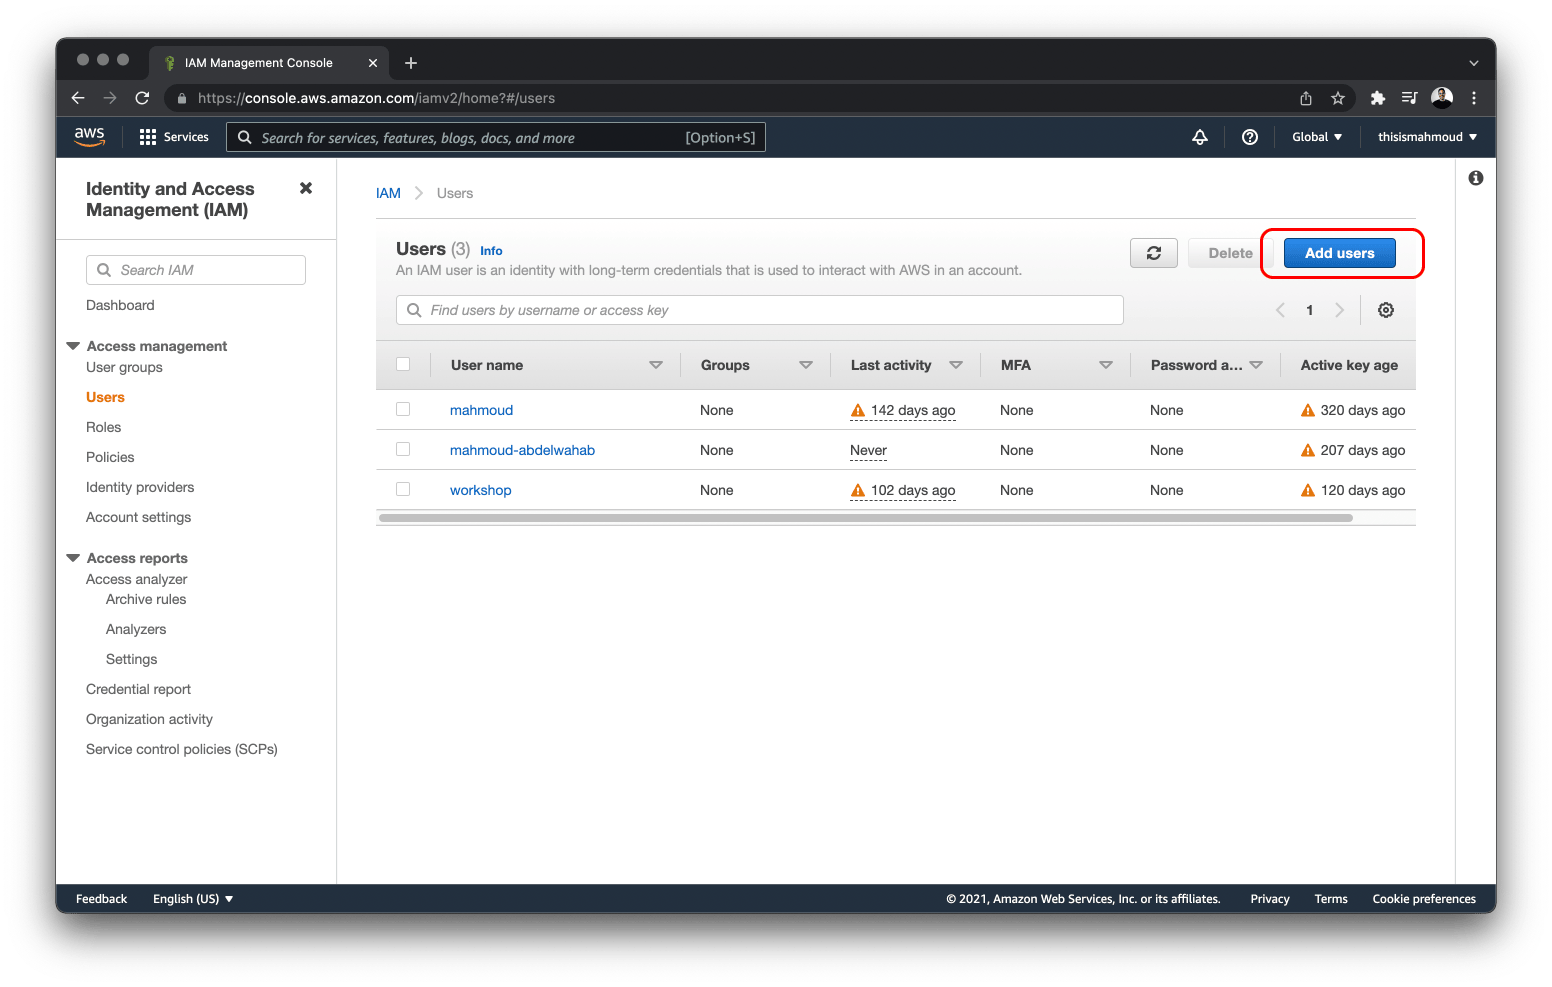
Next, click the Add users button to create a new user.
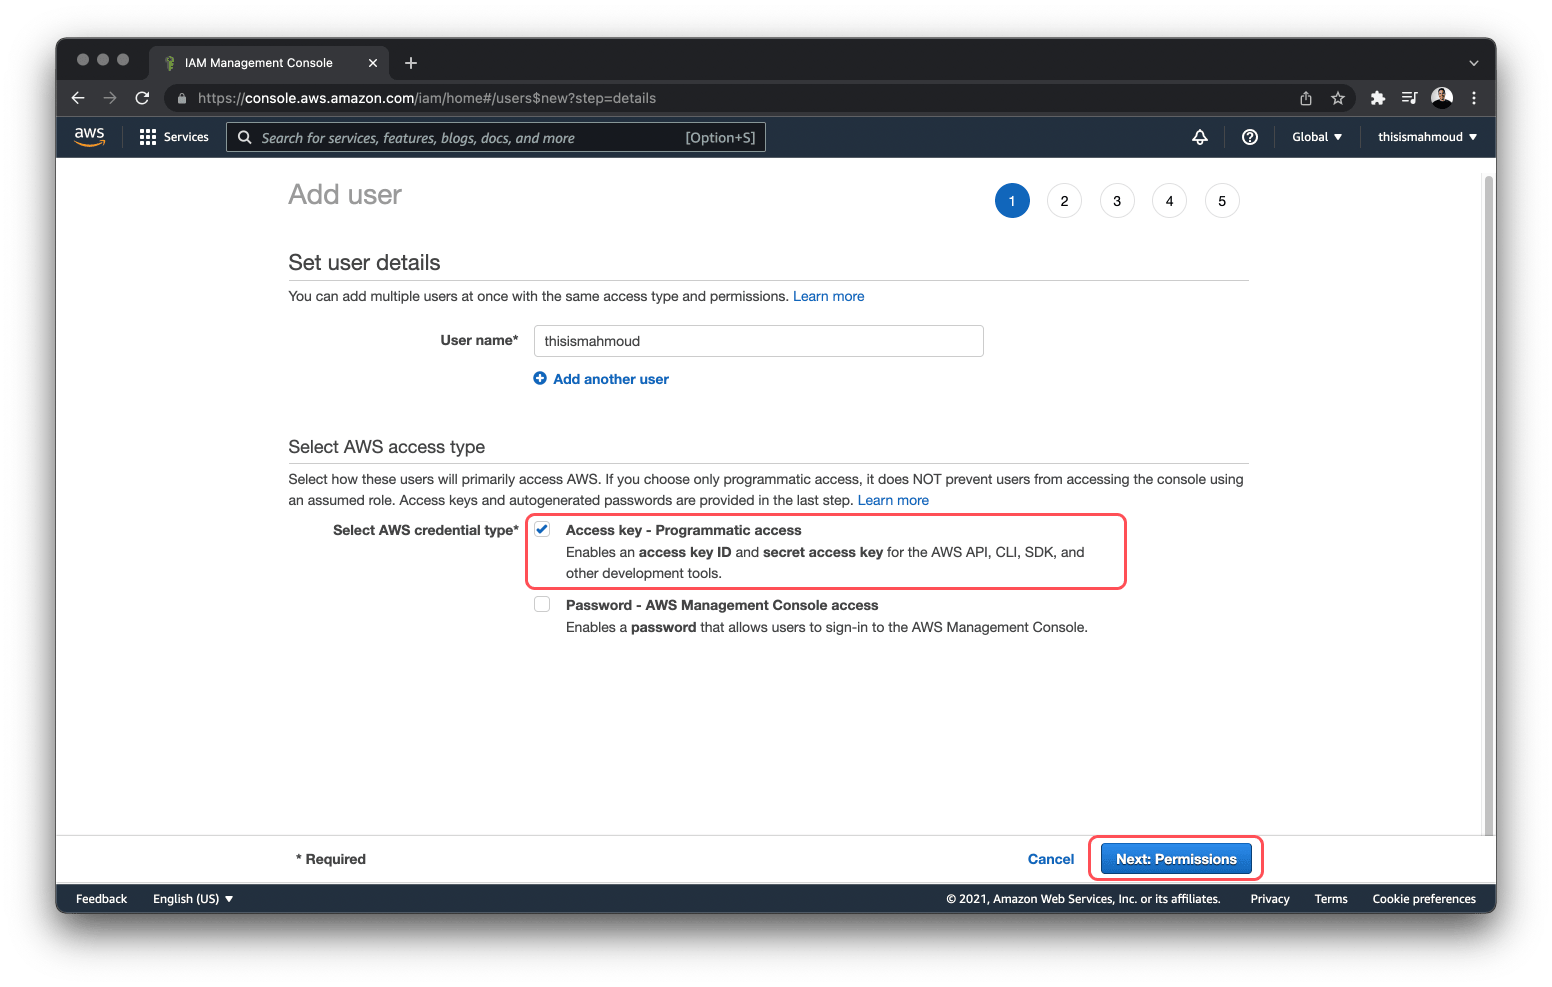
Provide a recognizable username for the newly created user and check the Access key - programmatic access checkbox.
Next, you need to specify what the user can do with different AWS resources by setting permissions. Select the Attach existing policies directly option and type "S3" in the search filter. Select AmazonS3FullAccess.
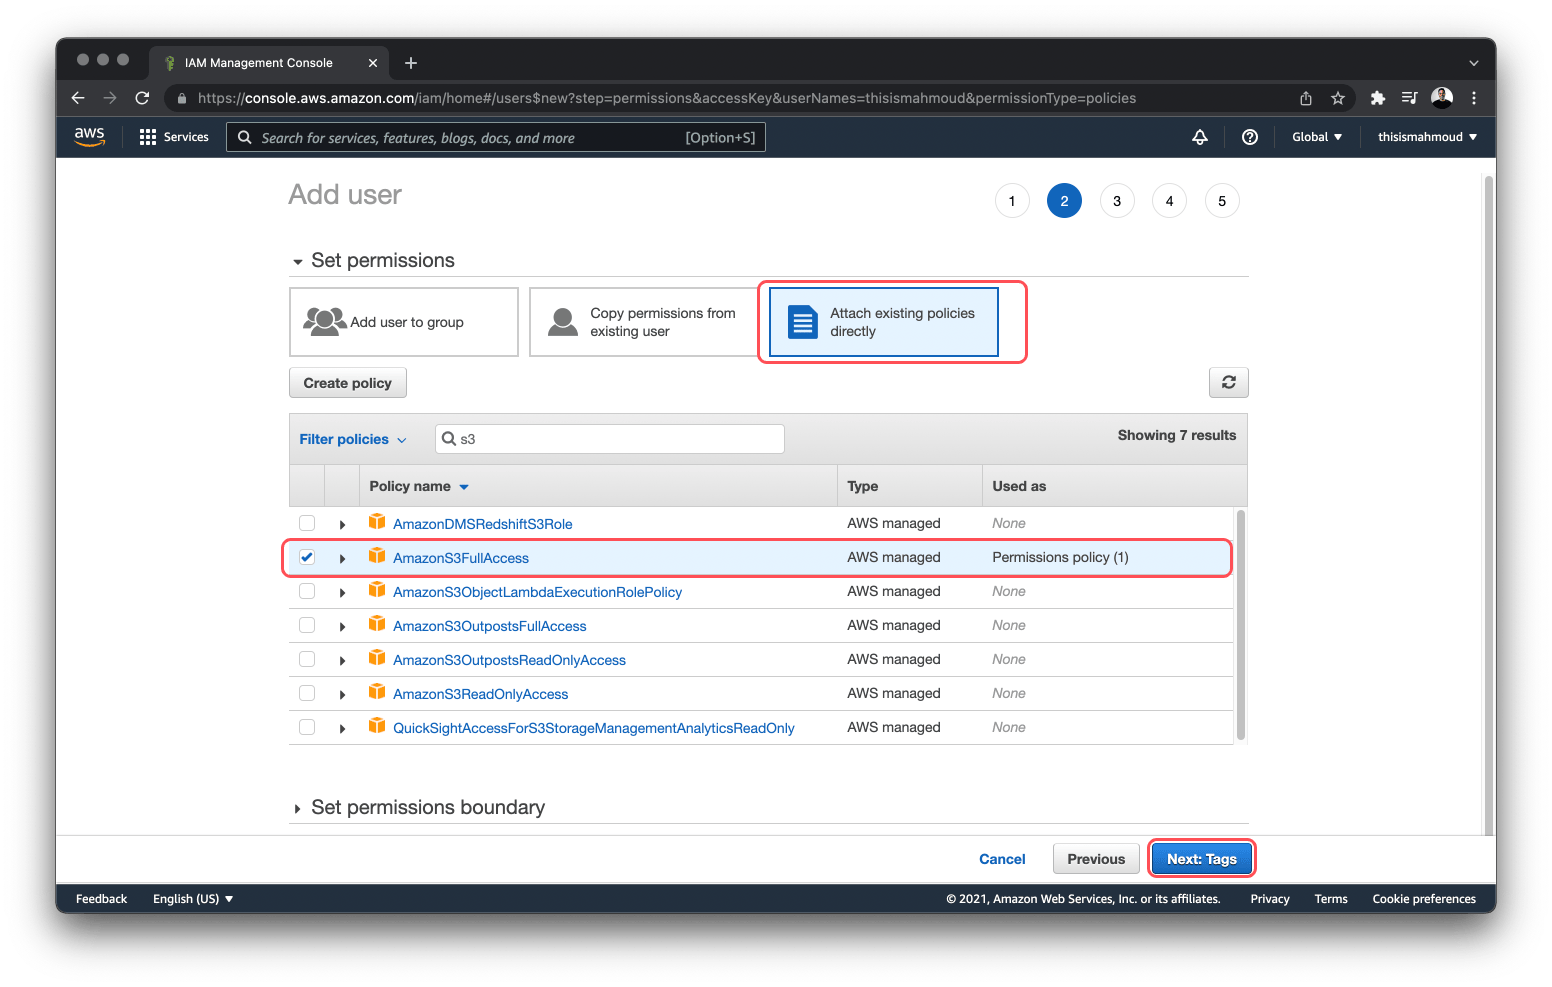
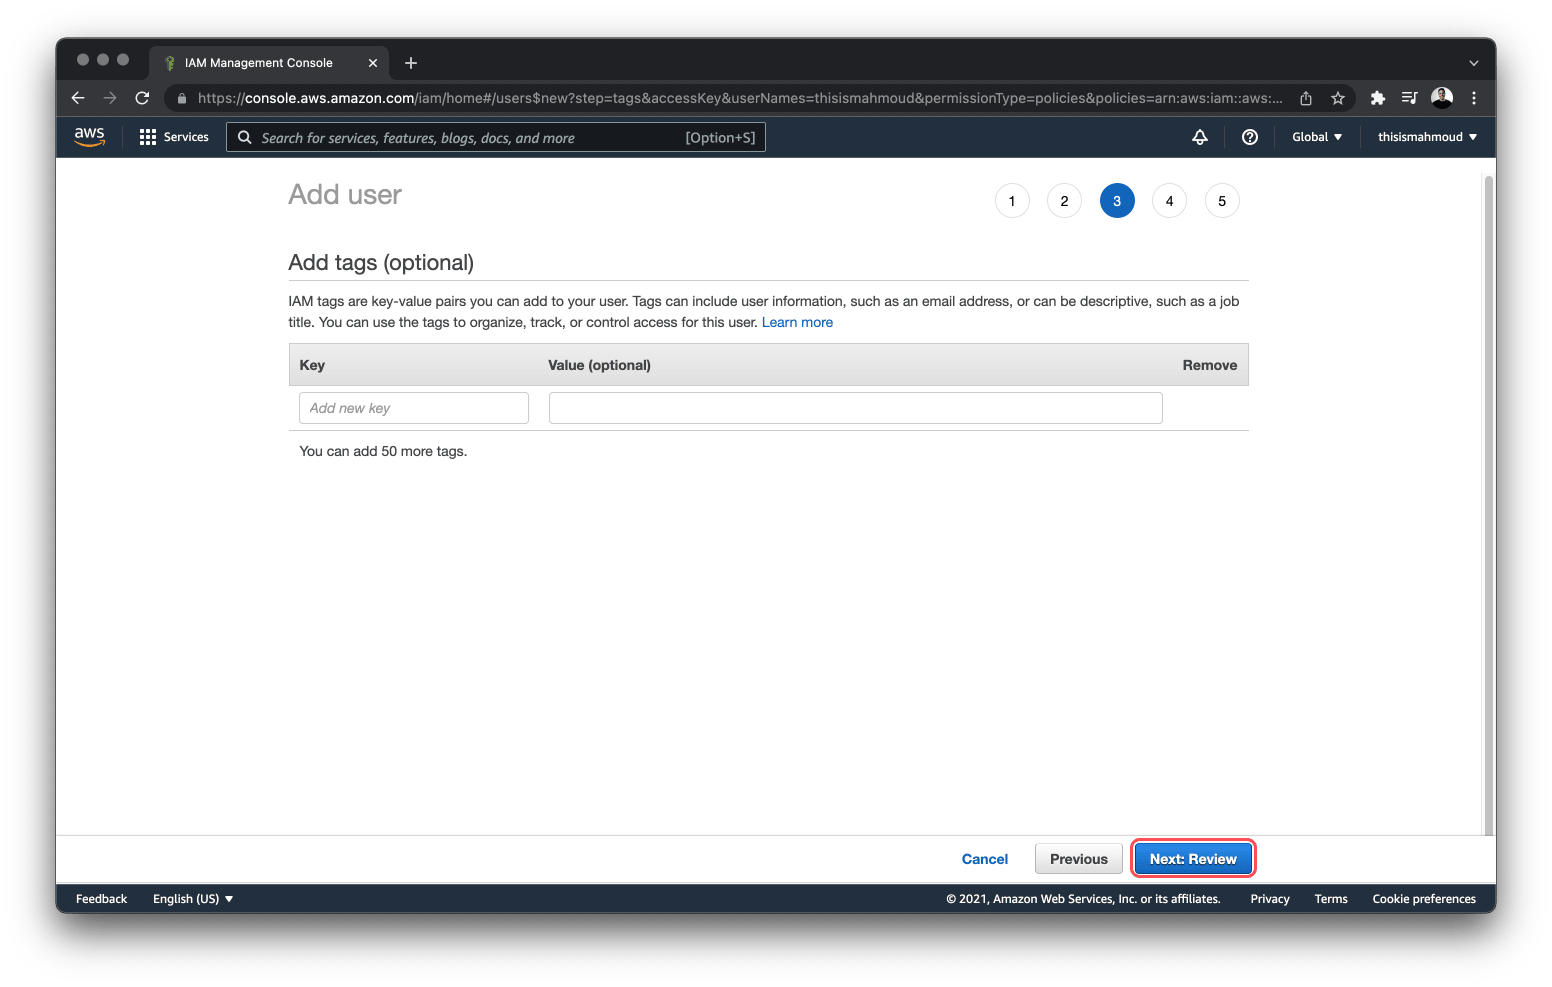
You can optionally define tags for newly created IAM users, but you do not need to do that for this project, so click Next: Review.
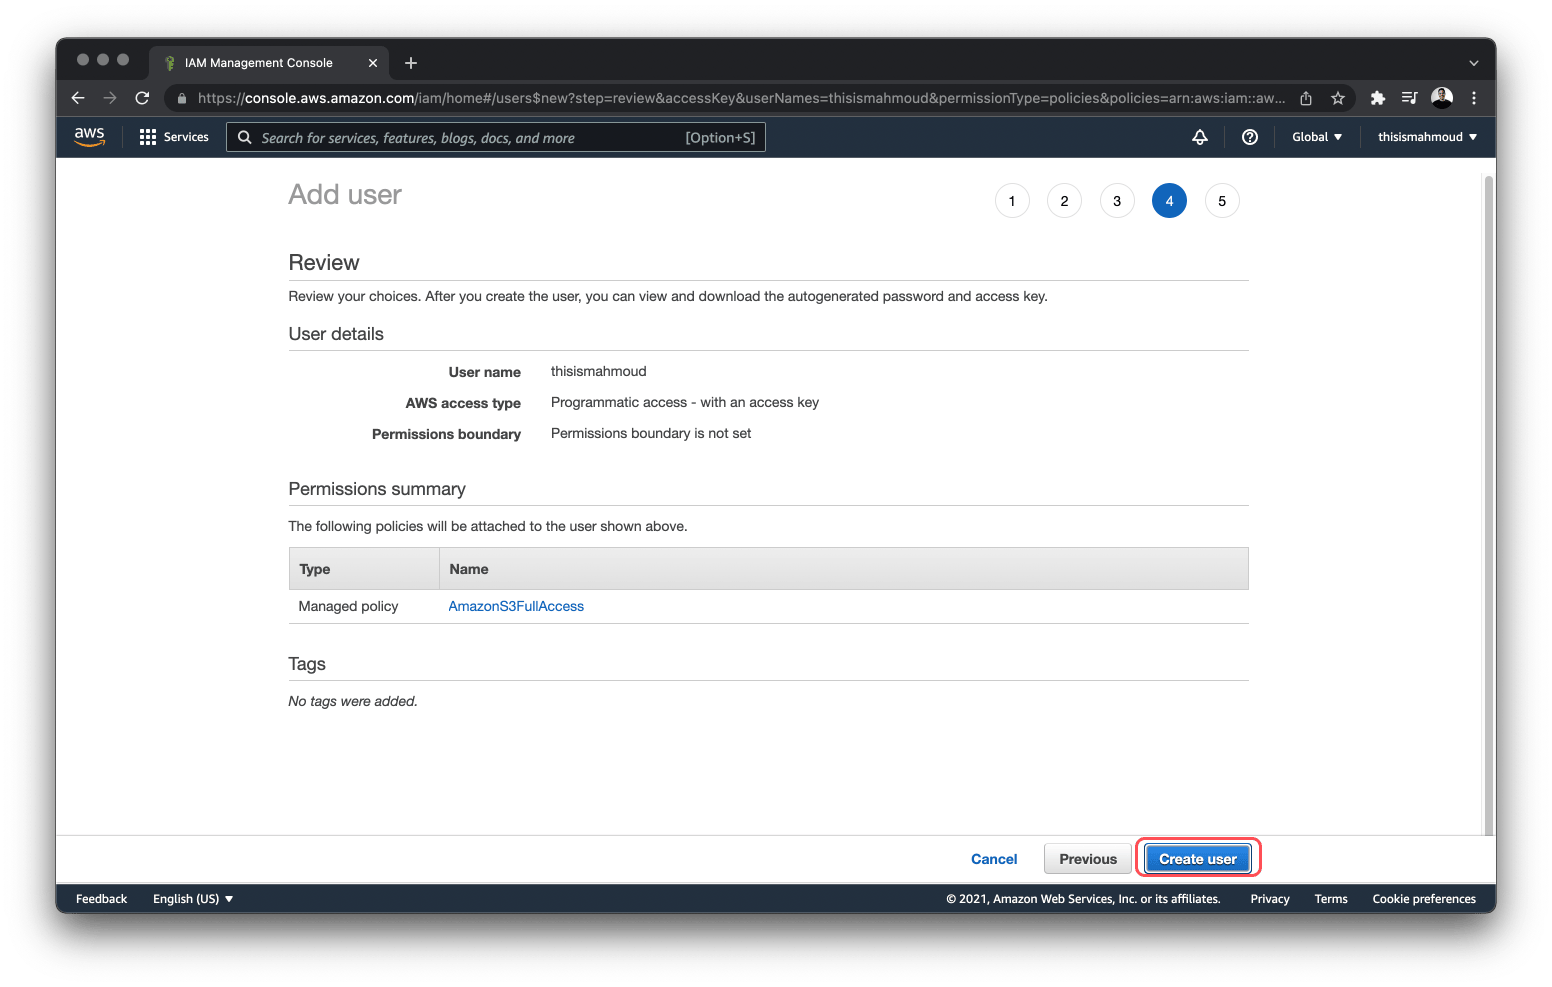
After reviewing that the user has the correct permissions and username, click Create user.
Finally, copy the "Access Key ID" and the "Secret Access Key" and store them in your .env file
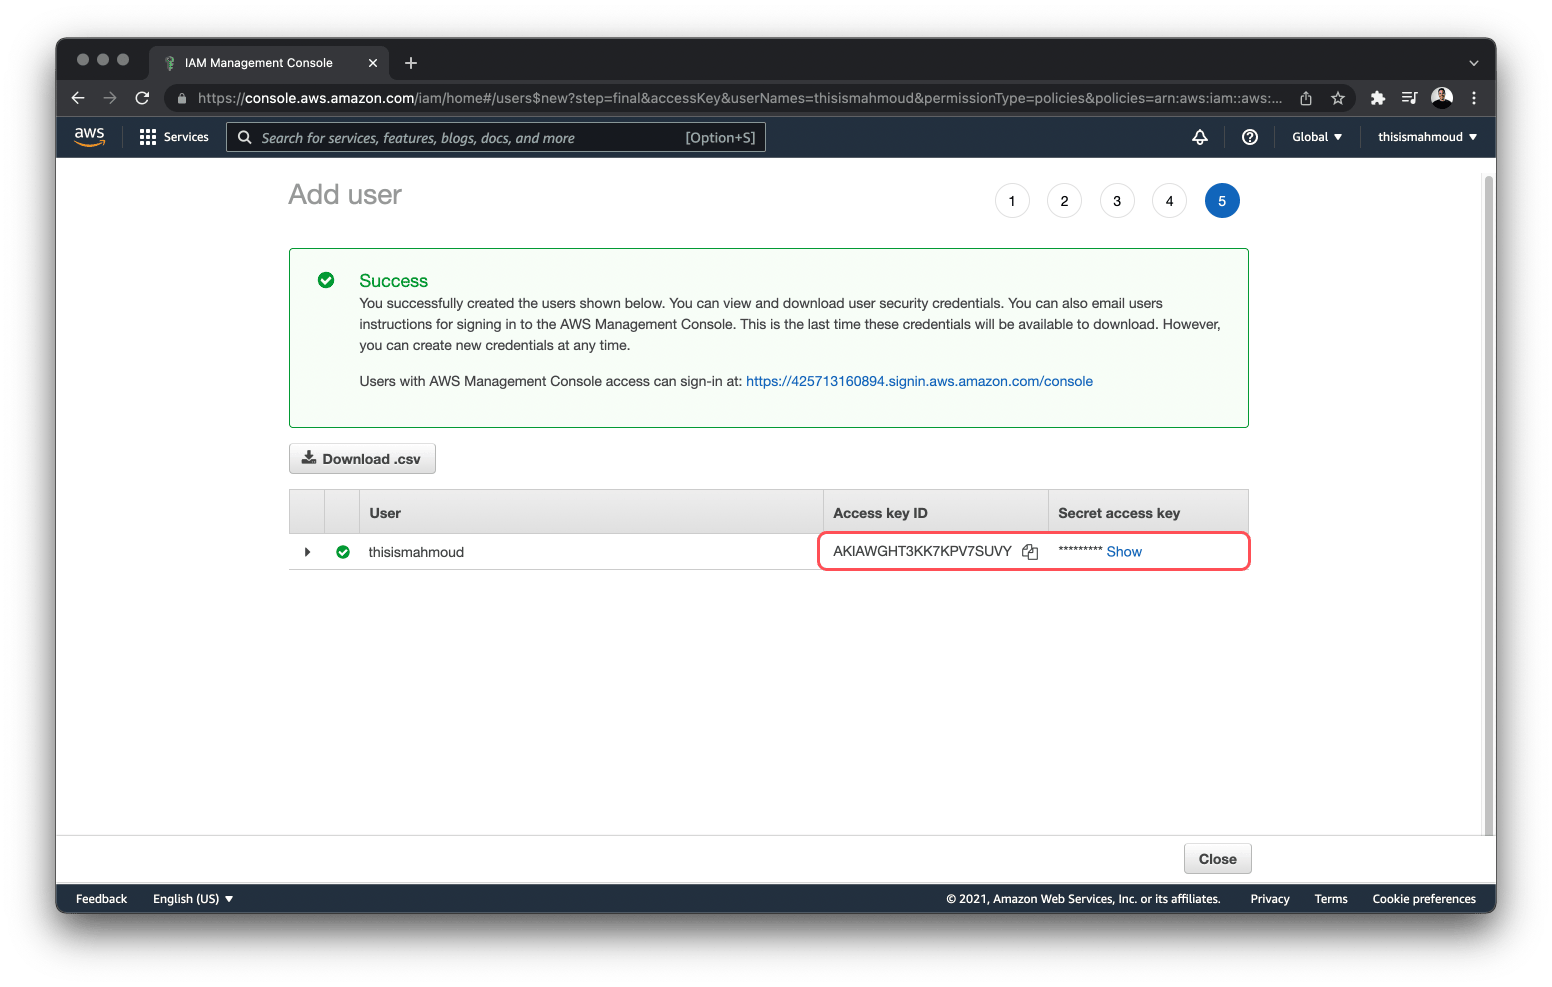
Note: These credentials can only be viewed once, so in case you lose these credentials or want to change them, you will need to generate new ones.
#.env
APP_AWS_ACCESS_KEY = ''
APP_AWS_SECRET_KEY = ''
Create and configure a new S3 bucket
The next step is to create an AWS S3 bucket which will store the uploaded objects. You can find the S3 service by looking it up in the search bar or by going to https://s3.console.aws.amazon.com/.
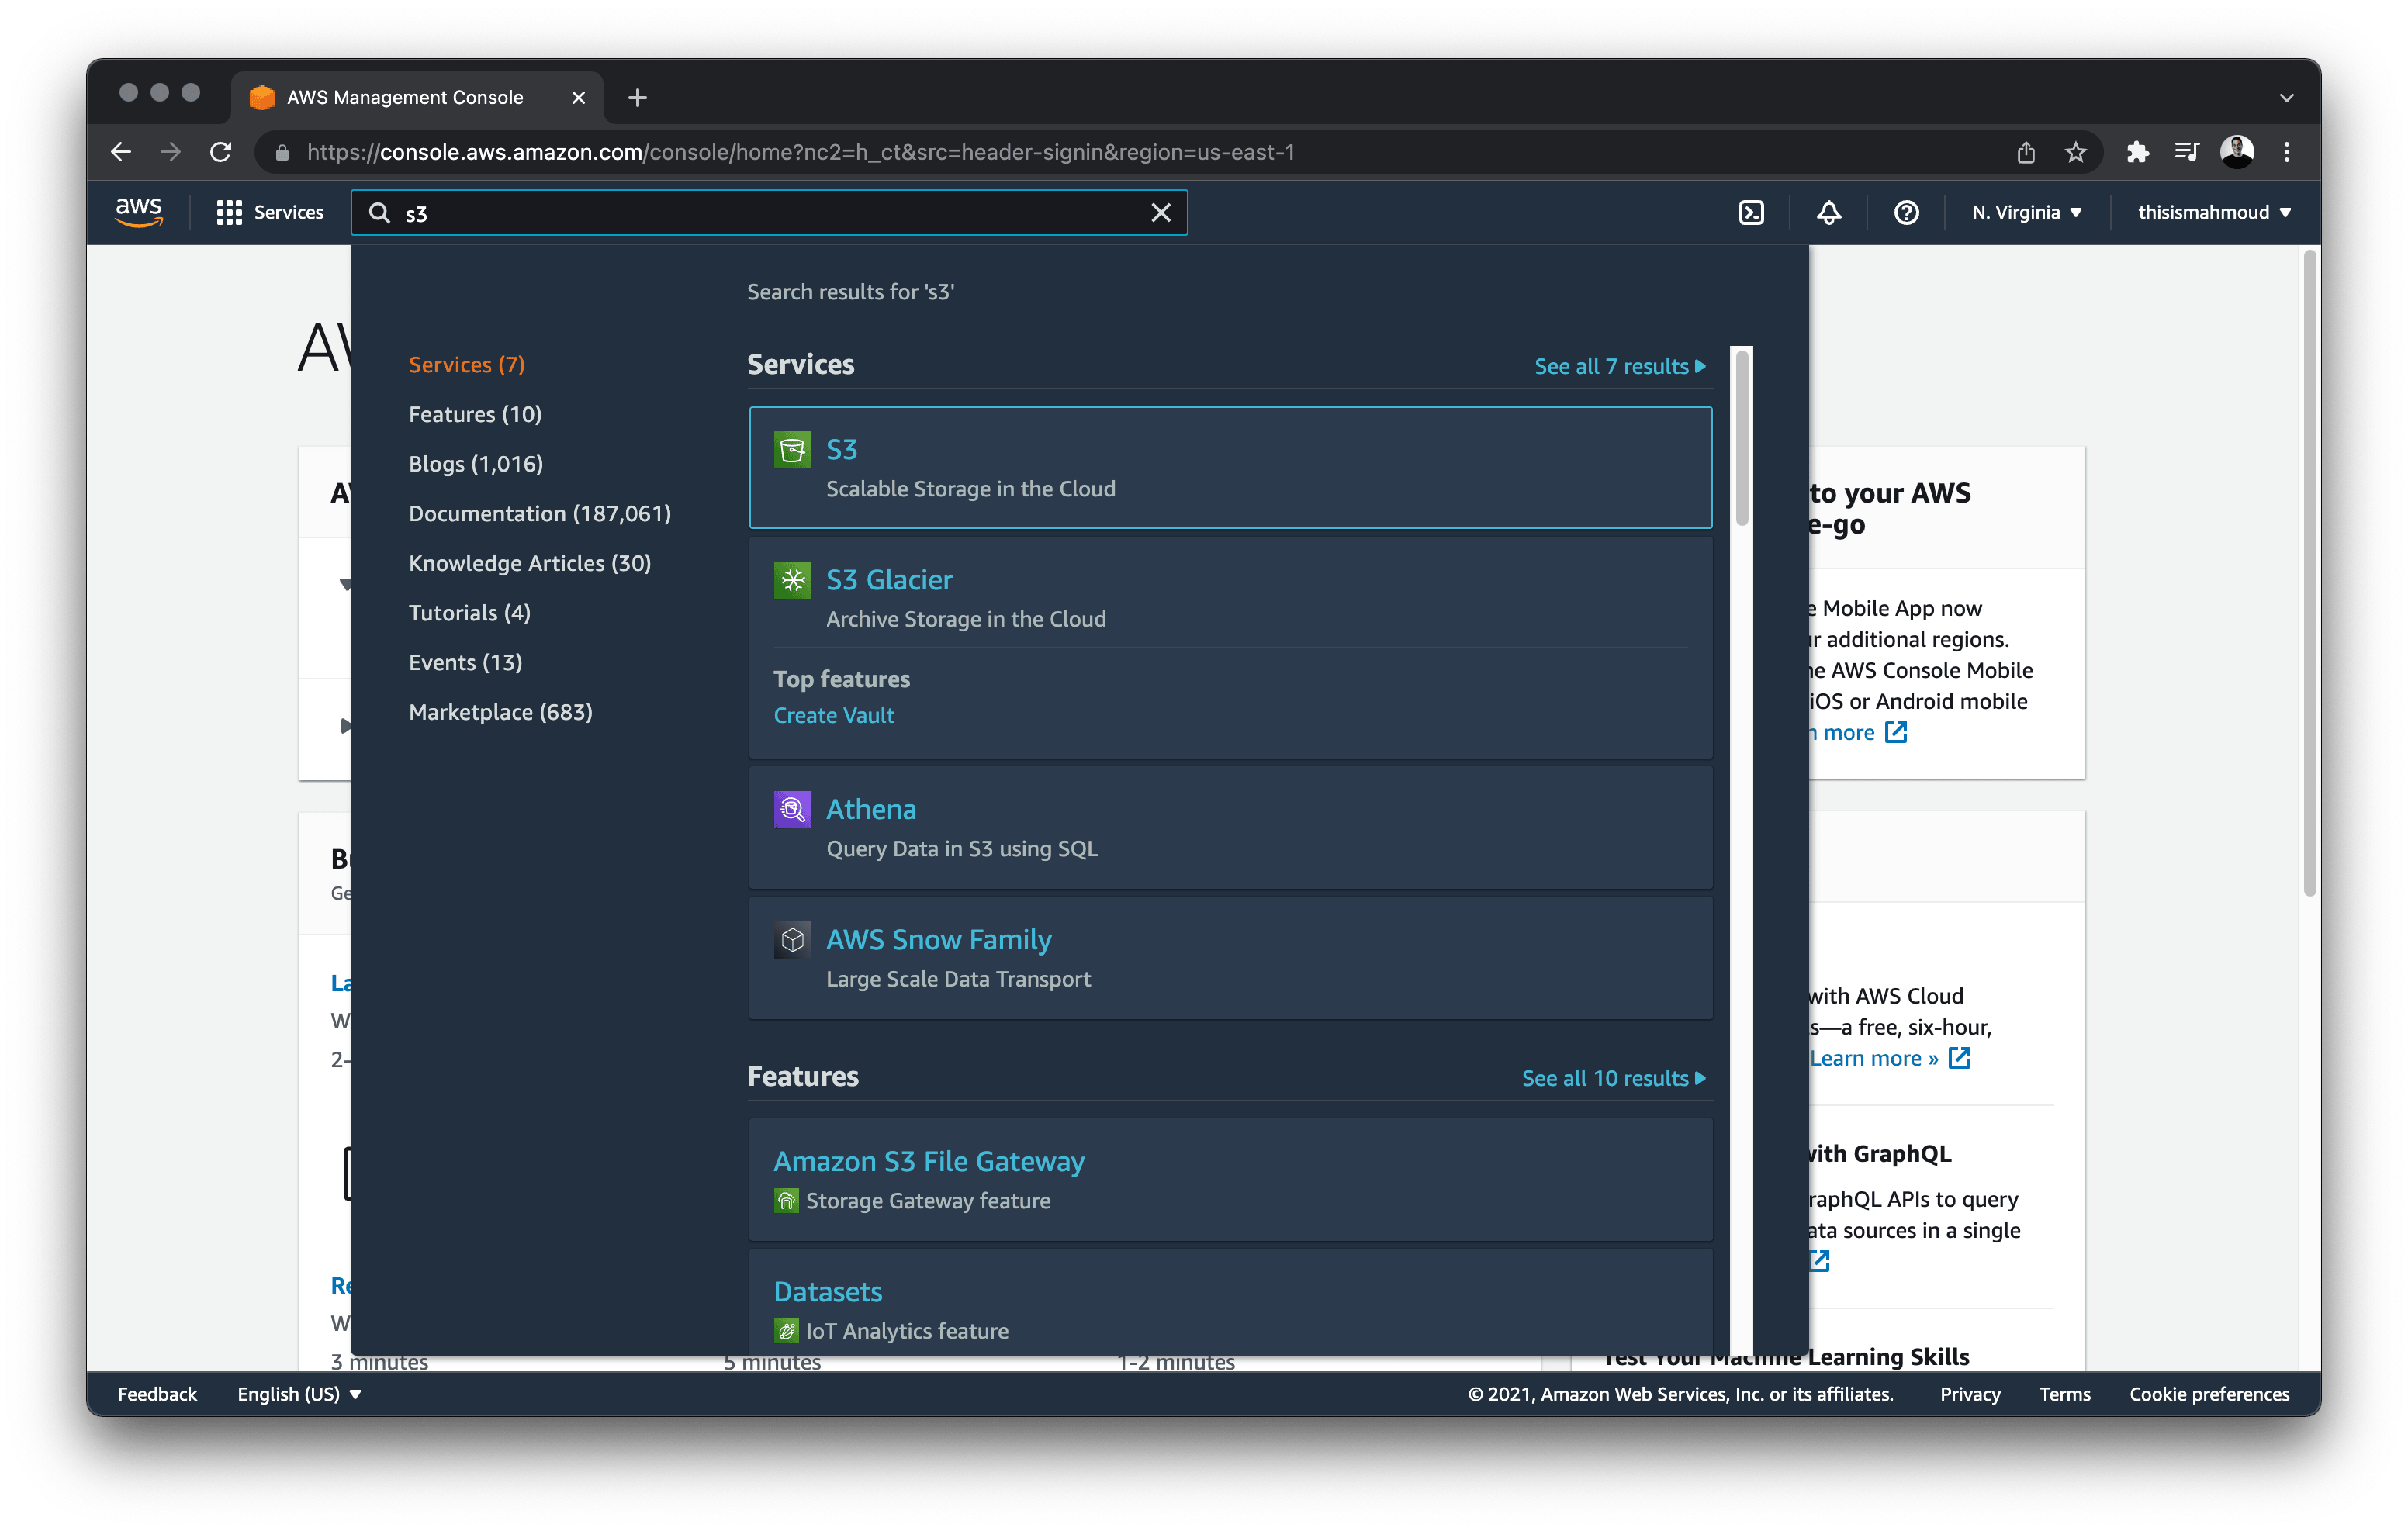
Note: there are different ways you can provison resources in AWS, you are using the AWS console for simplicity
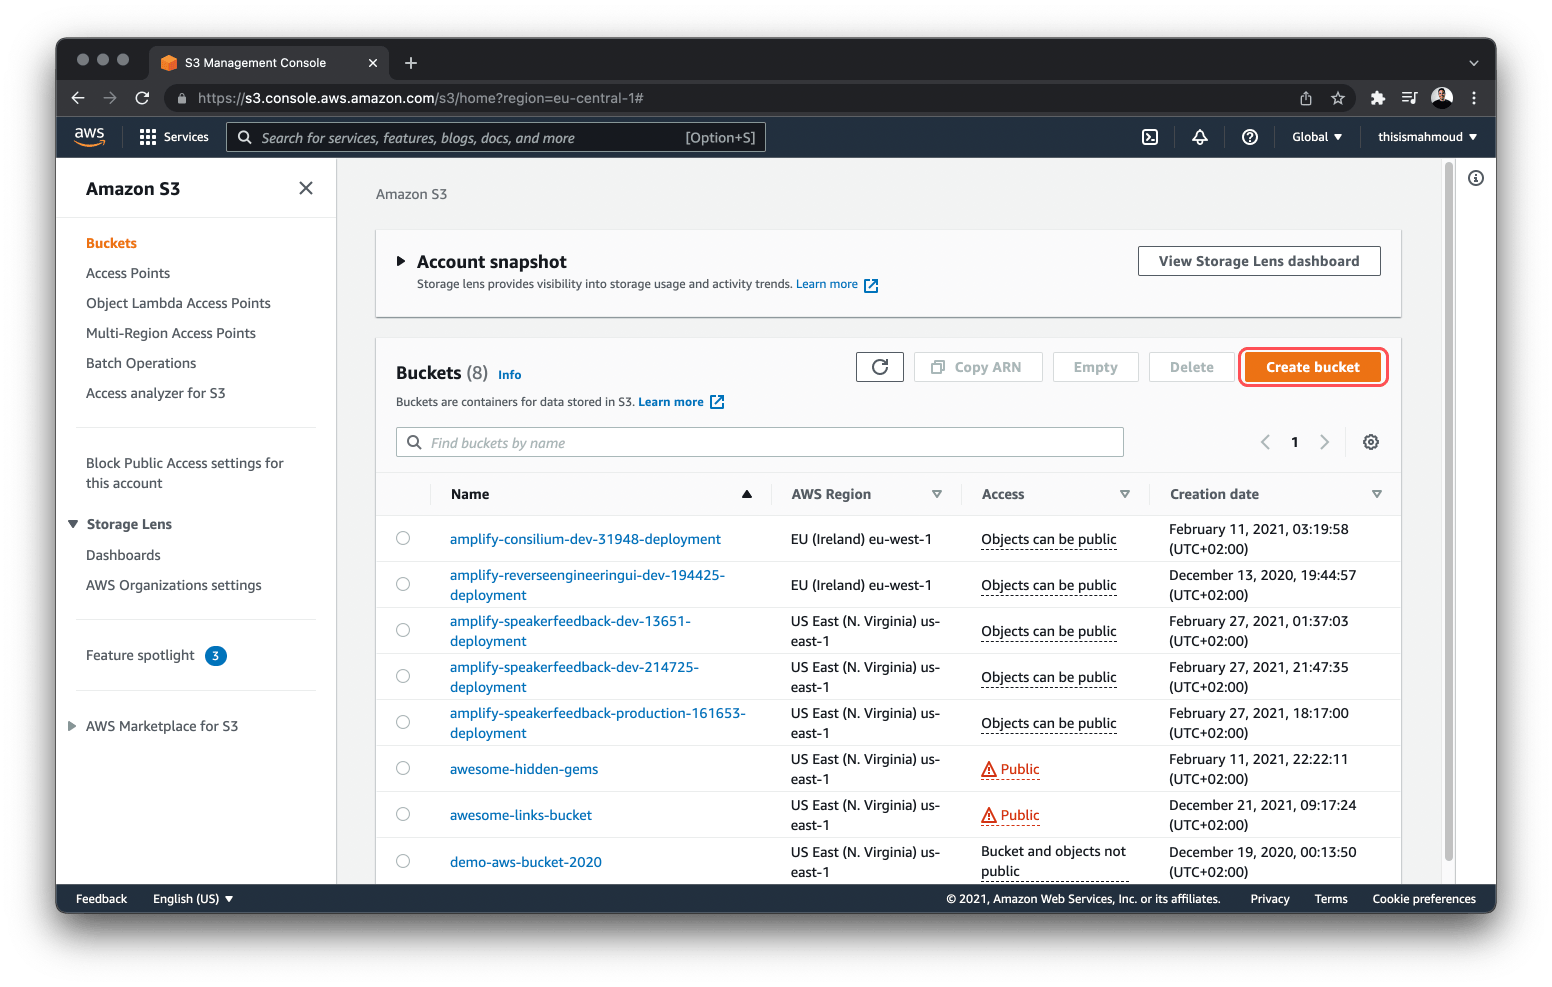
Next, click on Create bucket to create a new bucket.
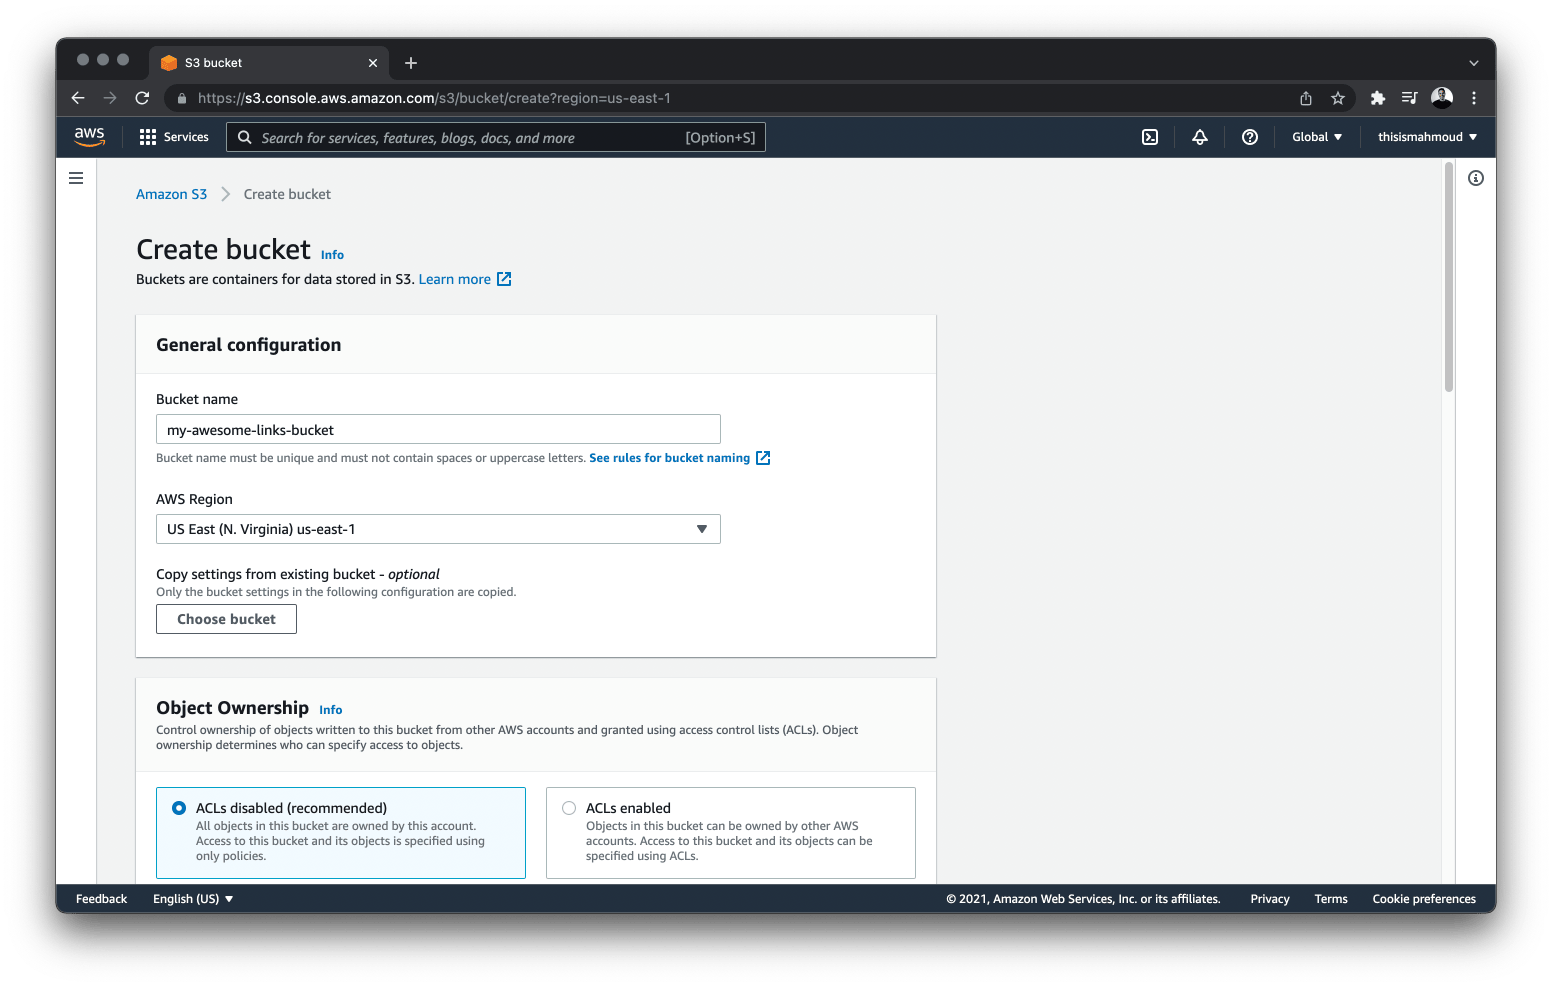
Pick a name and a region for your bucket. Save these values in your .env file.
# .env
APP_AWS_REGION = ''
AWS_S3_BUCKET_NAME = ''  # Will be used in an API route.
NEXT_PUBLIC_AWS_S3_BUCKET_NAME = '' # Will be used on the client-side
Note: The bucket name has to be unique and must not contain any spaces or uppercase letters.
Go ahead and create the bucket by navigating to the bottom of the page and clicking the Create bucket button. You can stick with the defaults settings for now, but you'll update them in the following steps.
Once S3 has provisioned the Bucket, navigate to it by selecting it in the table.
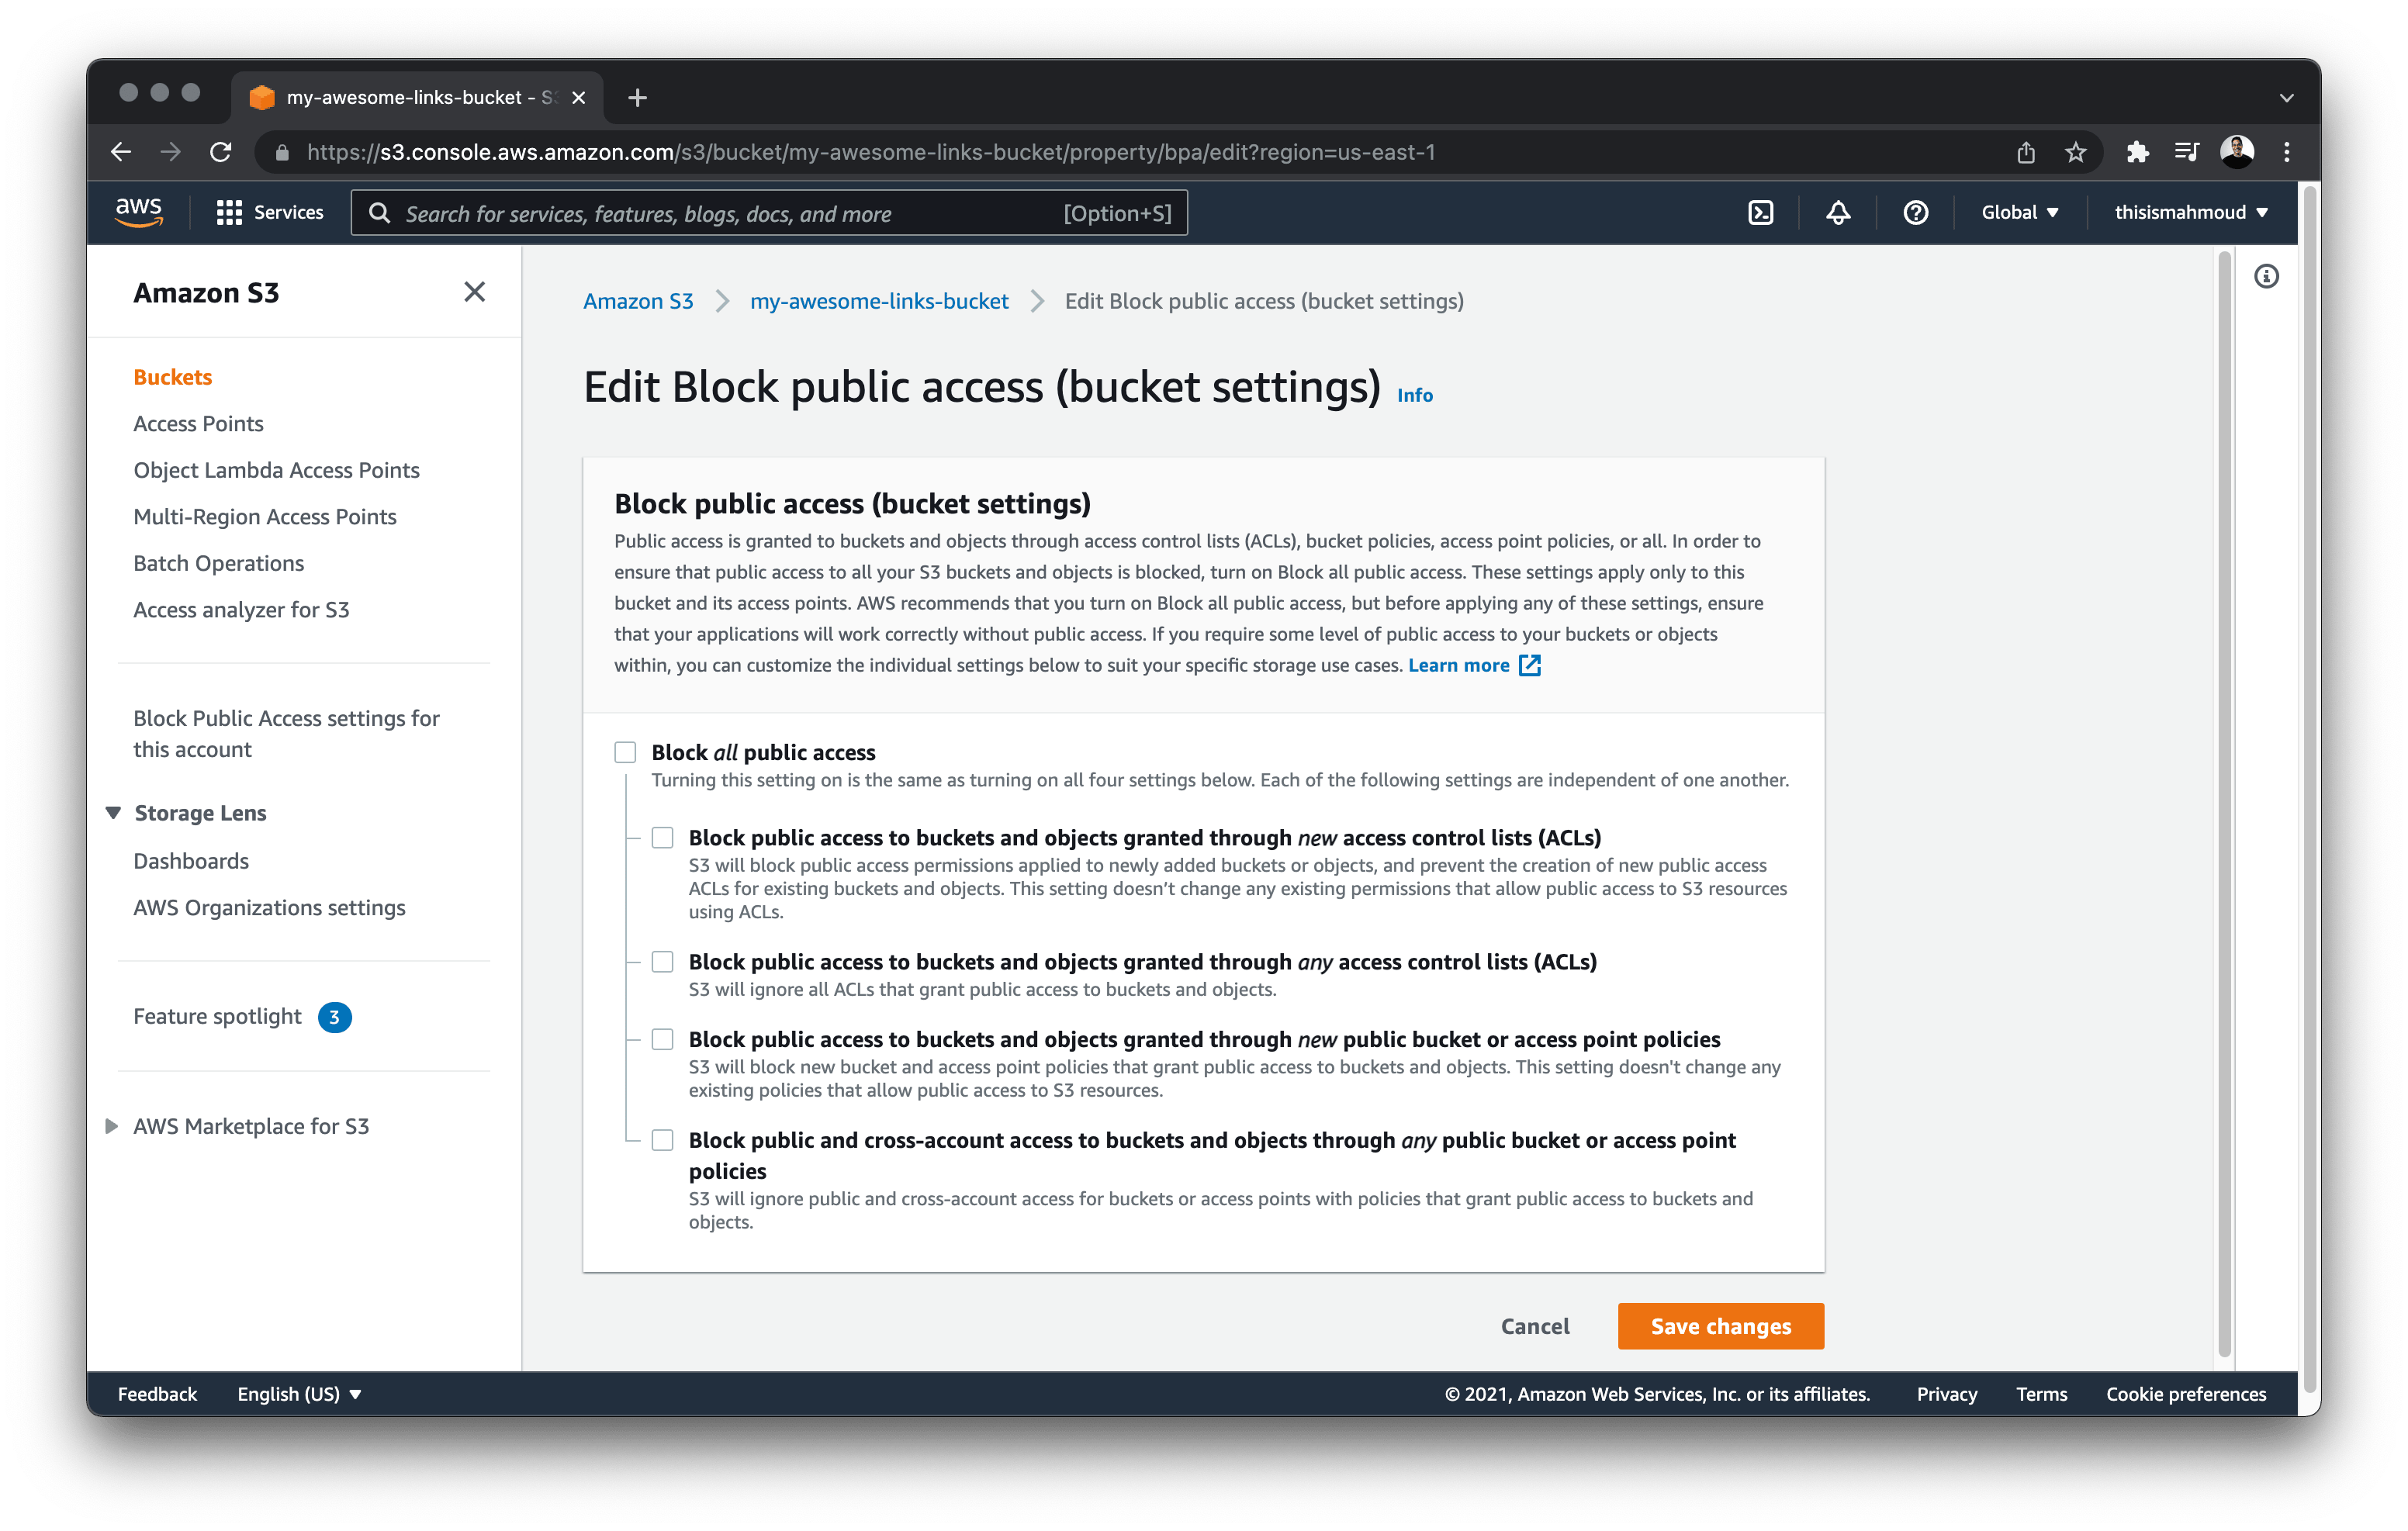
Navigate to the Permissions tab and click on the Edit button in the Block public access (bucket settings) section.
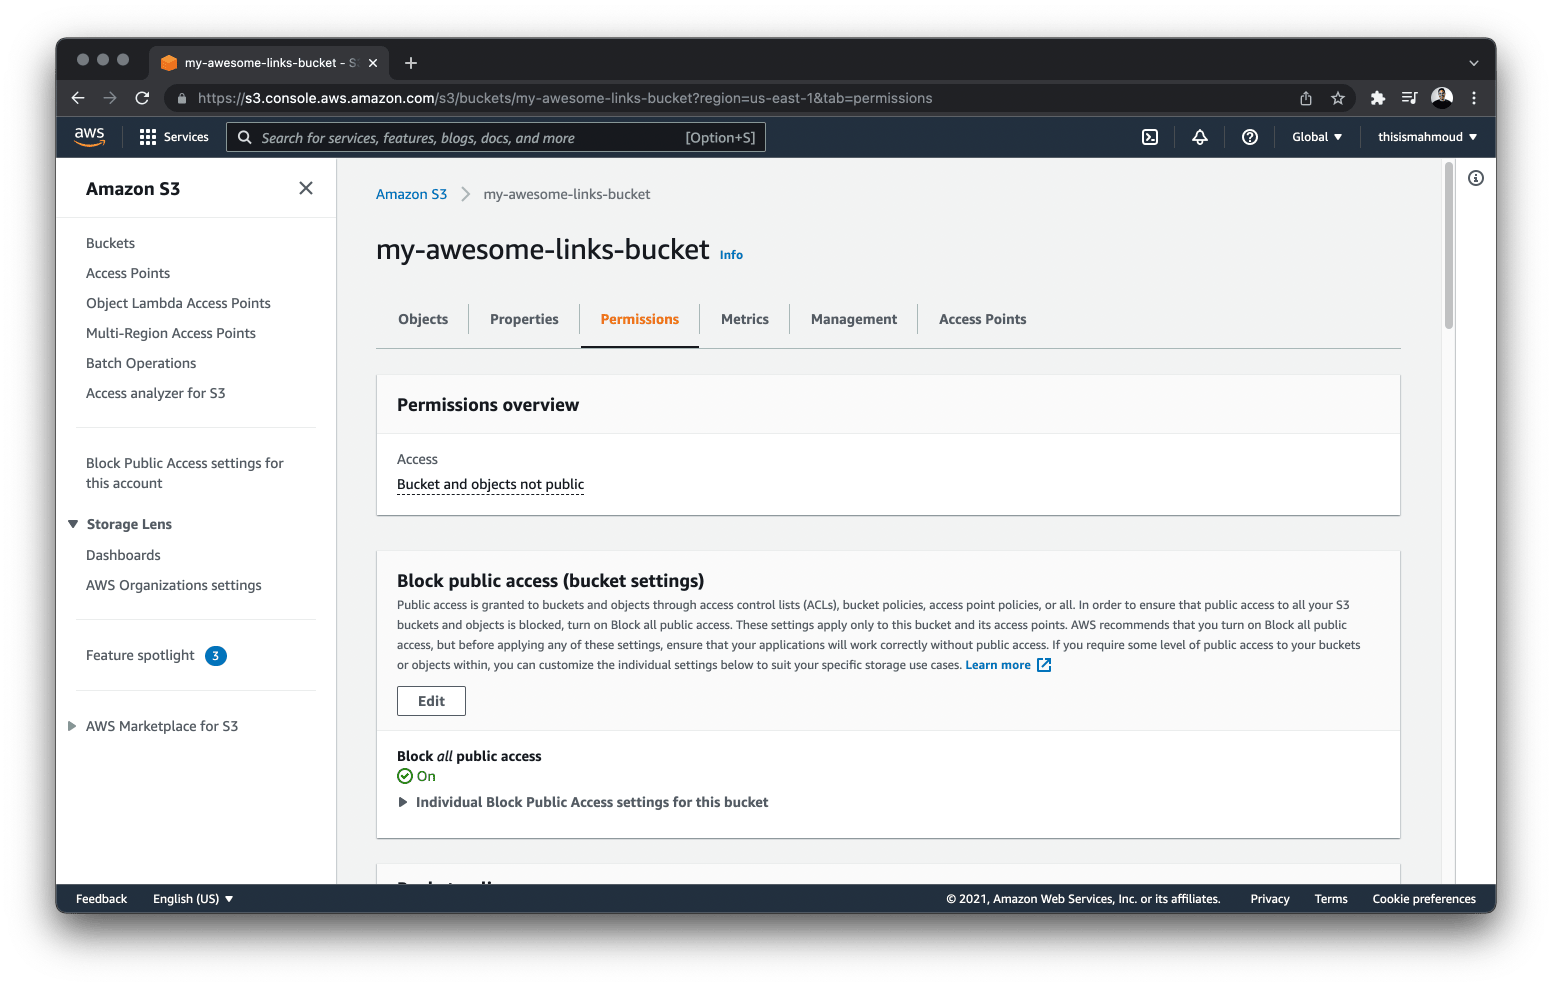
Uncheck Block all public access and click on Save changes. You need to allow public access because your application needs to access the images uploaded on AWS S3.
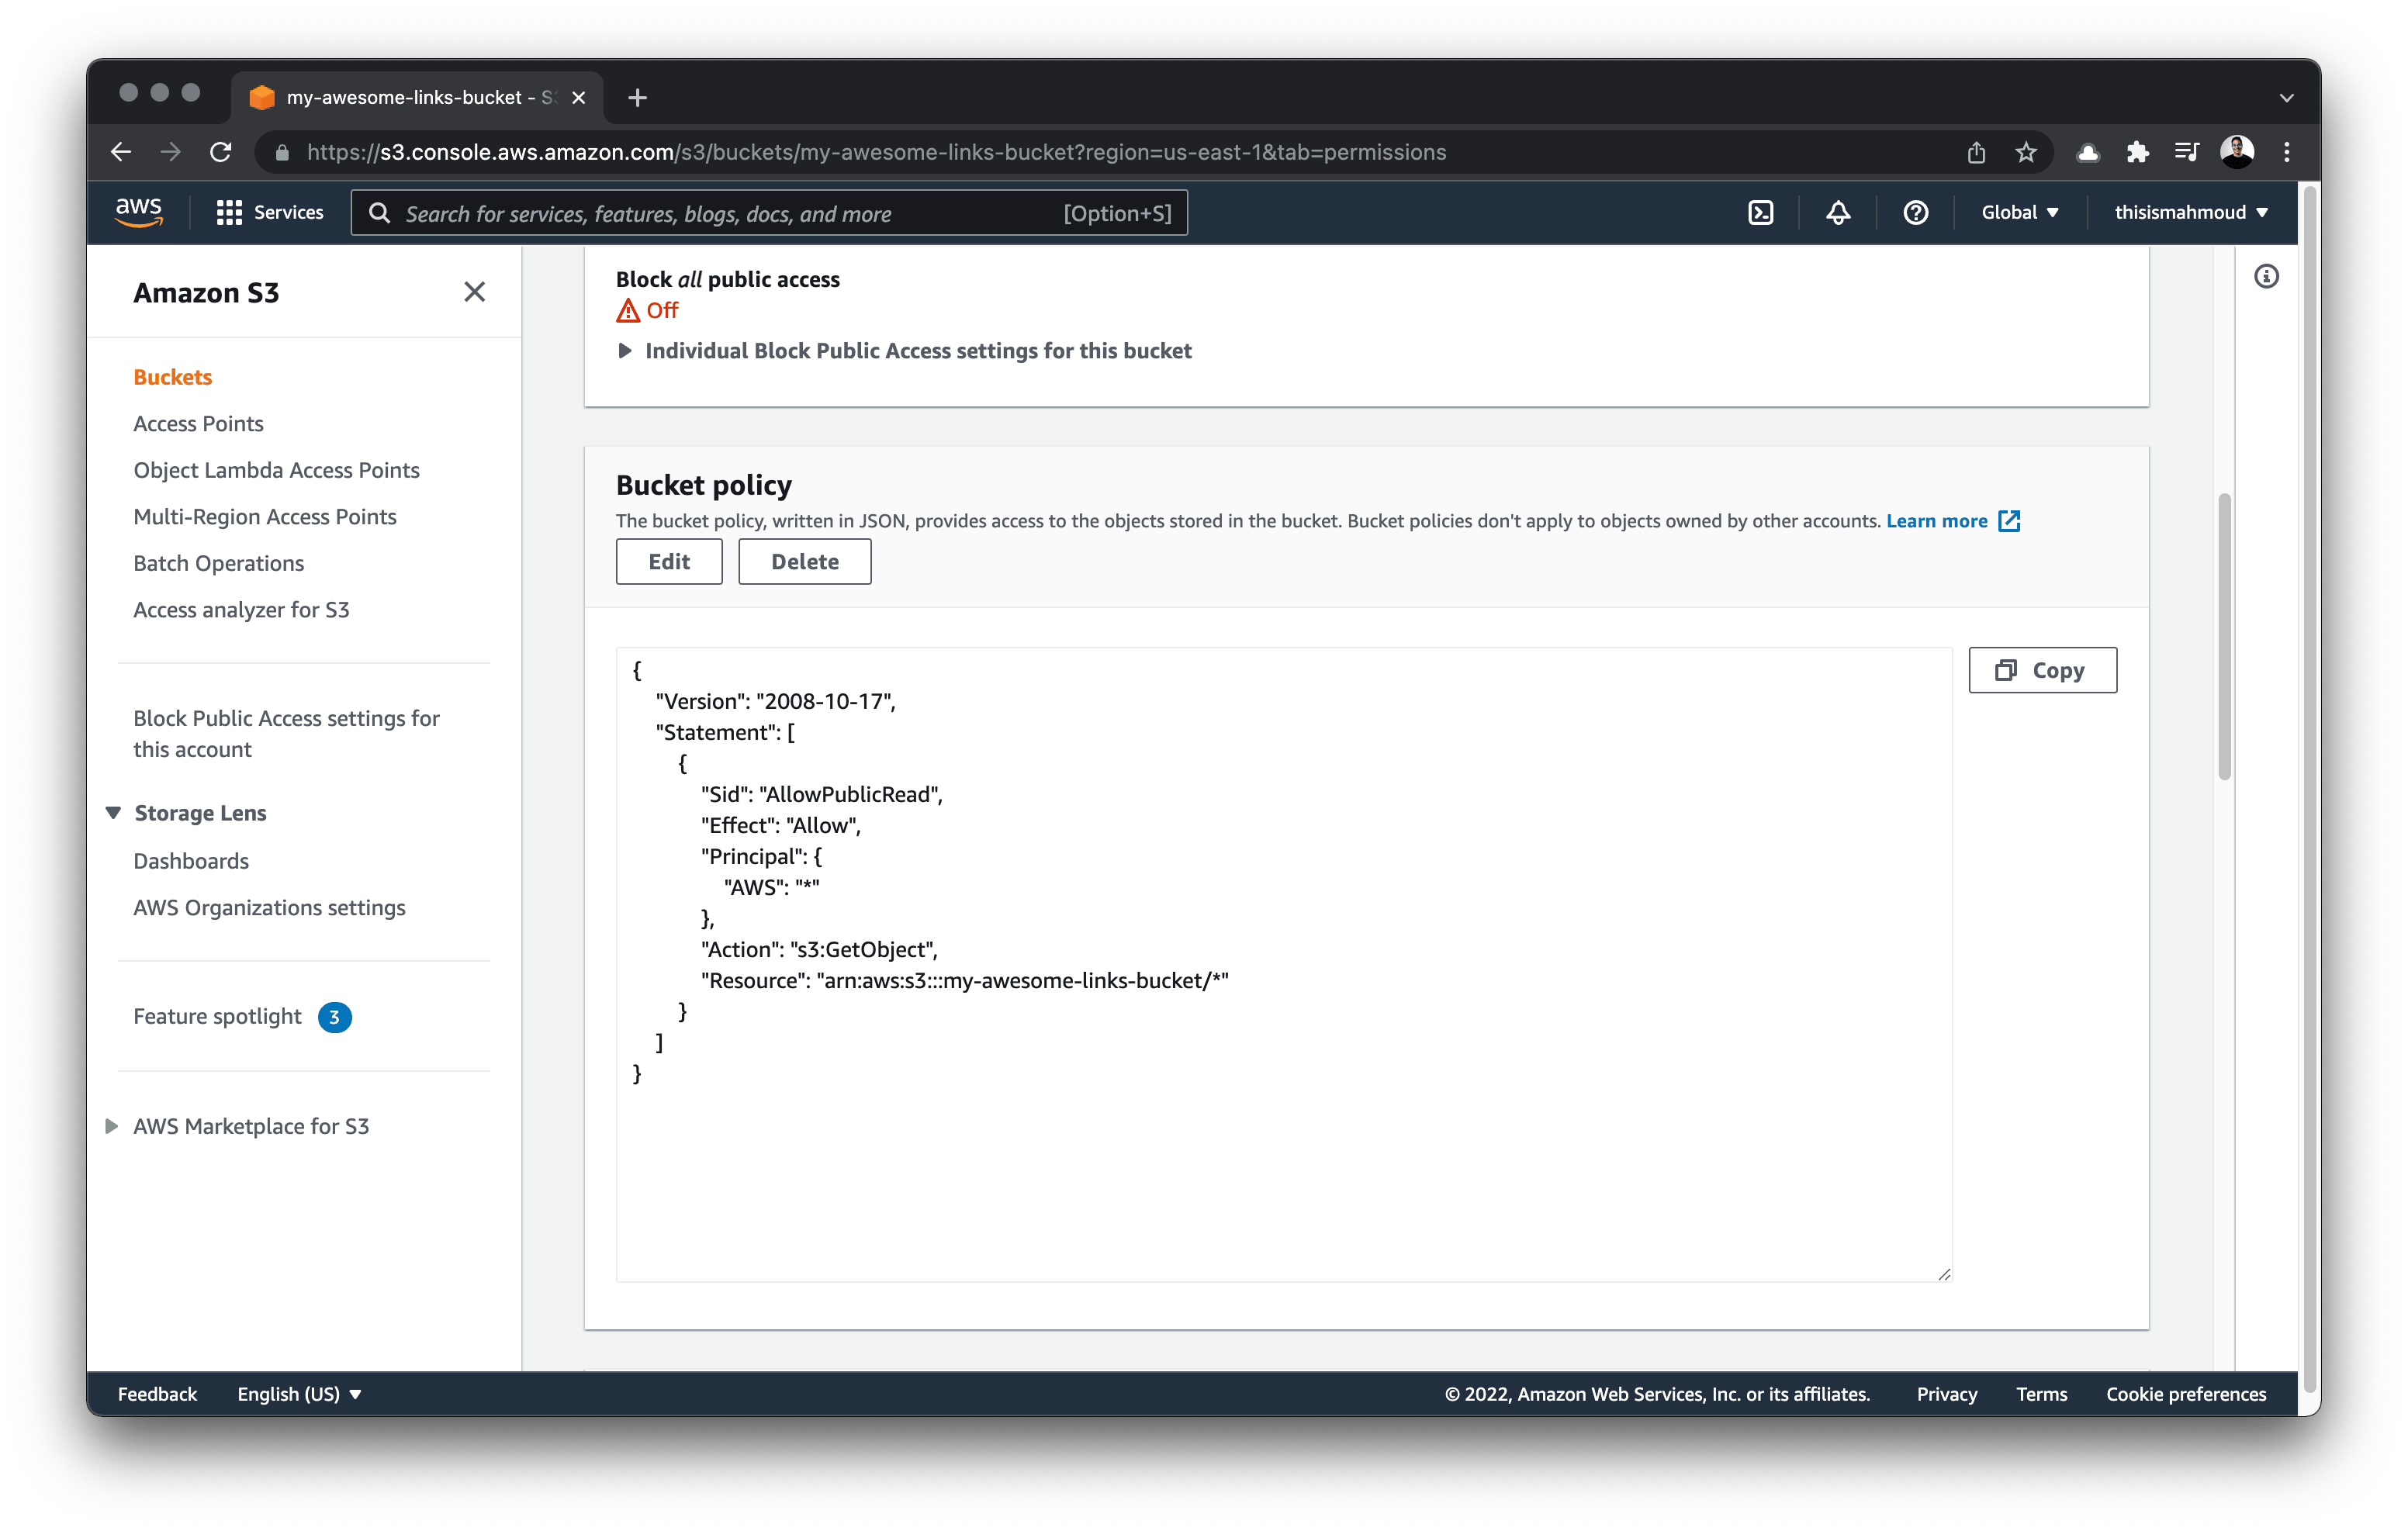
Next, update the resource policy to grant the application access to the Bucket and its contents. In the Permissions of your S3 Bucket, navigate to the Bucket policy section. Select Edit and add the following while changing "name-of-your-bucket" placeholder to the name of your Bucket:
{
  "Version": "2008-10-17",
  "Statement": [
    {
      "Sid": "AllowPublicRead",
      "Effect": "Allow",
      "Principal": {
        "AWS": "*"
      },
      "Action": "s3:GetObject",
      "Resource": "arn:aws:s3:::name-of-your-bucket/*"
    }
  ]
}
Next, you need to allow your application, which will be on a different domain, to access the stored images. In the Permissions tab of your bucket, scroll to the Cross-origin Resource Sharing (CORS) section at the bottom and add the following to it:
[
  {
    "AllowedHeaders": ["*"],
    "AllowedMethods": ["PUT", "POST", "DELETE"],
    "AllowedOrigins": ["http://localhost:3000"],
    "ExposeHeaders": []
  }
]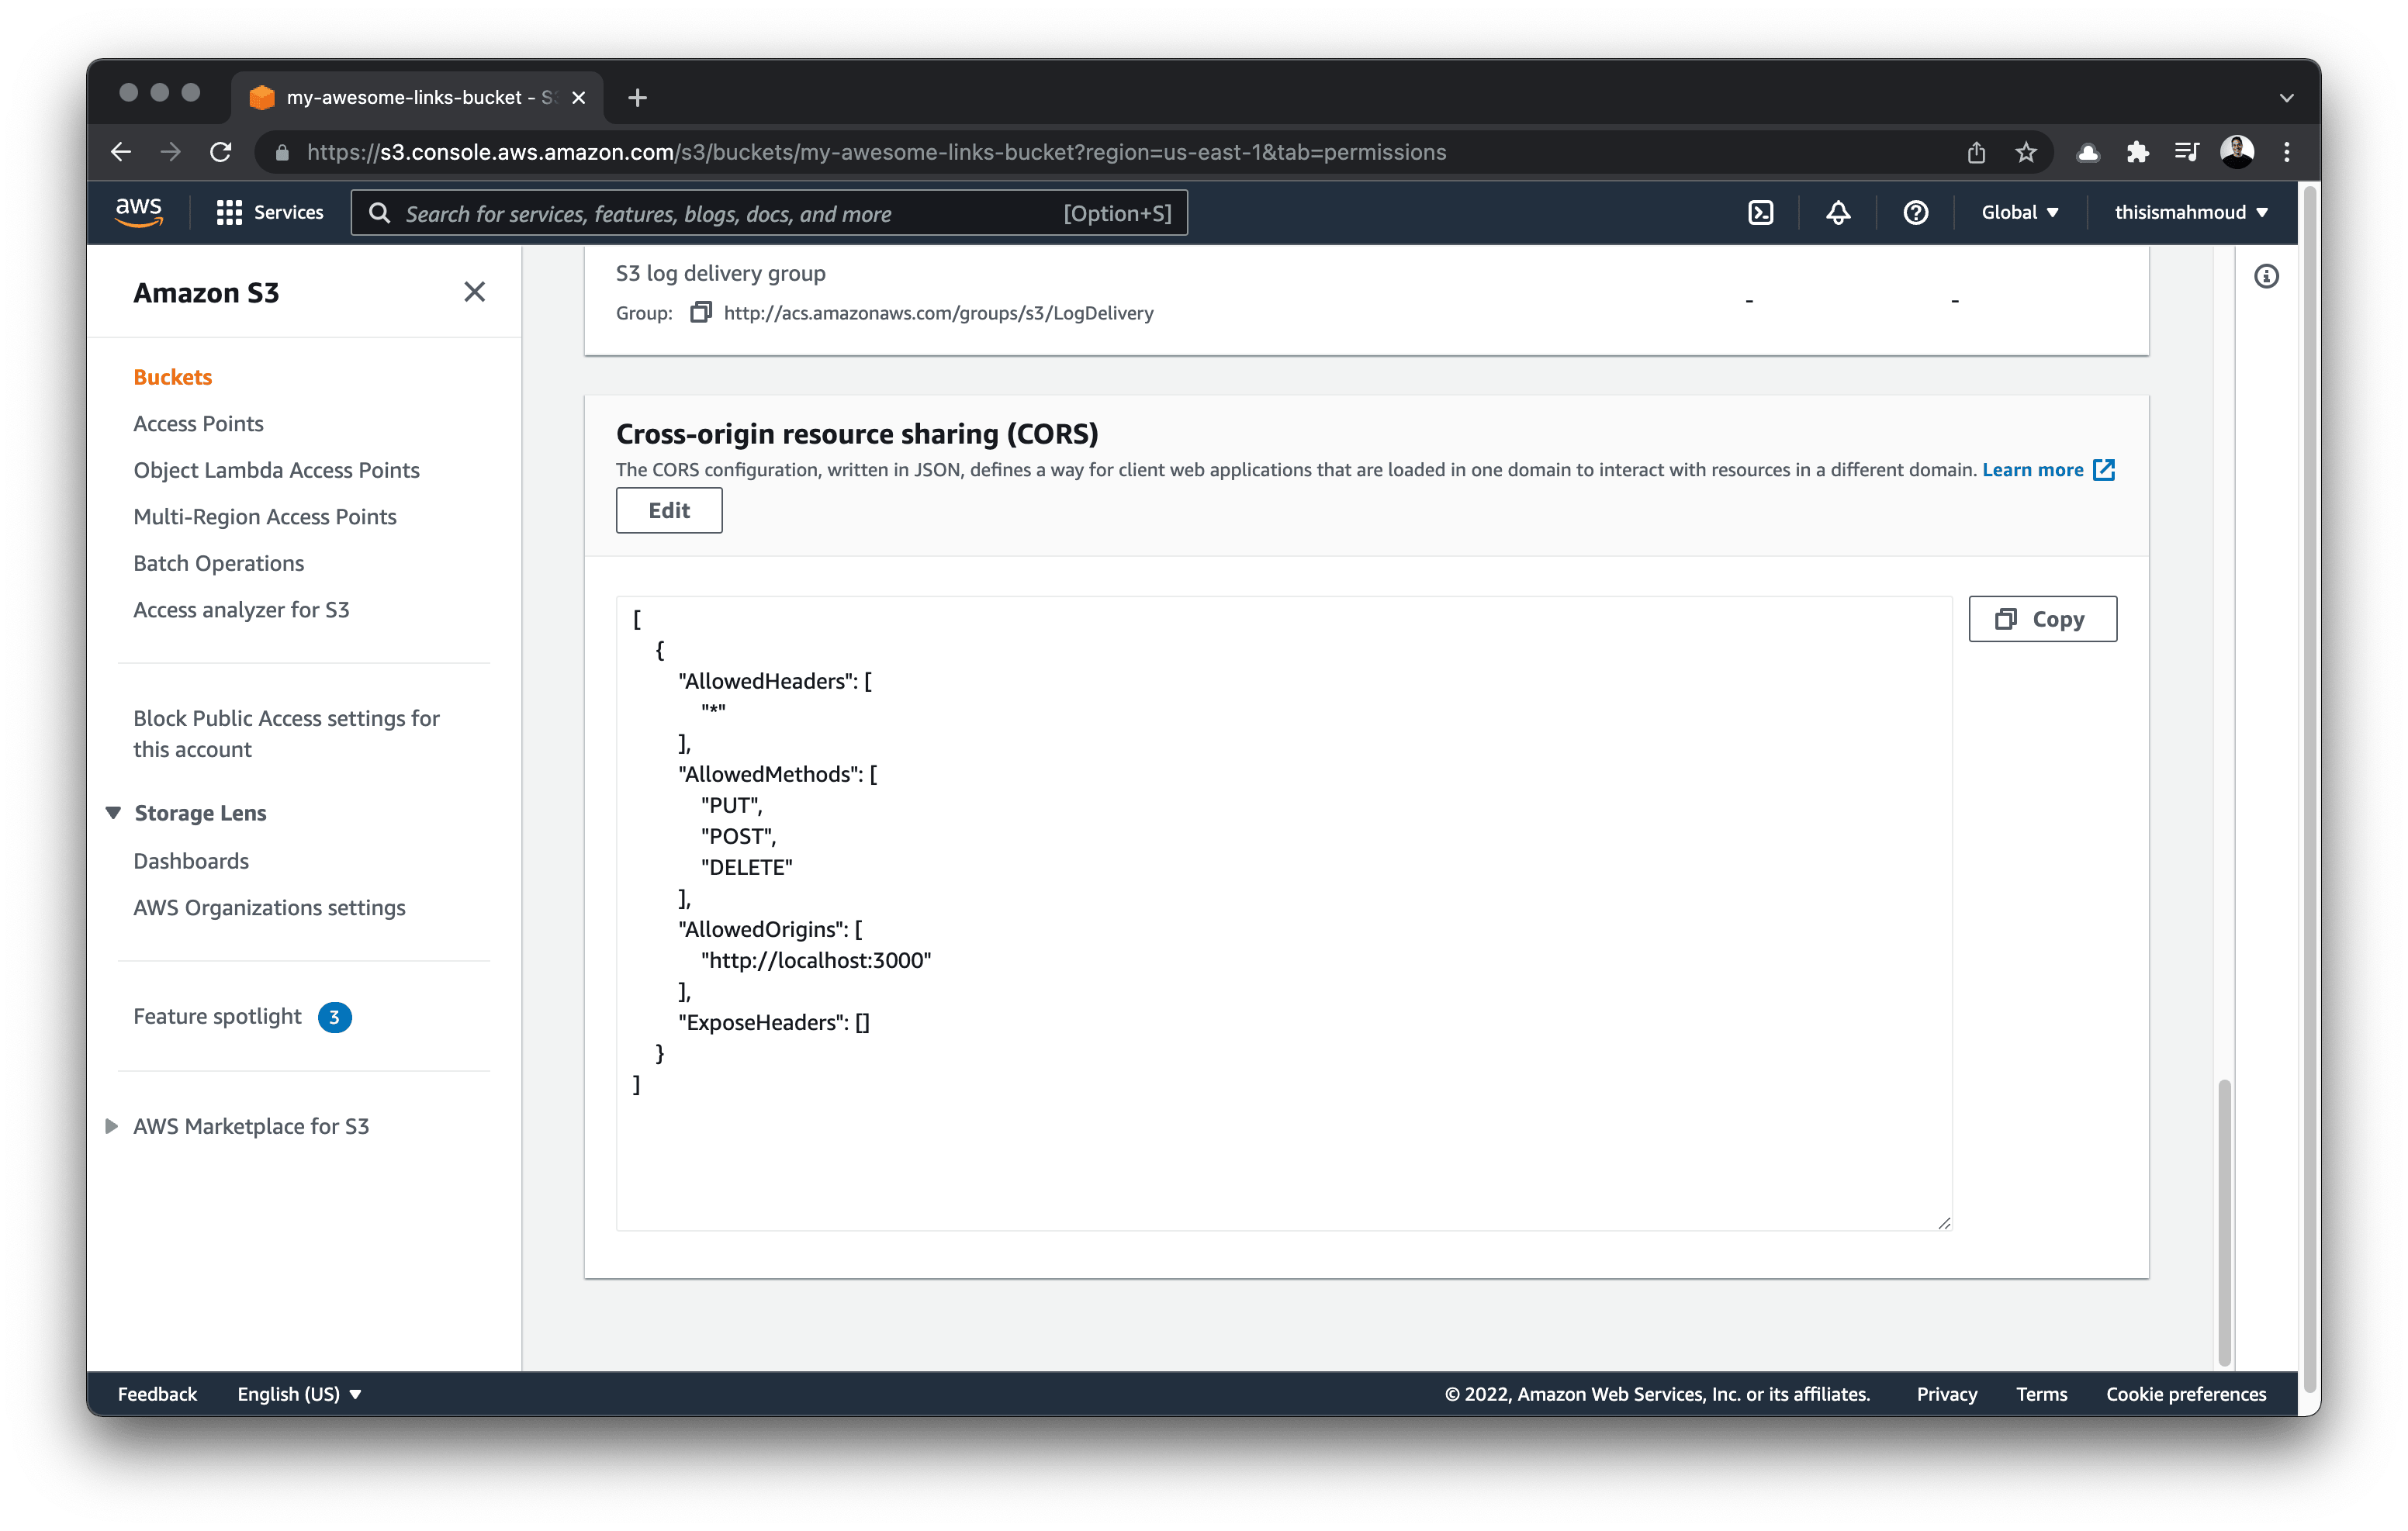
Note: Before deploying your application, ensure you update the "AllowedOrigins" array with the URL pointing to your application.
Add image upload functionality to your application
Now that you've set up S3, the next step is adding image upload functionality to your application. You'll create an API endpoint and update the frontend to handle image upload.
First, install the aws-sdk package by running the following command:
npm install aws-sdkNext, create a new file called upload-image.ts located in the pages/api/ directory and add the following code to it:
// pages/api/upload-image.ts
import aws from 'aws-sdk'
import type { NextApiRequest, NextApiResponse } from 'next'

export default async function handler(req: NextApiRequest, res: NextApiResponse) {
  try {
    // 1.
    const s3 = new aws.S3({
      accessKeyId: process.env.APP_AWS_ACCESS_KEY,
      secretAccessKey: process.env.APP_AWS_SECRET_KEY,
      region: process.env.APP_AWS_REGION,
    })

    // 2.
    aws.config.update({
      accessKeyId: process.env.APP_AWS_ACCESS_KEY,
      secretAccessKey: process.env.APP_AWS_SECRET_KEY,
      region: process.env.APP_AWS_REGION,
      signatureVersion: 'v4',
    })

    // 3.
    const post = await s3.createPresignedPost({
      Bucket: process.env.AWS_S3_BUCKET_NAME,
      Fields: {
        key: req.query.file,
      },
      Expires: 60, // seconds
      Conditions: [
        ['content-length-range', 0, 5048576], // up to 1 MB
      ],
    })

    // 4.
    return res.status(200).json(post)
  } catch (error) {
    console.log(error)
  }
}- Creates a new instance of the S3 Bucket
- Updates the main configuration class with the region, credentials, and additional request options
- Generates a presigned URL allowing you to write to the S3 Bucket
- Return the presigned URL that will be used for file upload
Finally, update the pages/admin.tsx file with the following code:
// pages/admin.tsx
import React from 'react'
import { type SubmitHandler, useForm } from 'react-hook-form'
import { gql, useMutation } from '@apollo/client'
import toast, { Toaster } from 'react-hot-toast'
import type { GetServerSideProps } from 'next'
import { getSession } from '@auth0/nextjs-auth0'

type FormValues = {
  title: string;
  url: string;
  category: string;
  description: string;
  image: FileList;
}

const CreateLinkMutation = gql`
  mutation($title: String!, $url: String!, $imageUrl: String!, $category: String!, $description: String!) {
    createLink(title: $title, url: $url, imageUrl: $imageUrl, category: $category, description: $description) {
      title
      url
      imageUrl
      category
      description
    }
  }
`

const Admin = () => {
  const [createLink, { data, loading, error }] = useMutation(CreateLinkMutation)
  const {
    register,
    handleSubmit,
    formState: { errors },
  } = useForm<FormValues>()

  // Upload photo function
  const uploadPhoto = async (e: React.ChangeEvent<HTMLInputElement>) => {
    if (!e.target.files || e.target.files.length <= 0) return
    const file = e.target.files[0]
    const filename = encodeURIComponent(file.name)
    const res = await fetch(`/api/upload-image?file=${filename}`)
    const data = await res.json()
    const formData = new FormData()

    Object.entries({ ...data.fields, file }).forEach(([key, value]) => {
      // @ts-ignore
      formData.append(key, value)
    })

    toast.promise(
      fetch(data.url, {
        method: 'POST',
        body: formData,
      }),
      {
        loading: 'Uploading...',
        success: 'Image successfully uploaded!🎉',
        error: `Upload failed 😥 Please try again ${error}`,
      },
    )
  }

  const onSubmit: SubmitHandler<FormValues> = async (data) => {
    const { title, url, category, description, image } = data
    const imageUrl = `https://${process.env.NEXT_PUBLIC_AWS_S3_BUCKET_NAME}.s3.amazonaws.com/${image[0]?.name}`
    const variables = { title, url, category, description, imageUrl }
    try {
      toast.promise(createLink({ variables }), {
        loading: 'Creating new link..',
        success: 'Link successfully created!🎉',
        error: `Something went wrong 😥 Please try again -  ${error}`,
      })
    } catch (error) {
      console.error(error)
    }
  }

  return (
    <div className="container mx-auto max-w-md py-12">
      <Toaster />
      <h1 className="text-3xl font-medium my-5">Create a new link</h1>
      <form className="grid grid-cols-1 gap-y-6 shadow-lg p-8 rounded-lg" onSubmit={handleSubmit(onSubmit)}>
        <label className="block">
          <span className="text-gray-700">Title</span>
          <input
            placeholder="Title"
            {...register('title', { required: true })}
            name="title"
            type="text"
            className="mt-1 block w-full rounded-md border-gray-300 shadow-sm focus:border-indigo-300 focus:ring focus:ring-indigo-200 focus:ring-opacity-50"
          />
        </label>
        <label className="block">
          <span className="text-gray-700">Description</span>
          <input
            placeholder="Description"
            {...register('description', { required: true })}
            name="description"
            type="text"
            className="mt-1 block w-full rounded-md border-gray-300 shadow-sm focus:border-indigo-300 focus:ring focus:ring-indigo-200 focus:ring-opacity-50"
          />
        </label>
        <label className="block">
          <span className="text-gray-700">Url</span>
          <input
            placeholder="https://example.com"
            {...register('url', { required: true })}
            name="url"
            type="text"
            className="mt-1 block w-full rounded-md border-gray-300 shadow-sm focus:border-indigo-300 focus:ring focus:ring-indigo-200 focus:ring-opacity-50"
          />
        </label>
        <label className="block">
          <span className="text-gray-700">Category</span>
          <input
            placeholder="Name"
            {...register('category', { required: true })}
            name="category"
            type="text"
            className="mt-1 block w-full rounded-md border-gray-300 shadow-sm focus:border-indigo-300 focus:ring focus:ring-indigo-200 focus:ring-opacity-50"
          />
        </label>
        <label className="block">
          <span className="text-gray-700">Upload a .png or .png image (max 1MB).</span>
          <input
            {...register('image', { required: true })}
            onChange={uploadPhoto}
            type="file"
            accept="image/png, image/jpeg"
            name="image"
          />
        </label>

        <button
          disabled={loading}
          type="submit"
          className="my-4 capitalize bg-blue-500 text-white font-medium py-2 px-4 rounded-md hover:bg-blue-600"
        >
          {loading ? (
            <span className="flex items-center justify-center">
              <svg
                className="w-6 h-6 animate-spin mr-1"
                fill="currentColor"
                viewBox="0 0 20 20"
                xmlns="http://www.w3.org/2000/svg"
              >
                <path d="M11 17a1 1 0 001.447.894l4-2A1 1 0 0017 15V9.236a1 1 0 00-1.447-.894l-4 2a1 1 0 00-.553.894V17zM15.211 6.276a1 1 0 000-1.788l-4.764-2.382a1 1 0 00-.894 0L4.789 4.488a1 1 0 000 1.788l4.764 2.382a1 1 0 00.894 0l4.764-2.382zM4.447 8.342A1 1 0 003 9.236V15a1 1 0 00.553.894l4 2A1 1 0 009 17v-5.764a1 1 0 00-.553-.894l-4-2z" />
              </svg>
              Creating...
            </span>
          ) : (
            <span>Create Link</span>
          )}
        </button>
      </form>
    </div>
  )
}

export default Admin

// getServerSideProps code remains unchanged
The form includes a new input field to handle file upload. The input field accepts images of either .png or .jpeg formats. Whenever an image is uploaded, the uploadPhoto function sends a request to the /api/upload-image API endpoint. A toast will be shown as the request is being resolved by the API – success, loading, or error states.
When the form is submitted, the URL of the image is included as a variable in the createLink mutation. A toast will appear as the mutation is being executed.
Summary and next steps
You learned how to add support for image upload using AWS S3. In the next part, you will deploy your app to Vercel and learn how you can use the Prisma Data Proxy to manage your database connection pool to ensure your application doesn't run out of connections.
Build your next app with Prisma
Start free. Scale when you’re ready.