Fullstack App With TypeScript, PostgreSQL, Next.js, Prisma & GraphQL: Authentication


This article is the third part of the course where you build a fullstack app with Next.js, GraphQL, TypeScript, Prisma and PostgreSQL. In this article, you will learn how to add authentication to your app.
Table of Contents
- Introduction
- Development environment
- Clone the repository
- Seed the database
- Authentication and securing the GraphQL API using Auth0
- Summary and next steps
Introduction
In this course, you will learn how to build "awesome-links", a fullstack app where users can browse through a list of curated links and bookmark their favorite ones.
In part 2, you built the GraphQL API using GraphQL Yoga and Pothos. You then used Apollo Client to consume the GraphQL API on the frontend.
Development environment
To follow along with this tutorial, ensure you have Node.js and the GraphQL extension installed. You will also need a PostgreSQL database running.
If you're following along from part 2, you can skip project setup and jump into the authentication and securing the GraphQL API using Auth0 section.
Note: You can set up PostgreSQL locally or a hosted instance on Heroku. You will need a remote database for the deployment step at the end of the course.
Clone the repository
You can find the complete source code for the course on GitHub.
Note: Each article has a corresponding branch. This way, you can follow along as you go through it. You'll have the same starting point as this article by checking out at part-3 branch. There might be a few differences between each branch, so to not run into any issues, it is recommended that you clone the branch for this article.
To get started, navigate into the directory of your choice and run the following command to clone the repository:
git clone -b part-3 https://github.com/prisma/awesome-links.gitNavigate into the cloned application and install the dependencies:
cd awesome-links
npm install
Seed the database
After setting up a PostgreSQL database, rename the env.example file to .env and set the connection string for your database. After that, run the following command to create the tables in your database:
Refer to Part 1 – Add Prisma to your Project for more details on the format of the connection string.
npx prisma migrate dev --name initIf prisma migrate dev did not trigger the seed step, run the following command to seed the database:
npx prisma db seedThis command will run the seed.ts file in the /prisma directory. seed.ts creates four links and one user in your database using Prisma Client.
You can now start the application server by running the following command:
npm run devProject structure and dependencies
The project has the following folder structure:
awesome-links/
┣ components/
┃ ┣ Layout
┃ ┗ AwesomeLink.tsx
┣ data/
┃ ┗ links.ts
┣ graphql/
┃ ┣ types/
┃ ┣ builder.tsx
┃ ┗ schema.ts
┣ lib/
┃ ┣ apollo.ts
┃ ┗ prisma.ts
┣ pages/
┃ ┣ api/
┃ ┃ ┗ graphql.ts
┃ ┣ _app.tsx
┃ ┣ about.tsx
┃ ┗ index.tsx
┣ prisma/
┃ ┣ migrations/
┃ ┣ schema.prisma
┃ ┗ seed.ts
┣ public/
┣ styles/
┃ ┗ tailwind.css
┣ .env.example
┣ .gitignore
┣ next-env.d.ts
┣ package-lock.json
┣ package.json
┣ postcss.config.js
┣ README.md
┣ tailwind.config.js
┗ tsconfig.json
This is a Next.js application that uses the following libraries and tools:
- Prisma for database access/CRUD operations
- Next.js as the fullstack React framework
- TailwindCSS for styling
- Pothos as the GraphQL schema construction library
- GraphQL Yoga as the GraphQL server
- Apollo Client as the GraphQL client
The pages directory contains the following files:
index.tsx: fetches links from the API and displays them on the page. The results are paginated and you can fetch more links._app.tsx: root component that allows you to persist layouts and state when navigating between pages./api/graphql.ts: GraphQL endpoint using Next.js's API routes.
Authentication and securing the GraphQL API using Auth0
Configure Auth0
To secure the app, you will use Auth0 – an authentication and authorization drop-in solution.
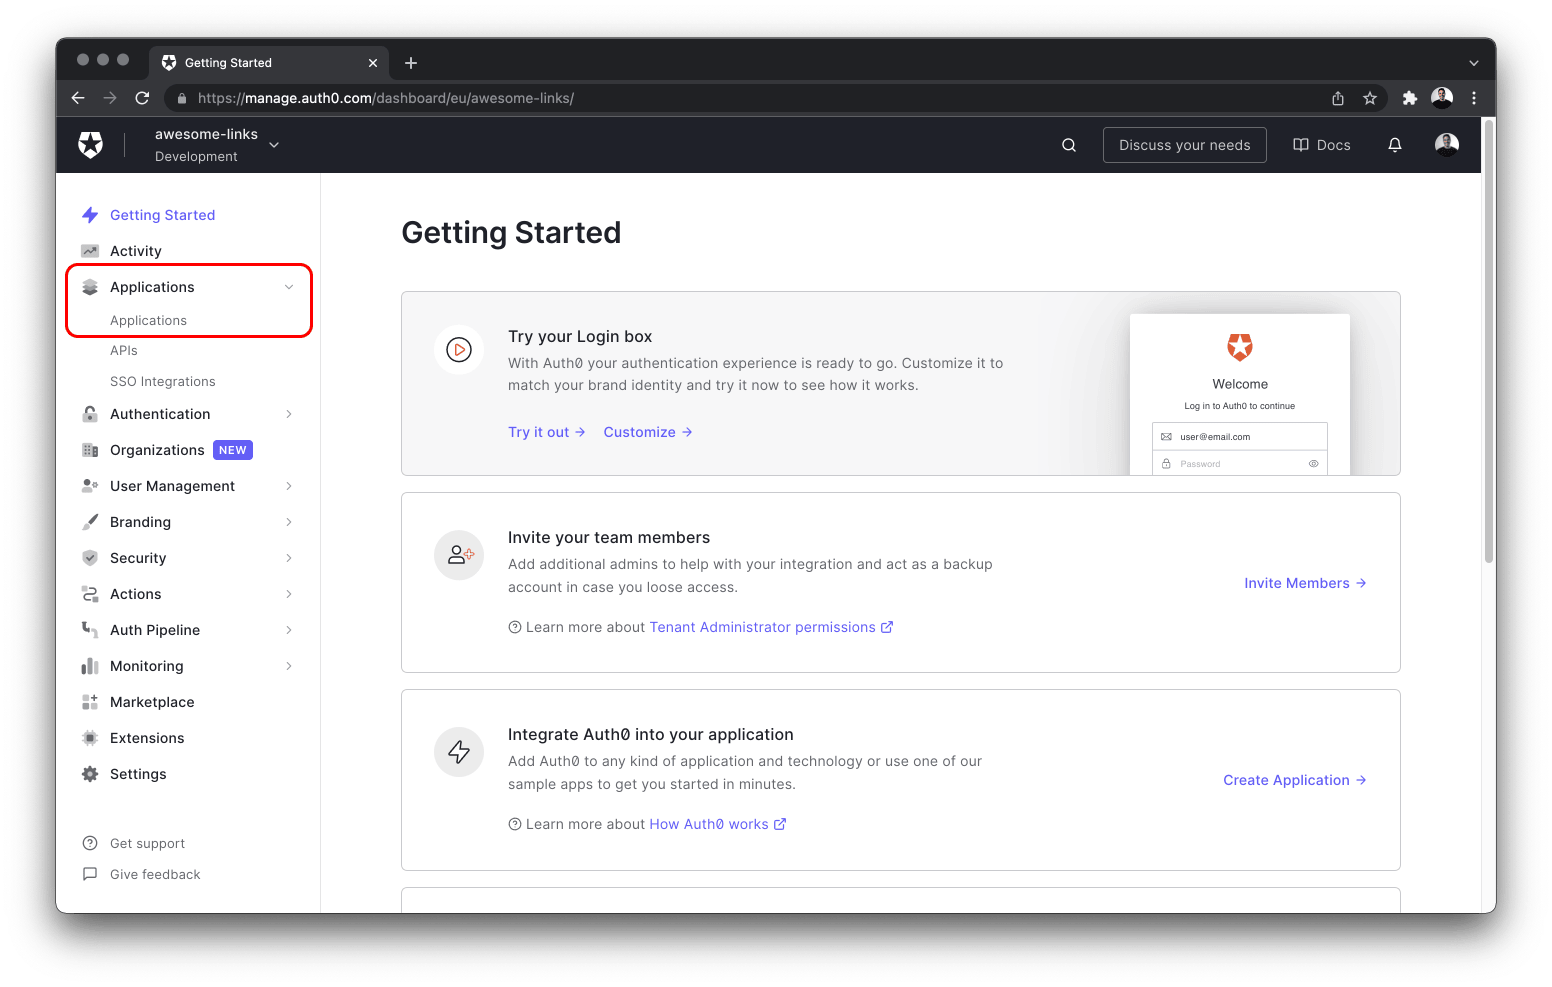
After creating an account, navigate to the Applications dropdown located on the left sidebar and select Applications from the sub-menu.
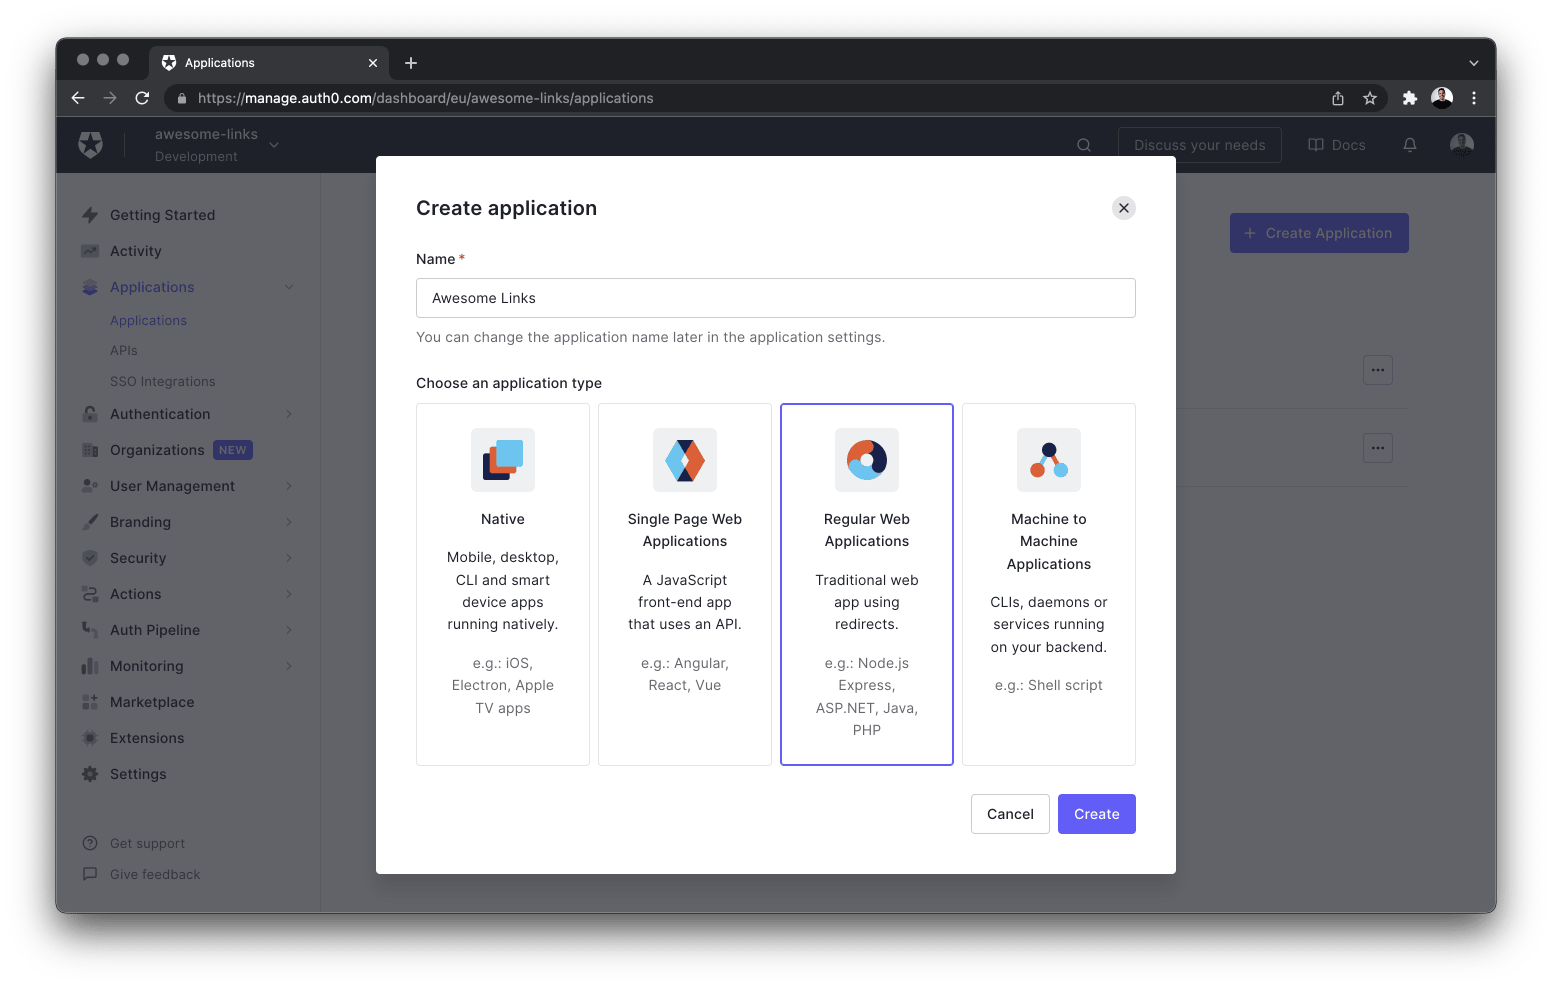
Next, create a new application by clicking the + Create application button. Give your app a name, select Regular Web Application and finalize creating the app by selecting the Create button on the bottom right of the dialog.
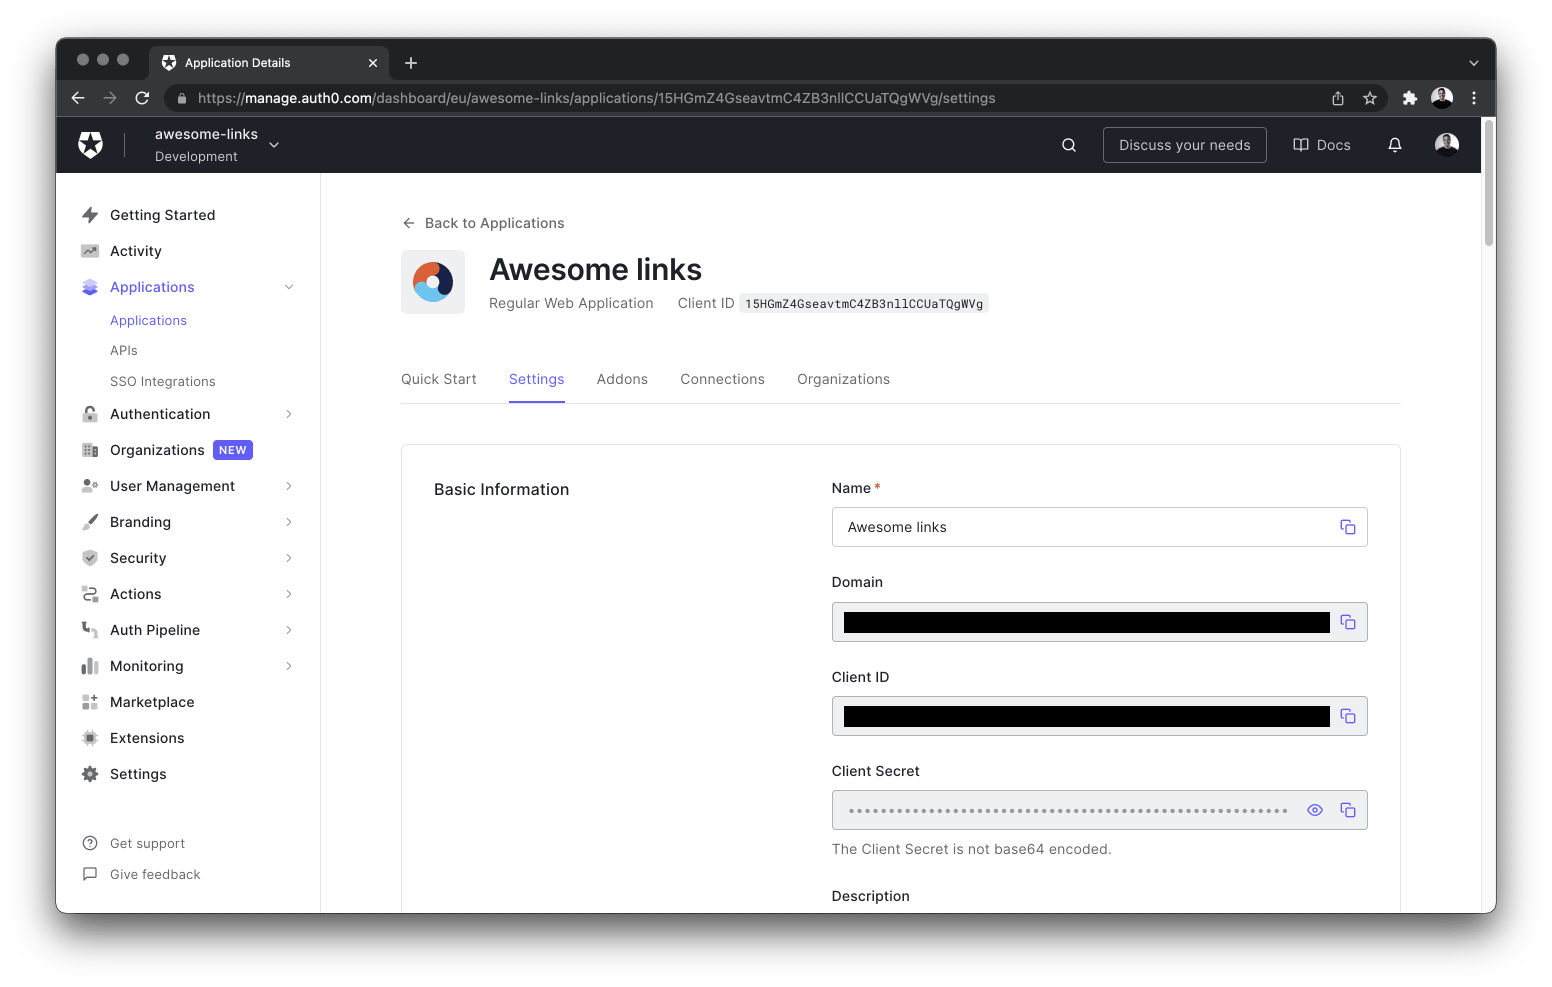
Once the application is successfully created, navigate to the Settings tab and copy the following information to the .env file of your project:
- Domain
- Client ID
- Client Secret
# .env
AUTH0_SECRET='...' # run `openssl rand -hex 32` to generate a 32 bytes value
AUTH0_BASE_URL='http://localhost:3000'
AUTH0_ISSUER_BASE_URL='https://YOUR_APP_DOMAIN'
AUTH0_CLIENT_ID='YOUR_CLIENT_ID'
AUTH0_CLIENT_SECRET='YOUR_CLIENT_SECRET'AUTH0_SECRET: A long secret value used to encrypt the session cookie. You can generate a suitable string by runningopenssl rand -hex 32in your terminal.AUTH0_BASE_URL: The base URL of your application.AUTH0_ISSUER_BASE_URL: The URL of your Auth0 tenant domain.AUTH0_CLIENT_ID: Your Auth0 application's Client ID.AUTH0_CLIENT_SECRET: Your Auth0 application's Client Secret.
Finally, you need to configure some of the application's URIs in the Auth0 dashboard. Add http://localhost:3000/api/auth/callback to the Allowed Callback URLs, and http://localhost:3000 to the Allowed Logout URLs list.
Save these configuration changes by clicking the Save Changes button at the bottom of the page.
When you're deploying your app to production, you can replace localhost with your deployed app's domain. Auth0 allows multiple URLs, so you can include both localhost and production URLs – separated by a comma.

Add the Auth0 SDK
You can add Auth0 to your project by installing the Auth0 Next.js SDK:
npm install @auth0/nextjs-auth0Next, create an auth/[...auth0].ts file inside the pages/api directory and add the following code to it:
// pages/api/auth/[...auth0].ts
import { handleAuth } from '@auth0/nextjs-auth0'

export default handleAuth()
This Next.js dynamic API route will automatically create the following endpoints:
/api/auth/login: Auth0's login route./api/auth/logout: The route used to logout the user./api/auth/callback: The route Auth0 redirects the user to after a successful login./api/auth/me: The route to fetch the user profile from Auth0.
Finally, navigate to the pages/_app.tsx file and update it with the following code that wraps your app with the UserProvider component from Auth0:
// pages/_app.tsx
import '../styles/tailwind.css'
import { UserProvider } from '@auth0/nextjs-auth0/client'
import Layout from '../components/Layout'
import { ApolloProvider } from '@apollo/client'
import type { AppProps } from 'next/app'
import apolloClient from '../lib/apollo'

function MyApp({ Component, pageProps }: AppProps) {
  return (
    <UserProvider>
      <ApolloProvider client={apolloClient}>
        <Layout>
          <Component {...pageProps} />
        </Layout>
      </ApolloProvider>
    </UserProvider>
  )
}

export default MyApp
Wrapping the MyApp component with the UserProvider component will allow all pages to access your user's authentication state.
Secure the GraphQL API
When sending queries or mutations to the API, you can authenticate the requests by including the user information. You can do that by attaching a user object – from Auth0 – to the GraphQL context.
Create a graphql/context.ts file and add the following snippet:
// graphql/context.ts
import {  getSession } from '@auth0/nextjs-auth0'
import type { NextApiRequest, NextApiResponse } from 'next'

export async function createContext({ req, res }: { req: NextApiRequest, res: NextApiResponse }) {
  const session = await getSession(req, res)

  // if the user is not logged in, return an empty object
  if (!session || typeof session === 'undefined') return {}

  const { user, accessToken } = session

  return {
    user,
    accessToken,
  }
}
The getSession() function from Auth0 returns information about the logged-in user and the access token. This data is then included in the GraphQL context. Your queries and mutations can now access the authentication state.
Update the server instance with the context property with the createContext function as it's value:
diff // pages/api/graphql.ts
import { createYoga } from 'graphql-yoga'

import type { NextApiRequest, NextApiResponse } from 'next'

import { schema } from '../../graphql/schema'
+import { createContext } from '../../graphql/context'


export default createYoga<{
  req: NextApiRequest
  res: NextApiResponse
}>({
  schema,
+  context: createContext,
  graphqlEndpoint: '/api/graphql'
})

export const config = {
  api: {
    bodyParser: false
  }
}
Next, update the SchemaBuilder function in graphql/builder.ts by specifying the type for the Context object:
diff // graphql/builder.ts
import SchemaBuilder from "@pothos/core";
import PrismaPlugin from '@pothos/plugin-prisma';
import type PrismaTypes from '@pothos/plugin-prisma/generated';
import prisma from "../lib/prisma";
import RelayPlugin from "@pothos/plugin-relay";
+import { createContext } from './context'


export const builder = new SchemaBuilder<{
  PrismaTypes: PrismaTypes,
+  Context: ReturnType<typeof createContext>,
}>({
  plugins: [PrismaPlugin, RelayPlugin],
  relayOptions: {},
  prisma: {
    client: prisma,
  }
})

builder.queryType({
  fields: (t) => ({
    ok: t.boolean({
      resolve: () => true,
    }),
  }),
});
Finally, the app's navbar should display a Login/Logout button depending on the user's authentication state. Update the Header component in components/Layout/Header.tsx with the following code:
// components/Layout/Header.tsx
import React from 'react'
import Link from 'next/link'
import { useUser } from '@auth0/nextjs-auth0/client'

const Header = () => {
  const { user } = useUser()
  return (
    <header className="text-gray-600 body-font">
      <div className="container mx-auto flex flex-wrap p-5 flex-col md:flex-row items-center">
        <Link href="/" className="flex title-font font-medium items-center text-gray-900 mb-4 md:mb-0">
          <svg
            className="w-10 h-10 text-white p-2 bg-blue-500 rounded-full"
            fill="none"
            stroke="currentColor"
            viewBox="0 0 24 24"
            xmlns="http://www.w3.org/2000/svg"
          >
            <path
              strokeLinecap="round"
              strokeLinejoin="round"
              strokeWidth="2"
              d="M13.828 10.172a4 4 0 00-5.656 0l-4 4a4 4 0 105.656 5.656l1.102-1.101m-.758-4.899a4 4 0 005.656 0l4-4a4 4 0 00-5.656-5.656l-1.1 1.1"
            ></path>
          </svg>
        </Link>
        <nav className="md:ml-auto flex flex-wrap items-center text-base justify-center">
          {user ? (
            <div className="flex items-center space-x-5">
              <Link href="/api/auth/logout" className="inline-flex items-center bg-gray-100 border-0 py-1 px-3 focus:outline-none hover:bg-gray-200 rounded text-base mt-4 md:mt-0">
                Logout
              </Link>
              <img alt="profile" className="rounded-full w-12 h-12" src={user.picture ? user.picture : ''} />
            </div>
          ) : (
            <Link href="/api/auth/login" className="inline-flex items-center bg-gray-100 border-0 py-1 px-3 focus:outline-none hover:bg-gray-200 rounded text-base mt-4 md:mt-0">
              Login
            </Link>
          )}
        </nav>
      </div>
    </header>
  )
}

export default Header
The useUser hook from Auth0 checks whether a user is authenticated or not. This hook runs client-side.
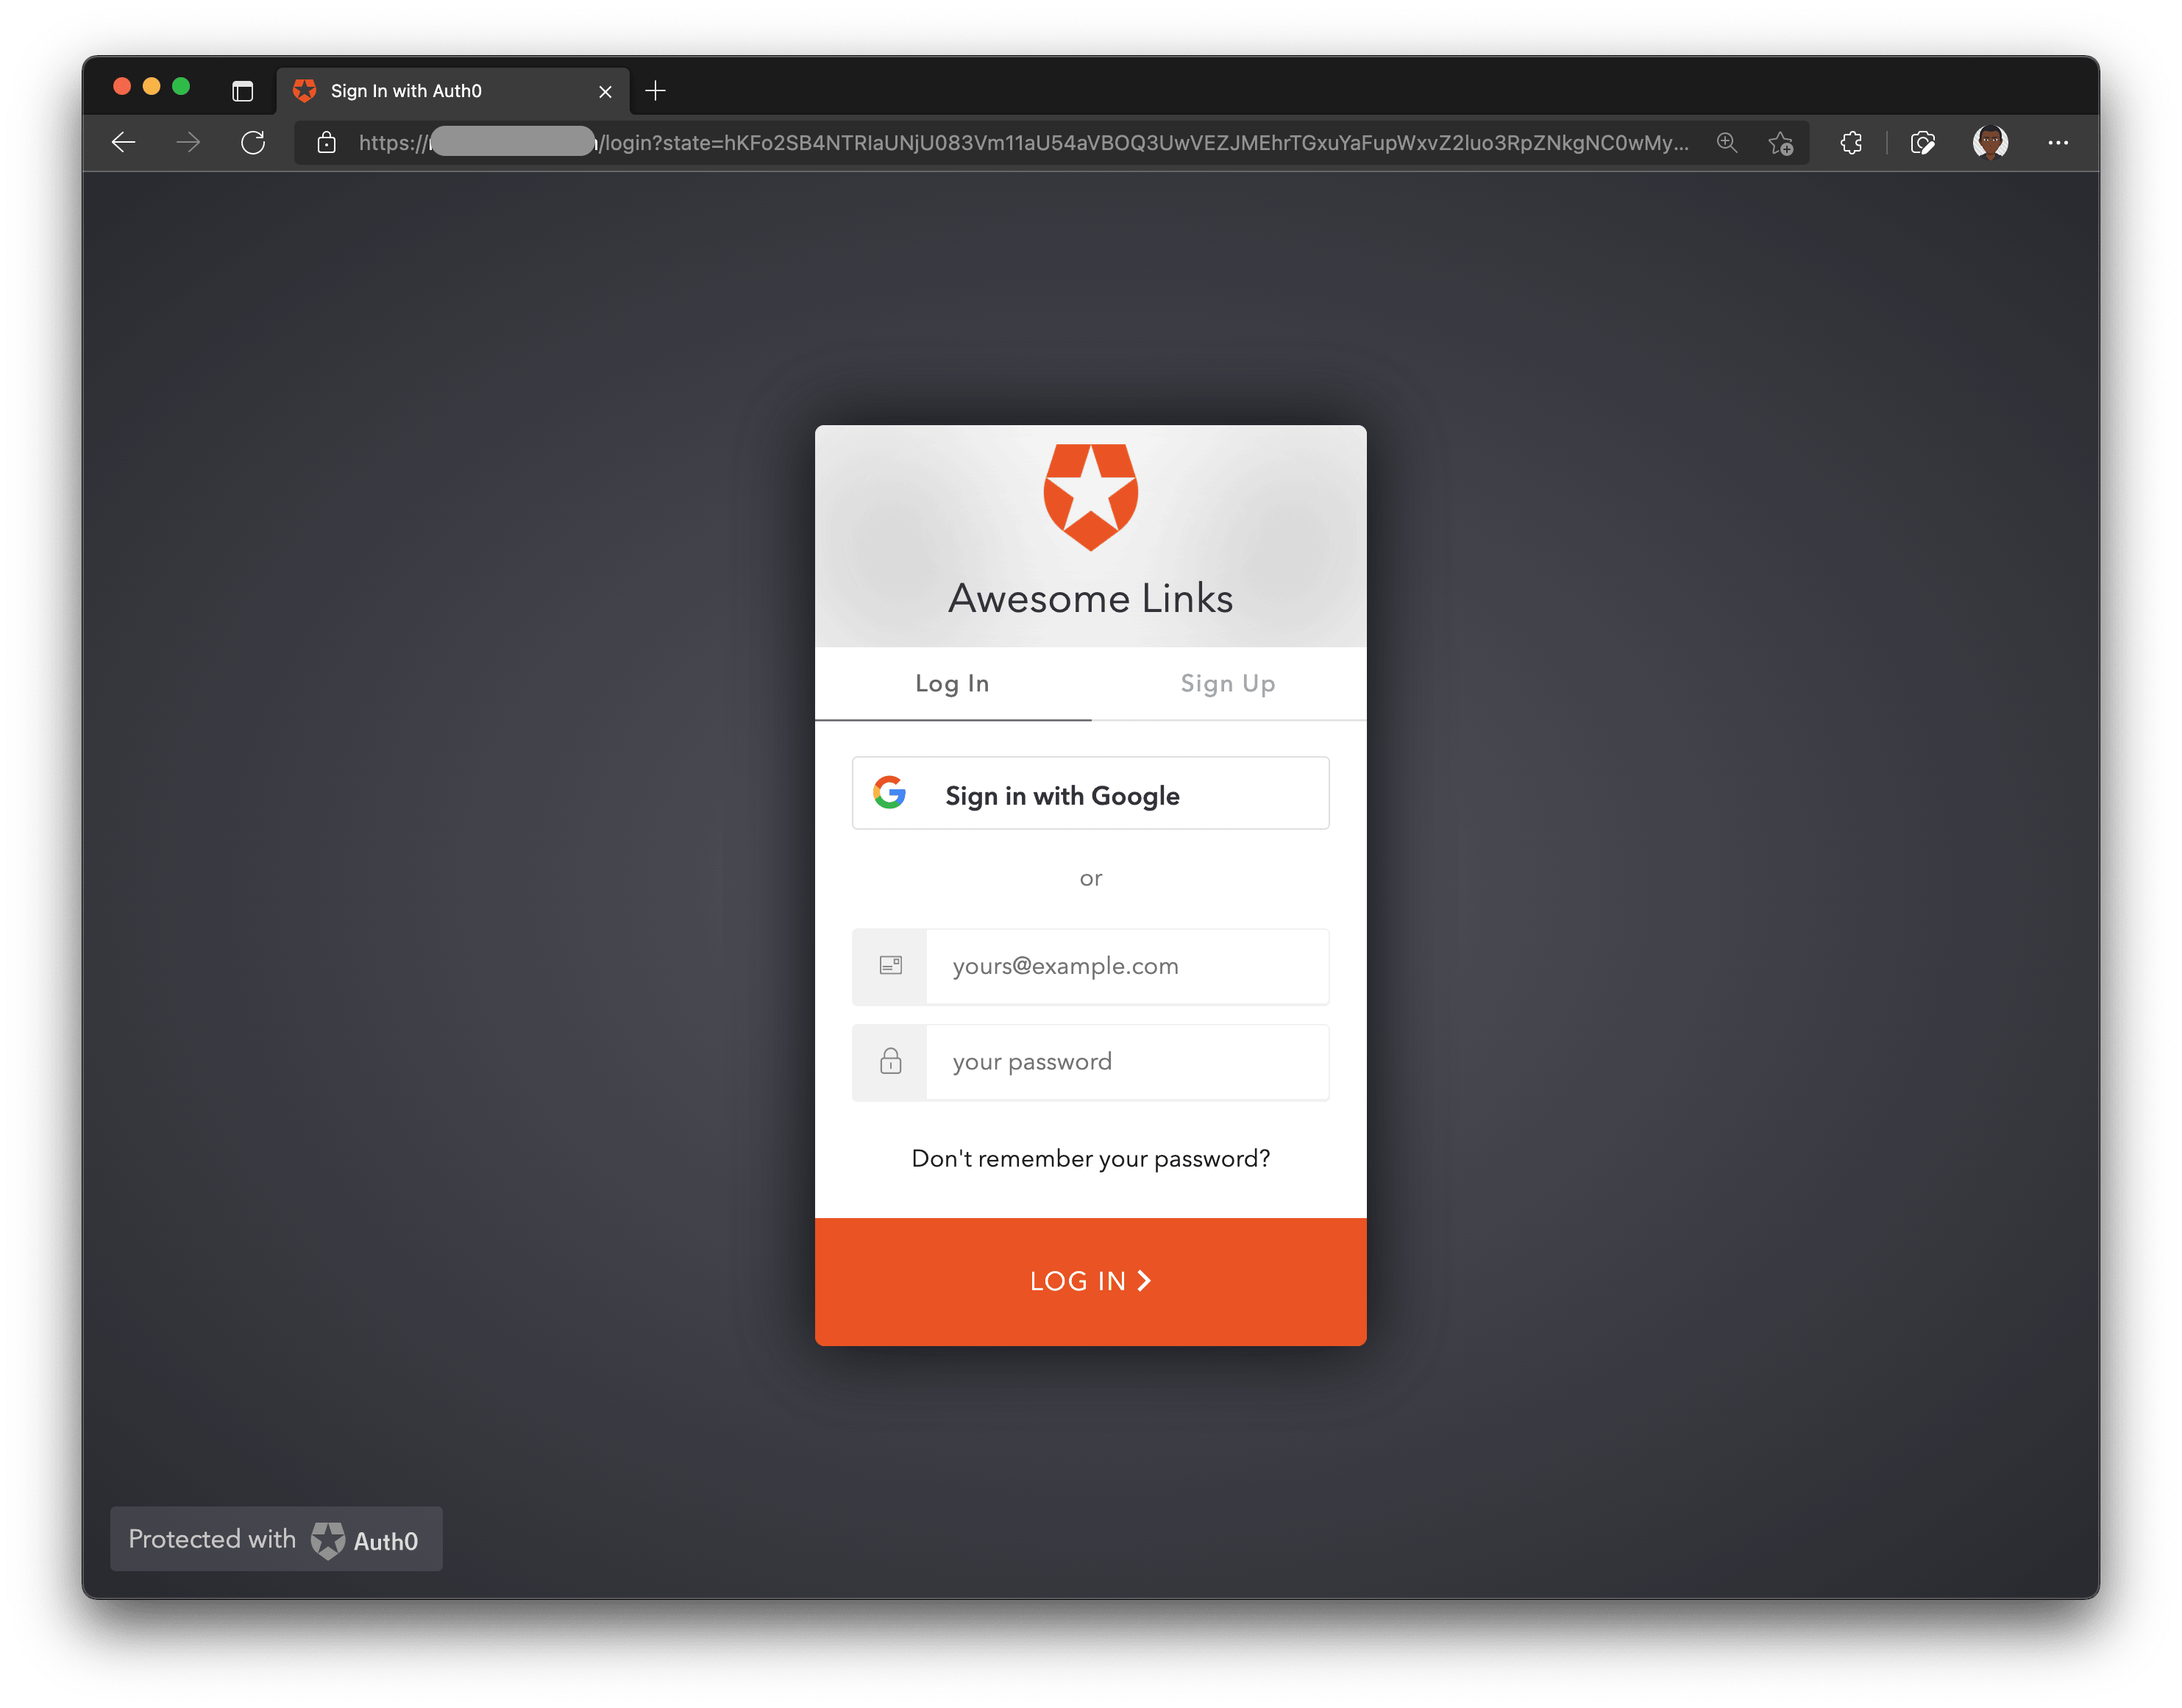
If you have done all the previous steps correctly, you should be able to sign up and login to the app!
Note: If you want to only allow authenticated requests to your GraphQL API, you can use the
withApiAuthRequiredfunction from Auth0 to secure it.
Sync Auth0 users with the app's database
Auth0 only manages users on your behalf and doesn't allow storing any data except the user's auth information. Therefore, whenever a user logs into your application the first time, you need to create a new record with the user information in your database.
To achieve that, you will leverage Auth0 Actions. Auth0 Actions are serverless functions that can execute at certain points during the Auth0 runtime.
You will define an API route that will receive the information sent from the Auth0 Action during the login process and save the information to your database. This pattern of creating an API endpoint to listen to events from a third party service is called a webhook.
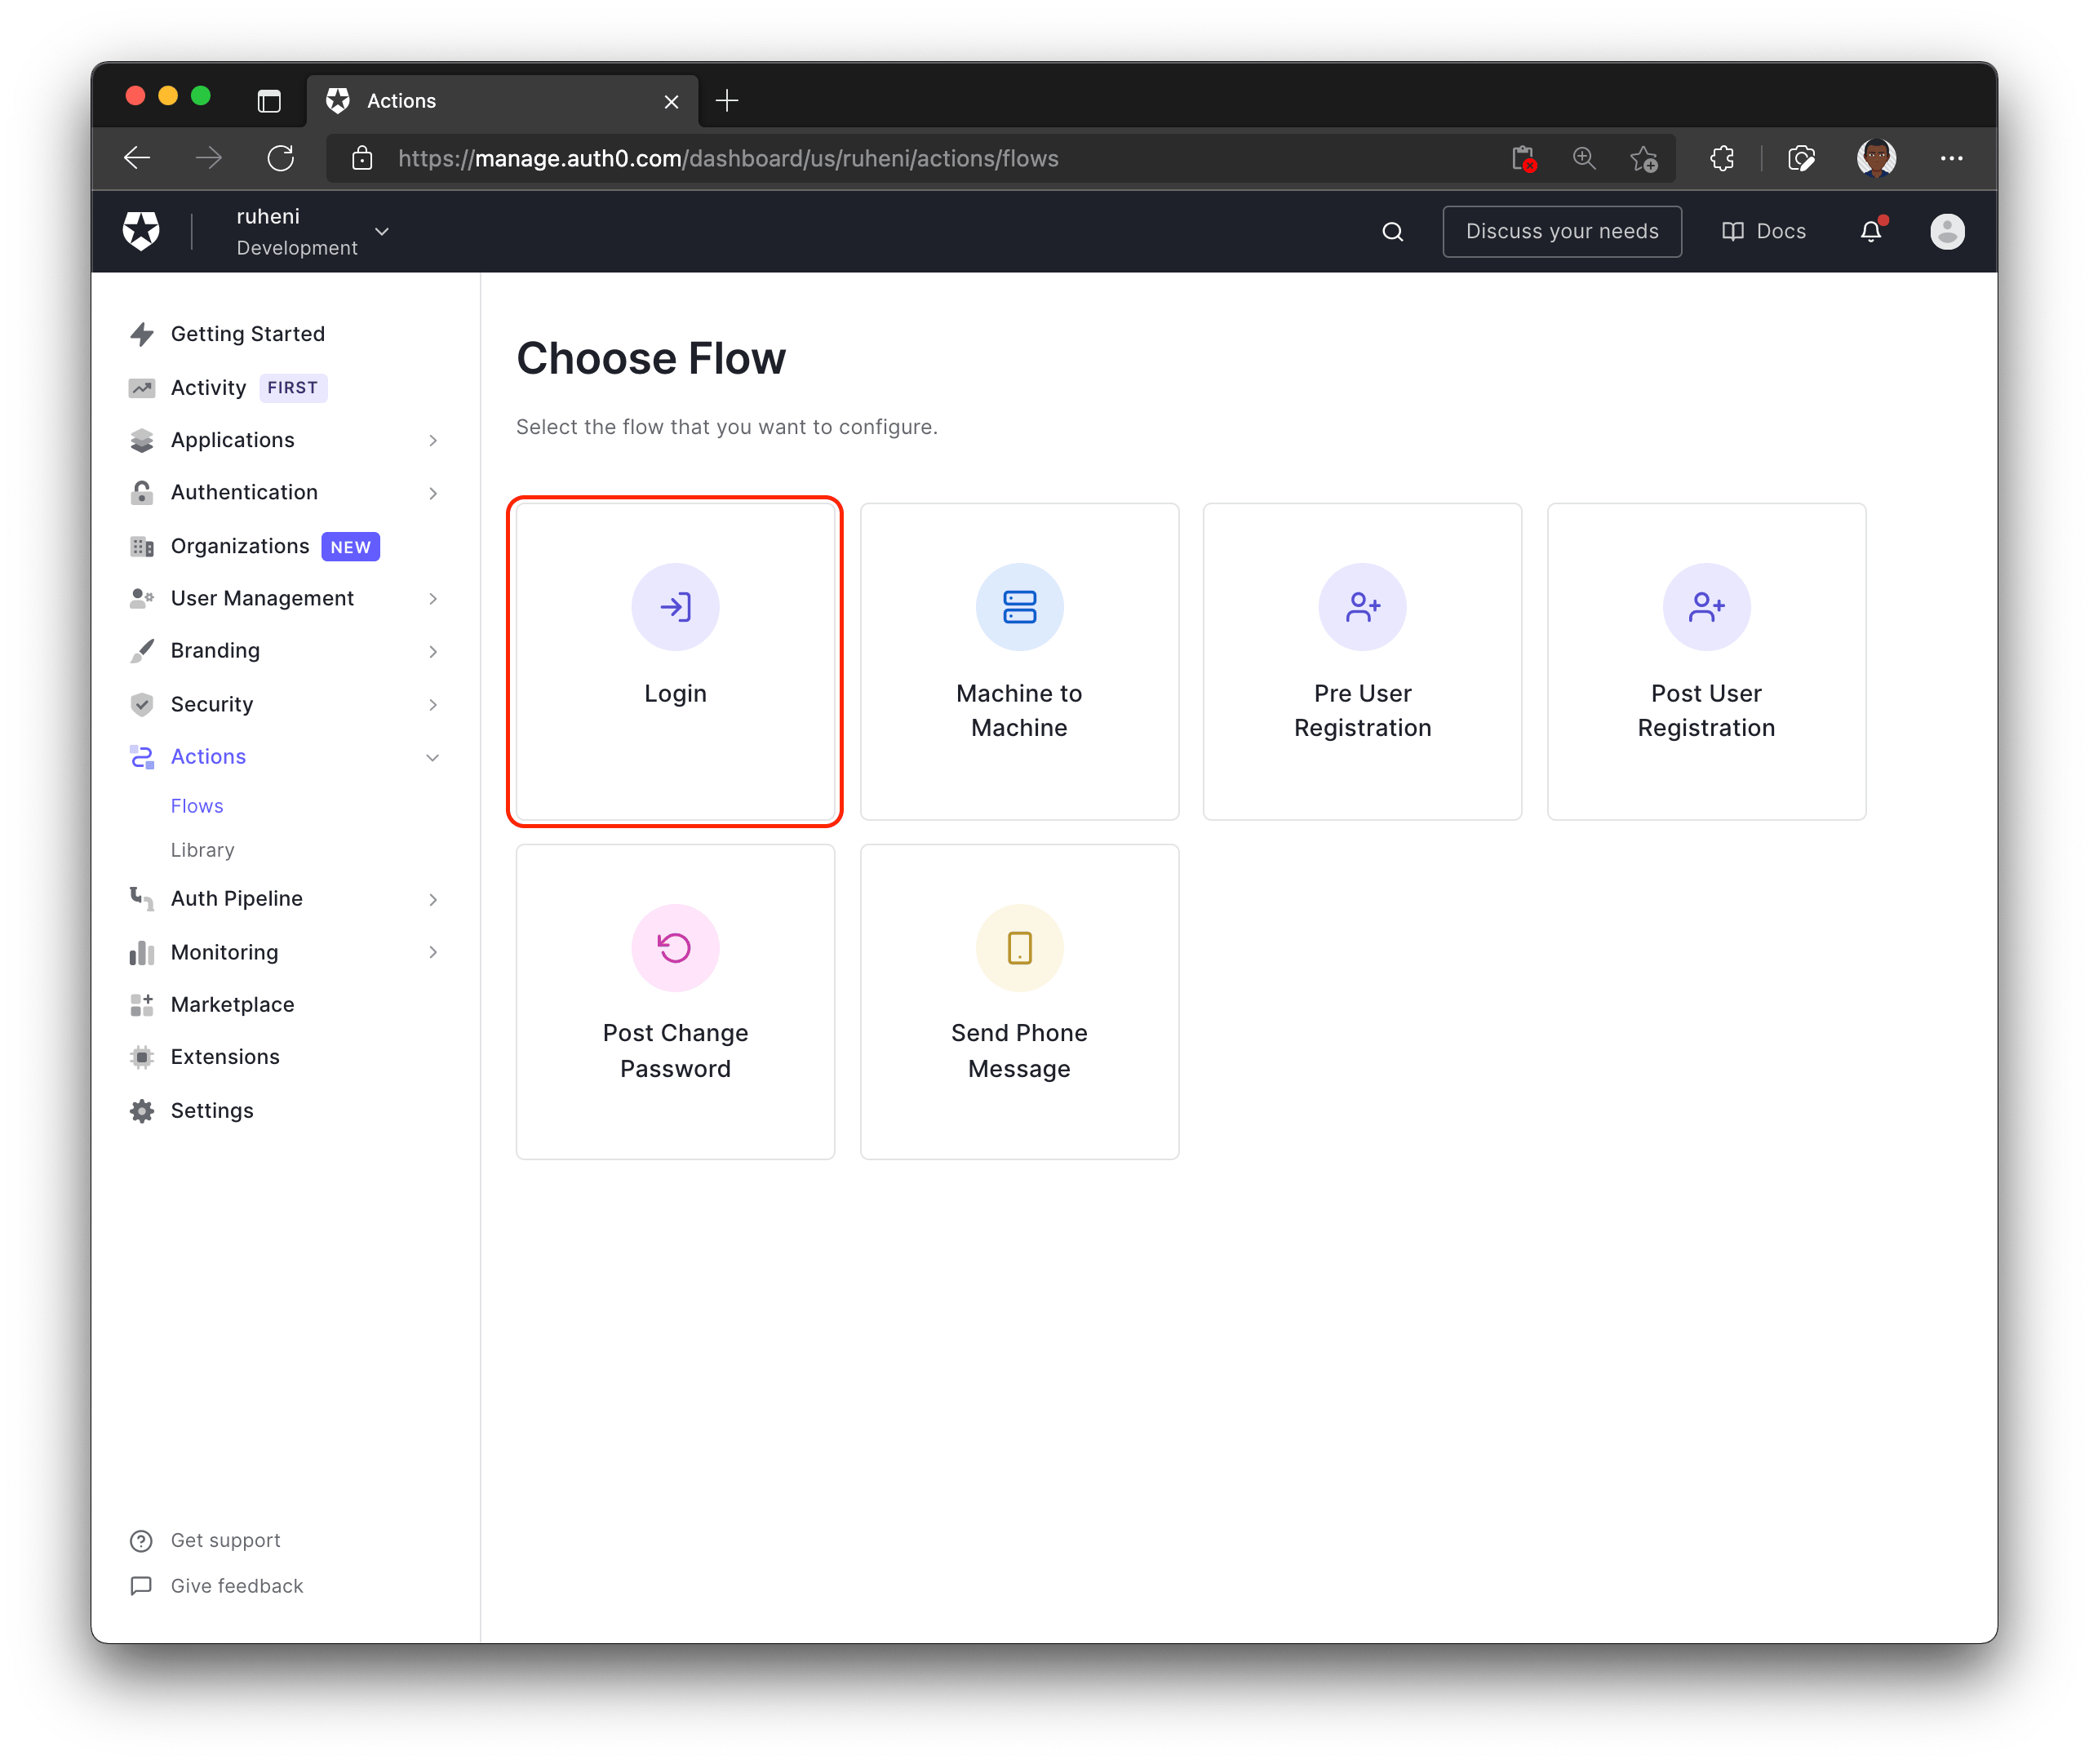
To get started with Auth0 Actions, navigate to the Actions dropdown located in the left sidebar, select Flows and choose Login.
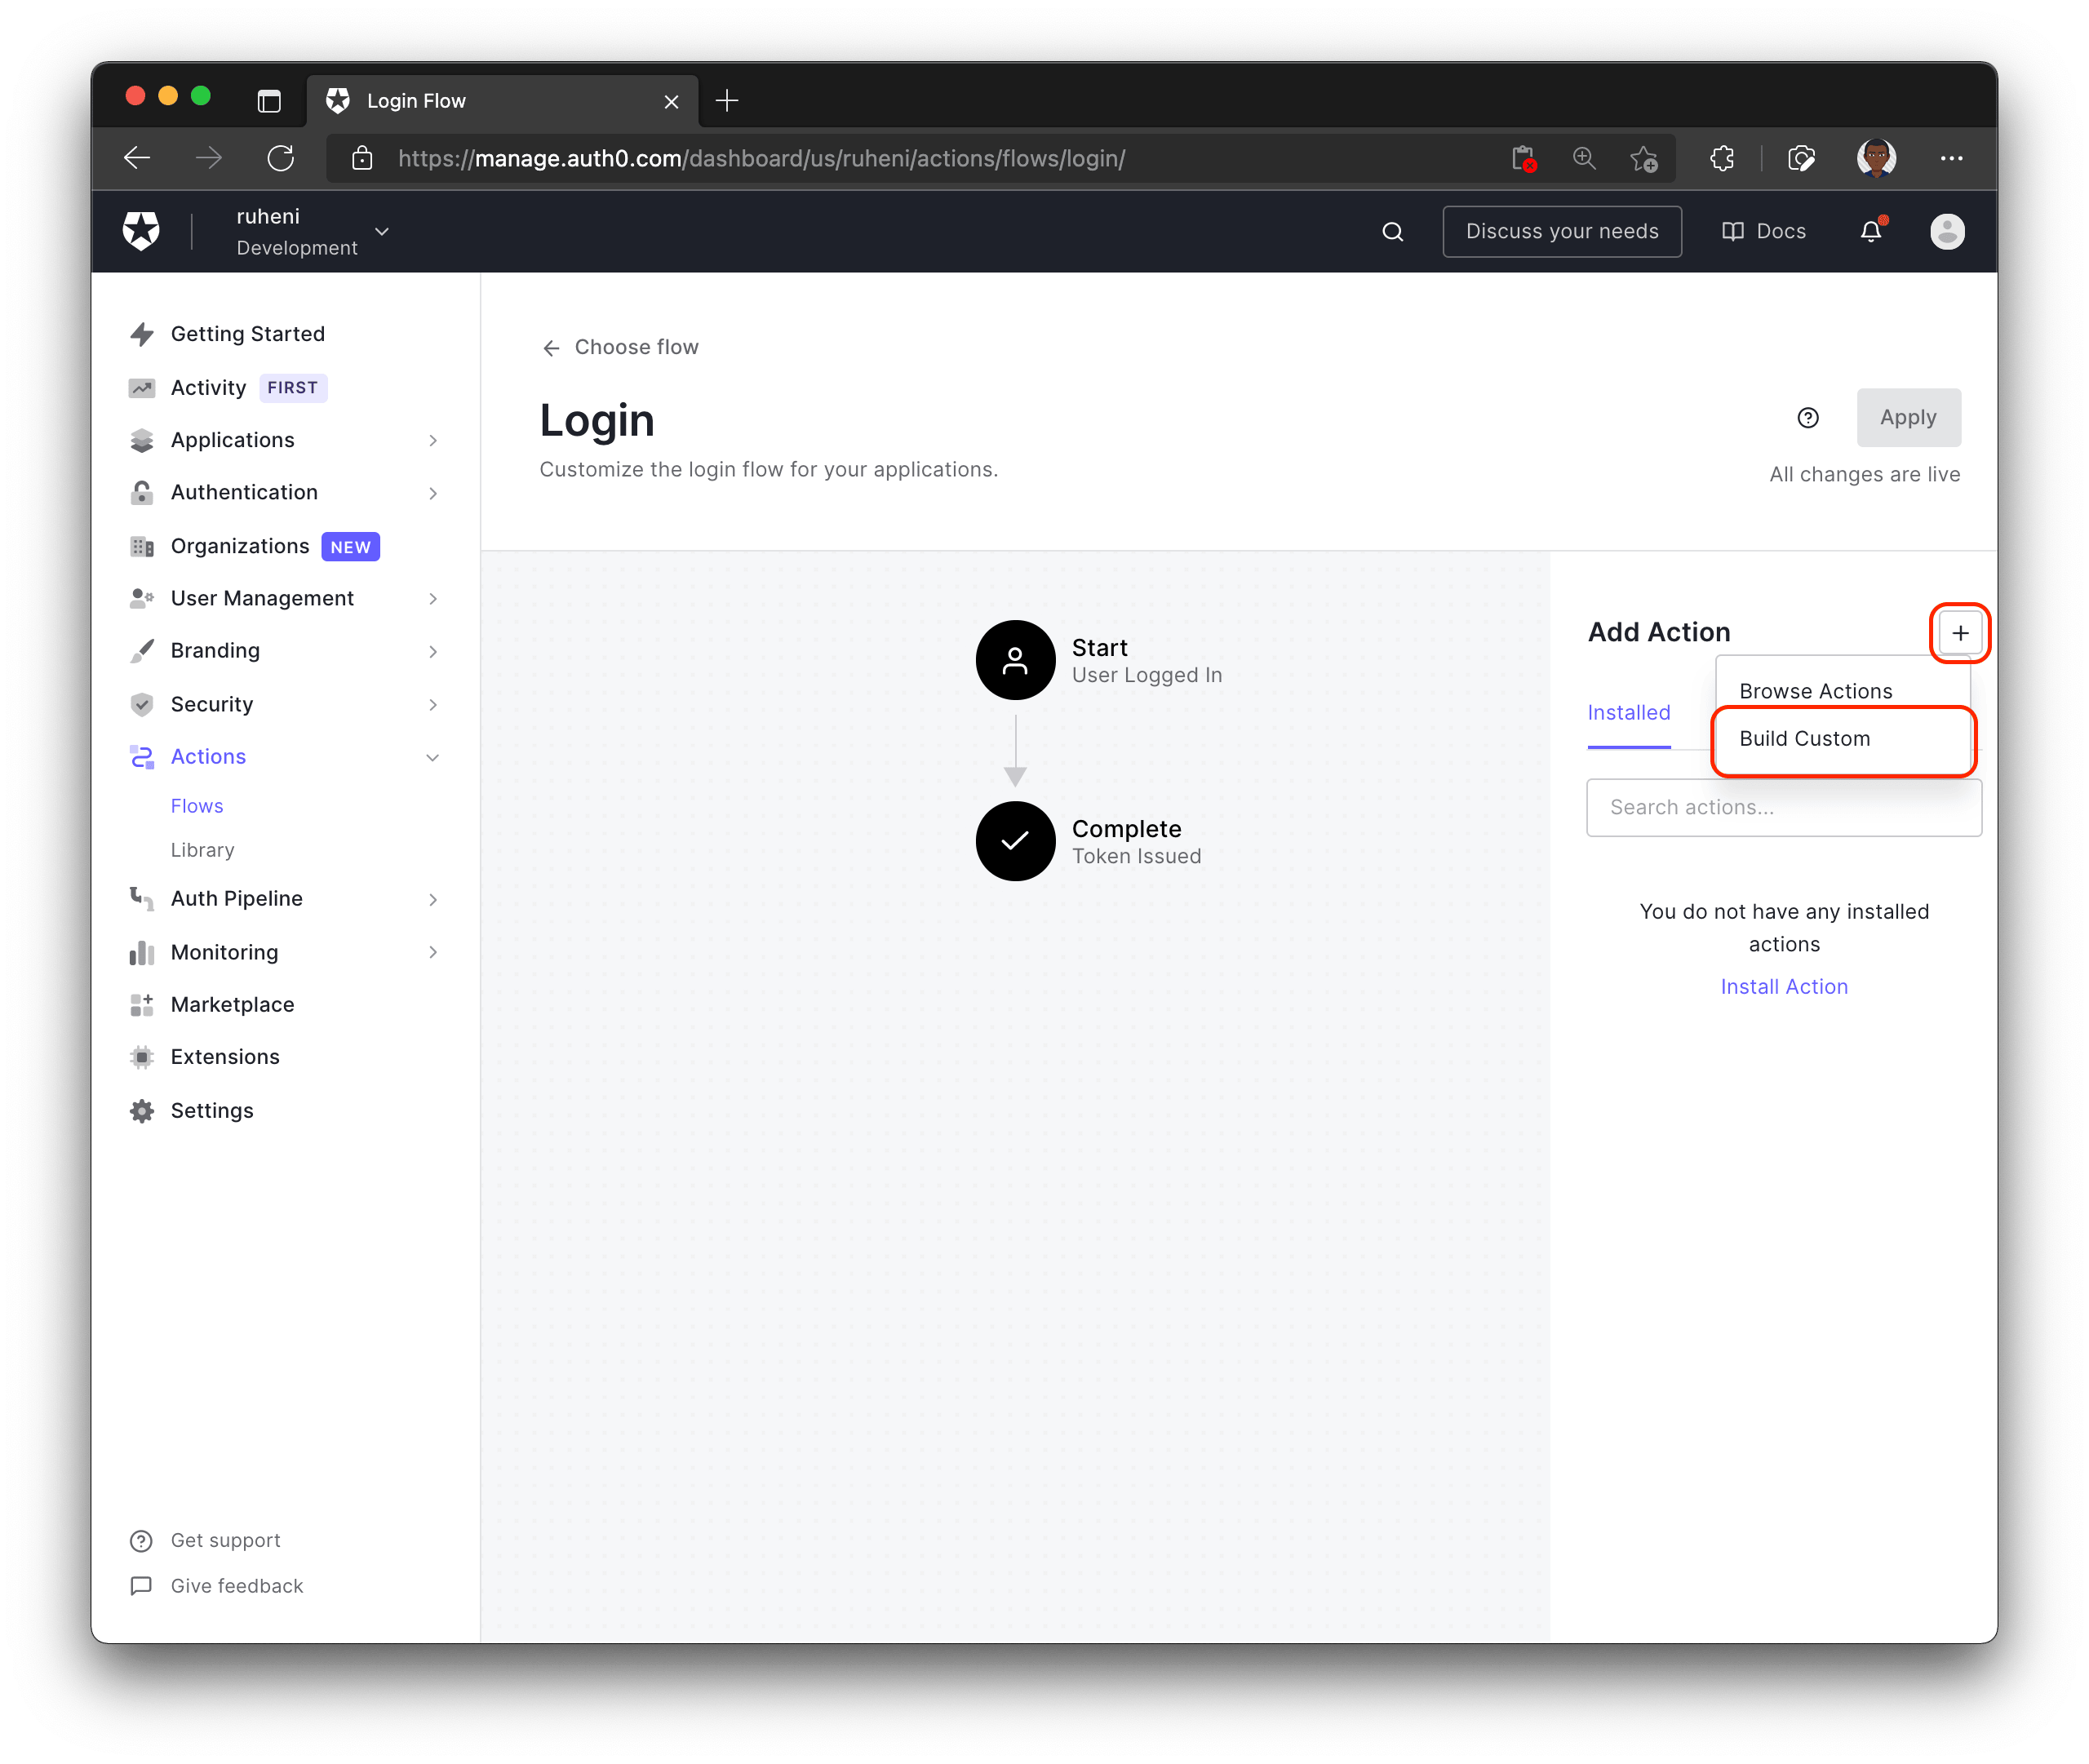
Next, to create a new Action, click the + icon and choose Build custom.
Pick a name for your custom Action, for example, "Create DB User" and complete the process by selecting Create.

After completing the previous step, you will be able to manage your newly created Action.
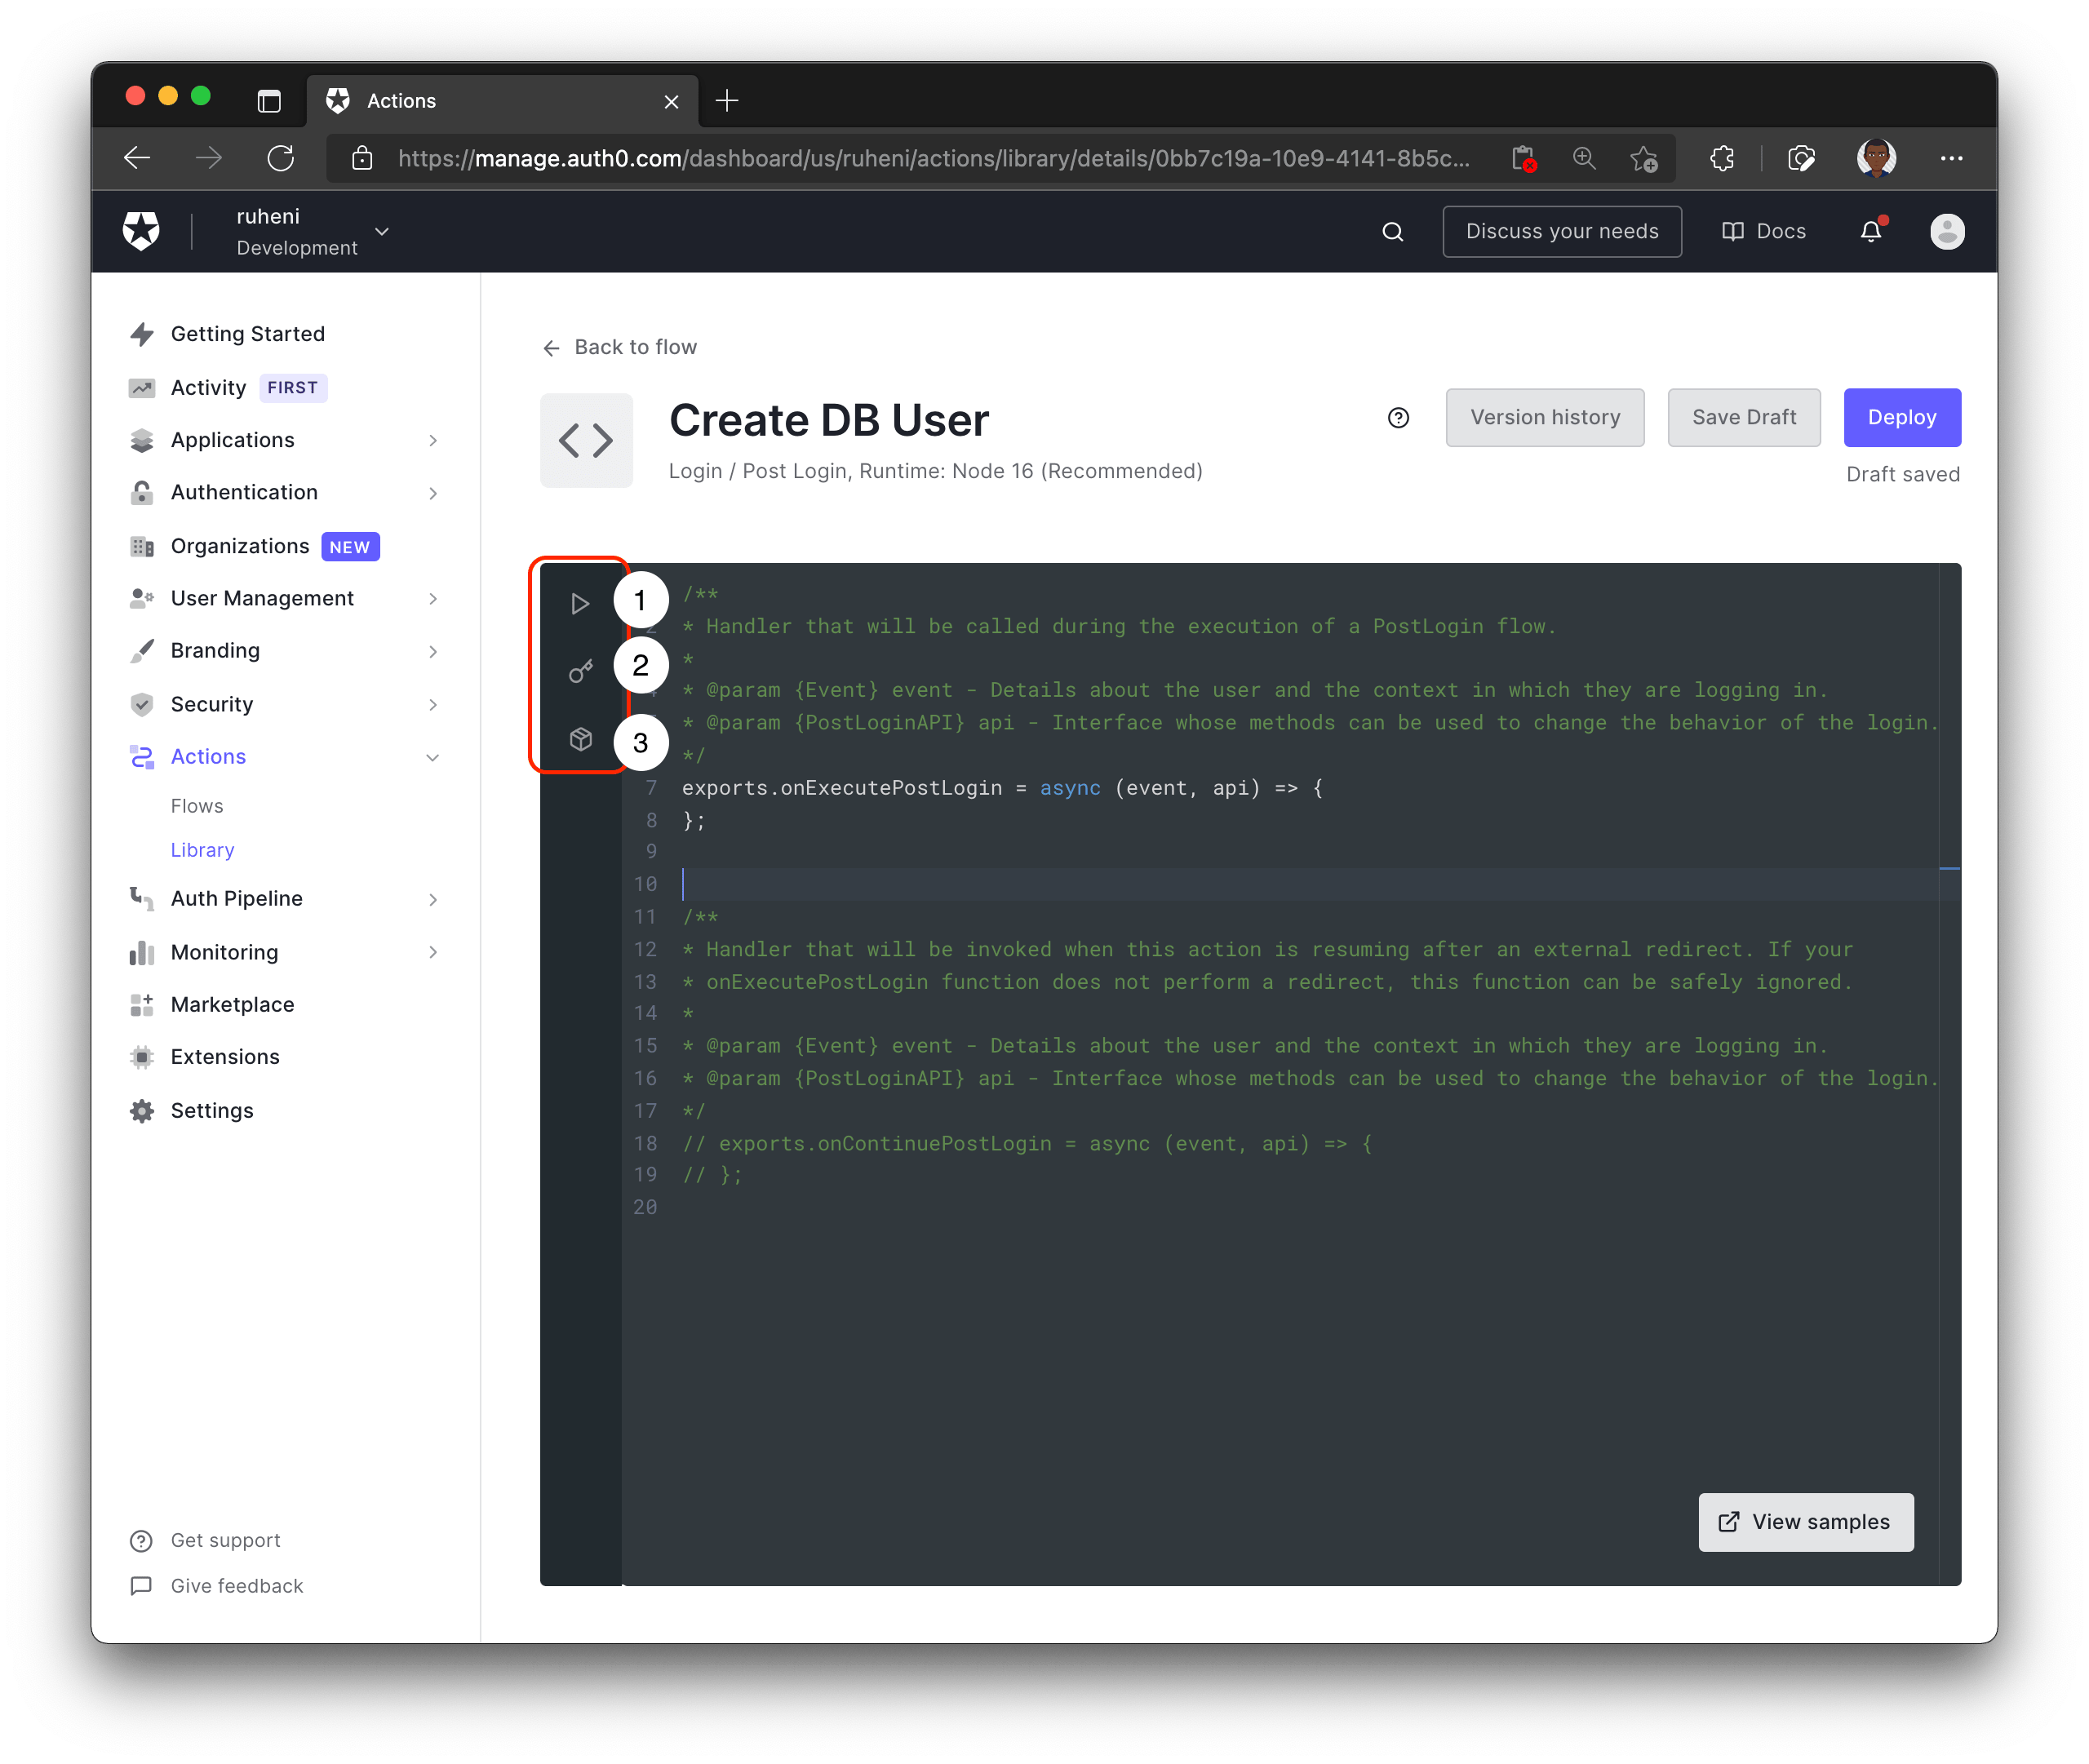
Here is a breakdown of the Auth0 Actions UI:
- 1 - Test your Action
- 2 - Define environment variables/secrets that will be used in the code
- 3 - Include modules that will be used in the Action's code
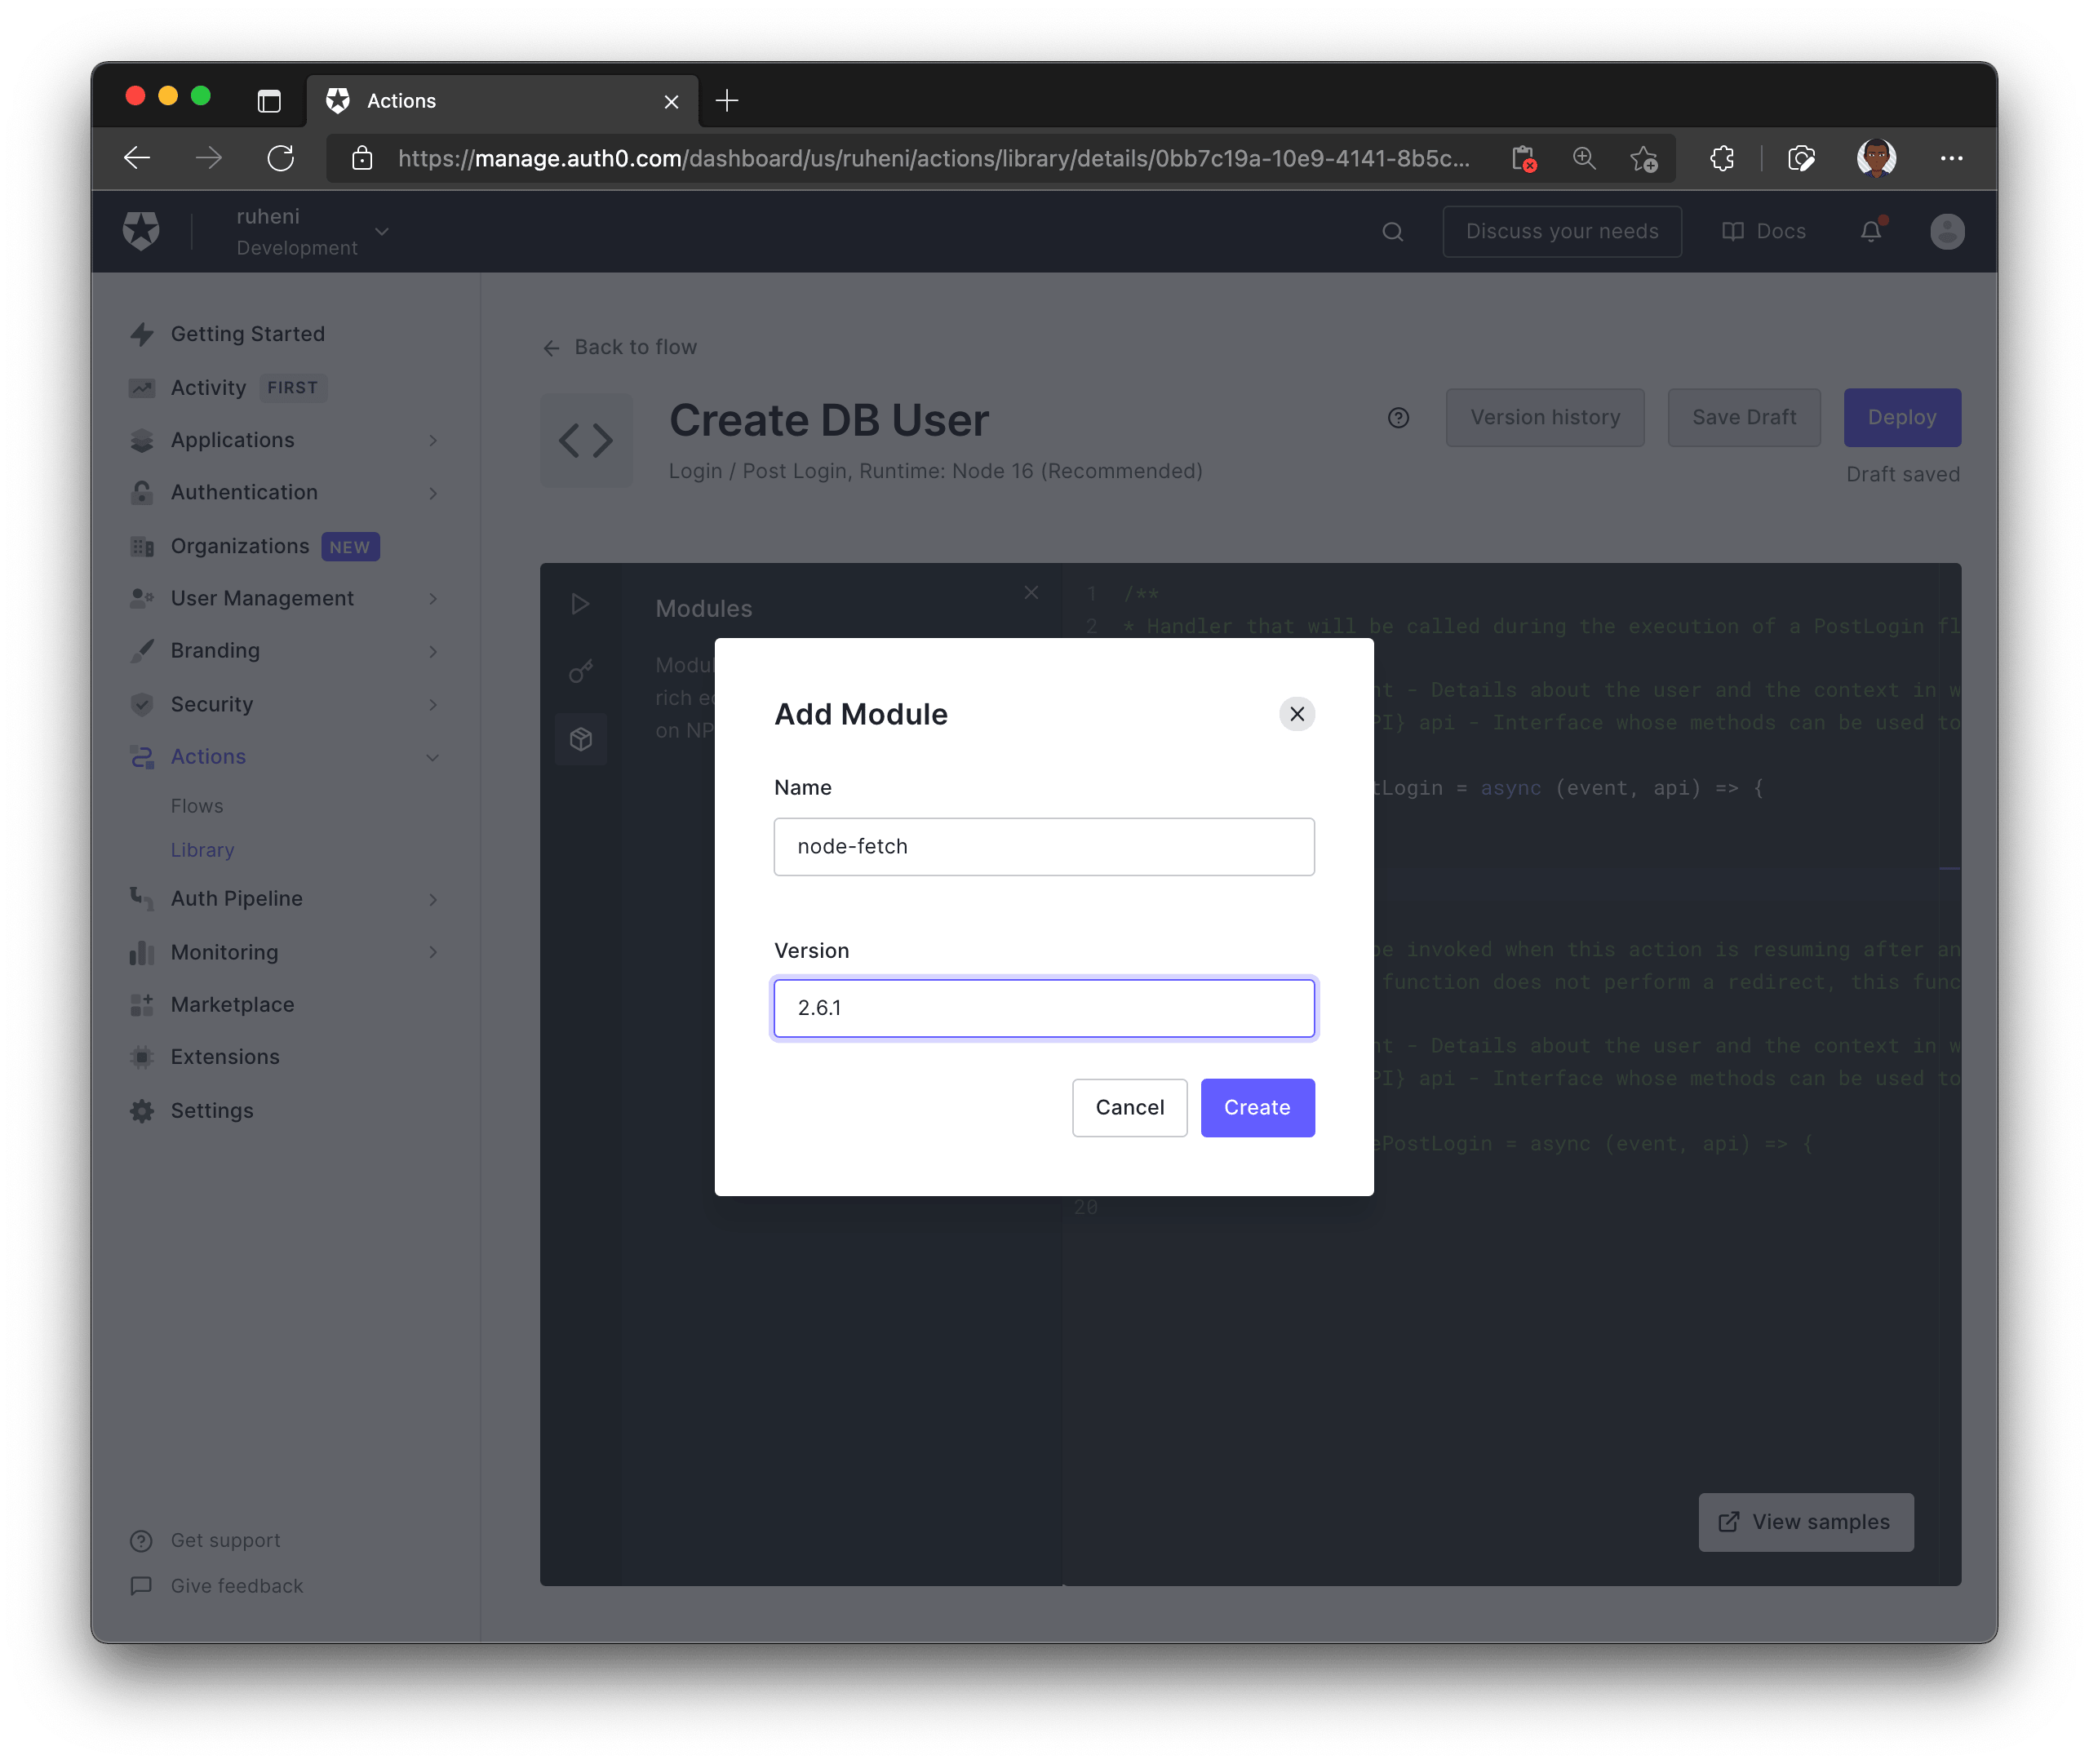
The first step is to include the node-fetch module version 2.6.1. You will use it in your Action to send a request to an API endpoint – you will create this later. This endpoint will handle the logic of creating a user record in the database.
Next, define a secret that will be included in every request sent by the Action to your endpoint. This secret will ensure that the requests are coming from the Auth0 Action instead of another untrusted third party.
You can generate a random secret using the following command in your terminal:
openssl rand -hex 32First, store this secret in the Auth0 dashboard with the key AUTH0_HOOK_SECRET.
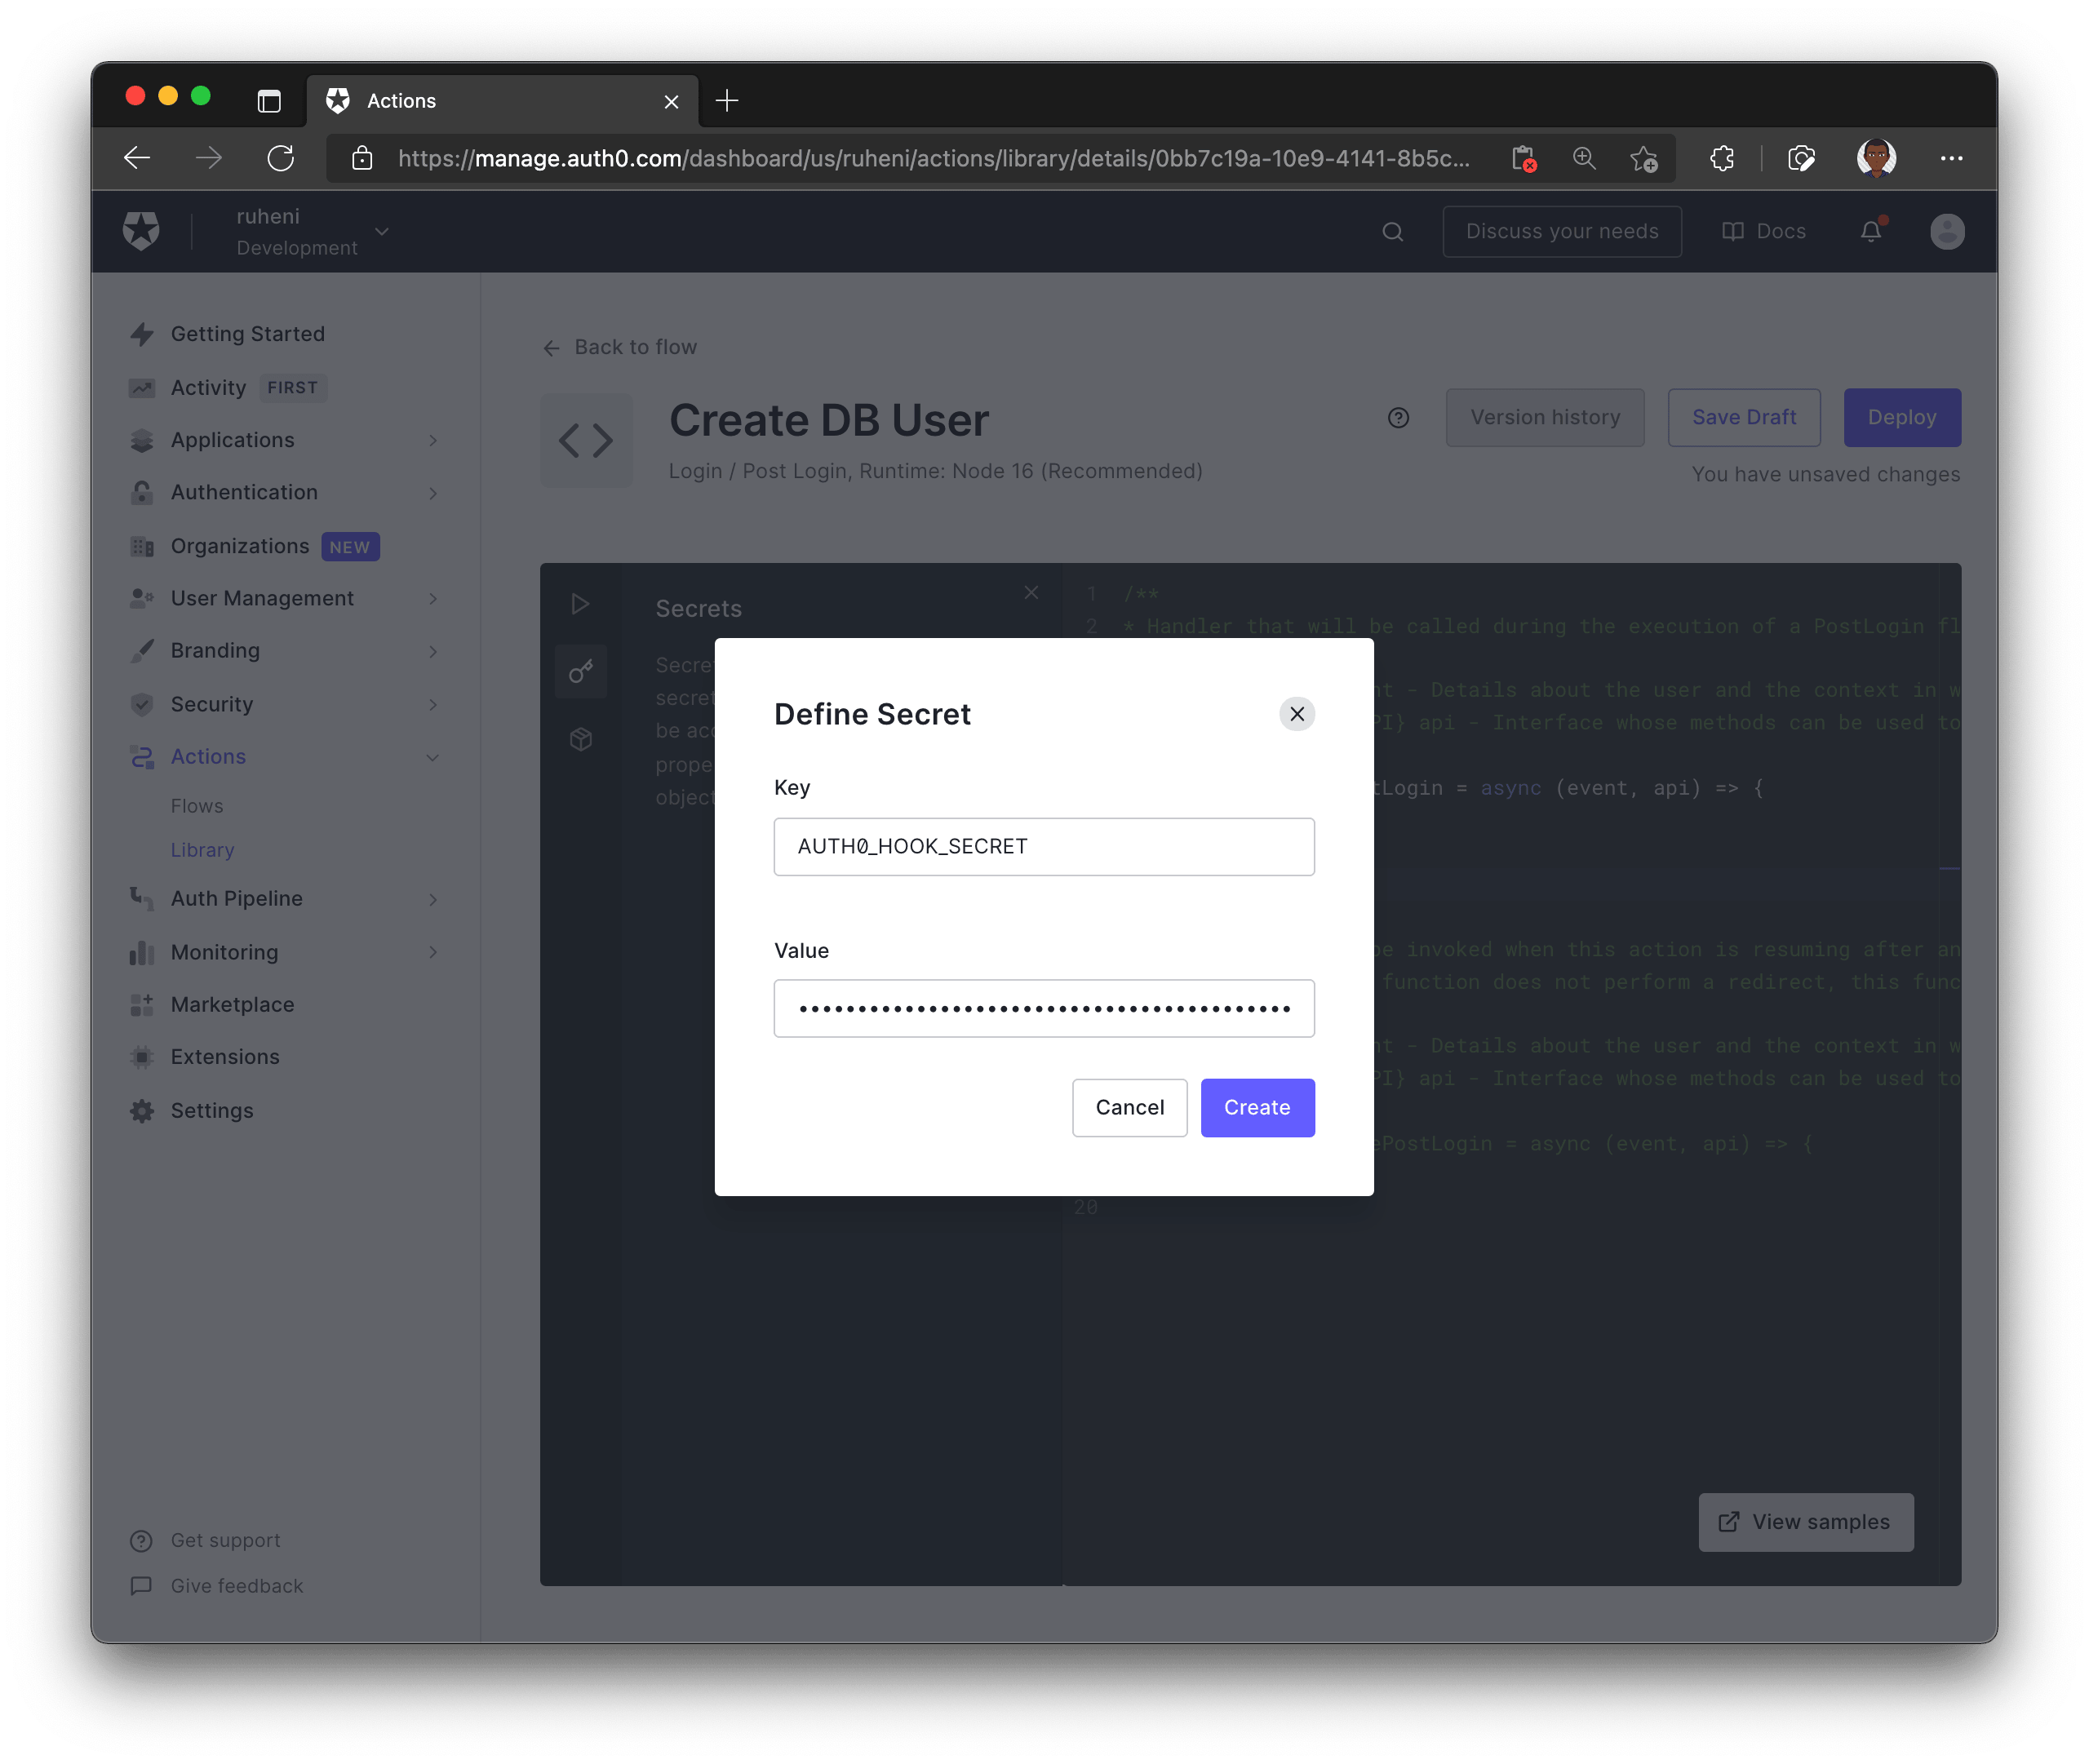
Now, also store the secret in your .env file.
AUTH0_HOOK_SECRET='' # same secret goes here
Finally, update the Action with the following code:
const fetch = require('node-fetch')

exports.onExecutePostLogin = async (event, api) => {
  // 1.
  const SECRET = event.secrets.AUTH0_HOOK_SECRET

  // 2.
  if (event.user.app_metadata.localUserCreated) {
    return
  }

  // 3.
  const email = event.user.email

  // 4.
  const request = await fetch('http://localhost:3000/api/auth/hook', {   // "localhost:3000" will be replaced before deploying this Action
    method: 'post',
    body: JSON.stringify({ email, secret: SECRET }),
    headers: { 'Content-Type': 'application/json' },
  })
  const response = await request.json()

  // 5.
  api.user.setAppMetadata('localUserCreated', true)
}- Retrieves the
AUTH0_HOOK_SECRETenvironment variable - Checks if the
localUserCreatedproperty on the user'sapp_metadata - Retrieves user's email from the login event – provided by Auth0
- Sends a
POSTrequest to an API route –http://localhost:3000/api/auth/hook - Adds the
localUserCreatedproperty to the user'sapp_metadata
The api.user.setAppMetadata function allows you to add additional properties to a user's profile.
Before you deploy this action, there's one more thing left to do.
Expose localhost:3000 using Ngrok
The Action you created runs on Auth0's servers. It cannot connect to localhost:3000 running on your computer. However, you can expose localhost:3000 to the internet and enable it to receive requests from Auth0's servers using a tool called Ngrok.
Ngrok will generate a URL to your localhost server that can be used in the Auth0 Action.
TODO: sign up for an account, get token from the dashboard
While your app is running, run the following command to expose localhost:3000:
npx ngrok http 3000 --authtoken "TOKEN" Note: Make sure to replace the
TOKENvalue with the token from Ngrok's dashboard.
The output on your terminal will resemble the following – but with different Forwarding URLs:
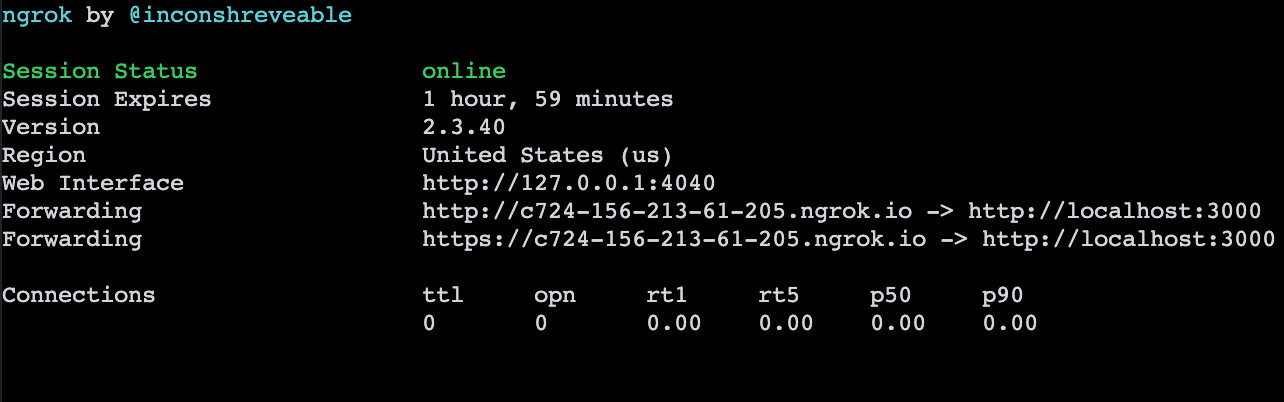
Copy the Forwarding URL, replace localhost:3000 with your Forwarding URL in your Action and click Deploy.
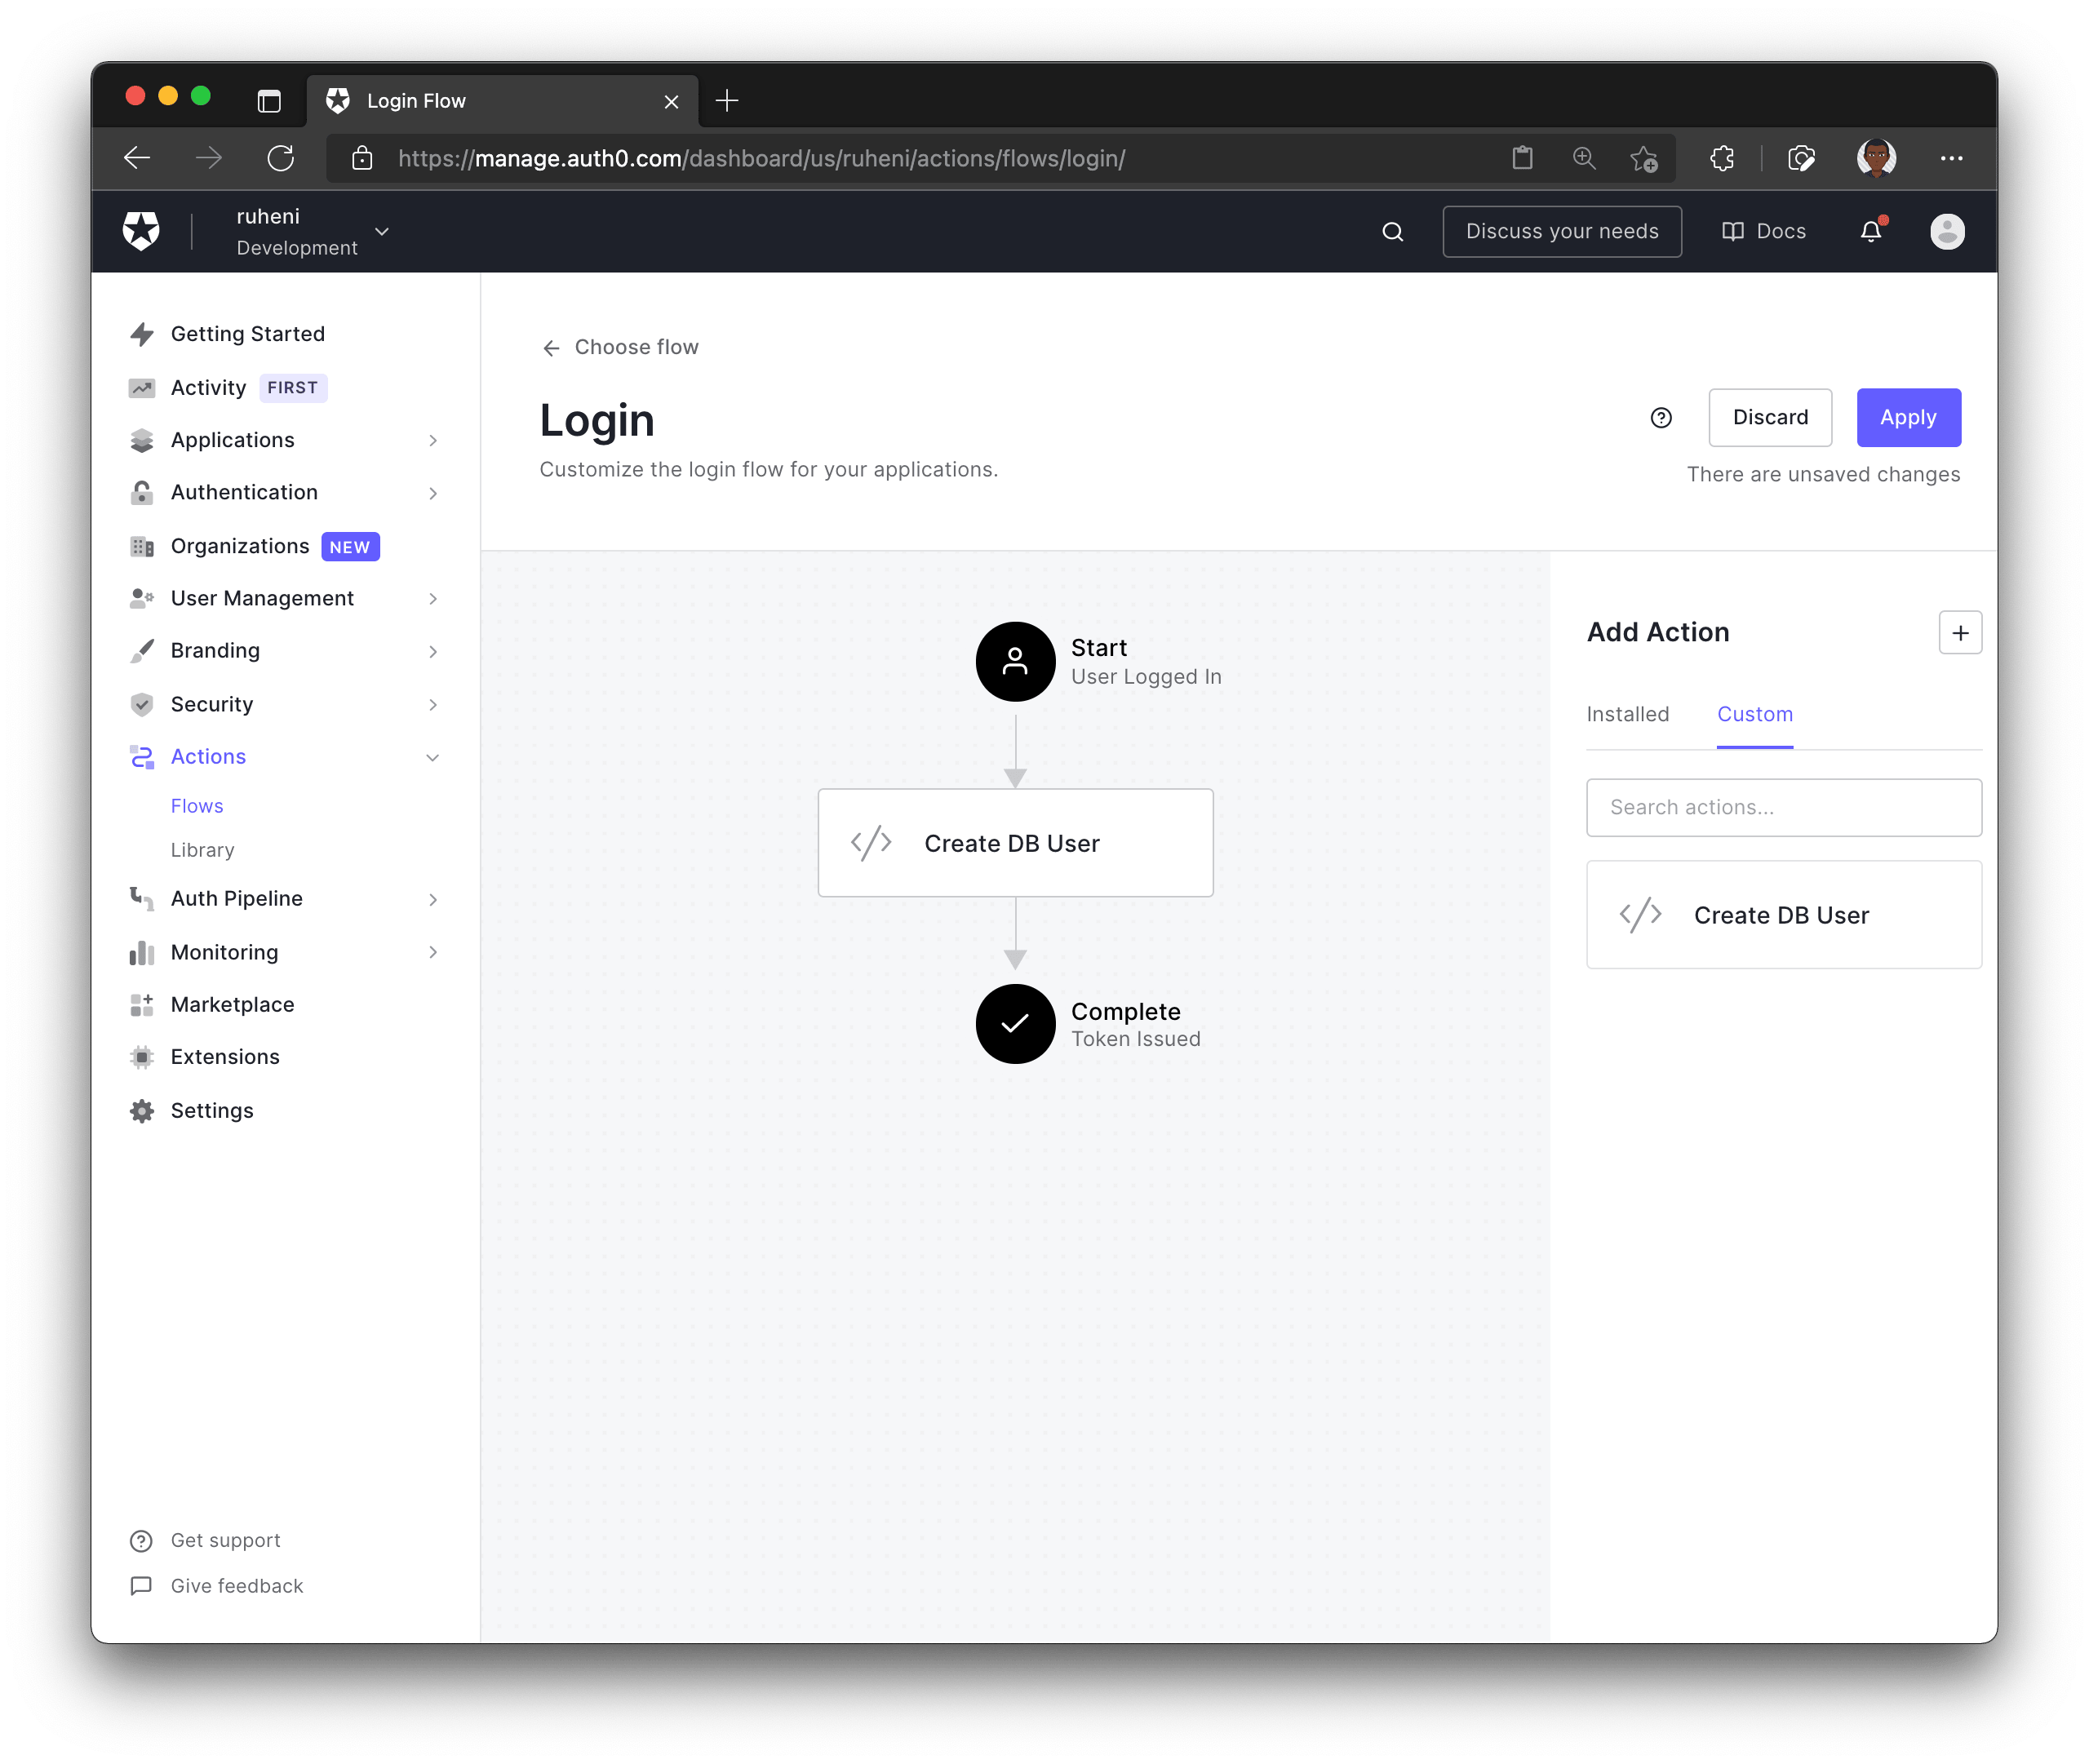
Now that the action is deployed, go back to the Login flow by pressing the Back to flow button.
The final thing you need to do is add your newly created action to the Login flow. You will find the action underneath the Custom tab. To add the action to your flow, you can drag-and-drop it between Start and Complete. Then click Apply to save the changes.
Define an API route for creating new users
Create a hook.ts file in the pages/api/auth/ folder and add the following code to it:
// pages/api/auth/hook.ts
import  prisma from '../../../lib/prisma';
import type { NextApiRequest, NextApiResponse } from 'next';

const handler = async (req: NextApiRequest, res: NextApiResponse) => {
  const { email, secret } = req.body;
  // 1
  if (req.method !== 'POST') {
    return res.status(403).json({ message: 'Method not allowed' });
  }
  // 2
  if (secret !== process.env.AUTH0_HOOK_SECRET) {
    return res.status(403).json({ message: `You must provide the secret 🤫` });
  }
  // 3
  if (email) {
    // 4
    await prisma.user.create({
      data: { email },
    });
    return res.status(200).json({
      message: `User with email: ${email} has been created successfully!`,
    });
  }
};

export default handler;
This endpoint does the following:
- Validates the request is a
POSTrequest - Validates the
AUTH0_HOOK_SECRETfrom the request body is correct - Validates that an email was provided in the request body
- Creates a new user record
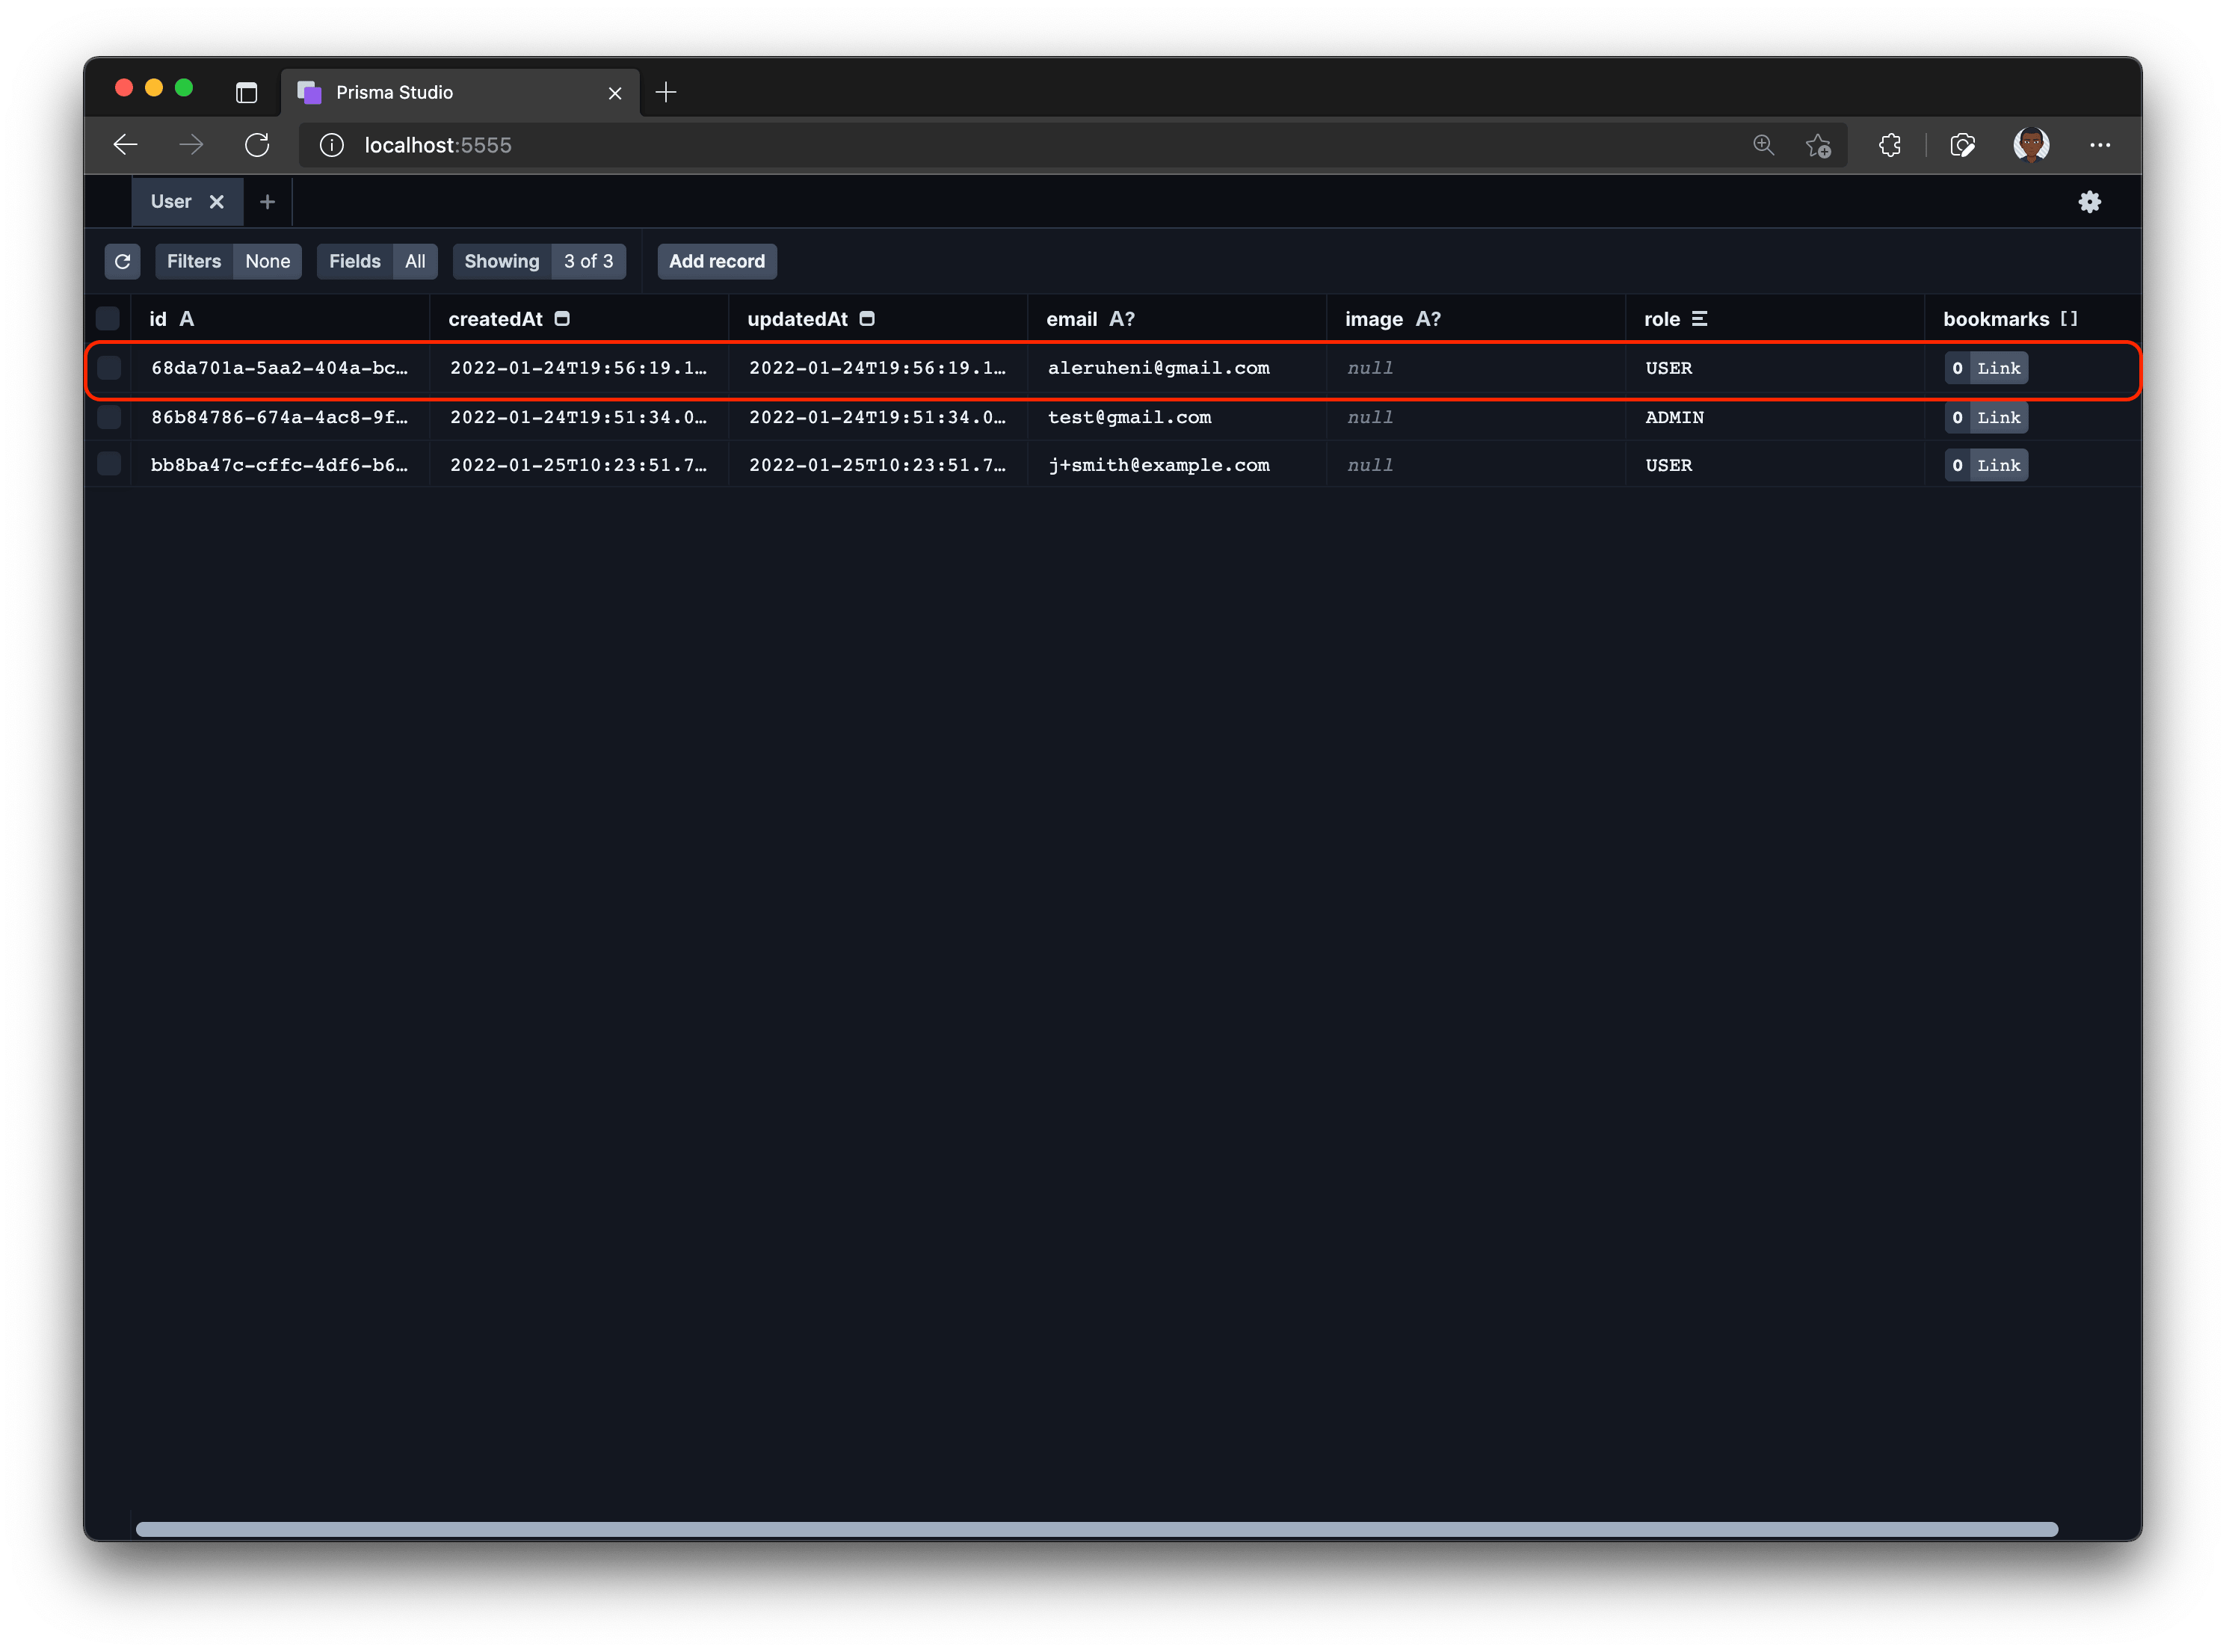
Once a user signs up to your application, the user's information will be synced to your database. You can view the newly created user in your database through Prisma Studio.
Create links – auth protected page
Navigate to graphql/builder.ts file and update with the following snippet:
diff
// graphql/builder.ts
// ...code above remains unchanged

builder.queryType({
  fields: (t) => ({
    ok: t.boolean({
      resolve: () => true,
    }),
  }),
});

+builder.mutationType({})
The above snippet registeres the Mutation type in the schema which allows you to define mutations in your GraphQL server.
Next, update graphql/types/Link.ts with the following mutation that adds the ability to create links:
// graphql/types/Link.ts
// ... code above remains unchanged

builder.mutationField("createLink", (t) =>
  t.prismaField({
    type: 'Link',
    args: {
      title: t.arg.string({ required: true }),
      description: t.arg.string({ required: true }),
      url: t.arg.string({ required: true }),
      imageUrl: t.arg.string({ required: true }),
      category: t.arg.string({ required: true }),
    },
    resolve: async (query, _parent, args, ctx) => {
      const { title, description, url, imageUrl, category } = args

      if (!(await ctx).user) {
        throw new Error("You have to be logged in to perform this action")
      }

      return prisma.link.create({
        ...query,
        data: {
          title,
          description,
          url,
          imageUrl,
          category,
        }
      })
    }
  })
)
The args property defines the input required to create a new link. The mutation also checks if a user is logged in so only authenticated users can create links. Finally, the create() function from Prisma creates a new database record.
Install the following dependencies you'll use for form management and notifications:
npm install react-hook-form react-hot-toastNext, create pages/admin.tsx page and add the following code. The code allows creation of a new link:
// pages/admin.tsx
import React from 'react'
import { type SubmitHandler, useForm } from 'react-hook-form'
import { gql, useMutation } from '@apollo/client'
import toast, { Toaster } from 'react-hot-toast'
import { getSession } from '@auth0/nextjs-auth0'
import prisma from '../lib/prisma'
import type { GetServerSideProps } from 'next'

type FormValues = {
  title: string;
  url: string;
  category: string;
  description: string;
  image: FileList;
}

const CreateLinkMutation = gql`
  mutation createLink($title: String!, $url: String!, $imageUrl: String!, $category: String!, $description: String!) {
    createLink(title: $title, url: $url, imageUrl: $imageUrl, category: $category, description: $description) {
      title
      url
      imageUrl
      category
      description
    }
  }
`

const Admin = () => {
  const {
    register,
    handleSubmit,
    formState: { errors },
    reset,
  } = useForm<FormValues>()

  const [createLink, { loading, error }] = useMutation(CreateLinkMutation, {
    onCompleted: () => reset()
  })

  const onSubmit: SubmitHandler<FormValues> = async (data) => {
    const { title, url, category, description } = data
    const imageUrl = `https://via.placeholder.com/300`
    const variables = { title, url, category, description, imageUrl }
    try {
      toast.promise(createLink({ variables }), {
        loading: 'Creating new link..',
        success: 'Link successfully created!🎉',
        error: `Something went wrong 😥 Please try again -  ${error}`,
      })

    } catch (error) {
      console.error(error)
    }
  }

  return (
    <div className="container mx-auto max-w-md py-12">
      <Toaster />
      <h1 className="text-3xl font-medium my-5">Create a new link</h1>
      <form className="grid grid-cols-1 gap-y-6 shadow-lg p-8 rounded-lg" onSubmit={handleSubmit(onSubmit)}>
        <label className="block">
          <span className="text-gray-700">Title</span>
          <input
            placeholder="Title"
            {...register('title', { required: true })}
            name="title"
            type="text"
            className="mt-1 block w-full rounded-md border-gray-300 shadow-sm focus:border-indigo-300 focus:ring focus:ring-indigo-200 focus:ring-opacity-50"
          />
        </label>
        <label className="block">
          <span className="text-gray-700">Description</span>
          <input
            placeholder="Description"
            {...register('description', { required: true })}
            name="description"
            type="text"
            className="mt-1 block w-full rounded-md border-gray-300 shadow-sm focus:border-indigo-300 focus:ring focus:ring-indigo-200 focus:ring-opacity-50"
          />
        </label>
        <label className="block">
          <span className="text-gray-700">Url</span>
          <input
            placeholder="https://example.com"
            {...register('url', { required: true })}
            name="url"
            type="text"
            className="mt-1 block w-full rounded-md border-gray-300 shadow-sm focus:border-indigo-300 focus:ring focus:ring-indigo-200 focus:ring-opacity-50"
          />
        </label>
        <label className="block">
          <span className="text-gray-700">Category</span>
          <input
            placeholder="Name"
            {...register('category', { required: true })}
            name="category"
            type="text"
            className="mt-1 block w-full rounded-md border-gray-300 shadow-sm focus:border-indigo-300 focus:ring focus:ring-indigo-200 focus:ring-opacity-50"
          />
        </label>

        <button
          disabled={loading}
          type="submit"
          className="my-4 capitalize bg-blue-500 text-white font-medium py-2 px-4 rounded-md hover:bg-blue-600"
        >
          {loading ? (
            <span className="flex items-center justify-center">
              <svg
                className="w-6 h-6 animate-spin mr-1"
                fill="currentColor"
                viewBox="0 0 20 20"
                xmlns="http://www.w3.org/2000/svg"
              >
                <path d="M11 17a1 1 0 001.447.894l4-2A1 1 0 0017 15V9.236a1 1 0 00-1.447-.894l-4 2a1 1 0 00-.553.894V17zM15.211 6.276a1 1 0 000-1.788l-4.764-2.382a1 1 0 00-.894 0L4.789 4.488a1 1 0 000 1.788l4.764 2.382a1 1 0 00.894 0l4.764-2.382zM4.447 8.342A1 1 0 003 9.236V15a1 1 0 00.553.894l4 2A1 1 0 009 17v-5.764a1 1 0 00-.553-.894l-4-2z" />
              </svg>
              Creating...
            </span>
          ) : (
            <span>Create Link</span>
          )}
        </button>
      </form>
    </div>
  )
}

export default Admin

export const getServerSideProps: GetServerSideProps = async ({ req, res }) => {
  const session = await getSession(req, res);

  if (!session) {
    return {
      redirect: {
        permanent: false,
        destination: '/api/auth/login',
      },
      props: {},
    }
  }

  return {
    props: {},
  };
}
The onSubmit function passes the form values to the createLink mutation. A toast will be shown as the mutation is being executed – success, loading, or error.
In getServerSideProps, if there is no session, you are redirecting the user to the login page. If a user record that matches the email of the logged-in user is found, the /admin page is rendered.
Update Header.tsx file by adding a + Create button authenticated users can use to create links.
diff // components/Layout/Header.tsx
/** imports */

const Header = () => {
  const { user } = useUser()
  return (
    <header className="text-gray-600 body-font">
         {/* the rest of the header... */}
        <nav className="...">
        {/** copy this snippet and add it right before the Logout button */}
+          {user && (
+            <div className="flex items-center justify-center mr-5 capitalize bg-blue-500 py-1 px-3 rounded-md text-white">
+              <Link href="/admin">
+                  + Create
+              </Link>
+            </div>
+          )}
           {/* Logout & login button... */}
        </nav>
      </div>
    </header>
  )
}

export default Header
You should now be able to create links! 🚀
Bonus: protecting pages based on the user role
You can tighten the authentication by ensuring only admin users can create links.
Firstly, update the createLink mutation to check a user's role:
// graphql/types/Link.ts
builder.mutationField("createLink", (t) =>
  t.prismaField({
    type: 'Link',
    args: {
      title: t.arg.string({ required: true }),
      description: t.arg.string({ required: true }),
      url: t.arg.string({ required: true }),
      imageUrl: t.arg.string({ required: true }),
      category: t.arg.string({ required: true }),
    },
    resolve: async (query, _parent, args, ctx) => {
      const { title, description, url, imageUrl, category } = args

      if (!(await ctx).user) {
        throw new Error("You have to be logged in to perform this action")
      }

      const user = await prisma.user.findUnique({
        where: {
          email: (await ctx).user?.email,
        }
      })

      if (!user || user.role !== "ADMIN") {
        throw new Error("You don have permission ot perform this action")
      }

      return prisma.link.create({
        ...query,
        data: {
          title,
          description,
          url,
          imageUrl,
          category,
        }
      })
    }
  })
)
Update admin.tsx page by adding the role check in your getServerSideProps to redirect users that are not admins. Users without the ADMIN role will be redirected to the /404 page.
// pages/admin.tsx
export const getServerSideProps: GetServerSideProps = async ({ req, res }) => {
  const session = await getSession(req, res);

  if (!session) {
    return {
      redirect: {
        permanent: false,
        destination: '/api/auth/login',
      },
      props: {},
    };
  }

  const user = await prisma.user.findUnique({
    select: {
      email: true,
      role: true,
    },
    where: {
      email: session.user.email,
    },
  });

  if (!user || user.role !== 'ADMIN') {
    return {
      redirect: {
        permanent: false,
        destination: '/404',
      },
      props: {},
    };
  }

  return {
    props: {},
  };
};
The default role assigned to a user when signing up is USER. So if you try to go to the /admin page, it will no longer work.
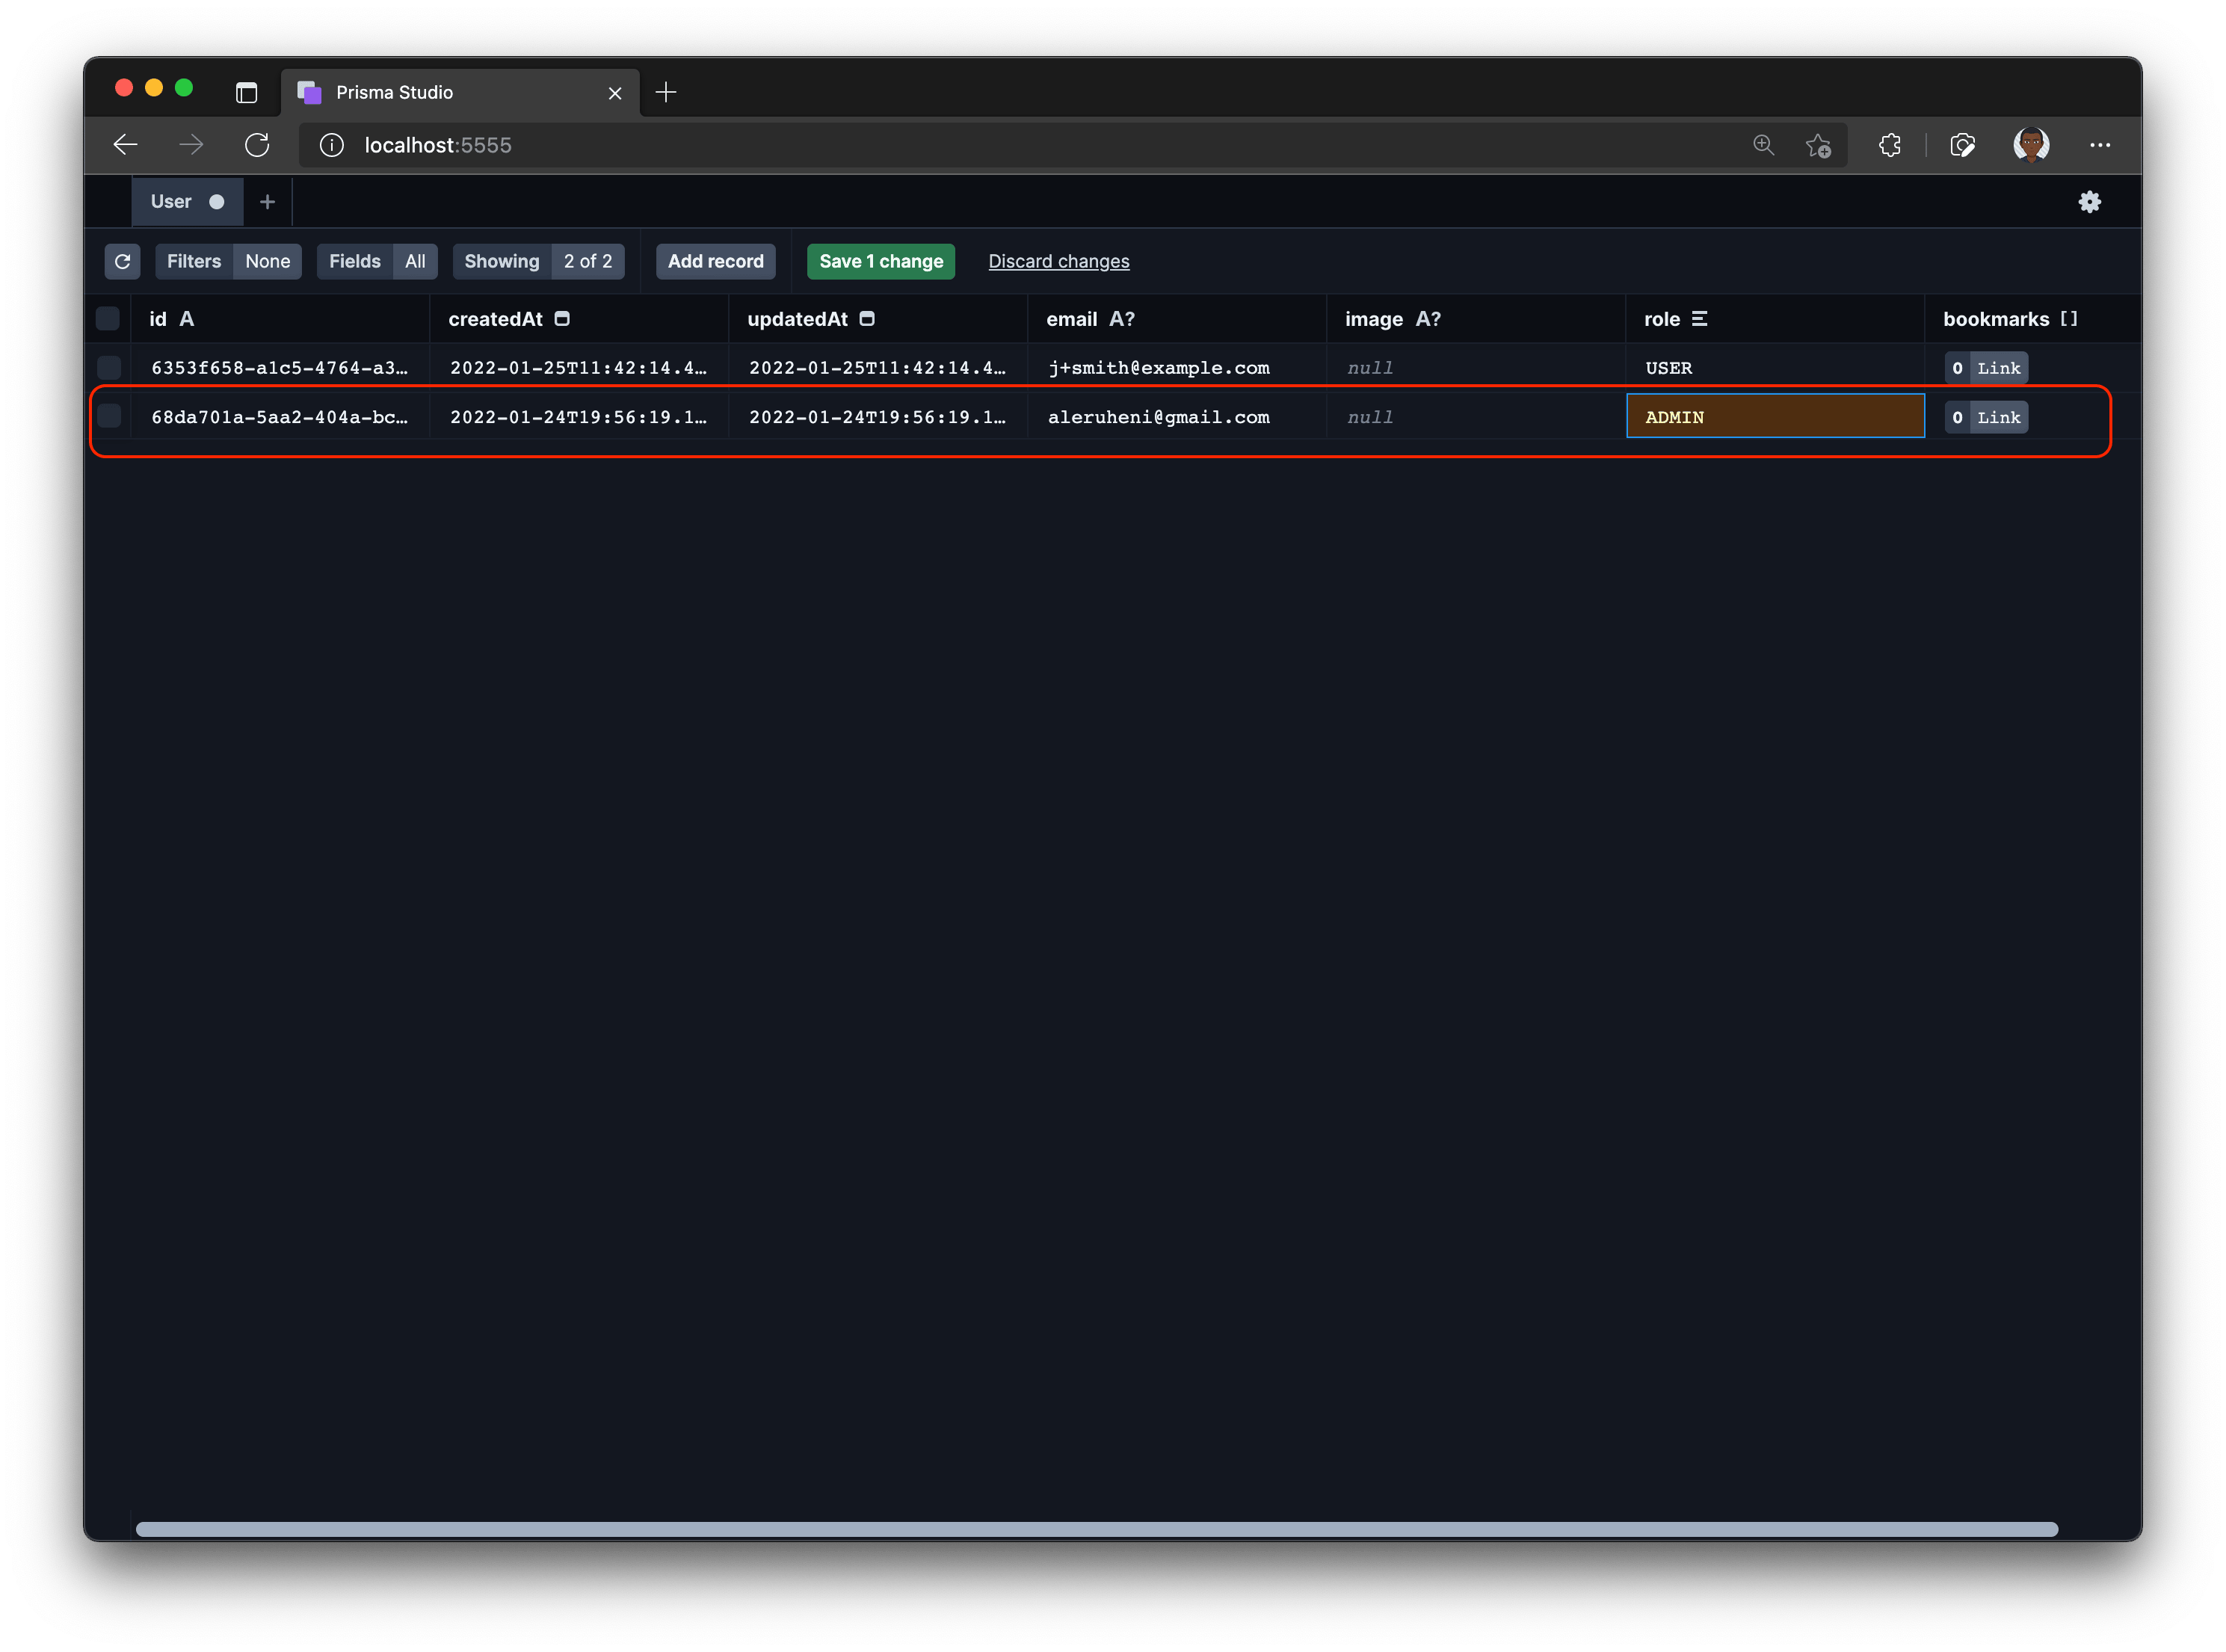
You can change this by modifying the role field of the user in the database. This is very easy to do in Prisma Studio.
First start Prisma Studio by running npx prisma studio in the terminal. Then click the User model and find the record matching the current user. Now, go ahead and update your user role from USER to ADMIN. Save your changes by pressing the Save 1 change button.
Navigate to the /admin page of your application and voila! You can now create links again.
Summary and next steps
In this part, you learned how to add authentication and authorization to a Next.js app using Auth0 and how you can use Auth0 Actions to add users to your database.
Stay tuned for the next part where you'll learn how to add image upload using AWS S3.
Build your next app with Prisma
Start free. Scale when you’re ready.